Firewall Access Policy Rulesets, Part 3 - Page 3
On this page
Using negation in policy rules
Suppose we want to set up a rule to permit access from the host on DMZ net "mail_relay_1" to hosts on the Internet, but do not want to open access from it to machines on our internal network represented by the object "internal-network". Since we want it to connect to hosts on the Internet and cannot predict their addresses, we have to use "any" as a destination in the policy rule. Unfortunately "any" includes our internal net as well, which is going to open undesired hole in the firewall.
There are two solutions to this problem. First, we can use two rules: first will deny access from "mail_relay_1" to "internal_net" and the second will permit access from "mail_relay_1" to "any". Since rules are consulted in the order they are specified in the policy, access to internal net will be blocked by the first rule since the packet would hit it first. These two rules are represented below:
Here are the generated iptables rules:
# Rule 0 (global)
#
$IPTABLES -A FORWARD -p tcp -m tcp -s 192.168.2.22 -d 192.168.1.0/24 \
    --dport 25  -j DROP
#
# Rule 1 (global)
#
$IPTABLES -A FORWARD -p tcp -m tcp -s 192.168.2.22 --dport 25  \
    -m state --state NEW  -j ACCEPT
Another solution uses negation. We can specify destination in the rule as "not internal_net", thus permitting access to anything but "internal_net". Negation can be enabled and disabled in the pop-up menu which you call by clicking right mouse button on the corresponding rule field. This rule depends on the rules below it to block access from "mail_relay1" to the "internal_net". If the policy was built using general principle of blocking everything and then enabling only types of connections that must be permitted, then it usually has a "catch-all" rule at the bottom that blocks everything. This last rule is going to deny connections from the "mail_relay1" to "internal_net".
Firewall Builder can use the "!" option to generate compact iptables command for this rule:
# Rule 0 (global)
#
$IPTABLES -A FORWARD -p tcp -m tcp  -s 192.168.2.22 -d ! 192.168.1.0/24 \
      --dport 25  -m state --state NEW  -j ACCEPT
Negation can be used in NAT rules in a similar way.
Firewall Builder can use similar "!" option for PF as well, but there is no negation in the PIX ACL syntax.
Things get more complicated if we have several networks inside and want to build a rule to permit connects from a server on DMZ to everywhere except for the three internal networks:
Simple "!" negation in the generated iptables command won't work, so the program generates the following more complicated script:
# Rule 0 (global)
#
$IPTABLES -N Cid168173X9037.0
$IPTABLES -A FORWARD -p tcp -m tcp  -s 192.168.2.22   --dport 25  \
    -m state --state NEW  -j Cid168173X9037.0
$IPTABLES -A Cid168173X9037.0  -d 192.168.1.0/24   -j RETURN
$IPTABLES -A Cid168173X9037.0  -d 192.168.10.0/24   -j RETURN
$IPTABLES -A Cid168173X9037.0  -d 192.168.20.0/24   -j RETURN
$IPTABLES -A Cid168173X9037.0  -j ACCEPT
The first rule checks protocol, port number and source address and if they match, passes control to the user-defined chain where destination address is compared with addresses of the three networks we want to protect. If either one of them matches, iptables target "RETURN" terminates analysis in the temporary chain and returns control. Note that in this case the firewall does not make any decision what to do with the packet. The rule above specifies action for the packets that do not head for the internal networks but does not say anything about those that do. Some other rules in the policy should decide what to do with them. This is why generated iptables script uses target "RETURN" instead of "DROP" or "ACCEPT" to simply return from the temporary chain and continue analysis of the packet further.
For PF, Firewall Builder uses combination of "!" option and a table:
table <tbl.r0.d> { 192.168.1.0/24 , 192.168.10.0/24 , 192.168.20.0/24 }
# Rule  0 (global)
#
pass  quick inet proto tcp  from 192.168.2.22  to ! <tbl.r0.d> port 25 keep state
Tagging packets
Tagging packets can be very useful facility that allows you to match a packet at one point in the rule set but act on it later on. This can be combined with rule branching for even more flexibility. Packet tagging is only supported in Firewall Builder for the firewall platforms that can do it, these are iptables and pf. Tagging sometimes can also be used to interact with packet processing not intended to enforce security policy, such as traffic shaping or QoS. Packet tags assigned by iptables can later be used for traffic shaping with Linux utility "tc".
In Firewall Builder tagging of packets is done using special service object type. First, you create an object of this type and configure tag number or a string. Once this is done, you can use this object to match tagged packets by just dropping the object to the "Service" column of a policy rule. To assign tag to a packet you choose action "Mark" (iptables) or "Tag" (PF) and drop the same Tag service object to a well in the action options dialog. Lets use an example given in the "A Practical Guide to Linux Traffic Control" to illustrate this. They show how packets can be tagged using iptables target "MARK" so that they can be placed in the right queue for traffic shaping later on. The iptables rule we will create looks like this:
iptables -t mangle -A POSTROUTING -o eth2 -p tcp --sport 80 -j MARK --set-mark 1
Note how the rule should be placed in the table "mangle", chain "POSTROUTING". This is how target MARK works, administrator just has to know that if they write iptables rules by hand.
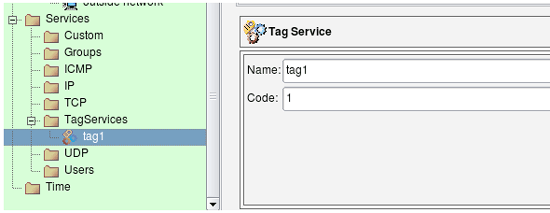
We start with a Tag Service object configured with tag "1":
We also need tcp service object to match source port 80:
And now the rule:
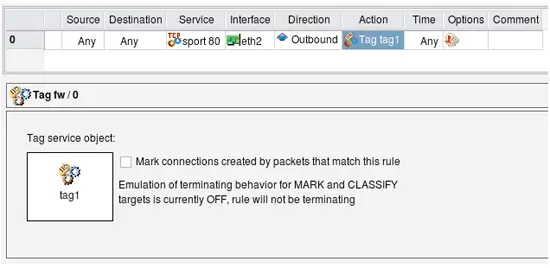
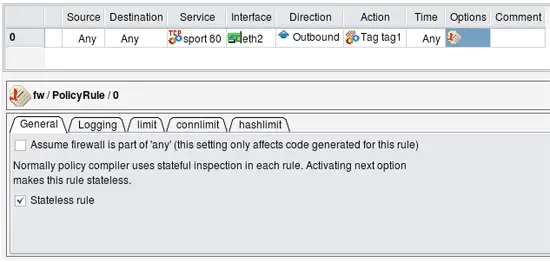
In order to replicate the rule from the Guide, I leave Source and Destination "any", put outside interface of the firewall in "Interface" column, set direction to "Outbound", set action to "Tag" and make it stateless. The following screenshots demonstrate how this is done:
Configuring Tag action
Configuring rule options to make the rule stateless
This configuration makes fwbuilder generate iptables command that is exactly the same as the one given in "A Practical Guide to Linux Traffic Control".
The rule reproduced from the Guide is stateless and matches and tags every reply HTTP packet crossing the firewall. This is not very efficient in case the firewall has to forward heavy HTTP traffic because it has to work on every single packet. To make things more efficient, iptables can mark whole sessions which means individual packets can be marked automatically as long as they belong to the session that was marked once. To use this feature with Firewall Builder, turn on checkbox "Mark connections created by packets that match this rule" in the dialog where you configure options for the rule action and where the well into which you had to drop Tag Service object is located. This checkbox modifies generated iptables script by adding a call to CONNMARK iptables target that marks whole connection and also by adding the following rule on top of the script:
# ================ Table 'mangle', automatic rules
$IPTABLES -t mangle -A PREROUTING -j CONNMARK --restore-mark
This rule automatically restores mark on the packets that belong to the marked session.
We will continue with examples of IPv6 policy access rules in the next article.
References:
- Project web site: http://www.fwbuilder.org/
- Source code, Linux .deb and .rpm package repositories, Windows and Mac OS X binary packages
- Firewall Builder Users Guide (PDF)
- Firewall Builder Users Guide (HTML)
- Examples of iptables, pf and other rules: Firewall Builder Cookbook
- Project announcements and status: Firewall Builder Project Blog


