Firewall Access Policy Rulesets, Part 3 - Page 2
Controlling access to different ports on the server
Firewall Builder can be used to generate a policy for the firewall running on the server. Here is an example that shows how to set up a policy to permit access to different ports on the server. First of all, we need to create a Firewall object to represent our server. The only difference between this case and a usual case where firewall protects one or more networks behind it is that for the server-firewall we only need to create one interface besides the loopback. The following screenshot demonstrates a policy that permits access to the web server running on this machine (both HTTP and HTTPS), as well as FTP and management access via SSH. Rule #1 allows the server to use DNS for name resolution. Service object used in the "Service" column in rule #1 is in fact a group that consists of TCP and UDP service objects that represent tcp and UDP variants of the protocol (both use the same destination port 53).
In this example I turned option "Assume firewall is part of any" off to simplify generated script. Here is the iptables script created for these rules:
# Rule 0 (global)
#
$IPTABLES -A INPUT -p tcp -m tcp  -m multiport  --dports 80,443,21,22 \
     -m state --state NEW  -j ACCEPT
#
# Rule 1 (global)
#
$IPTABLES -A OUTPUT -p tcp -m tcp  --dport 53  -m state --state NEW  -j ACCEPT
$IPTABLES -A OUTPUT -p udp -m udp  --dport 53  -m state --state NEW  -j ACCEPT
#
# Rule 2 (global)
#
$IPTABLES -N RULE_2
$IPTABLES -A INPUT  -j RULE_2
$IPTABLES -A RULE_2  -j LOG  --log-level info --log-prefix "RULE 2 -- DENY "
$IPTABLES -A RULE_2  -j DROP
Firewall Builder optimized generated rule and used module multiport to put all four TCP ports used in rule #0 in one iptables command. The program always uses module multiport to make generated script more compact, even if you use a mix of TCP, UDP and ICMP services in the same rule. Since iptables does not support using a mix of protocols in the same command, the program generates several iptables commands, one for each protocol, but still can use module multiport in each command if there are several ports to match.
Rule #1 was split because it matches both tcp and udp protocols. Because of that, in the generated iptables script we have one command for tcp and another for udp.
Note how iptables commands generated for rule #0 went into chain INPUT, whereas commands generated for rule #1 went into chain OUTPUT. Rule #0 controls access to the server (object "server" is in "Destination" in the rule) but rule #1 controls connections initiated by the server (object "server" is in "Source" of the rule). Firewall Builder picks the right chain automatically.
Generated PF script uses tables to match four tcp ports in the same rule:
# Rule  0 (global)
#
pass in   quick inet proto tcp  from any  to 192.168.1.10 \
    port { 80, 443, 21, 22 } keep state
#
# Rule  1 (global)
#
pass out  quick inet proto tcp  from 192.168.1.10  to any port 53 keep state
pass out  quick inet proto udp  from 192.168.1.10  to any port 53 keep state
#
# Rule  2 (global)
#
block in   log  quick inet  from any  to 192.168.1.10
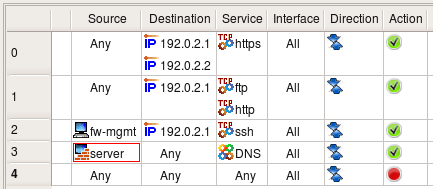
Sometimes the web server is bound to a several IP addresses on the same machine. One typical situation when this is needed is when the web server supports multiple sites using HTTPS protocol. The following firewall configuration demonstrates the case when interface eth0 has two IP addresses (192.0.2.1 and 192.0.2.2):
Suppose the web server should accept HTTPS connections to both IP addresses, while HTTP and FTP are allowed only on address 192.0.2.1. The management access to the server is allowed only via protocol SSH and only from the management workstation "fw-mgmt". The following rules enforce this policy:
The same rules could be used to permit or deny access to different ports on a server located on the network behind a dedicated firewall.
Here is how generated iptables script looks like:
# Rule 0 (global)
#
$IPTABLES -A INPUT -p tcp -m tcp -d 192.0.2.1 --dport 443 -m state --state NEW \
    -j ACCEPT
$IPTABLES -A INPUT -p tcp -m tcp -d 192.0.2.2 --dport 443 -m state --state NEW \
    -j ACCEPT
#
# Rule 1 (global)
#
$IPTABLES -A INPUT -p tcp -m tcp -m multiport -d 192.0.2.1 --dports 80,21  \
    -m state --state NEW  -j ACCEPT
#
# Rule 2 (global)
#
$IPTABLES -A INPUT -p tcp -m tcp -s 192.0.2.100 -d 192.0.2.1 --dport 22  \
    -m state --state NEW  -j ACCEPT
#
These iptables commands should be quite obvious. PF rules in this example also look very familiar:
# Tables: (1)
table <tbl.r0.d> { 192.0.2.1 , 192.0.2.2 }


# Rule  0 (global)
#
#
pass  quick inet proto tcp  from any  to <tbl.r0.d> port 443 keep state
#
# Rule  1 (global)
#
#
pass  quick inet proto tcp  from any  to 192.0.2.1 port { 80, 21 } keep state
#
# Rule  2 (global)
#
#
pass  quick inet proto tcp  from 192.0.2.100  to 192.0.2.1 port 22 keep state
Firewall talking to itself
Many services running on the firewall machine need to be able to establish connections to the same machine. X11, RPC, DNS are services like that, to name a few. Blocking these services on the firewall can cause various problems, depending on what protocol is being blocked. If it is DNS, then it may take a lot longer than usual to get to a command line prompt when logging in to the machine using telnet or ssh. Once logged in, you won't be able to resolve any host names into addresses. If X11 is blocked, then X server and any graphic environment using it (KDE, Gnome etc.) won't start. In any case though the problem can easily be solved by adding a simple any-any rule and specifying the loopback interface of the firewall to permit all sorts of communications. As shown on the screenshot below, this rule must specify the loopback interface, have action Accept and direction Both.
Running X11 and other complex services on the dedicated firewall machine should be discouraged. However, you may want to run a firewall to protect a server, workstation, or laptop where X11, RPC and other services are perfectly normal.
Generated iptables commands are placed in INPUT and OUTPUT chains because packets sent by the firewall to itself never hit FORWARD chain. Options "-i lo" and "-o lo" nail interface and direction:
$IPTABLES -A INPUT  -i lo   -m state --state NEW  -j ACCEPT
$IPTABLES -A OUTPUT  -o lo   -m state --state NEW  -j ACCEPT
For PF, we can specify interface to match but keep direction open so both "in" and "out" will match:
pass quick on lo inet from any to any keep state
Using Action 'Reject': blocking Ident protocol
Suppose we want to block connections to certain ports on the server behind the firewall, but want to do it in a "polite" manner that lets the sender host know right away that the connection attempt was blocked so our server would look like nothing is listening on that port at all. One of the practical applications of this setup would be blocking Ident connections to a mail relay or a mail server. Sendmail and many other MTA's (Mail Transport Agents) attempt to connect to Ident port (TCP port 113) on the mail relay every time they accept email from that relay. Many believe Ident protocol is practically useless and does not really serve as a protection against SPAM or for any other useful purpose. Unfortunately silent blocking of ident connections on the firewall using a rule with action "Deny" adds a delay in the email delivery. This happens because when sender host tries to establish Ident connection to the recipient, it sends TCP SYN packet to it (the first packet in three-way TCP handshake) and then waits for TCP ACK packet in response. However, it never sees it because recipient's firewall blocked its first TCP SYN packet. In situations like this, the sender host assumes the reply packet got lost and tries to send TCP SYN packet again. It repeats this for a few seconds (usually 30 sec) before it gives up. This adds 30 sec delay to email delivery. Our intent is to show how one can construct a policy rule to block Ident without causing this delay.
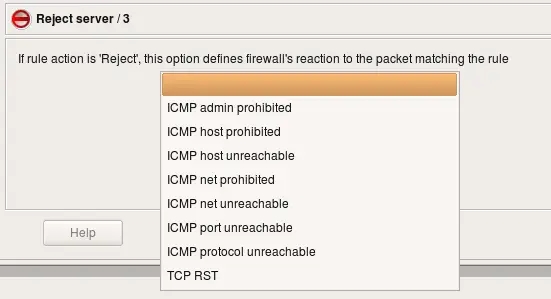
The simplest way to block any protocol is to use "Deny" action in the policy rule. Since "Deny" causes firewall to silently drop the packet, sender never knows what happened to it and keeps waiting for response. To avoid this delay we will set rule Action to "Reject". Normally "Reject" makes firewall to send ICMP "unreachable" message back to sender, thus indicating that access to requested port is denied by the firewall. This may be insufficient in some cases because the host trying to connect to our Ident port won't understand this type of ICMP message and will keep trying. In fact, most OS do not recognize ICMP "administratively prohibited" message and do keep trying. To make host on the other side stop its attempts right away we need to send TCP RST packet back instead of ICMP message. This can be done by setting the appropriate parameter for the "Reject" action. To set an Action parameter, change the Action to "Reject," then double-click the Reject icon to get the parameters dialog. (see screenshot below). It is also safe to turn stateful inspection off on this rule since we do not want connection to be established and therefore do not need to keep track of it.
Supported firewall platforms use different syntax for rules that should drop packets and send icmp or tcp rst back. Here is what Firewall Builder generates for the rule shown above for iptables:
# Rule 0 (global)
#
$IPTABLES -A FORWARD -p tcp -m tcp  -d 192.168.1.100 --dport 113 \
    -j REJECT  --reject-with tcp-reset
For PF it uses "return-rst" option:
# Rule  0 (global)
#
block return-rst  quick inet proto tcp  from any  to 192.168.1.100 port 113
There is no equivalent configuration option for PIX.


