Zimbra Integration With Samba - Ubuntu Based (Similar To AD And Exchange) - Page 3
On this page
Steps 10 and 11 need to be done on Samba server!
10 - Configuring Samba
There are many ways to configure Samba depending on what you needs are. In our case I will configure Samba to use Zimbra LDAP as password backend and to act as a primary domain controller for domain TM and as a WINS server for the network. This configuration will allow Windows workstations to join TM domain as if it was an NT domain. Below is my /etc/samba/smb.conf file best thing rename your /etc/samba/smb.conf to /etc/samba/smb.conf.old and then create a new file with the content below.
mv /etc/samba/smb.conf /etc/samba/smb.conf.old
vi /etc/samba/smb.conf
and then paste the text below.
[global] workgroup = TM netbios name = samba os level = 33 preferred master = yes enable privileges = yes server string = %h server (Samba, Ubuntu) wins support =yes dns proxy = no name resolve order = wins bcast hosts log file = /var/log/samba/log.%m log level = 3 max log size = 1000 syslog only = no syslog = 0 panic action = /usr/share/samba/panic-action %d security = user encrypt passwords = true ldap passwd sync = yes passdb backend = ldapsam:ldap://zimbra.tm.local/ ldap admin dn = "cn=config" ldap suffix = dc=tm,dc=local ldap group suffix = ou=groups ldap user suffix = ou=people ldap machine suffix = ou=machines obey pam restrictions = no passwd program = /usr/bin/passwd %u passwd chat = *Enter\snew\sUNIX\spassword:* %n\n *Retype\snew\sUNIX\spassword:* %n\n *password\supdated\ssuccessfully* . domain logons = yes logon path = logon home = logon script = logon.cmd add user script = /usr/sbin/adduser --quiet --disabled-password --gecos "" %u add machine script = /usr/sbin/adduser --shell /bin/false --disabled-password --quiet --gecos "machine account" --force-badname %u socket options = TCP_NODELAY domain master = yes local master = yes [homes] comment = Home Directories browseable =yes read only = No valid users = %S [netlogon] comment = Network Logon Service path = /var/lib/samba/netlogon guest ok = yes locking = no [profiles] comment = Users profiles path = /var/lib/samba/profiles read only = No [profdata] comment = Profile Data Share path = /var/lib/samba/profdata read only = No profile acls = Yes [printers] comment = All Printers browseable = no path = /tmp printable = yes public = no writable = no create mode = 0700 [print$] comment = Printer Drivers path = /var/lib/samba/printers browseable = yes read only = yes guest ok = no |
After you edited smb.conf file, you need to tell Samba what is the root password for ldap. (replace test123with your ldap root password).
smbpasswd -w test123
Restart the samba server and then after it's up restart the zimbra server.
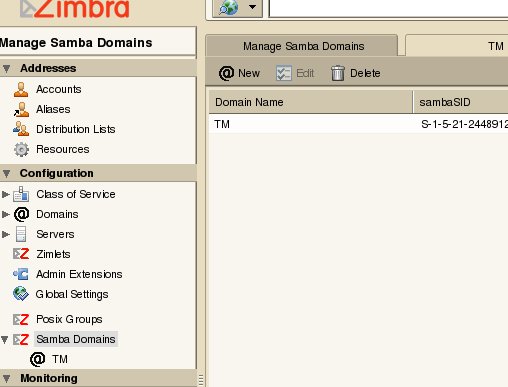
Now log in again to the Zimbra admin console and you should see the samba domain as shown below:

11 - Configuring pam_ldap and nss_ldap
Edit /etc/nsswitch.conf file. Replace these two lines:
passwd: compat group: compat |
with these lines:
passwd files ldap group files ldap |
This change will tell nsswitch to use ldap when it looks for uids and gids. It will first look at /etc/passwd and then at ldap. You may want to change these lines if you know what you are doing ;)
Edit /etc/pam.d/common-account. It should look like the following (you can comment the other line):
account sufficient pam_unix.so account sufficient pam_ldap.so |
Edit /etc/pam.d/common-auth. It should look like the following (you can comment the other line):
auth sufficient pam_ldap.so
auth sufficient pam_unix.so |
Edit /etc/pam.d/common-password. It should look like the following (you can comment the other line):
password sufficient pam_unix.so password sufficient pam_ldap.so |
Edit /etc/pam.d/common-session. It should look like the following (you can comment the other line):
session required pam_mkhomedir.so skel=/etc/skel umask=0077 session sufficient pam_unix.so session sufficient pam_ldap.so session required pam_mkhomedir.so skel=/etc/skel umask=0077 |
12 - Creating Linux and Samba groups using Zimbra Admin UI
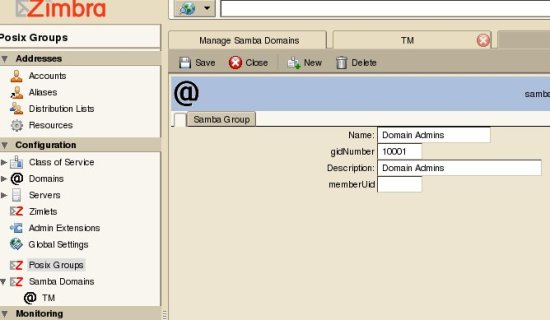
Log in to Zimbra Admin UI. Go to Posix Groups and click “New” and fill the info as shown below:

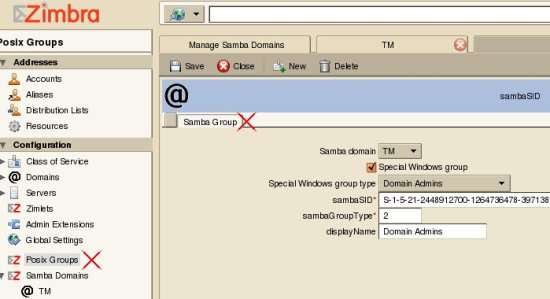
Then Click on the Samba Group tab and fill in the info as shown below:

If you are not sure what to type in group type field – type 2, this is the default value.
13 - Creating Linux and Samba users using Zimbra Admin UI
Back to the Zimbra Admin UI. Go to Accounts and hit New, fill in the information on the first screen and follow the wizard to the Posix Account screen. Fill in all the required fields on the Posix Account screen and click Next to go to Samba Account screen. Fill in the required fields and click Finish.
14 - Testing and fine tuning
To test if PAM on your Samba server is reading the user password information correctly from Zimbra LDAP, go back to your Samba server shell and run this command as root:
getent passwd
You should see the Zimbra accounts that you just created in the list.
Next, log in to Zimbra Admin UI, click on Aliases and remove [email protected] alias. Then run the following on the Samba server.
smbpasswd -a root
You need then to grant privileges to the domain admins group.
Run the following command as root on your Samba server. Put your domain name instead of TM.
More information on this topic is available in Official Samba HOWTO Reference Guide (http://us3.samba.org/samba/docs/man/Samba-HOWTO-Collection/).
Run the following command, it will ask for a password; enter the password you entered in the prevoius step:
net rpc rights grant "TM\Domain Admins" SeAddUsersPrivilege SeMachineAccountPrivilege SePrintOperatorPrivilege
Adding Windows NT/2000/XP machines to Samba domain
Log in to an Windows desktop as a local administrator and join the Samba domain the same way you would be joining a Windows domain. You might need to point your Windows WINS configuration to your Samba server depending on how your DHCP and DNS servers are configured, you may also you the same DNS for the Windows as for the servers.
Use a member of “Domain Admins” group to join the domain.
15 - My References and Nice Links:
- UNIX and Windows Accounts in Zimbra LDAP and Zimbra Admin UI
- Installing An Ubuntu Hardy 8.04 LTS DNS Server With BIND (includes a VMimage for a DNS which can work here)
- How To Install Zimbra Collaboration Suite (ZCS) On Ubuntu

