Virtual Users And Domains With Postfix, Courier, MySQL And SquirrelMail (Ubuntu 14.04LTS) - Page 5
This tutorial exists for these OS versions
- Ubuntu 13.10 (Saucy Salamander)
- Ubuntu 14.04 LTS (Trusty Tahr)
- Ubuntu 12.10 (Quantal Quetzal)
- Ubuntu 12.04 LTS (Precise Pangolin)
- Ubuntu 11.10 (Oneiric Ocelot)
- Ubuntu 11.04 (Natty Narwhal)
On this page
15 Installing SquirrelMail
SquirrelMail is a webmail interface that will let your users send and receive emails in a browser. This chapter shows how to install it and adjust it to our setup so that users can even change their email account password from the SquirrelMail interface.
To install SquirrelMail, we run:
apt-get install squirrelmail squirrelmail-compatibility php-pear php-db
Next we symlink the Apache configuration that comes with the SquirrelMail package to the /etc/apache2/conf-available directory and restart Apache:
ln -s /etc/squirrelmail/apache.conf /etc/apache2/conf-available/squirrelmail.conf
service apache2 restart
SquirrelMail comes with some pre-installed plugins, unfortunately none of them is capable of letting us change our email password in our MySQL database. But there's the Change SQL Password plugin which we can install manually:
cd /usr/share/squirrelmail/plugins
wget http://www.squirrelmail.org/plugins/change_sqlpass-3.3-1.2.tar.gz
tar xvfz change_sqlpass-3.3-1.2.tar.gz
cd change_sqlpass
cp config.php.sample config.php
Now we must edit config.php and adjust it to our setup. Please adjust the $csp_dsn, $lookup_password_query, $password_update_queries, $password_encryption, $csp_salt_static, and $csp_delimiter variables as follows and comment out $csp_salt_query:
vi config.php
[...]
$csp_dsn = 'mysql://mail_admin:mail_admin_password@localhost/mail';
[...]
$lookup_password_query = 'SELECT count(*) FROM users WHERE email = "%1" AND password = %4';
[...]
$password_update_queries = array('UPDATE users SET password = %4 WHERE email = "%1"');
[...]
$password_encryption = 'MYSQLENCRYPT';
[...]
$csp_salt_static = 'LEFT(password, 2)';
[...]
//$csp_salt_query = 'SELECT salt FROM users WHERE username = "%1"';
[...]
$csp_delimiter = '@';
[...] |
The complete file looks as follows:
<?php /** * SquirrelMail Change SQL Password Plugin * Copyright (C) 2001-2002 Tyler Akins * 2002 Thijs Kinkhorst <[email protected]> * 2002-2005 Paul Lesneiwski <[email protected]> * This program is licensed under GPL. See COPYING for details * * @package plugins * @subpackage Change SQL Password * */ // Global Variables, don't touch these unless you want to break the plugin // global $csp_dsn, $password_update_queries, $lookup_password_query, $force_change_password_check_query, $password_encryption, $csp_salt_query, $csp_salt_static, $csp_secure_port, $csp_non_standard_http_port, $csp_delimiter, $csp_debug, $min_password_length, $max_password_length, $include_digit_in_password, $include_uppercase_letter_in_password, $include_lowercase_letter_in_password, $include_nonalphanumeric_in_password; // csp_dsn // // Theoretically, any SQL database supported by Pear should be supported // here. The DSN (data source name) must contain the information needed // to connect to your database backend. A MySQL example is included below. // For more details about DSN syntax and list of supported database types, // please see: // http://pear.php.net/manual/en/package.database.db.intro-dsn.php // //$csp_dsn = 'mysql://user:password@localhost/email_users'; $csp_dsn = 'mysql://mail_admin:mail_admin_password@localhost/mail'; // lookup_password_query // // This plugin will always verify the user's old password // against their login password, but an extra check can also // be done against the database for more security if you // desire. If you do not need the extra password check, // make sure this setting is empty. // // This is a query that returns a positive value if a user // and password pair are found in the database. // // This query should return one value (one row, one column), the // value being ideally a one or a zero, simply indicating that // the user/password pair does in fact exist in the database. // // %1 in this query will be replaced with the full username // (including domain), such as "[email protected]" // %2 in this query will be replaced with the username (without // any domain portion), such as "jose" // %3 in this query will be replaced with the domain name, // such as "example.com" // %4 in this query will be replaced with the current (old) // password in whatever encryption format is needed per other // plugin configuration settings (Note that the syntax of // the password will be provided depending on your encryption // choices, so you NEVER need to provide quotes around this // value in the query here.) // %5 in this query will be replaced with the current (old) // password in unencrypted plain text. If you do not use any // password encryption, %4 and %5 will be the same values, // except %4 will have double quotes around it and %5 will not. // //$lookup_password_query = ''; // TERRIBLE SECURITY: $lookup_password_query = 'SELECT count(*) FROM users WHERE username = "%1" AND plain_password = "%5"'; //$lookup_password_query = 'SELECT count(*) FROM users WHERE username = "%1" AND crypt_password = %4'; $lookup_password_query = 'SELECT count(*) FROM users WHERE email = "%1" AND password = %4'; // password_update_queries // // An array of SQL queries that will all be executed // whenever a password change attempt is made. // // Any number of queries may be included here. // The queries will be executed in the order given here. // // %1 in all queries will be replaced with the full username // (including domain), such as "[email protected]" // %2 in all queries will be replaced with the username (without // any domain portion), such as "jose" // %3 in all queries will be replaced with the domain name, // such as "example.com" // %4 in all queries will be replaced with the new password // in whatever encryption format is needed per other // plugin configuration settings (Note that the syntax of // the password will be provided depending on your // encryption choices, so you NEVER need to provide quotes // around this value in the queries here.) // %5 in all queries will be replaced with the new password // in unencrypted plain text - BEWARE! If you do not use // any password encryption, %4 and %5 will be the same // values, except %4 will have double quotes around it // and %5 will not. // // $password_update_queries = array( // 'UPDATE users SET crypt_password = %4 WHERE username = "%1"', // 'UPDATE user_flags SET force_change_pwd = 0 WHERE username = "%1"', // 'UPDATE users SET crypt_password = %4, force_change_pwd = 0 WHERE username = "%1"', // ); $password_update_queries = array('UPDATE users SET password = %4 WHERE email = "%1"'); // force_change_password_check_query // // A query that checks for a flag that indicates if a user // should be forced to change their password. This query // should return one value (one row, one column) which is // zero if the user does NOT need to change their password, // or one if the user should be forced to change it now. // // This setting should be an empty string if you do not wish // to enable this functionality. // // %1 in this query will be replaced with the full username // (including domain), such as "[email protected]" // %2 in this query will be replaced with the username (without // any domain portion), such as "jose" // %3 in this query will be replaced with the domain name, // such as "example.com" // //$force_change_password_check_query = 'SELECT IF(force_change_pwd = "yes", 1, 0) FROM users WHERE username = "%1"'; //$force_change_password_check_query = 'SELECT force_change_pwd FROM users WHERE username = "%1"'; $force_change_password_check_query = ''; // password_encryption // // What encryption method do you use to store passwords // in your database? Please use one of the following, // exactly as you see it: // // NONE Passwords are stored as plain text only // MYSQLPWD Passwords are stored using the MySQL password() function // MYSQLENCRYPT Passwords are stored using the MySQL encrypt() function // PHPCRYPT Passwords are stored using the PHP crypt() function // MD5CRYPT Passwords are stored using encrypted MD5 algorithm // MD5 Passwords are stored as MD5 hash // //$password_encryption = 'MYSQLPWD'; $password_encryption = 'MYSQLENCRYPT'; // csp_salt_query // csp_salt_static // // Encryption types that need a salt need to know where to get // that salt. If you have a constant, known salt value, you // should define it in $csp_salt_static. Otherwise, leave that // value empty and define a value for the $csp_salt_query. // // Leave both values empty if you do not need (or use) salts // to encrypt your passwords. // // The query should return one value (one row, one column) which // is the salt value for the current user's password. This // query is ignored if $csp_salt_static is anything but empty. // // %1 in this query will be replaced with the full username // (including domain), such as "[email protected]" // %2 in this query will be replaced with the username (without // any domain portion), such as "jose" // %3 in this query will be replaced with the domain name, // such as "example.com" // //$csp_salt_static = 'LEFT(crypt_password, 2)'; //$csp_salt_static = '"a4"'; // use this format with MYSQLENCRYPT //$csp_salt_static = '$2$blowsomefish$'; // use this format with PHPCRYPT //$csp_salt_static = ''; $csp_salt_static = 'LEFT(password, 2)'; //$csp_salt_query = 'SELECT SUBSTRING_INDEX(crypt_password, '$', 1) FROM users WHERE username = "%1"'; //$csp_salt_query = 'SELECT SUBSTRING(crypt_password, (LENGTH(SUBSTRING_INDEX(crypt_password, '$', 2)) + 2)) FROM users WHERE username = "%1"'; //$csp_salt_query = 'SELECT salt FROM users WHERE username = "%1"'; //$csp_salt_query = ''; // csp_secure_port // // You may ensure that SSL encryption is used during password // change by setting this to the port that your HTTPS is served // on (443 is typical). Set to zero if you do not wish to force // an HTTPS connection when users are changing their passwords. // // You may override this value for certain domains, users, or // service levels through the Virtual Host Login (vlogin) plugin // by setting a value(s) for $vlogin_csp_secure_port in the vlogin // configuration. // $csp_secure_port = 0; //$csp_secure_port = 443; // csp_non_standard_http_port // // If you serve standard HTTP web requests on a non-standard // port (anything other than port 80), you should specify that // port number here. Set to zero otherwise. // // You may override this value for certain domains, users, or // service levels through the Virtual Host Login (vlogin) plugin // by setting a value(s) for $vlogin_csp_non_standard_http_port // in the vlogin configuration. // //$csp_non_standard_http_port = 8080; $csp_non_standard_http_port = 0; // min_password_length // max_password_length // include_digit_in_password // include_uppercase_letter_in_password // include_lowercase_letter_in_password // include_nonalphanumeric_in_password // // You can set the minimum and maximum password lengths that // you accept or leave those settings as zero to indicate that // no limit should be applied. // // Turn on any of the other settings here to check that the // new password contains at least one digit, upper case letter, // lower case letter and/or one non-alphanumeric character. // $min_password_length = 6; $max_password_length = 0; $include_digit_in_password = 0; $include_uppercase_letter_in_password = 0; $include_lowercase_letter_in_password = 0; $include_nonalphanumeric_in_password = 0; // csp_delimiter // // if your system has usernames with something other than // an "@" sign separating the user and domain portion, // specify that character here // //$csp_delimiter = '|'; $csp_delimiter = '@'; // debug mode // $csp_debug = 0; ?> |
Now we must go into the SquirrelMail configuration and tell SquirrelMail that we use Courier as our POP3 and IMAP server and enable the Change SQL Password and the Compatibility plugins:
/usr/sbin/squirrelmail-configure
You'll see the following menu. Navigate through it as indicated:
SquirrelMail Configuration : Read: config.php (1.4.0)
---------------------------------------------------------
Main Menu --
1. Organization Preferences
2. Server Settings
3. Folder Defaults
4. General Options
5. Themes
6. Address Books
7. Message of the Day (MOTD)
8. Plugins
9. Database
10. Languages
D. Set pre-defined settings for specific IMAP servers
C Turn color on
S Save data
Q Quit
Command >> <-- D
SquirrelMail Configuration : Read: config.php
---------------------------------------------------------
While we have been building SquirrelMail, we have discovered some
preferences that work better with some servers that don't work so
well with others. If you select your IMAP server, this option will
set some pre-defined settings for that server.
Please note that you will still need to go through and make sure
everything is correct. This does not change everything. There are
only a few settings that this will change.
Please select your IMAP server:
bincimap = Binc IMAP server
courier = Courier IMAP server
cyrus = Cyrus IMAP server
dovecot = Dovecot Secure IMAP server
exchange = Microsoft Exchange IMAP server
hmailserver = hMailServer
macosx = Mac OS X Mailserver
mercury32 = Mercury/32
uw = University of Washington's IMAP server
gmail = IMAP access to Google mail (Gmail) accounts
quit = Do not change anything
Command >> <-- courier
imap_server_type = courier
default_folder_prefix = INBOX.
trash_folder = Trash
sent_folder = Sent
draft_folder = Drafts
show_prefix_option = false
default_sub_of_inbox = false
show_contain_subfolders_option = false
optional_delimiter = .
delete_folder = true
Press enter to continue... <-- press ENTER
SquirrelMail Configuration : Read: config.php (1.4.0)
---------------------------------------------------------
Main Menu --
1. Organization Preferences
2. Server Settings
3. Folder Defaults
4. General Options
5. Themes
6. Address Books
7. Message of the Day (MOTD)
8. Plugins
9. Database
10. Languages
D. Set pre-defined settings for specific IMAP servers
C Turn color on
S Save data
Q Quit
Command >> <-- 8
SquirrelMail Configuration : Read: config.php (1.4.0)
---------------------------------------------------------
Plugins
Installed Plugins
1. view_as_html
Available Plugins:
2. administrator
3. bug_report
4. calendar
5. change_sqlpass
6. compatibility
7. delete_move_next
8. demo
9. filters
10. fortune
11. info
12. listcommands
13. mail_fetch
14. message_details
15. newmail
16. sent_subfolders
17. spamcop
18. squirrelspell
19. test
20. translate
R Return to Main Menu
C Turn color on
S Save data
Q Quit
Command >> <-- 6 (or whatever number the compatibility plugin has - it's needed by the change_sqlpass plugin)
SquirrelMail Configuration : Read: config.php (1.4.0)
---------------------------------------------------------
Plugins
Installed Plugins
1. view_as_html
2. compatibility
Available Plugins:
3. administrator
4. bug_report
5. calendar
6. change_sqlpass
7. delete_move_next
8. demo
9. filters
10. fortune
11. info
12. listcommands
13. mail_fetch
14. message_details
15. newmail
16. sent_subfolders
17. spamcop
18. squirrelspell
19. test
20. translate
R Return to Main Menu
C Turn color on
S Save data
Q Quit
Command >> <-- 6 (the number of the change_sqlpass plugin)
SquirrelMail Configuration : Read: config.php (1.4.0)
---------------------------------------------------------
Plugins
Installed Plugins
1. view_as_html
2. compatibility
3. change_sqlpass
Available Plugins:
4. administrator
5. bug_report
6. calendar
7. delete_move_next
8. demo
9. filters
10. fortune
11. info
12. listcommands
13. mail_fetch
14. message_details
15. newmail
16. sent_subfolders
17. spamcop
18. squirrelspell
19. test
20. translate
R Return to Main Menu
C Turn color on
S Save data
Q Quit
Command >> <-- S
SquirrelMail Configuration : Read: config.php (1.4.0)
---------------------------------------------------------
Plugins
Installed Plugins
1. view_as_html
2. compatibility
3. change_sqlpass
Available Plugins:
4. administrator
5. bug_report
6. calendar
7. delete_move_next
8. demo
9. filters
10. fortune
11. info
12. listcommands
13. mail_fetch
14. message_details
15. newmail
16. sent_subfolders
17. spamcop
18. squirrelspell
19. test
20. translate
R Return to Main Menu
C Turn color on
S Save data
Q Quit
Command >> S
Data saved in config.php
Press enter to continue... <-- press ENTER
SquirrelMail Configuration : Read: config.php (1.4.0)
---------------------------------------------------------
Plugins
Installed Plugins
1. view_as_html
2. compatibility
3. change_sqlpass
Available Plugins:
4. administrator
5. bug_report
6. calendar
7. delete_move_next
8. demo
9. filters
10. fortune
11. info
12. listcommands
13. mail_fetch
14. message_details
15. newmail
16. sent_subfolders
17. spamcop
18. squirrelspell
19. test
20. translate
R Return to Main Menu
C Turn color on
S Save data
Q Quit
Command >> <-- Q
Now we need to enable the squirrelmail as follows:
a2enconf squirrelmail
service apache2 reload
Now you can type in http://server1.example.com/squirrelmail or http://192.168.0.100/squirrelmail in your browser to access SquirrelMail.
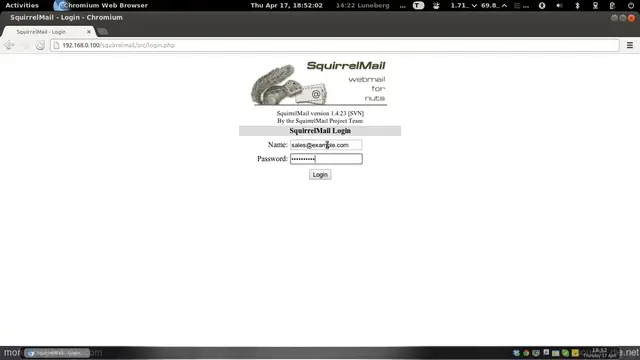
Log in with your email address (e.g. [email protected]) and your password:
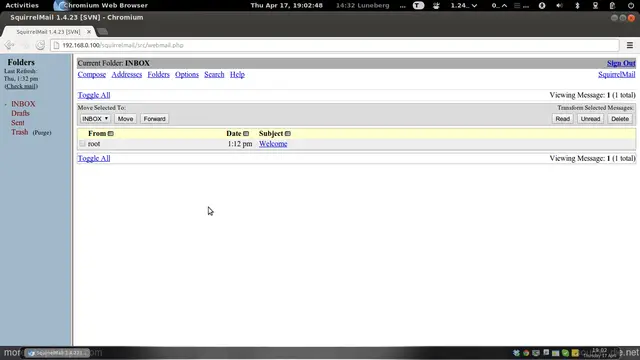
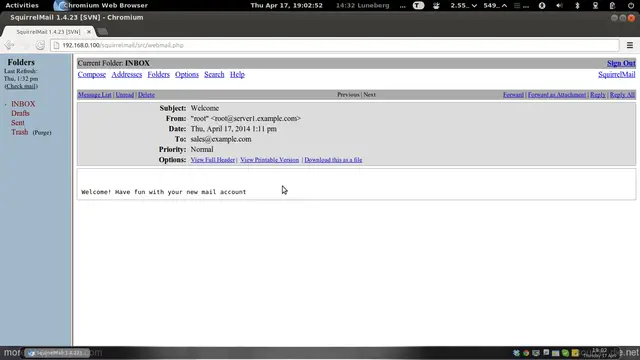
You should find the welcome email in your inbox:
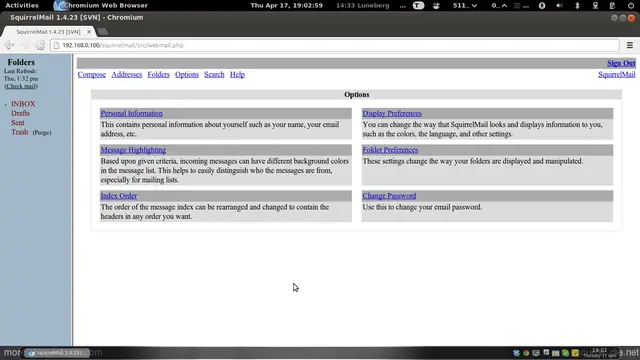
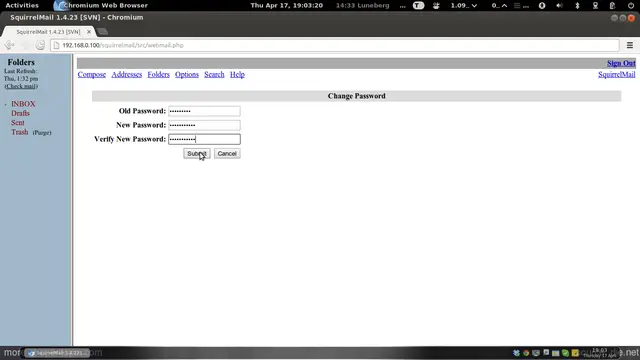
To change your password, go to Options and then select Change Password:
Type in your current password and then your new password twice:
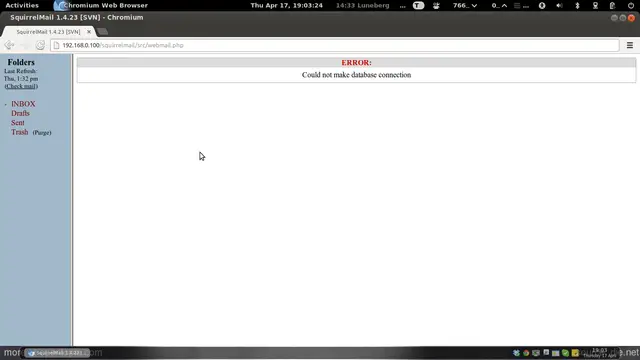
If the password has been changed successfully, you will see the following error message which means you must log in again with your new password (because the old one isn't active anymore):
17 References
- Tutorial: ISP-style Email Service with Debian-Sarge and Postfix 2.1: http://workaround.org/articles/ispmail-sarge/
- Postfix + Quota: http://vhcs.net/new/modules/newbb/viewtopic.php?topic_id=3496&forum=17
- Mail Passwords Encrypted using saslauthd: http://www.syscp.de/docs/public/contrib/cryptedmailpws
18 Links
- Postfix MTA: http://www.postfix.org/
- Postfix Quota Patch: http://web.onda.com.br/nadal/
- phpMyAdmin: http://www.phpmyadmin.net/
- SquirrelMail: http://www.squirrelmail.org/
- Ubuntu: http://www.ubuntu.com/
- Virtual Mail Admin Interface (VMA): http://code.google.com/p/vma/

