Virtual Multiserver Environment With Dedicated Web & MySQL, Email & DNS Servers On Debian Squeeze With ISPConfig 3 - Page 3
6.3 Installing The Primary DNS Server
Edit the hosts file and add the IP addresses and hostnames for all servers. The hostnames and IP addresses have to be adjusted to match your setup.
nano /etc/hosts
127.0.0.1  localhost
192.168.1.2 web.example.tld
192.168.1.3 mail.example.tld
192.168.1.4 ns1.example.tld
192.168.1.5 ns2.example.tld

# The following lines are desirable for IPv6 capable hosts
::1     localhost ip6-localhost ip6-loopback
fe00::0 ip6-localnet
ff00::0 ip6-mcastprefix
ff02::1 ip6-allnodes
ff02::2 ip6-allrouters
ff02::3 ip6-allhosts
Set the hostname of the server:
echo ns1.example.tld > /etc/hostname
/etc/init.d/hostname.sh start
Install MySQL client and server:
apt-get -y install mysql-client mysql-server
Enter the new password for MySQL when requested by the installer.
Then install install the commandline version of PHP to be able to run PHP-based shell scripts for ISPConfig:
apt-get -y install php5-cli php5-mysql php5-mcrypt mcrypt
Install fail2ban: This is optional but recommended, because the ISPConfig monitor tries to show the log:
apt-get install fail2ban
Install BIND DNS Server:
apt-get -y install bind9 dnsutils
Next install ISPConfig 3 on the dns server. To get the download URL of the latest ISPConfig 3 stable release, please visit the ISPConfig website: http://www.ispconfig.org/ispconfig-3/download/
Download the latest ISPConfig 3 stable release:
cd /tmp
wget
http://www.ispconfig.org/downloads/ISPConfig-3-stable.tar.gz
tar xfz ISPConfig-3-stable.tar.gz
cd ispconfig3_install/install/
Then start the install script:
php -q install.php
Select language (en,de) [en]:<-- en
Installation mode (standard,expert) [standard]:<-- expert
Full qualified hostname (FQDN) of the server, eg server2.domain.tld [ns1.example.tld]:<-- ns1.example.tld
MySQL server hostname [localhost]:<-- localhost
MySQL root username [root]:<-- root
MySQL root password []:<-- Enter your MySQL root password here
MySQL database to create [dbispconfig]:<-- dbispconfig
MySQL charset [utf8]:<-- utf8
Shall this server join an existing ISPConfig multiserver setup (y,n) [n]:<-- y
MySQL master server hostname []:<-- web.example.tld
MySQL master server root username [root]:<-- root
MySQL master server root password []:<-- Enter the root password of the master server here
MySQL master server database name [dbispconfig]:<-- dbispconfig
Configure Mail (y,n) [y]:<-- n
Configure Jailkit (y,n) [y]:<-- n
Configure FTP Server (y,n) [y]:<-- n
Configure DNS Server (y,n) [y]:<-- y
Configure Apache Server (y,n) [y]:<-- n
Configure Firewall Server (y,n) [y]:<--n
Install ISPConfig Web-Interface (y,n) [y]:<--n
Run...
rm -f /var/www/ispconfig
... to remove the ISPConfig interface link in the /var/www directory.
Clean up the install directories:
rm -rf /tmp/ispconfig3_install/install
rm -f /tmp/ISPConfig-3-stable.tar.gz
6.4 Installing The Secondary DNS Server
Edit the hosts file and add the IP addresses and hostnames for all servers. The hostnames and IP addresses have to be adjusted to match your setup.
nano /etc/hosts
127.0.0.1  localhost
192.168.1.2 web.example.tld
192.168.1.3 mail.example.tld
192.168.1.4 ns1.example.tld
192.168.1.5 ns2.example.tld

# The following lines are desirable for IPv6 capable hosts
::1     localhost ip6-localhost ip6-loopback
fe00::0 ip6-localnet
ff00::0 ip6-mcastprefix
ff02::1 ip6-allnodes
ff02::2 ip6-allrouters
ff02::3 ip6-allhosts
Set the hostname of the server:
echo ns2.example.tld > /etc/hostname
/etc/init.d/hostname.sh start
Install MySQL client and server:
apt-get -y install mysql-client mysql-server
Enter the new password for MySQL when requested by the installer.
Then install install the commandline version of PHP to be able to run PHP-based shell scripts for ISPConfig:
apt-get -y install php5-cli php5-mysql php5-mcrypt mcrypt
Install fail2ban: This is optional but recommended, because the ISPConfig monitor tries to show the log:
apt-get install fail2ban
Install BIND DNS Server:
apt-get -y install bind9 dnsutils
Next install ISPConfig 3 on the dns server. To get the download URL of the latest ISPConfig 3 stable release, please visit the ISPConfig website: http://www.ispconfig.org/ispconfig-3/download/
Download the latest ISPConfig 3 stable release:
cd /tmp
wget
http://www.ispconfig.org/downloads/ISPConfig-3-stable.tar.gz
tar xfz ISPConfig-3-stable.tar.gz
cd ispconfig3_install/install/
Then start the install script:
php -q install.php
Select language (en,de) [en]:<-- en
Installation mode (standard,expert) [standard]:<-- expert
Full qualified hostname (FQDN) of the server, eg server2.domain.tld [ns2.example.tld]:<-- ns2.example.tld
MySQL server hostname [localhost]:<-- localhost
MySQL root username [root]:<-- root
MySQL root password []:<-- Enter your MySQL root password here
MySQL database to create [dbispconfig]:<-- dbispconfig
MySQL charset [utf8]:<-- utf8
Shall this server join an existing ISPConfig multiserver setup (y,n) [n]:<-- y
MySQL master server hostname []:<-- web.example.tld
MySQL master server root username [root]:<-- root
MySQL master server root password []:<-- Enter the root password of the master server here
MySQL master server database name [dbispconfig]:<-- dbispconfig
Configure Mail (y,n) [y]:<-- n
Configure Jailkit (y,n) [y]:<-- n
Configure FTP Server (y,n) [y]:<-- n
Configure DNS Server (y,n) [y]:<-- y
Configure Apache Server (y,n) [y]:<-- n
Configure Firewall Server (y,n) [y]:<--n
Install ISPConfig Web-Interface (y,n) [y]:<--n
Run...
rm -f /var/www/ispconfig
... to remove the ISPConfig interface link in the /var/www directory.
Clean up the install directories:
rm -rf /tmp/ispconfig3_install/install
rm -f /tmp/ISPConfig-3-stable.tar.gz
6.5 Adjust The Server Settings In ISPConfig
Log into ISPConfig on the master server with a web browser:
http://192.168.1.2:8080
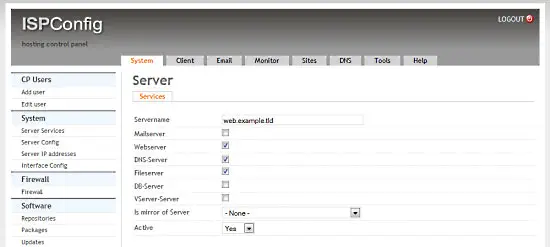
Click on System > Server services > web.example.tld and disable all checkboxes except of the Webserver, Fileserver and DB-Server checkbox and click on Save.
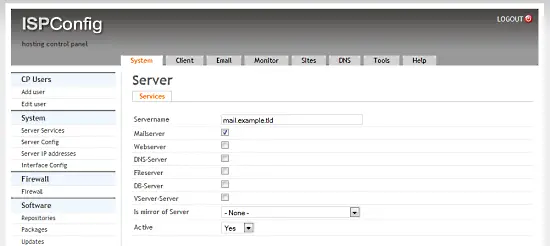
Click on System > Server services > mail.example.tld and disable all checkboxes except of the Mailserver checkbox and click on Save.
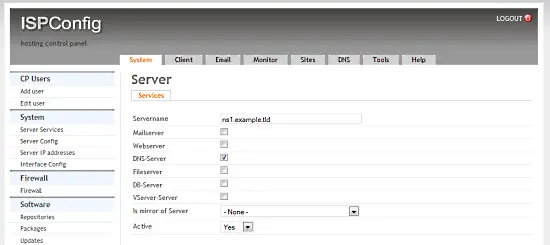
Click on System > Server services > ns1.example.tld and disable all checkboxes except of the DNS-Server checkbox and click on Save.
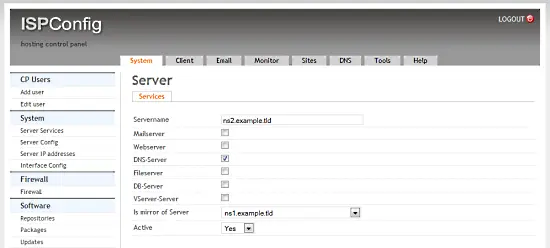
Click on System > Server services > ns2.example.tld and disable all checkboxes except of the DNS-Server checkbox and select ns1.example.tld in the Is mirror of Server selectbox and click on Save.
6.6 Setting Reverse DNS
Since most mail servers check for a valid Reverse DNS entry, we have to setup one for our mail server. Hetzner allows us to do this in their Web Interface:
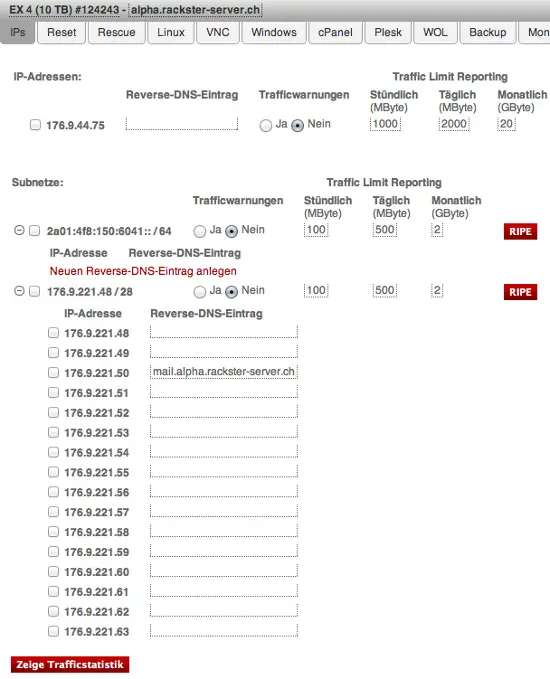
Note the entry for IP 176.9.221.50. For you, under IP 192.168.1.3 you should fill in: mail.example.tld

