Setup New User and SSH Key Auth. using Ansible on Ubuntu 18.04

Ansible is a simple automation tool that automates software applications deployment, cloud provisioning, and configuration management. It's a server orchestration tool that helps you to manage and control a large number of server nodes from single places called 'Control Machines'. Ansible was created by Michael DeHaan in 2012 and is written in Python and Powershell.

In this tutorial, we will learn how to deploy a new user and enable the SSH Key-Based authentication using the automation tool Ansible. We will also learn how to configure the Ansible 'Control Machine', as well as how to write simple ansible playbook.

Prerequisites

  • 2 or more Ubuntu 18.04 Servers
    • 10.0.15.10      control-machine
    • 10.0.15.21      ansi01
    • 10.0.15.22      ansi02
  • Root privileges

What we will do?

  1. Setup Ansible Control Machine
  2. Define User and SSH Key
  3. Create Inventory File
  4. Create Ansible Playbook
  5. Deploy Server Using Playbook
  6. Testing

Step 1 - Setup Ansible Control Machine

In this tutorial, we will be using the Ubuntu 16.04 servers as the Ansible 'Machine Control' and ansible hosts. The first step we need to do is to set up the 'control machine'.

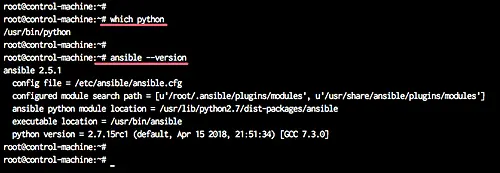
We will install python and ansible on the ansible 'control machine' by running the following command.

sudo apt install python ansible -y

Setup Ansible Control Machine

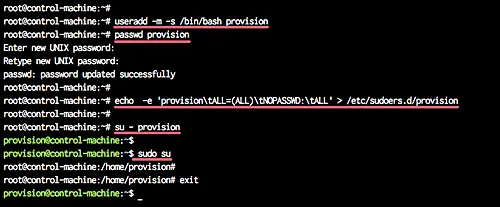
After the installation is complete, we will add a new system user.

We will add a new user named 'provision' in order to perform server provisioning using Ansible.

Add new user 'provision' and give the user a password.

useradd -m -s /bin/bash provision
passwd provision

Now add the 'provision' user for sudo without the password by creating new configuration file under the '/etc/sudoers.d/' using the command below.

echo  -e 'provision\tALL=(ALL)\tNOPASSWD:\tALL' > /etc/sudoers.d/provision

A new user has been created, and now it can use sudo without a password.

Add user

Step 2 - Define User and SSH Key

In this step, we will define the user for ansible hosts. This user will be automatically created by ansible, so we just need to define the username, password, and the ssh public key.

For each server ('ansi01' and 'ansi02'), we will create a new user named 'provision' with password 'secret01'. And we need to encrypt the 'secret01' password using the mkpasswd command.

Encrypt the 'secret01' password using the command below.

mkpasswd --method=SHA-512
TYPE THE PASSWORD 'secret01'

Note:

Make sure the 'whois' package is installed on the system, or you can install using the following command.

sudo apt install whois -y

And you will get the SHA-512 encrypted password.

Define User and SSH Key

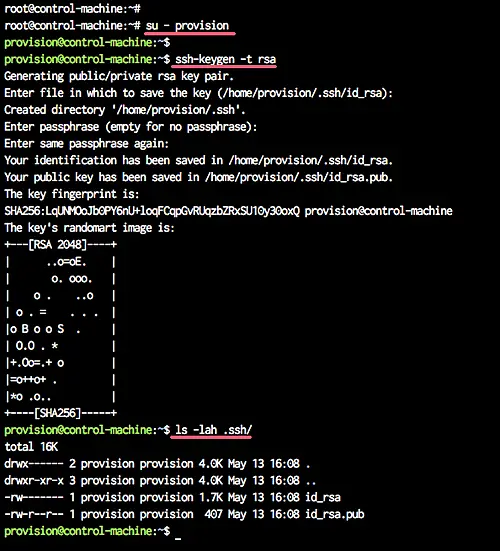
Next, we will generate a new ssh-key.

Login to the 'provision' user and generate the ssh key using the ssh-keygen command.

su - provision
ssh-keygen -t rsa

Now the user and password have been defined, and the ssh key has been created l(ocated at the '.ssh' directory).

user and password have been defined

Step 3 - Create New Inventory

In this step, we will define the inventory files for all server hosts.

Login as the 'provision' user and create a new directory for the project.

su - provision
mkdir -p ansible01/

Go to the 'ansible01' directory and create a new inventory file 'inventory.ini' using vim.

cd ansible01/
vim inventory.ini

Paste the following configuration there.

[webserver]
ansi01 ansible_host=10.0.15.21
ansi02 ansible_host=10.0.15.22

Save and exit.

Now create a new ansible configuration file 'ansible.cfg'.

vim ansible.cfg

Paste the following configuration there.

[defaults]
inventory = /home/provision/ansible01/inventory.ini

Save and exit.

Create New Inventory

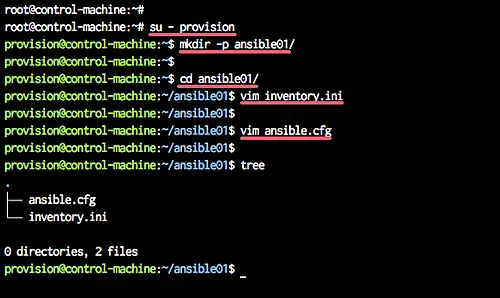
The ansible inventory file has been created, and our ansible scripts will be located under the 'provision' user, inside the 'ansible01' directory.

Step 4 - Create Ansible Playbook

Ansible Playbook is set of instructions that you send to run on a single or group of server hosts. It represents the ansible-provisioning, where the automation is defined as tasks, and all jobs like installing packages, editing files, will be done by ansible modules.

In this step, we will create a new ansible playbook to deploy a new user, deploy the ssh key, and configure the ssh service.

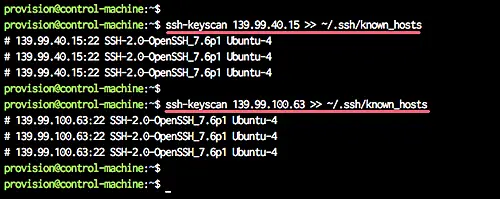
Before we create a new ansible playbook, we will scan all server fingerprint using the ssh-keyscan command as below.

ssh-keyscan 10.0.15.21 >> ~/.ssh/known_hosts
ssh-keyscan 10.0.15.22 >> ~/.ssh/known_hosts

Those servers fingerprint will be stored at the '.ssh/known_hosts' file.

Create Ansible Playbook

Note:

If you have a lot of server nodes, you can save your host list and then manually scan the ssh key fingerprint using bash script as shown below.

for i in $(cat list-hosts.txt)
do
ssh-keyscan $i >> ~/.ssh/known_hosts
done

Next, create the ansible playbook named 'deploy-ssh.yml' using vim.

vim deploy-ssh.yml

Paste following the ansible playbook there.

---
- hosts: all
  vars:
    - provision_password: '$6$w9S3t7x1kRtmG0u$6nVU9KZsC12Q8DYI4FtgKPy.e/cq/jseB/.DViTO1SpUnoCy.dxcOf8hyfitGq5V0yhgXccxzlqm2o.I3SlDJ0'
  gather_facts: no
  remote_user: root

  tasks:

  - name: Add a new user named provision
    user:
         name=provision
         password={{ provision_password }}

  - name: Add provision user to the sudoers
    copy:
         dest: "/etc/sudoers.d/provision"
         content: "provision  ALL=(ALL)  NOPASSWD: ALL"

  - name: Deploy SSH Key
    authorized_key: user=provision
                    key="{{ lookup('file', '/home/provision/.ssh/id_rsa.pub') }}"
                    state=present

  - name: Disable Password Authentication
    lineinfile:
          dest=/etc/ssh/sshd_config
          regexp='^PasswordAuthentication'
          line="PasswordAuthentication no"
          state=present
          backup=yes
    notify:
      - restart ssh

  - name: Disable Root Login
    lineinfile:
          dest=/etc/ssh/sshd_config
          regexp='^PermitRootLogin'
          line="PermitRootLogin no"
          state=present
          backup=yes
    notify:
      - restart ssh

  handlers:
  - name: restart ssh
    service:
      name=sshd
      state=restarted

Save and exit.

On the playbook script:

  • we create the 'deploy-ssh.yml' playbook script to be applied on all servers defined in the 'inventory.ini' file.
  • we create the ansible variable 'provision_password', containing the encrypted password for the new user.
  • Set the Ansible facts to 'no'.
  • Define the 'root' user as a remote user to perform tasks automation.
  • We create new tasks for adding a new user, add the user to the sudoers, and upload the ssh key.
  • We create new tasks for configuring the ssh services, disabling the root login, and disable password authentication. Tasks for configuring the ssh will trigger the 'restart ssh' handlers.
  • We create a handler to restart the ssh service.

Step 5 - Run the Playbook

Login to the 'provision' user and go to the 'ansible01' directory.

su - provision
cd ansible01/

Now run the the 'deploy-ssh.yml' playbook using the command as shown below.

ansible-playbook deploy-ssh.yml --ask-pass

Type your root password, and you will get the result as below.

Run the Playbook

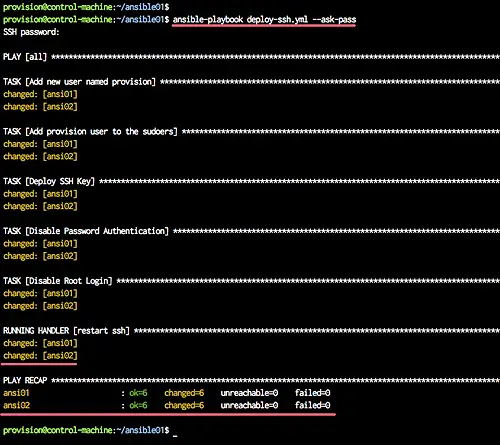
All tasks for deploying a new user and ssh key have been completed successfully.

Step 6 - Testing

Test using ansible command.

ansible webserver -m ping
ansible webserver -m shell -a id

Now you will get the green messages as below.

Testing Ansible

Now we can manage those 'ansi01' and 'ansi02' servers using Ansible, and the 'provision' user will be default user for Ansible.

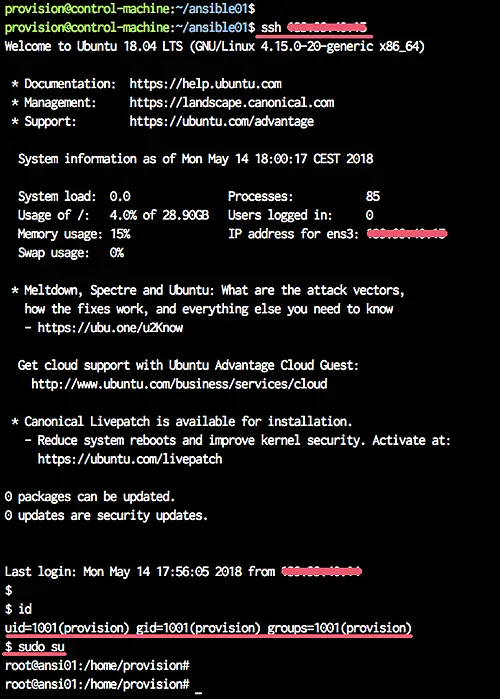
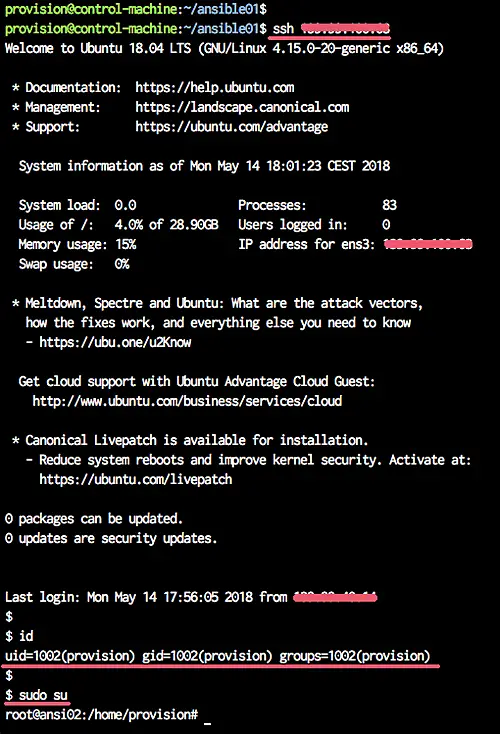
Testing connection to the servers

ssh 10.0.15.21
ssh 10.0.15.22

And you will be connected to each server using the default key '.ssh/id_rsa' file, and using the user 'provision'.

Test server connection

Another test

Deploying new user and ssh-key using ansible has been completed successfully.

Reference

Share this page:

Suggested articles

17 Comment(s)

Add comment

Comments

By: Pete

In the real world, where we have constant attackers, best to avoid simple accounts.  Always use a random account for ansible management on every host and let ansible deal with it. Adding a 5+ numbers to the end of the username is usually sufficient.

By: Ashish

 playbook is not working for me it is giving error

ERROR! Syntax Error while loading YAML.

  expected <block end>, but found '<block mapping start>'


The error appears to have been in '/home/provision/ansible01/deploy-ssh.yml': line 5, column 3, but may

be elsewhere in the file depending on the exact syntax problem.


The offending line appears to be:


     - provision_password: '6$FmwtHyEr$kvOwf4JhHJgvFvxbfFUJBwGtKmQOvbWvQldWc74t4QdKQdbv.U4ymseGWL5oaW5LlKNmOhwQHDiMufyqMWm6V1'

  gather_facts: no

  ^ here

By: till

Seems as if you did not keep the exact indention when writing the file. In .yml files, the white space and number of white spaces in front of the lines matters.

By: akash

thanks for given information .

but i have to copy one file from one server to another server without asking password and we will use root access.

it means i have to copy id_rsa.pub key on another servers in authorize_keys file .

how can i do that.

By: Helpful Chap

Here's the valid YAML as a paste on bastebin.

https://pastebin.com/raw/ntaeudav

HTH

By: Helpful Guy

Actually, the problem is that if you look carefully at the ansible.cfg above, it looks like the box below.  Notice there is one space space before the word 'inventory'?  Remove the space and save.  Finished.

[defaults] inventory = /home/provision/ansible01/inventory.ini

By: William Wallace

I get this error:

cannot lock /etc/passwd; try again later.\n"

By: till

Either you did not run the command as root user or you have the passwd file opened in another program at the same time.

By: William Wallace

Also on the remote machines the user provision is not added to /etc/sudoers its added to /etc/sudoers.d/provision which does not work when using sudo with "provision":

$ sudo su - provision 

$ sudo apt-get install


We trust you have received the usual lecture from the local System

Administrator. It usually boils down to these three things:


    #1) Respect the privacy of others.

    #2) Think before you type.

    #3) With great power comes great responsibility.


[sudo] password for provision: 

Sorry, try again.

[sudo] password for provision: 

Sorry, try again.

[sudo] password for provision: 

sudo: 3 incorrect password attempts

Let me know Thank you.

By: William Wallace

No I didnt I did it exactly as your instructions, and that  is the control machine where it failed, this is the command:

[email protected]:~/ansible01$ ansible-playbook deploy-ssh.yml --ask-pass

SSH password: 


PLAY [all] *********************************************************************


TASK [Add a new user named provision] ******************************************

fatal: [debian]: FAILED! => {"changed": false, "failed": true, "msg": "usermod: Permission denied.\nusermod: cannot lock /etc/passwd; try again later.\n", "name": "provision", "rc": 1}

Thank you.

By: William Wallace

Also as a suggestion add to the requierements list to install "sshpass"  package on the control machine other ways the command will fail with: "password option requires package "sshpass" to be installed.

It just need to be intalled on the control machine.

Thank you.

By: Gaurav

To execute my playbook as root user , control machine public key has to be added in authorized_keys file of /root/.ssh/authorized_keys ??

By: Tom

This article should never have someone edit the sudoers file manually.  especially in a how-to.  Mistakes can be made that would break sudo completely and require intervention at a console level to fix, or if you're in a cloud instance with no console to possibly have to re-deploy a new server.

By: Vulture

how to solve this problem?


TASK [Add a new user named provision] *****************************************************************************************************************************************************************************

fatal: [ans.test1]: FAILED! => {"changed": false, "msg": "useradd: Permission denied.\nuseradd: cannot lock /etc/passwd; try again later.\n", "name": "provision", "rc": 1}

fatal: [ans.test2]: FAILED! => {"changed": false, "msg": "useradd: Permission denied.\nuseradd: cannot lock /etc/passwd; try again later.\n", "name": "provision", "rc": 1}


By: khalid

HI,

when i run this command "echo  -e 'provision\tALL=(ALL)\tNOPASSWD:\tALL' > /etc/sudoers.d/provision"

I get this error  : bash: /etc/sudoers.d/provision: Permission non accordée

By: Todd Sanders

Beautiful and well written, thank you for sharing. One thing I would say, I did see some errors when I ran the "ansible-playbook deploy-ssl.yml", this is what I came up with the resolve the issue (Identation errors, but it work beautifully)


---

  - hosts: all

    vars:

      - provision_password: '$6$oeSm0qmQt3EzEBUX$XUghv88HRGWNpYTNY6cWbbGGD2a8LPlyDFLoT6Rl1AkLM14R1p195kkjXwft/wwzYqw3L//Kr0XUPiUMpz9ef1'

    gather_facts: no

    remote_user: root


    tasks:


    - name: Add a new user named provision

      user:

            name=provision

            password={{ provision_password }}


    - name: Add provision user to the sudoers

      copy:

          dest: "/etc/sudoers.d/provision"

          content: "provision ALL=(ALL) NOPASSWD: ALL"


    - name: Deploy SSH Key

      authorized_key: user=provision

                      key="{{ lookup('file', '/home/provision/.ssh/id_rsa.pub') }}"

                      state=present


    - name: Disable Password Authentication

      lineinfile:

            dest=/etc/ssh/sshd_config

            dest=/etc/ssh/sshd_config

            regexp='^PasswordAuthentication'

            line="PasswordAuthentication no"

            state=present

            backup=yes

      notify:

        - restart ssh


    handlers:

    - name: restart ssh

      service:

          name=ssh

          state=restarted

By: Todd Sanders

On thing I notocied, I added the items that were supposed to go into ansible.cfg and placed it into inventory.ini

The script still ran with no issues (so I have not created ansible.cfg, this was an oversight on my part but it still worked). 

---

  - hosts: all

    vars:

      - provision_password: '$6$oeSm0qmQt3EzEBUX$XUghv88HRGWNpYTNY6cWbbGGD2a8LPlyDFLoT6Rl1AkLM14R1p195kkjXwft/wwzYqw3L//Kr0XUPiUMpz9ef1'

    gather_facts: no

    remote_user: root


    tasks:


    - name: Add a new user named provision

      user:

            name=provision

            password={{ provision_password }}


    - name: Add provision user to the sudoers

      copy:

          dest: "/etc/sudoers.d/provision"

          content: "provision ALL=(ALL) NOPASSWD: ALL"


    - name: Deploy SSH Key

      authorized_key: user=provision

                      key="{{ lookup('file', '/home/provision/.ssh/id_rsa.pub') }}"

                      state=present


    - name: Disable Password Authentication

      lineinfile:

            dest=/etc/ssh/sshd_config

            dest=/etc/ssh/sshd_config

            regexp='^PasswordAuthentication'

            line="PasswordAuthentication no"

            state=present

            backup=yes

      notify:

        - restart ssh


    handlers:

    - name: restart ssh

      service:

          name=ssh

          state=restarted