Run your own cloud: Installing OwnCloud 9 on Debian 8
On this page
- Installing ownCloud
- 1. Install required and recommended packages
- 2. Download
- 3. Verify the integrity of the downloaded package
- 4. Import ownCloud PGP public key to GnuPG keyring
- 5. Verify authenticity of package signature
- 6. Extract software package
- 7. Copy ownCloud directory into Apache2 document root
- 8. Add owncloud to Apache2 available sites
- 9. Edit ownCoud site configuration
- 10. Symlink configuration file into /etc/apache2/sites-enabled
- 11. Enable Apache2 modules
- 12. Enable the ownCloud site configuration and restart Apache2
- 13. Set permissions for ownCloud files
- 14. Create ownCloud database and database user
- 15. Configure ownCloud client
- Optional: Using SSL
OwnCloud offers you the ability to run a cloud storage service that you administer and control yourself. The latest version, ownCloud 9.0, was released on March 8.
Installing ownCloud
Let's look at the process of installing ownCloud 9.0 on a system running Debian Jessie.
1. Install required and recommended packages
Begin by installing the supporting software packages. OwnCloud uses PHP and recommends MariaDB as its database. As root, install the following packages with apt-get:
apt-get install mariadb-server mariadb-client apache2 libapache2-mod-php5 php5-json php5-gd php5-mysql php5-curl php5-intl php5-mcrypt php5-imagick
2. Download
Next, download the ownCloud 9.0 package. In this step we will also download the SHA256 hash, ownCloud's public PGP signature, and the PGP signature for the softare package. We'll use these in the following steps to verify and authenticate the software before installing it. SHA256 is the recommended verification algorithm, but if you'd prefer to verify using MD5, that hash is also available for download on ownCloud's website.
These commands use wget to download the files, but you could just as easily download them by entering the URLs into your web browser.
wget https://download.owncloud.org/community/owncloud-9.0.0.tar.bz2
wget https://download.owncloud.org/community/owncloud-9.0.0.tar.bz2.sha256
wget https://owncloud.org/owncloud.asc
wget https://download.owncloud.org/community/owncloud-9.0.0.tar.bz2.asc
3. Verify the integrity of the downloaded package
Check that the SHA256 hash of the downloaded software archive matches the sum provided by ownCloud:
sha256sum -c owncloud-9.0.0.tar.bz2.sha256
Successful output:
owncloud-9.0.0.tar.bz2: OK
If the sums do not match, you should not proceed! Make sure that your download is verified before performing the remaining steps.
4. Import ownCloud PGP public key to GnuPG keyring
Next, we'll use GnuPG to verify authenticity of the software package. To do this, first import ownCloud's public PGP key into your GnuPG keyring.
gpg --import owncloud.asc
Successful output:
[...]
gpg: Total number processed: 1
gpg: imported: 1 (RSA: 1)
5. Verify authenticity of package signature
Next, use GnuPG to verify the signature of the software package. It will check the signature against the archive, using the key you imported in the previous step.
gpg --verify owncloud-9.0.0.tar.bz2.asc
Successful output:
[...]
gpg: Good signature from "ownCloud <[email protected]>"
[...]
You will receive a warning that ownCloud's signature is not yet trusted. Trusting the signature is an optional step for you to perform yourself. For more information about trusting public keys, refer to the GNU Privacy Handbook, Chapter 3.
6. Extract software package
After the download is verified and authenticated, extract it.
tar xjvf owncloud-9.0.0.tar.bz2
7. Copy ownCloud directory into Apache2 document root
Next, copy the newly-created owncloud directory and its contents into your web document root. In Debian 8, Apache2 uses /var/www/html as its default document root; you can customize this location if you wish. In this tutorial, we will place owncloud directly into /var/www.
cp -r owncloud /var/www
8. Add owncloud to Apache2 available sites
Now we can begin configuring Apache2. Create a copy of the default site configuration file, /etc/apache2/sites-available/000-default.conf, naming it owncloud.conf.
cp /etc/apache2/sites-available/000-default.conf /etc/apache2/sites-available/owncloud.conf
9. Edit ownCoud site configuration
As root, open /etc/apache2/sites-available/owncloud.conf in a text editor. Make the following modifications:
- Locate the ServerName line and uncomment it by removing the leading #
- Change the ServerName value to match the hostname that will appear in the URL you use to access the server: for instance, www.mypersonaldomain.com or myhostname
- Add the following lines to the end of the file, modifying the directory name as necessary to conform to the location where you placed owncloud:
Alias /owncloud "/var/www/owncloud/"

<Directory /var/www/owncloud/>
  Options +FollowSymlinks
  AllowOverride All

 <IfModule mod_dav.c>
  Dav off
 </IfModule>

 SetEnv HOME /var/www/owncloud
 SetEnv HTTP_HOME /var/www/owncloud

</Directory>
10. Symlink configuration file into /etc/apache2/sites-enabled
Create a symbolic link to your site configuration in the directory /etc/apache2/sites-enabled:
ln -s /etc/apache2/sites-available/owncloud.conf /etc/apache2/sites-enabled/owncloud.conf
11. Enable Apache2 modules
OwnCloud requires mod_rewrite. Enable it:
a2enmod rewrite
The headers module is recommended. Enable it:
a2enmod headers
The env, dir, and mime modules are also recommended. These are usually enabled by default, but you can manually enable them to be safe:
a2enmod env
a2enmod dir
a2enmod mime
12. Enable the ownCloud site configuration and restart Apache2
Enable your site configuration:
a2ensite owncloud
Restart the Apache2 service so your changes take effect:
service apache2 restart
13. Set permissions for ownCloud files
Before you can begin configuring ownCloud, you'll need to make sure the HTTP user/group have permission to make changes to ownCloud's files. In Debian, this user and group are named www-data. Make them the owner of the owncloud directory and all its contents.
chown -R www-data:www-data /var/www/owncloud/
Next, refine these permissions. The exact permissions for the owncloud installation are:
- All files should be read-write for the file owner, read-only for the group owner, and not accessible to others
- All directories should be executable, read-write for the directory owner, and read-only for the group owner
- The apps/ directory should be owned by [HTTP user]:[HTTP group]
- The config/ directory should be owned by [HTTP user]:[HTTP group]
- The themes/ directory should be owned by [HTTP user]:[HTTP group]
- The assets/ directory should be owned by [HTTP user]:[HTTP group]
- The data/ directory should be owned by [HTTP user]:[HTTP group]
- The [ocpath]/.htaccess file should be owned by root:[HTTP group]
- The data/.htaccess file should be owned by root:[HTTP group]
- Both .htaccess files should be read-write for the file owner, read-only for the group owner, and not accessible to others
To conform to this permissions structure, copy and paste the following script into a new file. In this example, the script filename will be /root/oc-perms.sh. Modify the ocpath value if you are using a custom location.
#!/bin/bash
ocpath='/var/www/owncloud'
htuser='www-data'
htgroup='www-data'
rootuser='root'

printf "Creating possible missing Directories\n"
mkdir -p $ocpath/data
mkdir -p $ocpath/assets

printf "chmod Files and Directories\n"
find ${ocpath}/ -type f -print0 | xargs -0 chmod 0640
find ${ocpath}/ -type d -print0 | xargs -0 chmod 0750

printf "chown Directories\n"
chown -R ${rootuser}:${htgroup} ${ocpath}/
chown -R ${htuser}:${htgroup} ${ocpath}/apps/
chown -R ${htuser}:${htgroup} ${ocpath}/config/
chown -R ${htuser}:${htgroup} ${ocpath}/data/
chown -R ${htuser}:${htgroup} ${ocpath}/themes/
chown -R ${htuser}:${htgroup} ${ocpath}/assets/

chmod +x ${ocpath}/occ

printf "chmod/chown .htaccess\n"
if [ -f ${ocpath}/.htaccess ]
 then
  chmod 0644 ${ocpath}/.htaccess
  chown ${rootuser}:${htgroup} ${ocpath}/.htaccess
fi
if [ -f ${ocpath}/data/.htaccess ]
 then
  chmod 0644 ${ocpath}/data/.htaccess
  chown ${rootuser}:${htgroup} ${ocpath}/data/.htaccess
fi
Make the script executable:
chmod u+x /root/oc-perms.sh
Execute it:
/root/oc-perms.sh
14. Create ownCloud database and database user
Next, prepare a database for ownCloud to use. Log in to the MariaDB client as the database root user:
mysql -u root -p
You will be prompted for the database root user's password. If you installed MariaDB for the first time in step 1, you were prompted to create this password. Enter it now. You will be placed at the MariaDB client prompt.
Choose a name for your owncloud database (ocdbname), the owncloud database user (ocuser), and the password for that user (ocuserpw). Then run the following two commands at the MariaDB prompt, replacing the bracketed values with your own:
CREATE DATABASE [ocdbname];
GRANT ALL ON [ocdbname].* TO [ocuser]@localhost IDENTIFIED BY '[ocuserpw]';
Exit the database client:
quit
15. Configure ownCloud client
Navigate a web browser to your ownCloud installation, e.g. http://myhostname/owncloud. You will be presented with fields where you can create an ownCloud administrator account, and enter the database configuration values.
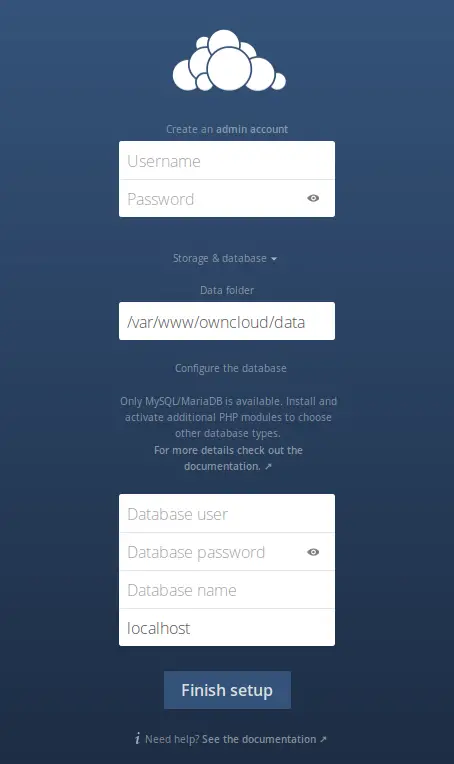
Username and Password are values for the user who will administer the installation; set these to whatever you like.
Database user, Database password, and Database name should conform to the [ocuser], [ocuserpw], and [ocdbname] values you created in the previous step.
Click Finish setup.
Congratulations! You're ready to start using ownCloud.
Optional: Using SSL
It's advisable to encrypt the network traffic that will pass in and out of ownCloud. Here are a few steps to get HTTPS up and running with your installation.
1. Enable SSL in Apache2
a2enmod ssl
a2ensite default-ssl
2. Add SSL Virtualhost configuration to owncloud.conf
Apache2 comes with a default SSL site configuration, located in /etc/apache2/sites-available/default-ssl.conf. Copy the contents of this file and paste them into the top of owncloud.conf. Within the <VirtualHost _default_:443> section, make the following modifications:
Add a ServerName line with your hostname as the value, e.g.:
ServerName myhostname
Edit the DocumentRoot line to reflect the parent directory of the owncloud installation, e.g.:
DocumentRoot /var/www/
3. Generate a new certificate/key pair, if necessary
The <VirtualHost _default_:443> section already contains three important lines for enabling SSL when the site is accessed by HTTPS:
SSLEngine on
SSLCertificateFile /etc/ssl/certs/ssl-cert-snakeoil.pem
SSLCertificateKeyFile /etc/ssl/private/ssl-cert-snakeoil.key
The SSLCertificateFile and SSLCertificateKeyFile values point to files that should already exist on your system, installed as part of the default openssl and ssl-cert packages. However, you may need to regenerate these files under certain circumstances -- if you make changes to the configuration in /etc/hosts, for instance.
If you need to regenerate these files, use the command:
make-ssl-cert generate-default-snakeoil --force-overwrite
For more information, and for troubleshooting certificate errors, refer to the notes in /usr/share/doc/apache2/README.Debian.gz.
4. Reload Apache2 configuration
service apache2 reload
You should now be able to access your ownCloud installation using an https:// URL. Note that you will receive a warning in your web browser because your certificate is self-signed. You will need to manually add your site as an exception before establishing the secure connection.

