Install Mattermost with PostgreSQL and Nginx on CentOS 7
On this page
- Names, Variables, and accounts used within this HowTo
- Prerequisites
- Install PostgreSQL database server
- Download and extract Mattermost
- Installing Mattermost
- Create a user that runs the Mattermost daemon
- Create a data storage folder for Mattermost
- Set owner of mattermost directory
- Configure the database connection for mattermost
- Configure the email connectivity for mattermost
- Configure mattermost to only listen on internal interface (127.0.0.1)
- Test the Mattermost server
- Setup Mattermost as a daemon
- Setup Nginx server
- Enable epel-repository
- Install nginx
- Configure nginx
- Firewalld
- Summary
Mattermost is an open source, self-hosted Slack-alternative. Mattermost is modern communication behind your firewall.
As an alternative to proprietary SaaS messaging, Mattermost brings all your team communication into one place, making it searchable and accessible anywhere.
Mattermost is “Slack-compatible, not Slack-limited”, supporting a superset of Slack’s incoming and outgoing webhook integrations, including compatibility with existing Slack integrations. From your existing Slack teams, you can import users, public channel history and even theme setting colors into Mattermost.
Names, Variables, and accounts used within this HowTo
local IP of server                 : 192.168.2.100
FQDN of server                     : mattermost.example.com
Name of mattermost database        : mattermost
User to access mattermost database : mmuser
Password for mmuser within database: DBAss47slX3
Prerequisites
This Howto explains the installation of Mattermost on CentOS7 using PostgreSQL as a database backend. For the purpose of this guide, we will assume that we install everything on a single server but for experienced users, it would be easy to disassemble the parts and install each component (eg. the database server) on a different machine. The installation has been done with the user root but you could, of course, use a sudo enabled user, too.
We also assume that the server has an IP address of 192.168.2.100 and that DNS resolves to mattermost.example.com. So anywhere in this HowTo where you read 192.168.2.100 or mattermost.example.com replace it with the IP address of your server.
Before you can start, you need a minimum installation of CentOS7. After installation, make sure you setup email correctly (postfix configuration), so that your system is able to send emails (eg. via a smart host or a similar solution).
Please do some small checks before you continue:
Try to send a mail from a terminal on your server:
[root@mattermost ~]echo -en "Subject: Testmail\n\nThis is a test\n" | sendmail [email protected]
(replace [email protected] with an email address your server should be able to send to). Make sure, you received an email from the system!
Verify name resolution for mattermost.example.com
From a different computer (not the server we try to setup) try to ping mattermost.example.com. You should get a positive result:
C:\>ping mattermost.example.com
Pinging mattermost.witron.com [192.168.2.100] with 32 bytes of data:
Reply from 192.168.2.100: bytes=32 time<1ms TTL=64
Reply from 192.168.2.100: bytes=32 time<1ms TTL=64
Reply from 192.168.2.100: bytes=32 time<1ms TTL=64
Reply from 192.168.2.100: bytes=32 time<1ms TTL=64

Ping statistics for 192.168.2.100:
Packets: Sent = 4, Received = 4, Lost = 0 (0% loss),
Approximate round trip times in milli-seconds:
Minimum = 0ms, Maximum = 0ms, Average = 0ms
Verify internet connectivity
We will now install the package wget (which we will need later).
[root@mattermost ~] yum -y install wget
and use it to determine our public ip. So we can check our internet connectivity.
[root@mattermost ~] wget http://ipinfo.io/ip -qO -
46.101.122.124
The result should be your public IP address.
Check firewall status and disable it for now
Please check if your CentOS7 installation has firewalld enabled. You can verify this by typing
[root@mattermost ~] systemctl status firewalld
If it shows something like
Active: active (running) since ...
please turn it off and disable it with this 2 commands.
[root@mattermost ~] systemctl stop firewalld
[root@mattermost ~] systemctl disable firewalld
At the end of this tutorial, you will find instructions how to re-enable firewalld and how to set it up correctly to work with Mattermost.
If you pass all of the above checks or you know you have a usable system for this tutorial you can continue now.
Install PostgreSQL database server
We will use PostgreSQL as database backend for Mattermost. Install it with the following command:
[root@mattermost ~] yum -y install postgresql-server postgresql-contrib
After installation we have to init the database.
[root@mattermost ~] postgresql-setup initdb
Initializing database ... OK
Then start PostgreSQL and enable it for automatic start.
[root@mattermost ~]# systemctl start postgresql
[root@mattermost ~]# systemctl enable postgresql
Created symlink from /etc/systemd/system/multi-user.target.wants/postgresql.service to /usr/lib/systemd/system/postgresql.service.
Please verify, that PostgreSQL is running by executing.
[root@mattermost ~]# systemctl status postgresql
It should report something similar to this (make sure there is Active: active (running) somewhere in the text).
? postgresql.service - PostgreSQL database server
Loaded: loaded (/usr/lib/systemd/system/postgresql.service; enabled; vendor preset: disabled)
Active: active (running) since Fri 2016-03-04 11:37:50 CET; 44s ago
Main PID: 17660 (postgres)
CGroup: /system.slice/postgresql.service
??17660 /usr/bin/postgres -D /var/lib/pgsql/data -p 5432
??17661 postgres: logger process
??17663 postgres: checkpointer process
??17664 postgres: writer process
??17665 postgres: wal writer process
??17666 postgres: autovacuum launcher process
??17667 postgres: stats collector process

Mar 04 11:37:48 mattermost systemd[1]: Starting PostgreSQL database server...
Mar 04 11:37:50 mattermost systemd[1]: Started PostgreSQL database server.
Mar 04 11:37:59 mattermost systemd[1]: Started PostgreSQL database server.
Create mattermost database and database user
PostgreSQL automatically created a user and group with the name postgres. We use the user postgres to connect to the database engine and setup a database and a user that can access it.
Start a prompt as the user postgres:
[root@mattermost ~]# sudo -i -u postgres
Your prompt will now change to:
-bash-4.2$
Now let's connect to the database server.
-bash-4.2$ psql
psql (9.2.15)
Type "help" for help.
postgres=#
Within the PostgreSQL prompt we now create a database with name 'mattermost'.
postgres=# CREATE DATABASE mattermost;
CREATE DATABASE
Now we create a user 'mmuser' with the password 'DBAss47slX3'.
postgres=# CREATE USER mmuser WITH PASSWORD 'DBAss47slX3';
CREATE ROLE
Grant the user access to the Mattermost database by typing:
postgres=# GRANT ALL PRIVILEGES ON DATABASE mattermost to mmuser;
GRANT
postgres=#
We can then exit the PostgreSQL prompt by typing:
postgres=# \q
-bash-4.2$
And then exit the shell we started as user 'postgres' with.
-bash-4.2$ exit
logout
[root@mattermost ~]#
Allow access to the PostgreSQL database from localhost via username/password
Later, our mattermost instance would like to talk to the PostgreSQL database and authenticate with username and password. To allow this, we slightly need to change the PostgreSQL configuration. Open the file:
vi /var/lib/pgsql/data/pg_hba.conf
with an editor like vi or nano and change the line:
host all all 127.0.0.1/32 ident
to:
host all all 127.0.0.1/32 md5
Save the file and then restart Postgresql.
[root@mattermost ~]# systemctl restart postgresql
We should verify that we did that correctly by connecting to the database server with our previously created user and password (use your password if you used a different one on your server):
[root@mattermost ~]# psql --host=127.0.0.1 --dbname=mattermost --username=mmuser --password
Password for user mmuser:
psql (9.2.15)
Type "help" for help.

mattermost=> \q
[root@mattermost ~]#
Our PostgreSQL server and database is now ready for Mattermost!
Download and extract Mattermost
Let's download a copy of the Mattermost server direclty from their Github repository (at the time of the creation of this tutorial version v2.0.0 was the current version) using wget.
[root@mattermost ~]# cd
[root@mattermost ~]# wget -q "https://github.com/mattermost/platform/releases/download/v2.0.0/mattermost.tar.gz" -O mattermost.tar.gz
Now let's extract the archive and put the extracted files to their target location (in this case we use /opt/mattermost).
[root@mattermost ~]# tar -xvzf mattermost.tar.gz
[root@mattermost ~]# mv mattermost /opt
Installing Mattermost
Create a user that runs the Mattermost daemon
We will later run Mattermost as a deamon. Therefore we setup a new user on our system with name 'mattermost'. It will run the mattermost instance later. Execute the following command to create a system user and group 'mattermost':
[root@mattermost ~]# useradd -r mattermost -U -s /sbin/nologin
Create a data storage folder for Mattermost
Mattermost wants to store some of it's data, eg. uploaded files etc. in a folder. So we need to create that folder. It can be anywhere on the hard drive but must be accessible by the user 'mattermost'. I chose to use '/opt/mattermost/data'. Create the folder with the following command:
[root@mattermost ~]# mkdir -p /opt/mattermost/data
Set owner of mattermost directory
Now we set the group and owner of the mattermost directory to our previously created user and group:
[root@mattermost ~]# chown -R mattermost:mattermost /opt/mattermost
[root@mattermost ~]# chmod -R g+w /opt/mattermost
Configure the database connection for mattermost
To tell Mattermost how it should connect to our PostgreSQL database we need to edit it's configuration file:
/opt/mattermost/config/config.json
Please find the section 'SqlSettings' and change it to our needs:
BEFORE
"SqlSettings": {
 "DriverName": "mysql",
 "DataSource": "mmuser:mostest@tcp(dockerhost:3306)/mattermost_test?charset=utf8mb4,utf8",
 "DataSourceReplicas": [],
 "MaxIdleConns": 10,
 "MaxOpenConns": 10,
 "Trace": false,
 "AtRestEncryptKey": "7rAh6iwQCkV4cA1Gsg3fgGOXJAQ43QVg"
 },
AFTER
"SqlSettings": {
 "DriverName": "postgres",
 "DataSource": "postgres://mmuser:[email protected]:5432/mattermost?sslmode=disable&connect_timeout=10",
 "DataSourceReplicas": [],
 "MaxIdleConns": 10,
 "MaxOpenConns": 10,
 "Trace": false,
 "AtRestEncryptKey": "7rAh6iwQCkV4cA1Gsg3fgGOXJAQ43QVg"
 },
You can leave the AtRestEncryptKey as is!
Configure the email connectivity for mattermost
Again we need to edit it's configuration file
/opt/mattermost/config/config.json
Find the section 'EmailSettings' and change it to our needs:
BEFORE
 "EmailSettings": {
 "EnableSignUpWithEmail": true,
 "EnableSignInWithEmail": true,
 "EnableSignInWithUsername": false,
 "SendEmailNotifications": false,
 "RequireEmailVerification": false,
 "FeedbackName": "",
 "FeedbackEmail": "",
 "SMTPUsername": "",
 "SMTPPassword": "",
 "SMTPServer": "",
 "SMTPPort": "",
 "ConnectionSecurity": "",
 "InviteSalt": "bjlSR4QqkXFBr7TP4oDzlfZmcNuH9YoS",
 "PasswordResetSalt": "vZ4DcKyVVRlKHHJpexcuXzojkE5PZ5eL",
 "SendPushNotifications": false,
 "PushNotificationServer":
},
AFTER
 "EmailSettings": {
 "EnableSignUpWithEmail": true,
 "EnableSignInWithEmail": true,
 "EnableSignInWithUsername": false,
 "SendEmailNotifications": false,
 "RequireEmailVerification": false,
 "FeedbackName": "",
 "FeedbackEmail": "",
 "SMTPUsername": "",
 "SMTPPassword": "",
 "SMTPServer": "127.0.0.1",
 "SMTPPort": "25",
 "ConnectionSecurity": "",
 "InviteSalt": "bjlSR4QqkXFBr7TP4oDzlfZmcNuH9YoS",
 "PasswordResetSalt": "vZ4DcKyVVRlKHHJpexcuXzojkE5PZ5eL",
 "SendPushNotifications": false,
 "PushNotificationServer": ""
 },
We use 127.0.0.1 and port 25 because we use our local postfix install that is already configured to be able to send email to the outside. If your setup differs here, you have to set the correct values!
Configure mattermost to only listen on internal interface (127.0.0.1)
By default, the mattermost server instance will listen on all interfaces on port 8065 (:8065). Because we want to put an Nginx-Server in front of mattermost, we change this behaviour so that it will only listen on localhost (127.0.0.1:8065).
Just change the line
"ListenAddress": ":8065",
to
"ListenAddress": "127.0.0.1:8065",
in the config.json file.
Test the Mattermost server
We can now test if our mattermost server would start by running it from the command line. Please make sure, you do this as the user 'mattermost'. If you accidently did this as 'root' you have to fix the permissions for the mattermost folder again!
[root@mattermost ~]# su - mattermost -s /bin/bash

Last login: Fri Mar 4 12:47:52 CET 2016 on pts/0
su: warning: cannot change directory to /home/mattermost: No such file or directory
-bash-4.2$
Now change to the mattermost installation directory:
-bash-4.2$ cd /opt/mattermost/bin/
And run mattermost from the command line:
-bash-4.2$ ./platform
The output should look similar to this:
[2016/03/04 13:00:10 CET] [INFO] Loaded system translations for 'en' from '/opt/mattermost/i18n/en.json'
[2016/03/04 13:00:10 CET] [INFO] Current version is 2.0.0 (5950/Sat Feb 13 15:42:01 UTC 2016/c71c5cef632c7dc68072167c6fe091a60835fa02)
[2016/03/04 13:00:10 CET] [INFO] Enterprise Enabled: false
[2016/03/04 13:00:10 CET] [INFO] Current working directory is /opt/mattermost/bin
[2016/03/04 13:00:10 CET] [INFO] Loaded config file from /opt/mattermost/config/config.json
[2016/03/04 13:00:10 CET] [INFO] Server is initializing...
[2016/03/04 13:00:10 CET] [INFO] Pinging sql master database
[2016/03/04 13:00:10 CET] [INFO] Pinging sql replica-0 database
[2016/03/04 13:00:10 CET] [DEBG] Deleting any unused pre-release features
[2016/03/04 13:00:10 CET] [INFO] The database schema has been set to version 2.0.0
[2016/03/04 13:00:10 CET] [DEBG] Initializing user api routes
[2016/03/04 13:00:10 CET] [DEBG] Initializing team api routes
[2016/03/04 13:00:10 CET] [DEBG] Initializing channel api routes
[2016/03/04 13:00:10 CET] [DEBG] Initializing post api routes
[2016/03/04 13:00:10 CET] [DEBG] Initializing web socket api routes
[2016/03/04 13:00:10 CET] [DEBG] Initializing file api routes
[2016/03/04 13:00:10 CET] [DEBG] Initializing command api routes
[2016/03/04 13:00:10 CET] [DEBG] Initializing admin api routes
[2016/03/04 13:00:10 CET] [DEBG] Initializing oauth api routes
[2016/03/04 13:00:10 CET] [DEBG] Initializing webhook api routes
[2016/03/04 13:00:10 CET] [DEBG] Initializing preference api routes
[2016/03/04 13:00:10 CET] [DEBG] Initializing license api routes
[2016/03/04 13:00:10 CET] [DEBG] Parsing server templates at /opt/mattermost/api/templates/
[2016/03/04 13:00:10 CET] [DEBG] Initializing web routes
[2016/03/04 13:00:10 CET] [DEBG] Using static directory at /opt/mattermost/web/static/
[2016/03/04 13:00:10 CET] [DEBG] Parsing templates at /opt/mattermost/web/templates/
[2016/03/04 13:00:10 CET] [INFO] Starting Server...
[2016/03/04 13:00:10 CET] [INFO] Server is listening on 127.0.0.1:8065
[2016/03/04 13:00:10 CET] [INFO] RateLimiter is enabled
[2016/03/04 13:00:10 CET] [DEBG] Checking for security update from Mattermost
[2016/03/04 13:00:10 CET] [EROR] Failed to get security update information from Mattermost.
Stop the mattermost server with Ctrl+C
and then exit the shell we started as user 'mattermost' with:
-bash-4.2$ exit
logout
[root@mattermost ~]#
If your mattermost instance does not start, read the output carefully. I had myself a lot of problems because I forgot a simple Comma in config.json. Also make sure you do not use special characters in your dbuser's password especially no '@' sign. That drove me weird at the beginning!
If you accidently ran the above command as 'root' and that might also work you have to re-fix the permissions for the mattermost folder. Use this command if you ran into this mistake:
[root@mattermost ~]# chown -R mattermost:mattermost /opt/mattermost
If everything went fine, we can now continue.
Setup Mattermost as a daemon
To setup Mattermost as a daemon create a file
/etc/systemd/system/mattermost.service
with the following content:
[Unit]
Description=Mattermost
After=syslog.target network.target

[Service]
Type=simple
WorkingDirectory=/opt/mattermost/bin
User=mattermost
ExecStart=/opt/mattermost/bin/platform
PIDFile=/var/spool/mattermost/pid/master.pid

[Install]
WantedBy=multi-user.target
Then reload the daemon files with:
[root@mattermost ~]# systemctl daemon-reload
We can now start/stop/enable/disable this service as we are used to do.
So let's start Mattermost, get its status and then enable it as a service (autostart).
Start mattermost daemon
[root@mattermost ~]# systemctl start mattermost.service
Verify mattermost status
[root@mattermost ~]# systemctl status mattermost.service
? mattermost.service - Mattermost
Loaded: loaded (/etc/systemd/system/mattermost.service; disabled; vendor preset: disabled)
 Active: active (running) since Fri 2016-03-04 14:03:40 CET; 4s ago
Main PID: 18573 (platform)
CGroup: /system.slice/mattermost.service
??18573 /opt/mattermost/bin/platform
...
...
Make sure it is active (running)!
Enable daemon for autostart
[root@mattermost ~]# systemctl enable mattermost.service
Created symlink from /etc/systemd/system/multi-user.target.wants/mattermost.service to /etc/systemd/system/mattermost.service.
Now just for sure we make a test if Mattermost is listening on 127.0.0.1:8065 by executing the following command:
[root@mattermost config]# curl -s "http://127.0.0.1:8065" | grep -b "2015 Mattermost"
We should get a single line that contains '2015 Mattermost'.
11343: <span class="pull-right footer-link copyright">© 2015 Mattermost, Inc.</span>
If so, we can be sure, that the Mattermost server instance is running and we can continue.
Fix SELinux related permission problems
On CentOS7 SELinux is enabled by default. We could turn it of entirely but it is better to reconfigure it and allow our Mattermost server to execute.
Just enter the following 2 commands to fix SELinux permissions:
[root@mattermost config]# chcon -Rt httpd_sys_content_t /opt/mattermost/
[root@mattermost config]# setsebool -P httpd_can_network_connect 1
Setup Nginx server
We will put a Nginx server in front of our Mattermost server instance.
The main benefits are:
- Port mapping :80 to :8065
- Standard request logs
- more options when later switching to SSL
Enable epel-repository
Nginx is not in the default repositories of CentOS. So we need to enable the epel repository first. This is an easy task, just enter:
[root@mattermost config]# yum -y install epel-release && yum update
Install nginx
After we have enabled the epel-release we can simply install nginx with the following command:
[root@mattermost config]# yum -y install nginx
This will install nginx and all it's dependencies.
Configure nginx
There are many ways to configure Nginx. This tutorial will just show how to create a very simple setup for Nginx that just hosts our Mattermost server on port 80.
Change Nginx default configuration file
Create a backup of the current nginx.conf by executing:
[root@mattermost config]# cp /etc/nginx/nginx.conf /etc/nginx/nginx.conf.bak
Then replace /etc/nginx/nginx.conf with this content:
# For more information on configuration, see:
# * Official English Documentation: http://nginx.org/en/docs/
# * Official Russian Documentation: http://nginx.org/ru/docs/

user nginx;
worker_processes auto;
error_log /var/log/nginx/error.log;
pid /run/nginx.pid;

events {
 worker_connections 1024;
}

http {
 log_format main '$remote_addr - $remote_user [$time_local] "$request" '
 '$status $body_bytes_sent "$http_referer" '
 '"$http_user_agent" "$http_x_forwarded_for"';

 access_log /var/log/nginx/access.log main;

 sendfile on;
 tcp_nopush on;
 tcp_nodelay on;
 keepalive_timeout 65;
 types_hash_max_size 2048;

 include /etc/nginx/mime.types;
 default_type application/octet-stream;

 # Load modular configuration files from the /etc/nginx/conf.d directory.
 # See http://nginx.org/en/docs/ngx_core_module.html#include
 # for more information.
 include /etc/nginx/conf.d/*.conf;

 server {
 server_name mattermost.example.com;
 location / {
 client_max_body_size 50M;
 proxy_set_header Upgrade $http_upgrade;
 proxy_set_header Connection "upgrade";
 proxy_set_header Host $http_host;
 proxy_set_header X-Real-IP $remote_addr;
 proxy_set_header X-Forwarded-For $proxy_add_x_forwarded_for;
 proxy_set_header X-Forwarded-Proto $scheme;
 proxy_set_header X-Frame-Options SAMEORIGIN;
 proxy_pass http://127.0.0.1:8065;
 }
 }
}
Please make sure you use the correct hostname as stated earlier in this document.
To verify that we do not have any syntax errors in our configuration files, run the following command to check the syntax:
[root@mattermost config]# nginx -t
nginx: the configuration file /etc/nginx/nginx.conf syntax is ok
nginx: configuration file /etc/nginx/nginx.conf test is successful
Start and enable Nginx as daemon
Start Nginx
[root@mattermost config]# systemctl start nginx
Check status
[root@mattermost config]# systemctl status nginx
Make sure, that it outputs at least a line showing:
...
Active: active (running)...
...
Enable as daemon
[root@mattermost config]# systemctl enable nginx
Created symlink from /etc/systemd/system/multi-user.target.wants/nginx.service to /usr/lib/systemd/system/nginx.service.
If everything went fine, you should now have a working Mattermost installation running behind Nginx. Verify it by opening the following URL in your browser:
The Mattermost login screen should appear!
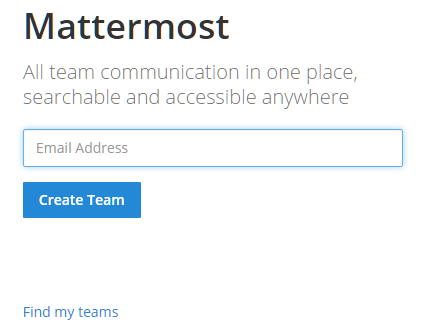
Now you can continue to setup your Mattermost installation by entering your email address and create an account.
Firewalld
Earlier in this tutorial, we disabled firewalld. If you want to re-enable it but want to keep Port 80 open (which we currently use for Mattermost via Nginx) just do the following:
Start and re-enable Firewalld
[root@mattermost config]# systemctl start firewalld
[root@mattermost config]# systemctl enable firewalld
Created symlink from /etc/systemd/system/dbus-org.fedoraproject.FirewallD1.service to /usr/lib/systemd/system/firewalld.service.
Created symlink from /etc/systemd/system/basic.target.wants/firewalld.service to /usr/lib/systemd/system/firewalld.service.
Open Port 80 in the Firewall
[root@mattermost config]# firewall-cmd --zone=public --add-port=80/tcp --permanent
success
[root@mattermost config]# firewall-cmd --reload
success
Now your Mattermost installation should be accessible, even Firewalld is running!
Summary
I hope you found this tutorial useful and it worked. In a production environment, you should create/use certificates for your Mattermost website and enable https through Nginx. This can be easily accomplished by slightly modifying this Howto.

