There is a new version of this tutorial available for Debian 9 (Stretch).

Debian 8 Jessie LAMP server tutorial with Apache 2, PHP 5 and MariaDB (instead of MySQL)

LAMP is short for Linux, Apache, MySQL, PHP. This tutorial shows how you can install an Apache2 webserver on a Debian Jessie (8) server with PHP 5 support (mod_php) and MariaDB support. MariaDB is a fork of the well known MySQL database server, it provides a MySQL compatible feature set and is a bit faster according to benchmarks that I found on the internet. MariaDB will work with all applications that require MySQL like Wordpress, Joomla etc.

A LAMP setup is a perfect basis for CMS systems like Joomla, Wordpress or Drupal.


1 Preliminary Note

In this tutorial, I use the hostname server1.example.com with the IP address 192.168.1.100. These settings might differ for you, so you have to replace them where appropriate.


2 Installing MariaDB as MySQL replacement

First we install MariaDB like this:

apt-get -y install mariadb-server mariadb-client

You will be asked to provide a password for the MariaDB root user - this password is valid for the user [email protected] as well as [email protected], so we don't have to specify a MariaDB root password manually later on:

New password for the MariaDB "root" user: <-- yourrootsqlpassword
Repeat password for the MariaDB "root" user: <-- yourrootsqlpassword


3 Installing Apache 2.4

Apache is available as a Debian package, therefore we can install it like this:

apt-get -y install apache2

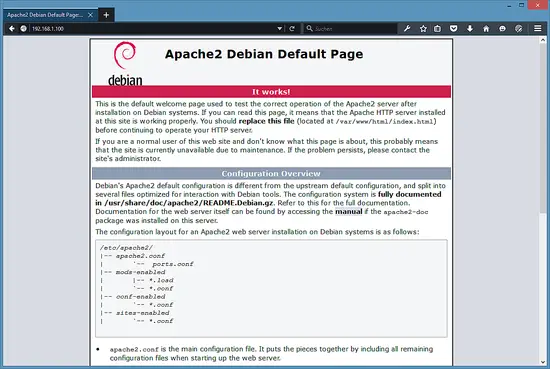
Now direct your browser to http://192.168.1.100, and you should see the Apache2 placeholder page (It works!):

Apache's default document root is /var/www on Debian, and the configuration file is /etc/apache2/apache2.conf. Additional configurations are stored in subdirectories of the /etc/apache2 directory such as /etc/apache2/mods-enabled (for Apache modules), /etc/apache2/sites-enabled (for virtual hosts), and /etc/apache2/conf-enabled.


4 Installing PHP 5.6

We can install PHP 5 and the Apache PHP 5 module as follows:

apt-get -y install php5 libapache2-mod-php5

We must restart Apache afterward:

service apache2 restart


5 Testing PHP / Getting details about your PHP installation

The document root of the default web site is /var/www/html. We will now create a small PHP file (info.php) in that directory and call it in a browser. The file will display lots of useful details about our PHP installation, such as the installed PHP version.

nano /var/www/html/info.php
<?php
phpinfo();
?>

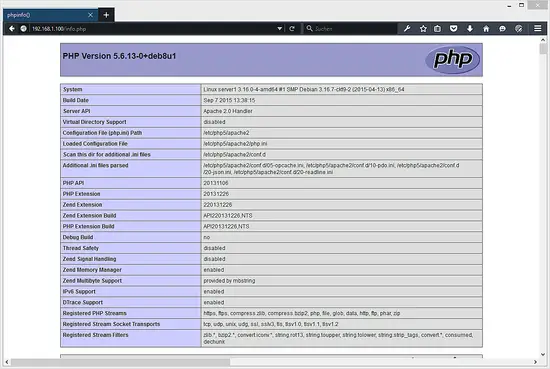
Now we call that file in a browser (e.g. http://192.168.1.100/info.php):

As you see, PHP5 is working, and it's working through the Apache 2.0 Handler, as shown in the Server API line. If you scroll further down, you will see all modules that are already enabled in PHP5. MySQL / MariaDB is not listed there which means we don't have MySQL support in PHP5 yet.


6 Getting MySQL and MariaDB Support in PHP

To get MySQL support in PHP, we can install the php5-mysql package. But as we use MariaDB here, it is better to use the newer php5-mysqlnd package as the old drivers from php5-mysql will cause warning messages in the logs. It's a good idea to install some other PHP5 modules as well as you might need them for your applications. You can search for available PHP5 modules like this:

apt-cache search php5

Pick the ones you need and install them like this:

apt-get -y install php5-mysqlnd php5-curl php5-gd php5-intl php-pear php5-imagick php5-imap php5-mcrypt php5-memcache php5-pspell php5-recode php5-snmp php5-sqlite php5-tidy php5-xmlrpc php5-xsl

Now restart Apache2:

service apache2 restart

7 Install APCu PHP Cache to improve the PHP speed

APCu is a free PHP opcode cacher for caching and optimizing PHP intermediate code. It is strongly recommended to have one of these installed to speed up your PHP page.

APCu can be installed as follows:

apt-get install php5-apcu

Now restart Apache:

service apache2 restart

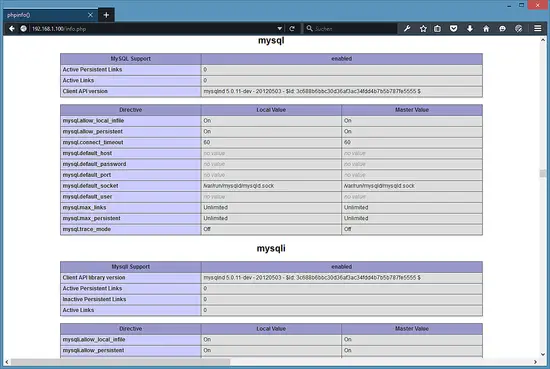
Now reload http://192.168.1.100/info.php in your browser and scroll down to the modules section again. You should now find lots of new modules there, including the MySQL module which is used as MariaDB driver:


8 phpMyAdmin

phpMyAdmin is a web interface through which you can manage your MySQL and MariaDB databases. It's a good idea to install it:

apt-get -y install phpmyadmin

You will see the following questions:

Web server to reconfigure automatically: <-- apache2
Configure database for phpmyadmin with dbconfig-common?
<-- Yes
Password of the database's administrative user: <-- Enter the MariaDB root password
MySQL application password for phpmyadmin: <-- Press enter, apt will create a random password automatically.

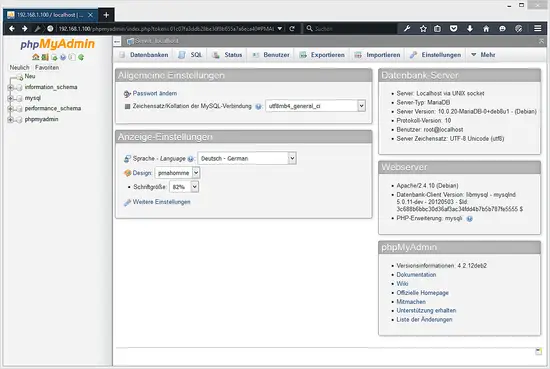
Afterwards, you can access phpMyAdmin under http://192.168.1.100/phpmyadmin/:

PHPMyAdmin will switch to the language of your Web Browser automatically as long as there is a language file for your language. So don't worry that the screenshot is in German language, your PHPMyAdmin install will be in your native language automatically.


Share this page:

Suggested articles

32 Comment(s)

Add comment

Comments

By: Yui

APCu is not APC, its variable only cache, it does not cache or optimize any opcode. Opcache is recommended with modern PHP. Variable cache can be re-used with webapp support (i.e. Tribe cache plugin to use object caching in Wordpress and reduce SQL requests)

By: mediaphysis

Really a simple, clear and working explanation. Thanks a lot!

By: Alan

It would be nice to have tutorial how to setup VSFTPD with apache2. Like secure permissions and so on.

By: lordlifen

Good Tuto 

By: José Luz

Thanks a lot!

By: Heartz

Amazingly clear and simple. Thank you very much.

On a side note, I couldn't gain access to the index.html file created automatically by apache since it was located in www/ and not in www/html/ (which is the reason why I looked for a tutorial). That being said, you explained in step 5 that the root was actually www/html/ so I managed to fix that.

Is there a reason why you could access to the index and I could not?

By: till

Are you sure that you use Debian 8 (Jessie) and not Debian 7 (Wheezy)? On Debian 7, the index page was in /var/www while it is /var/www/html/ on Debian 8.

By: Heartz

Yes. I am using Debian 8.1 (Jessie).

By: Arnault

Thx for tuto,For those of you who got trouble with phpmyadmin 404, 

cd /var/www/html/example.org/public_html sudo ln -s /usr/share/phpmyadmin

By: charlie

Brilliant. Set up my first Lamp Server using these Instuctions. Not a single glitch

By: Anon

Hi, I finished the tutorial then go onto http://localhost/phpmyadmin, and it says NOT FOUND ON THIS SERVER. You think its because of my wireless usb dongle messing up the IPs? because my main ip on ifconfig is 10.0.2.15?

By: Gonzalo

Use https

By: Mart-Jan

Thank you for this easy to understand and great tutorial!

By: Joe

Will MariaDB accept a MySQL backup to restore dababases.  (I'm moving a LAMP from Wheezy to Jessie)

By: Raffaele

Perfect !!

By: Janeen

I have everything installed and the info.php file just shows a blank page (no error).  I'm just learning linux and php, so I'm not sure if I missed something.  I followed this tutorial completely.

By: till

Most likely a typo in your info.php file. Take a look into the apache error log: /var/log/apache2/error.log to see the exact error message.

By: Gerald

Well I tried the cd /var/www/html/example.org/public_html sudo ln -s /usr/share/phpmyadmin for the 404 error on myphpadmin and get told no such directory exists. The script said it installed just fine, just can't find the darn thing, it is not in /var/www/html/ that's for sure.

By: till

PHPMyAdmin is accessed trough an alias and not a directory or symlink, so it is absolutely OK that there is no symlink. If you can't access PHPMyAdmin then you did not enable it in apache during PHPMyAdmin installation. You can redo that by running:


dpkg-reconfigure phpmyadmin


Ensure that you select the apache option in the dialog.

By: Janeen

Just tried looking at the error log and I'm getting "This location could not be displayed".  Clearly I did something wrong installing Apache2. Should I remove Apache2 and try re-installing?

By: Xpomk

Great tutorial!

Thanks!

By: Mar

To fix the "404 not found" error when trying to access phpmyadmin

sudo ln -s /usr/share/phpmyadmin /var/www/html/

By: bartek

Very, very good tuto. thank you.

By: Carlos

Great tutorial! Unfortunately after installing phpmyadmin i get error mysqli|mysql not found. Installing apt-get install php5-mysql and service apache2 restart did not help...

By: cornelius

help me, how to fix ?


Reading package lists... DoneBuilding dependency tree       Reading state information... DoneSome packages could not be installed. This may mean that you haverequested an impossible situation or if you are using the unstabledistribution that some required packages have not yet been createdor been moved out of Incoming.The following information may help to resolve the situation:The following packages have unmet dependencies: mariadb-client : Depends: mariadb-client-10.0 (>= 10.0.26-0+deb8u1) but it is not going to be installed mariadb-server : Depends: mariadb-server-10.0 (>= 10.0.26-0+deb8u1) but it is not going to be installedE: Unable to correct problems, you have held broken packages.

By: dantech

To have access to phpMyAdmin on your website (i.e. http://example.com/phpmyadmin/ ) all you need to do is include the following line in /etc/apache2/apache2.conf (needed only before Squeeze, since 6.0 it will be linked by the package install script to /etc/apache2/conf.d/phpmyadmin.conf -> ../../phpmyadmin/apache.conf automatically):

Include /etc/phpmyadmin/apache.conf

Restart Apache:

# /etc/init.d/apache2 restart


Go to http://<SERVERIP>/phpmyadmin/ to start using it. (Use the IP or name of your PC/server instead of <SERVERIP> (The localhost IP is always 127.0.0.1).)

By: birame

merci pour le tuto

By: Az

Thanks. o/

By: Glin Zachariah

Thanks for the info!

By: Pipo

dont work anymore sorry

apt-get -y install mariadb-server mariadb-client

then it ask you for the install disk

By: till

The tutorial still works fine. Your problem is that you installed your server from an install disk and then did not comment it out in the Debian sources.list file. so either insert the disk again when you install additional software or comment out the disk as install source in the sources.list file so that debian fetches the files from the internet repository.

By: Christoph

Hi there,

does this tutorial also applies to Debian Stretch?


Thanks in advance,


Christoph