How to restrict access to the ONLYOFFICE editors to the users of your Nextcloud instance
On this page
Nextcloud integrated with ONLYOFFICE allows users to build a private cloud office on their own server and get a total control over the data stored there. To deploy and integrate them, just follow the instructions of this tutorial.
Once you got your setup up and running, you may notice that ONLYOFFICE remains publicly accessible and can be used by any other instance out there. To restrict the access so that only users of one particular Nextcloud instance can access ONLYOFFICE editors, you can proceed in two different ways.
Configure IP Filter
Open the /etc/onlyoffice/documentserver/default.json file using any available text editor.
"ipfilter": {
 "rules": [
 {
 "address": "ip_address",
 "allowed": true
 },
 {
 "address": "*",
 "allowed": false
 }
 ],
 "useforrequest": true,
 "errorcode": 403
}
Change the following default settings. Enter your "ip_address" that can contain:
- IP in the X.X.X.X format for ipv4,
- IP in the xxxx.xxxx.xxxx.xxxx.xxxx.xxxx.xxxx.xxxx format for ipv6,
- dns-name,
- * wildcard to replace any symbol/symbols.
- and the "allowed" rule that can be true or false.
Restart the services for the config changes to take effect:
supervisorctl restart all
Enable JWT token
Another possibility is to make access to the document server public and enable JWT token to secure the connection.
Open the /etc/onlyoffice/documentserver/default.json file with any available text editor to set your own secret token:
{
 "services": {
 "CoAuthoring": {
 "secret": {
 "inbox": {
 "string": "mysecret"
 },
 "outbox": {
 "string": "mysecret"
 },
 },
 "token": {
 "enable": {
 "browser": true,
 "request": {
 "inbox": true,
 "outbox": true
 }
 }
 }
 }
 }
}
Change the "mysecret" parameter and save the changes. Restart the services for the config changes to take effect:
supervisorctl restart all
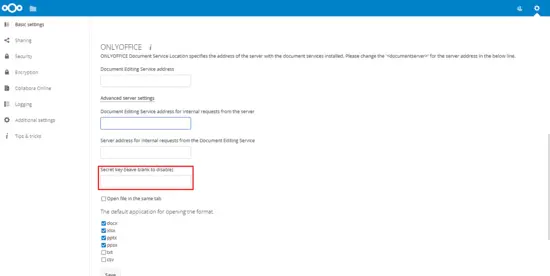
Once saved, open the Nextcloud Admin settings, go to the ONLYOFFICE section and enter the same secret token to the appropriate field in the Advanced server settings section.
Finally save the changes, to enable JWT.


