How to install Spacewalk on CentOS
Spacewalk manages software content updates for Red Hat derived distributions such as Fedora, CentOS, and Scientific Linux, behind your firewall. This is the open source version of RedHat satellite 5.We do have RedHat satellite 6 and the open source version is katello. I will show you in detail of how to configure that in detail in my next tutorial. Spacewalk is a very powerful tool when it comes to manage the infrastructure and is really stable and well build.
I am going trough the installation of Spacewalk and will show you in detail how to configure it to be production ready along with all the feature we can use with it. I going with embedded Postgres installation.
In this tutorial, I will be using 3 servers:
- 192.168.1.20 - spacewalk Server - centos 7
- 192.168.1.21 - spacewalk client - centos 6
- 192.168.1.22 - space walk client - centos 7
Requirements
CentOS 7 with minimum install:
cat /etc/redhat-release
Result:
CentOS Linux release 7.3.1611(Core)
SELinux in enforced mode:
sestatus
SELinux status: enabled
SELinuxfs mount: /sys/fs/selinux
SELinux rootdirectory: /etc/selinux
Loaded policy name: targeted
Current mode:enforcing
Mode from config file: enforcing
Policy MLS status: enabled
Policy deny_unknown status: allowed
Max kernel policy version: 28
[root@spacewalk ~]#
Add the host entry/etc/hosts
192.168.1.20 spacewalk.sunil.cc spacewalk
Installation of the Spacewalk Server
Installing the Spacewalk CentOS repo.
rpm -Uvh http://yum.spacewalkproject.org/2.6/RHEL/7/x86_64/spacewalk-repo-2.6-0.el7.noarch.rpm
cat > /etc/yum.repos.d/jpackage-generic.repo << EOF
[jpackage-generic]
name=JPackage generic
baseurl=http://vesta.informatik.rwth-aachen.de/ftp/pub/comp/Linux/jpackage/5.0/generic/free/
#mirrorlist=http://www.jpackage.org/mirrorlist.php?dist=generic&type=free&release=5.0
enabled=1
gpgcheck=1
gpgkey=http://www.jpackage.org/jpackage.asc
EOF
rpm -Uvh https://dl.fedoraproject.org/pub/epel/epel-release-latest-7.noarch.rpm
Installing PostgreSQL for spacewalk:
yum install -y spacewalk-setup-postgresql spacewalk-postgresql
Adding Firewall rules.
firewall-cmd --add-service=http --permanent; firewall-cmd --add-service=https --permanent; firewall-cmd --add-port=5222/tcp --permanent;firewall-cmd --add-port=5269/tcp --permanent;firewall-cmd --add-port=69 â??permanent; firewall-cmd --add-port=5222/udp --permanent;firewall-cmd --add-port=5269/udp --permanent
And reload the firewall.
firewall-cmd --reload
Enable Firewalld.
systemctl enable firewalld
systemctl restart firewalld
Configure PostgreSQL server.
Here I have given the DB name to be spacewalk, username to be spacewalkuser and password spacewalkuser.
spacewalk-setup-postgresql create --db spacewalk --user spacewalkuser --password spacewalkuser
/usr/bin/spacewalk-setup-postgresql: line 87: isSUSE: command not found
/usr/bin/spacewalk-setup-postgresql: line 100: isSUSE: command not found
Note: Forwarding request to 'systemctl enable postgresql.service'.
Created symlink from /etc/systemd/system/multi-user.target.wants/postgresql.service to /usr/lib/systemd/system/postgresql.service.
Hint: the preferred way to do this is now "postgresql-setup initdb"
Initializing database ... OK
/usr/bin/spacewalk-setup-postgresql: line 154: [: 018446744073692774399: integer expression expected
Redirecting to /bin/systemctl start  postgresql.service
Redirecting to /bin/systemctl reload  postgresql.service
Setup of the Spacewalk server.
spacewalk-setup --skip-db-install
* Setting up SELinux..
** Database: Setting up database connection for PostgreSQL backend.
** Database: Embedded database installation SKIPPED.
Could not connect to the database.  Your connection information may be incorrect.  Error: DBI connect('dbname=rhnschema','rhnuser',...) failed: FATAL:  no pg_hba.conf entry for host "[local]", user "rhnuser", database "rhnschema", SSL off at /usr/share/perl5/vendor_perl/Spacewalk/Setup.pm line 1686.

Hostname (leave empty for local)?
Database? spacewalk
Username? spacewalkuser
Password?
** Database: Populating database.
*** Progress: ###########################
* Configuring tomcat.
* Setting up users and groups.
** GPG: Initializing GPG and importing key.
** GPG: Creating /root/.gnupg directory
You must enter an email address.
Admin Email Address? [email protected]
* Performing initial configuration.
* Configuring apache SSL virtual host.
Should setup configure apache's default ssl server for you (saves original ssl.conf) [Y]?
** /etc/httpd/conf.d/ssl.conf has been backed up to ssl.conf-swsave
* Configuring jabberd.
* Creating SSL certificates.
CA certificate password?
You must enter a password.
CA certificate password?
Re-enter CA certificate password?
Organization? IT
Organization Unit [spacewalk.sunil.cc]?
Email Address [[email protected]]?
City? Den Haag
State?
State? Zuid-Holland
Country code (Examples: "US", "JP", "IN", or type "?" to see a list)? NL
** SSL: Generating CA certificate.
** SSL: Deploying CA certificate.
** SSL: Generating server certificate.
** SSL: Storing SSL certificates.
* Deploying configuration files.
* Update configuration in database.
* Setting up Cobbler..
Cobbler requires tftp and xinetd services be turned on for PXE provisioning functionality. Enable these services [Y]? Y
* Restarting services.
Installation complete.
Visit https://spacewalk.sunil.cc to create the Spacewalk administrator account.
[root@spacewalk ~]#
Restart Spacewalk.
spacewalk-service restart
Shutting down spacewalk services...
Redirecting to /bin/systemctl stop  taskomatic.service
Stopping cobblerd (via systemctl):                         [  OK  ]
Redirecting to /bin/systemctl stop  rhn-search.service
Redirecting to /bin/systemctl stop  osa-dispatcher.service
Redirecting to /bin/systemctl stop  httpd.service
Redirecting to /bin/systemctl stop  tomcat.service
Redirecting to /bin/systemctl stop  jabberd.service
Redirecting to /bin/systemctl stop  postgresql.service
Done.
Starting spacewalk services...
Redirecting to /bin/systemctl start  postgresql.service
Redirecting to /bin/systemctl start  jabberd.service
Redirecting to /bin/systemctl start  tomcat.service
Waiting for tomcat to be ready ...
Redirecting to /bin/systemctl start  httpd.service
Redirecting to /bin/systemctl start  osa-dispatcher.service
Redirecting to /bin/systemctl start  rhn-search.service
Starting cobblerd (via systemctl):                         [  OK  ]
Redirecting to /bin/systemctl start  taskomatic.service
Done.
[root@spacewalk ~]#
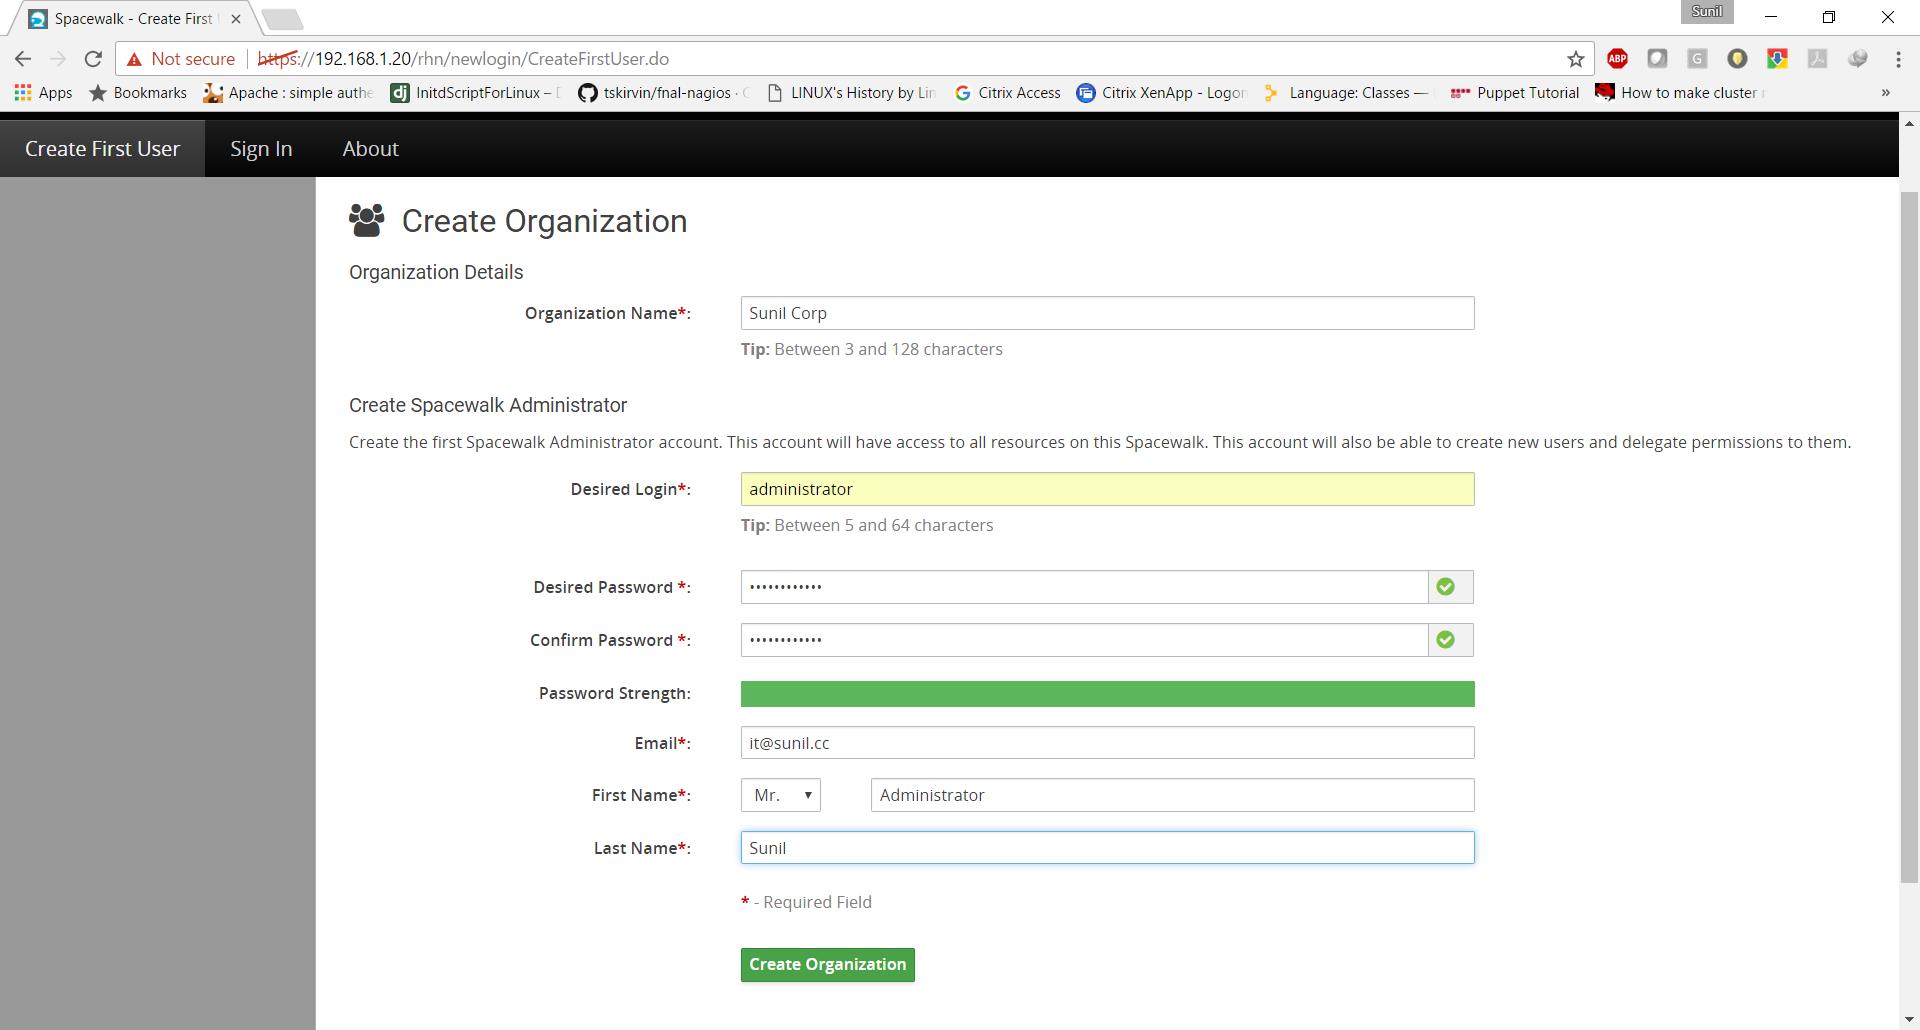
Configure User Spacewalk
Access the URL from browser http://192.168.1.20
Fill in the organization details.
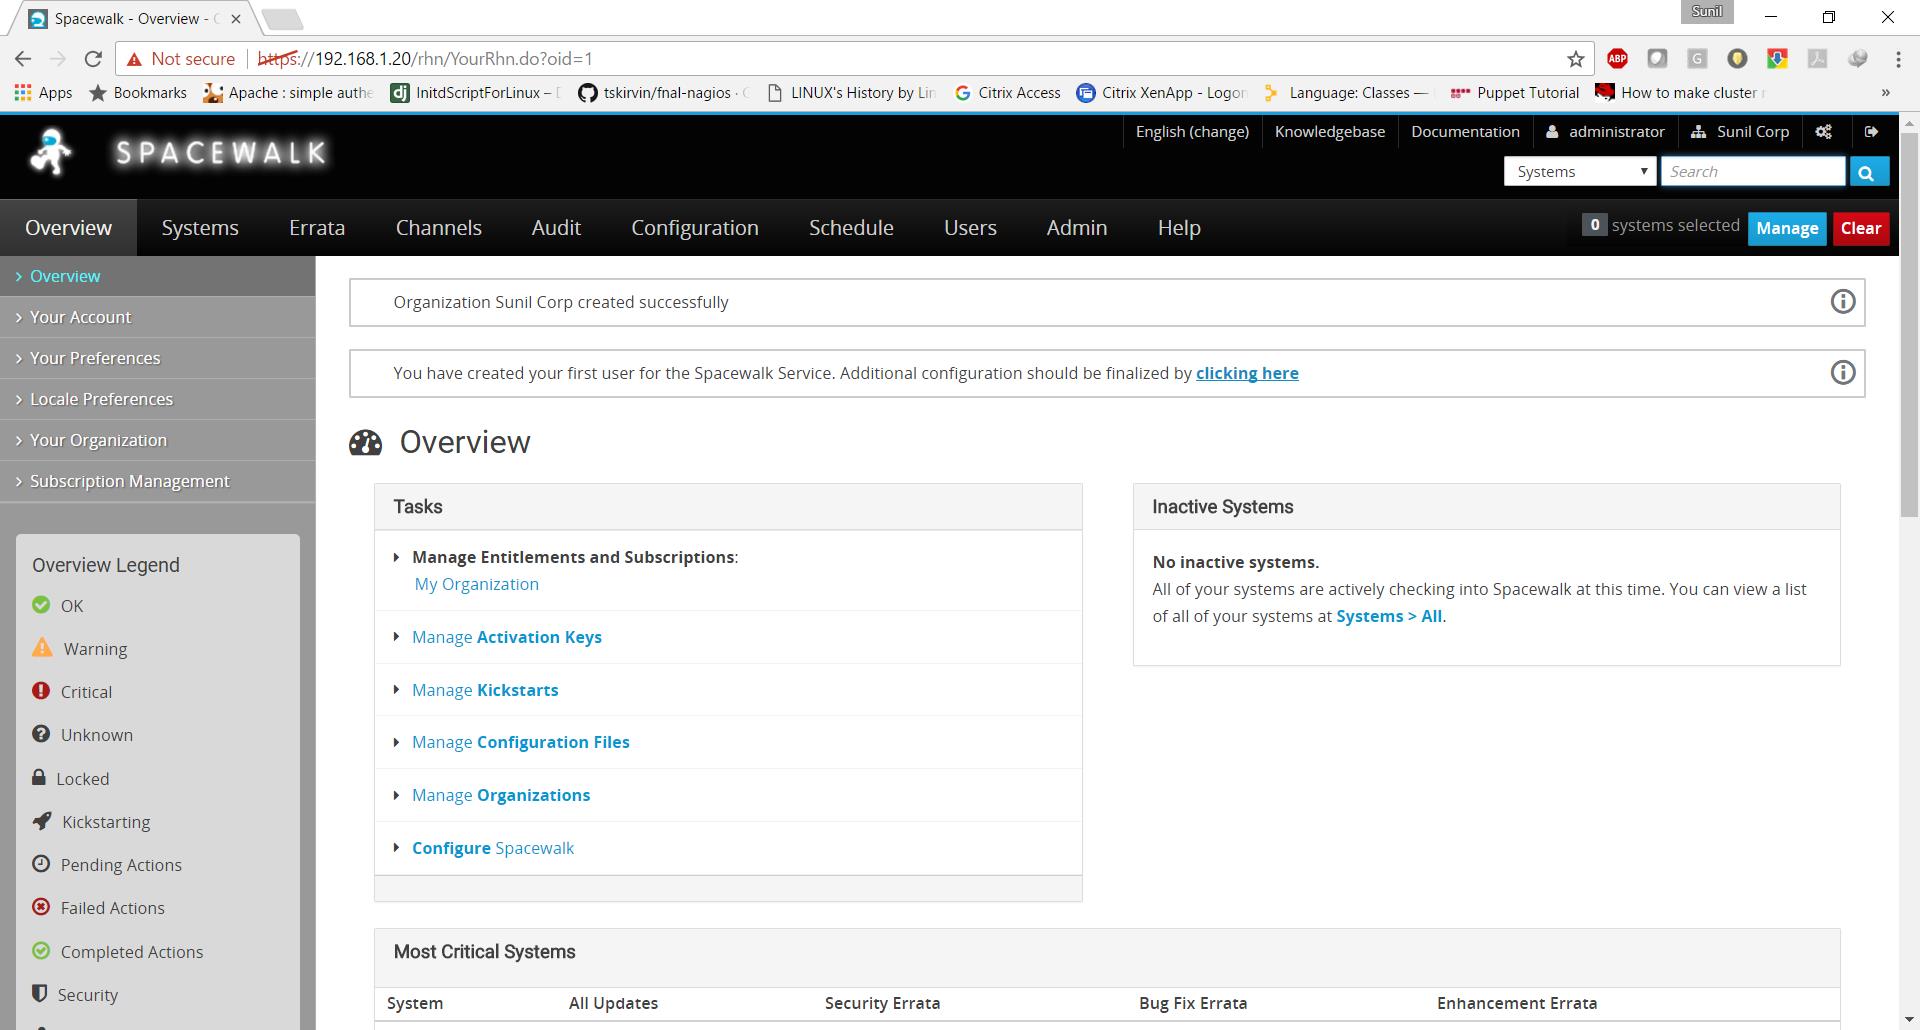
Spacewalk is Successfully installed.
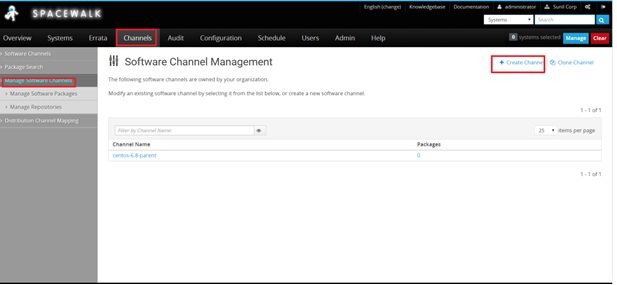
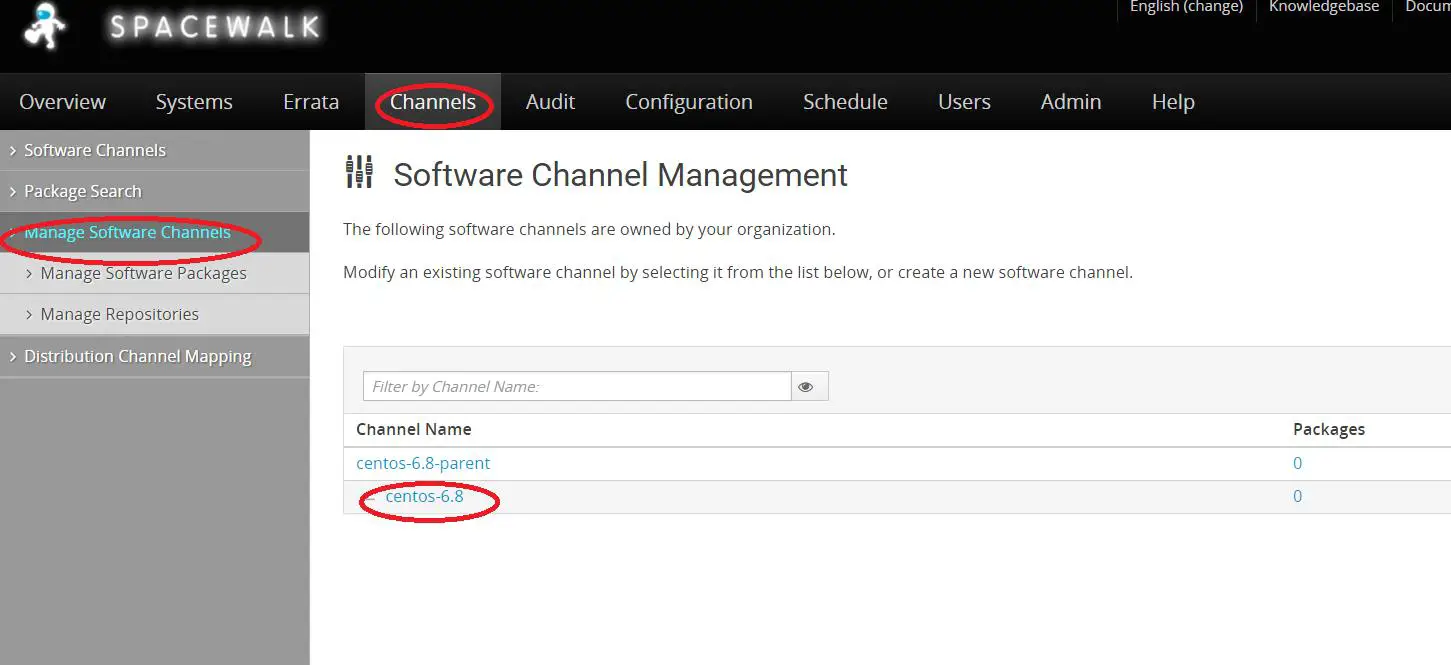
Spacewalk channel creation
Click on channels -> manage Software channels -> create channel
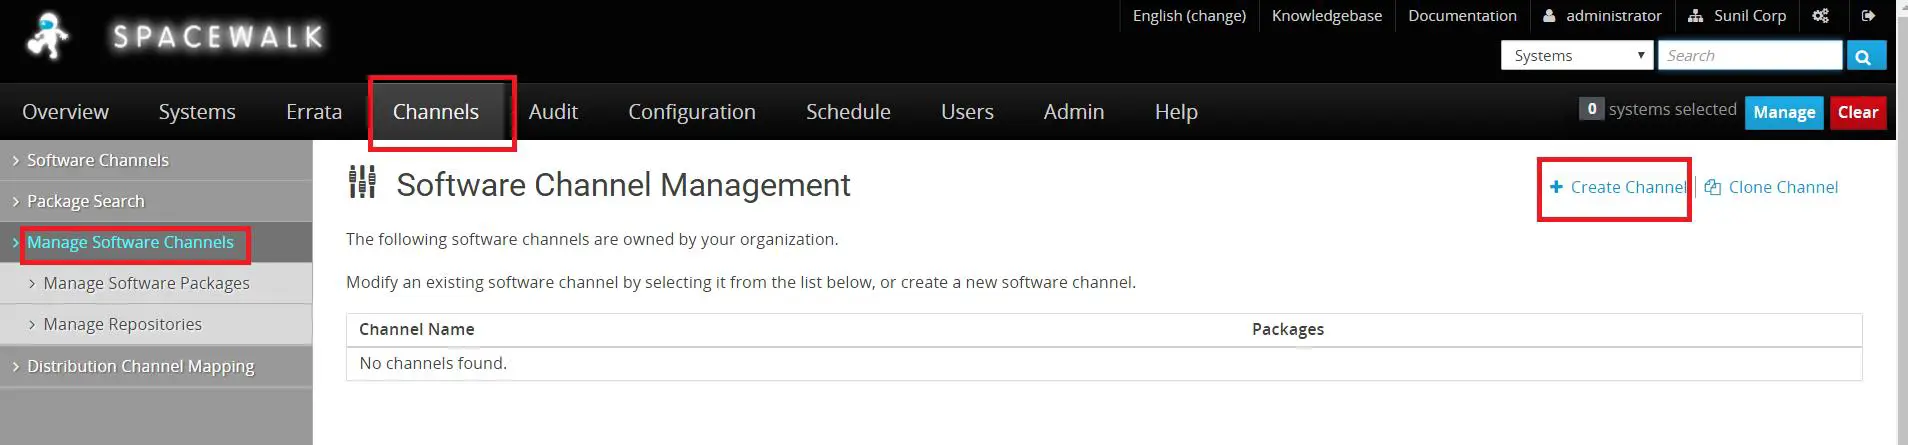
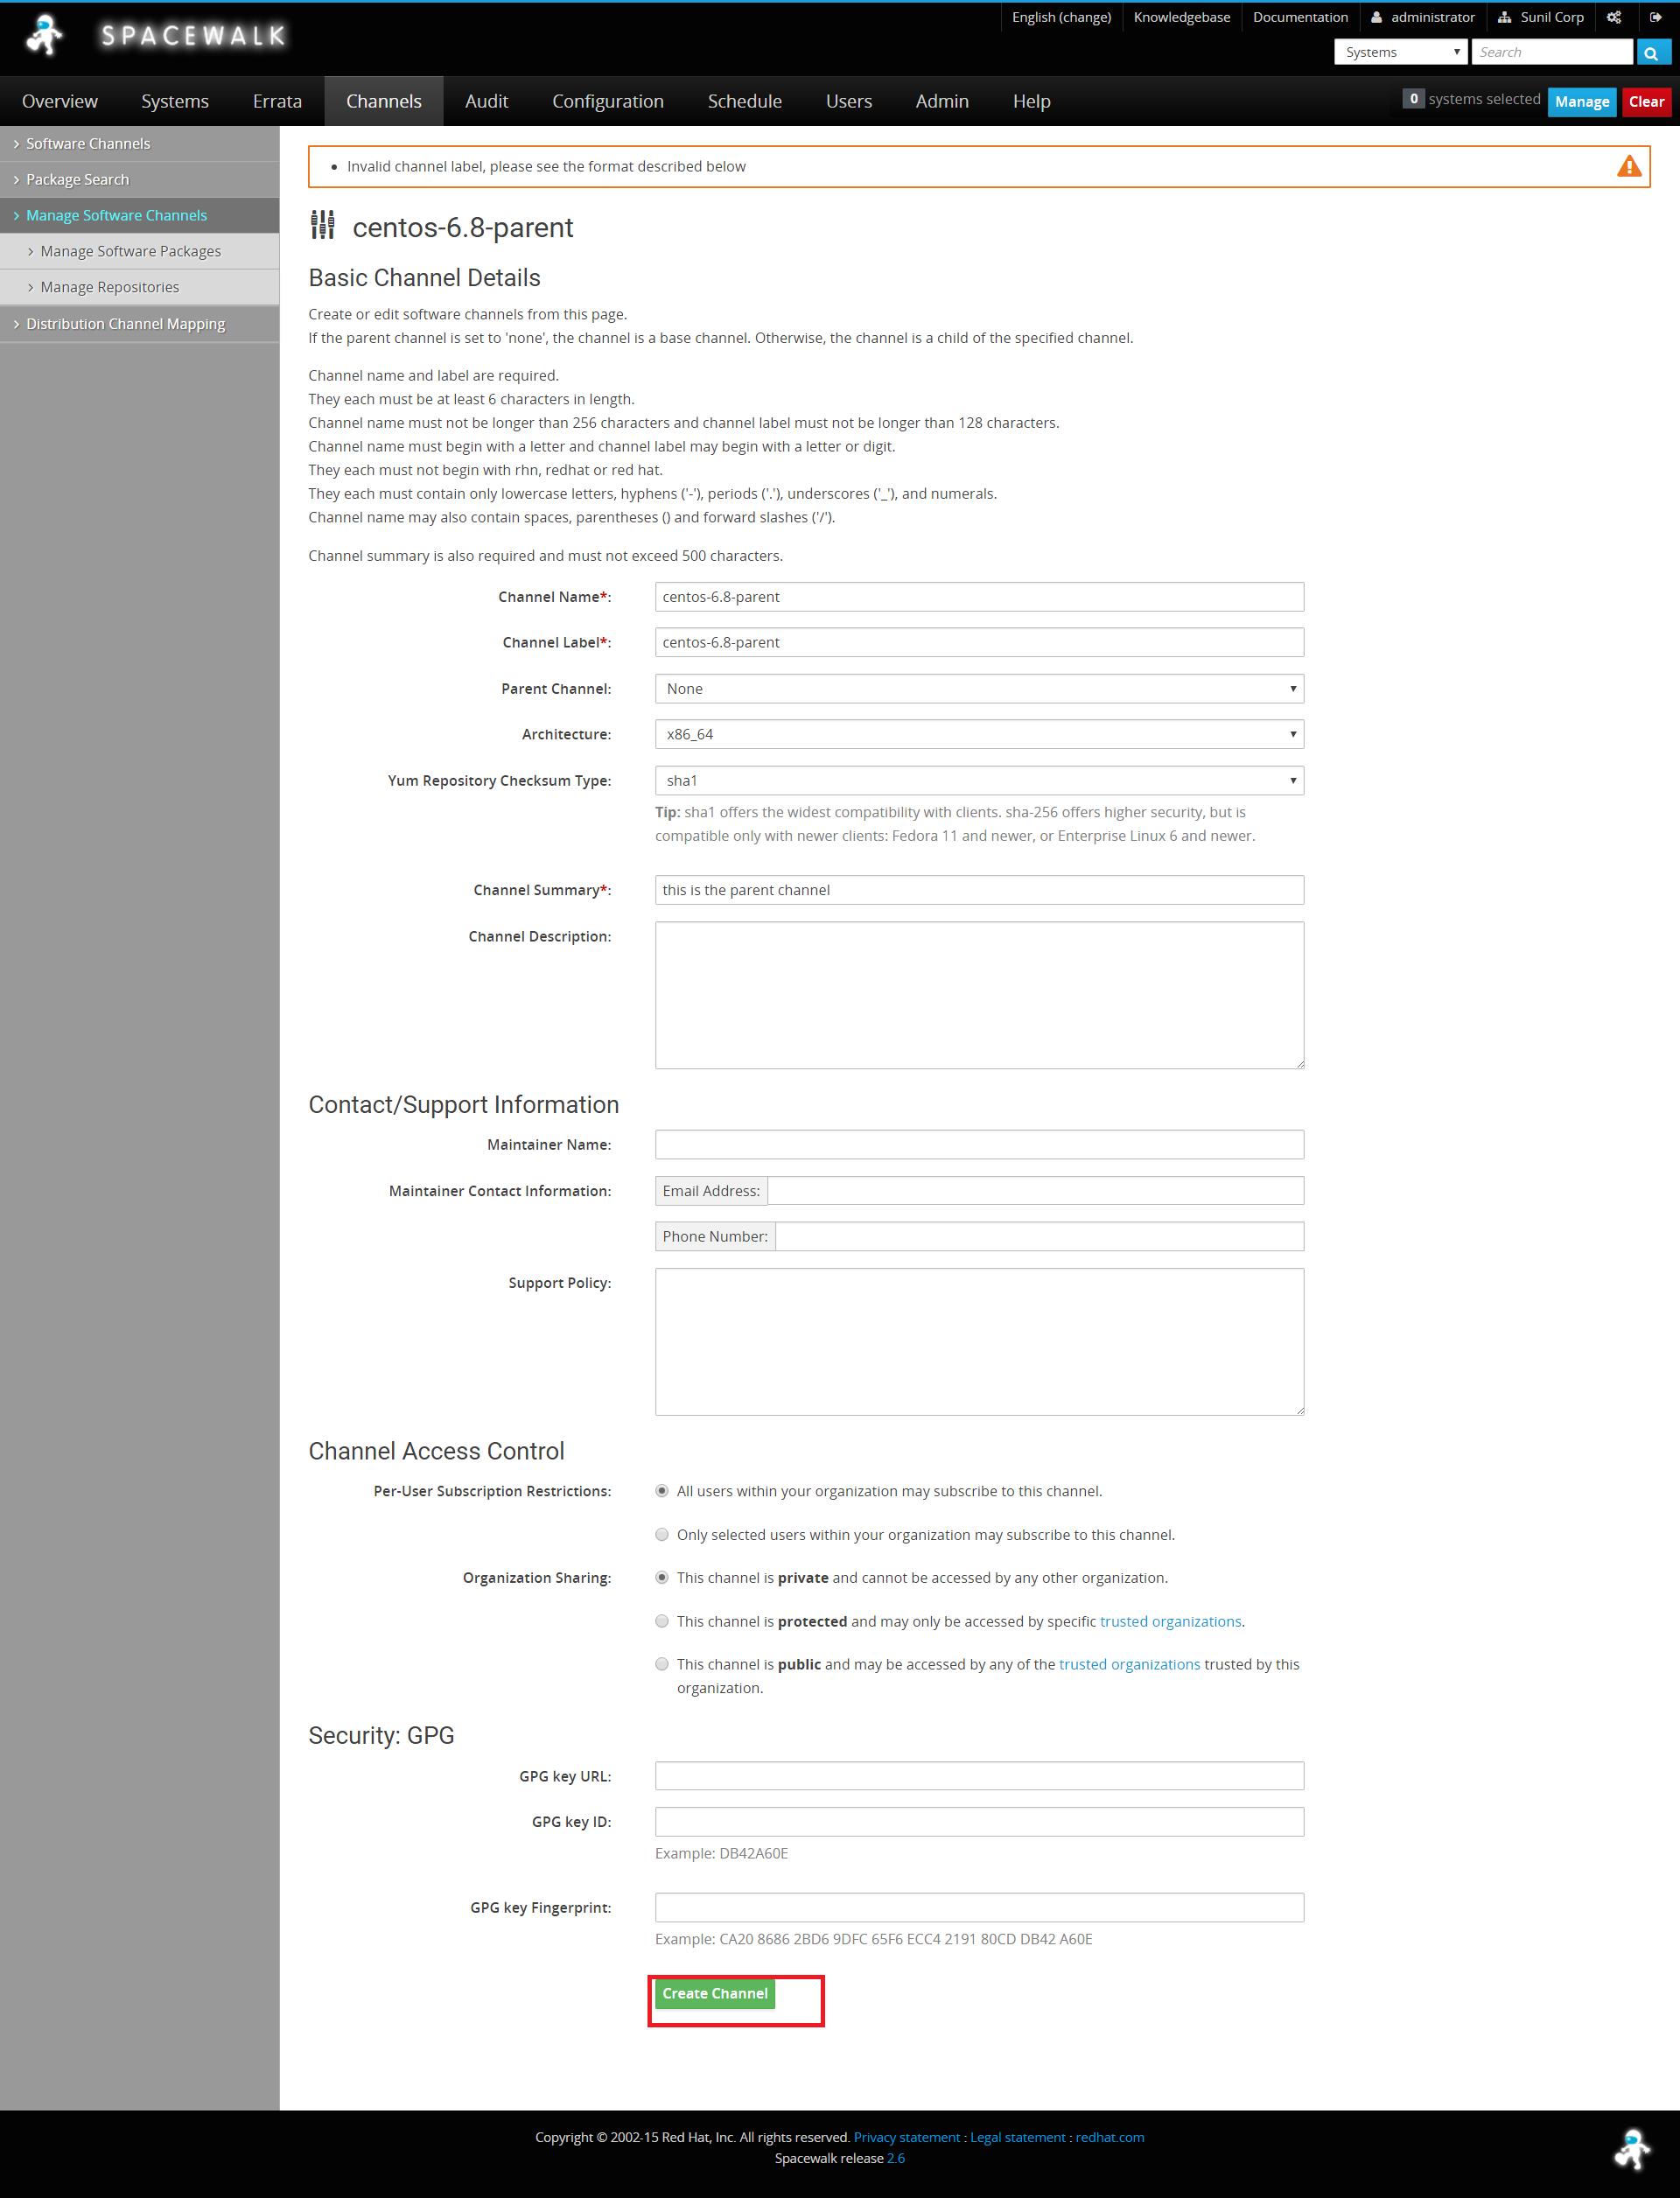
Create a parent channel -> centos6.8-parent
Now we need to create child channels
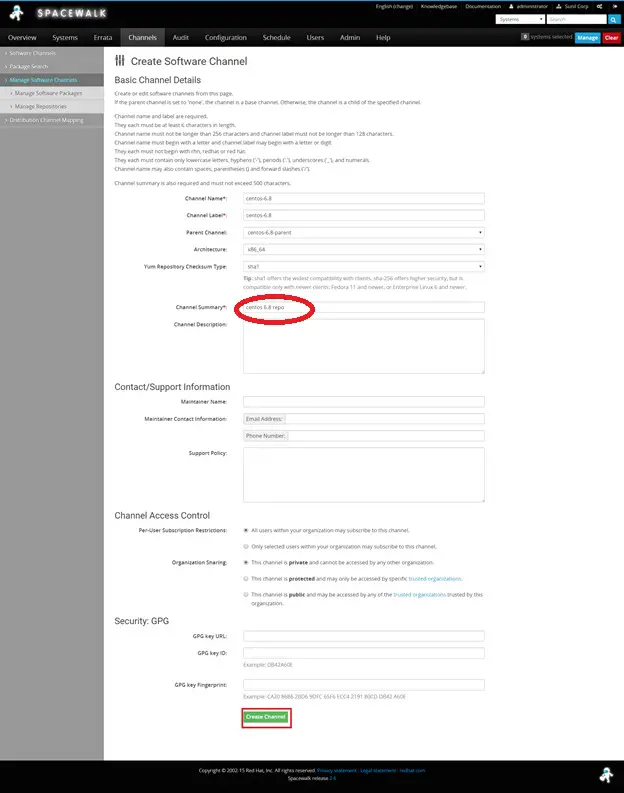
Channels -> manage channels -> create channel
Choose the parent channel to be centos-6.8-parent
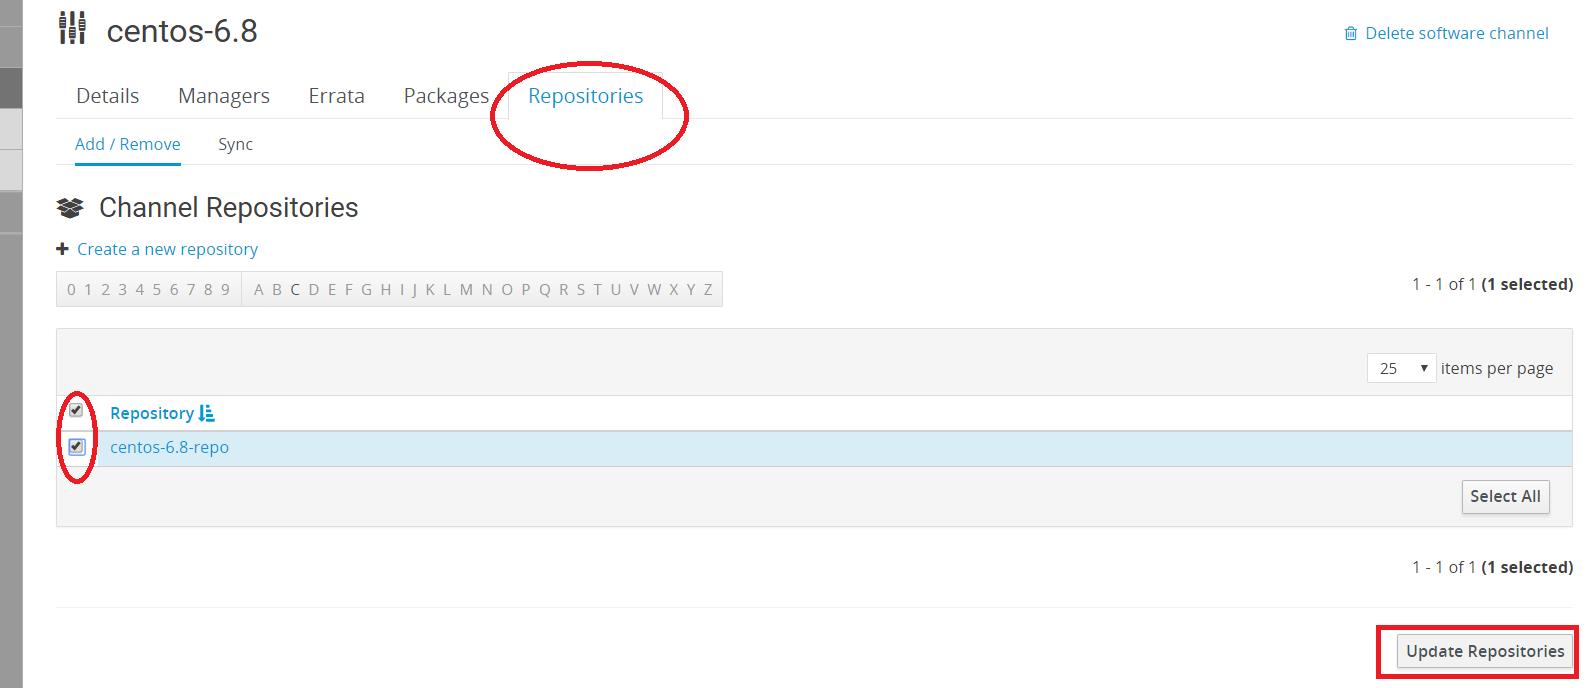
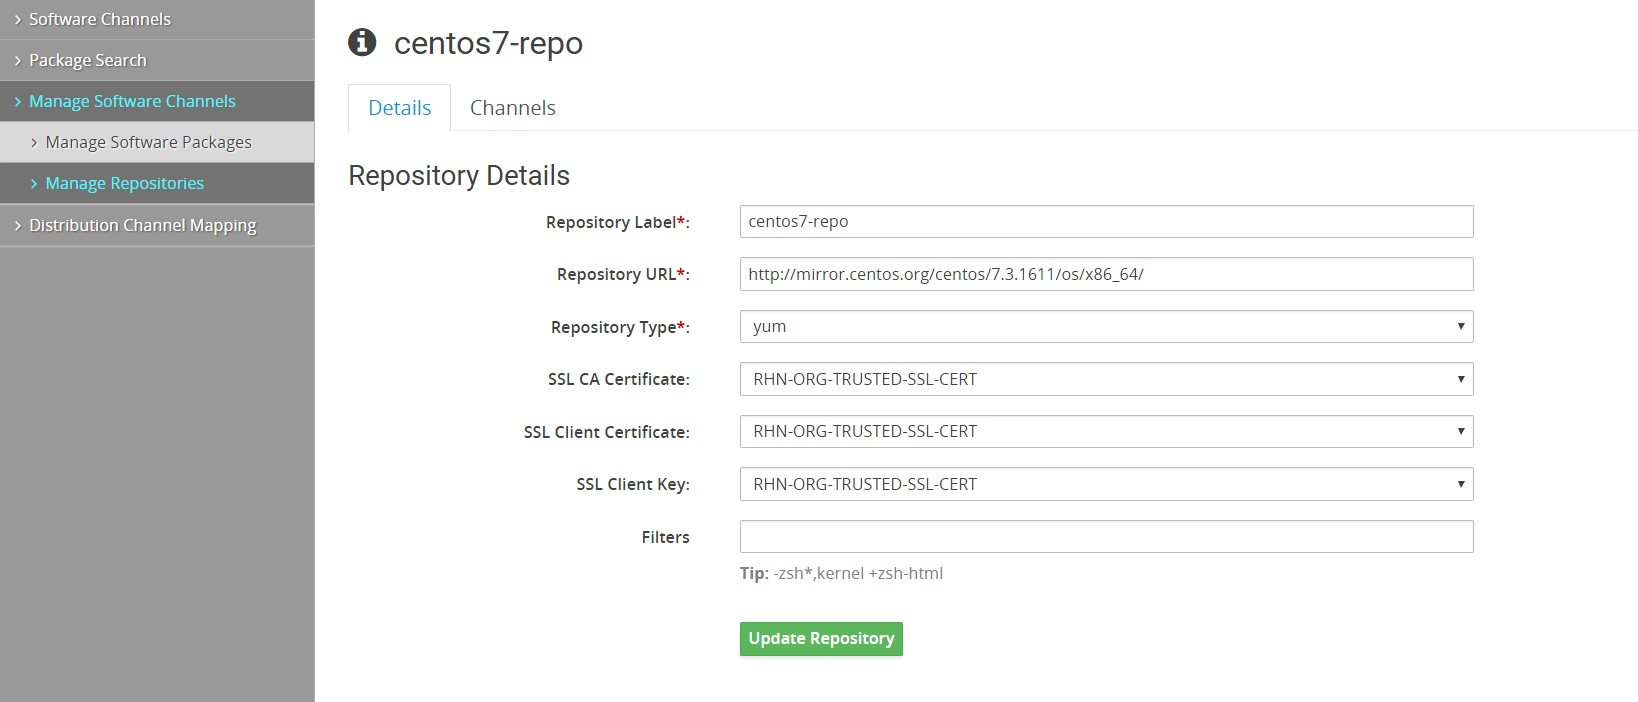
Now we will create the repo for centos 6.8
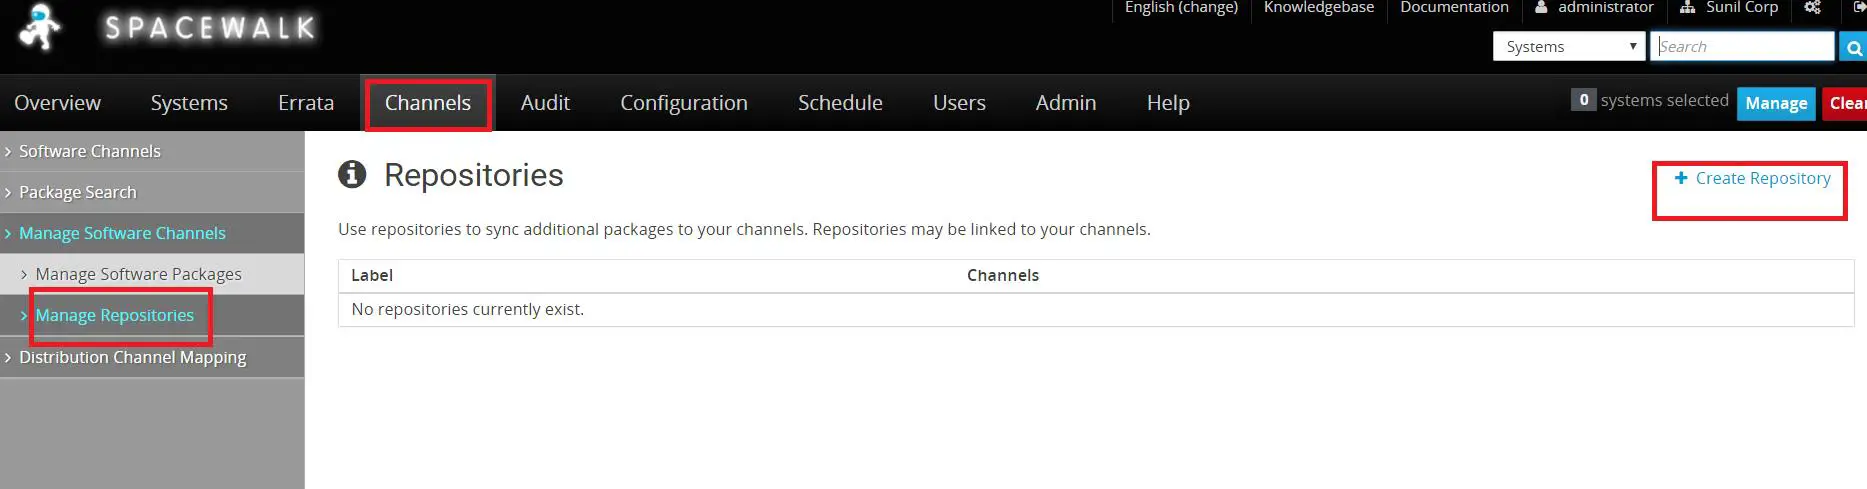
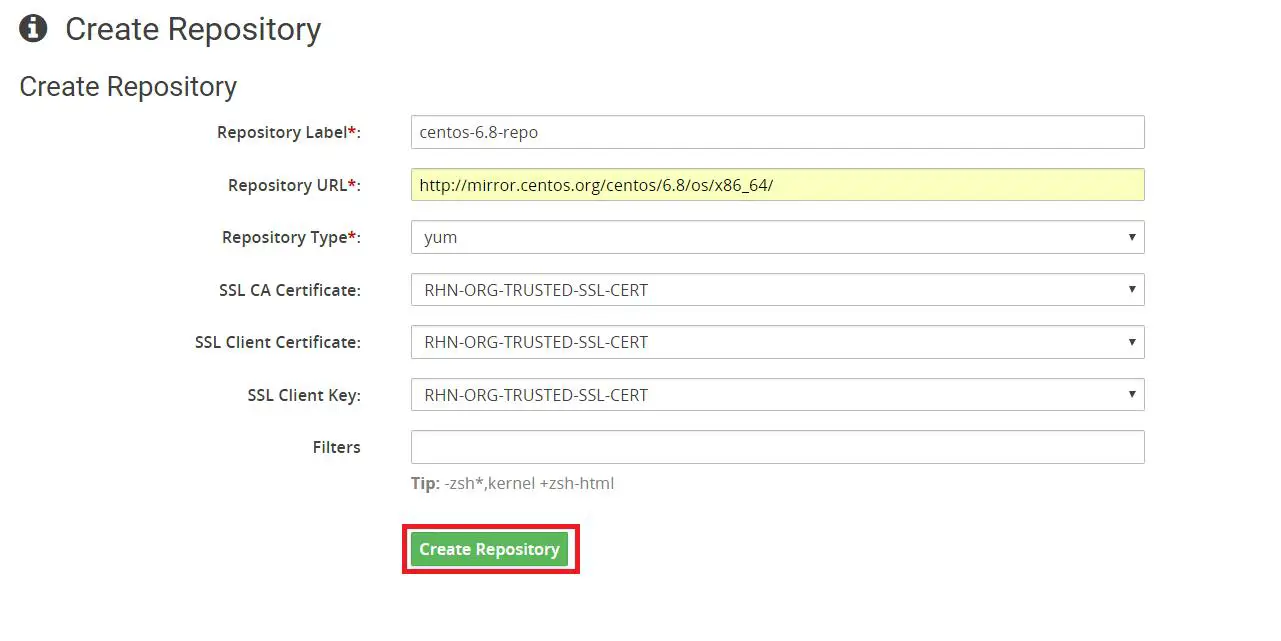
Linking the repo to the child channel which we created earlier
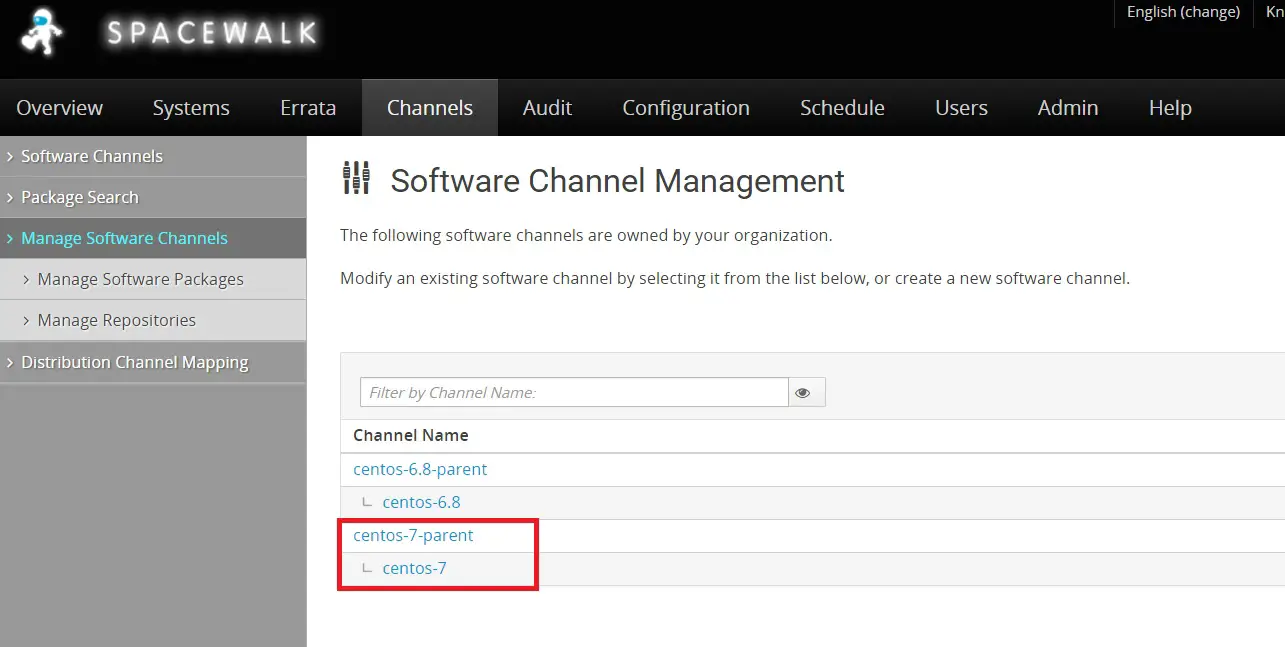
Need to replicate the same steps for channel creation in centos 7.
Now we need to download the packages from the repo. We can do it via command line or from the dashboard.
command line
[root@spacewalk ~]# spacewalk-repo-sync --list
00:01:23 ======================================
00:01:23 |   Channel Label   |   Repository   |
00:01:23 ======================================
00:01:23 centos-7-child | http://mirror.centos.org/centos/7.3.1611/os/x86_64/
00:01:23 centos-6.8 | http://mirror.centos.org/centos/6.8/os/x86_64/
00:01:23 centos-7 | No repository set
00:01:23 centos-6.8-parent | No repository set
[root@spacewalk ~]#

[root@spacewalk ~]# spacewalk-repo-sync -c centos-6.8
00:02:18 ======================================
00:02:18 | Channel: centos-6.8
00:02:18 ======================================
00:02:18 Sync of channel started.
00:02:18 Repo URL: http://mirror.centos.org/centos/6.8/os/x86_64/
00:02:30 Packages in repo:              6696
00:02:40 Packages already synced:          0
00:02:40 Packages to sync:              6696
00:02:40 1/6696 : 389-ds-base-1.2.11.15-74.el6-0.x86_64
00:02:43 2/6696 : 389-ds-base-devel-1.2.11.15-74.el6-0.i686
00:02:43 3/6696 : 389-ds-base-devel-1.2.11.15-74.el6-0.x86_64
00:02:44 4/6696 : 389-ds-base-libs-1.2.11.15-74.el6-0.i686
00:02:45 5/6696 : 389-ds-base-libs-1.2.11.15-74.el6-0.x86_64
00:02:46 6/6696 : ConsoleKit-0.4.1-6.el6-0.x86_64
00:02:47 7/6696 : ConsoleKit-devel-0.4.1-6.el6-0.x86_64
Once it is done it will look like this
[root@spacewalk ~]# spacewalk-repo-sync -c centos-6.8
08:44:57 ======================================
08:44:57 | Channel: centos-6.8
08:44:57 ======================================
08:44:57 Sync of channel started.
08:44:57 Repo URL: http://mirror.centos.org/centos/6.8/os/x86_64/
08:44:58 Packages in repo:              6696
08:45:47 No new packages to sync.
08:45:47 Repo http://mirror.centos.org/centos/6.8/os/x86_64/ has comps file comps.xml.
08:45:47 Repo http://mirror.centos.org/centos/6.8/os/x86_64/ has 0 errata.
08:45:47 Sync of channel completed in 0:00:49.
08:45:47 Total time: 0:00:49
[root@spacewalk ~]#
From Web browser
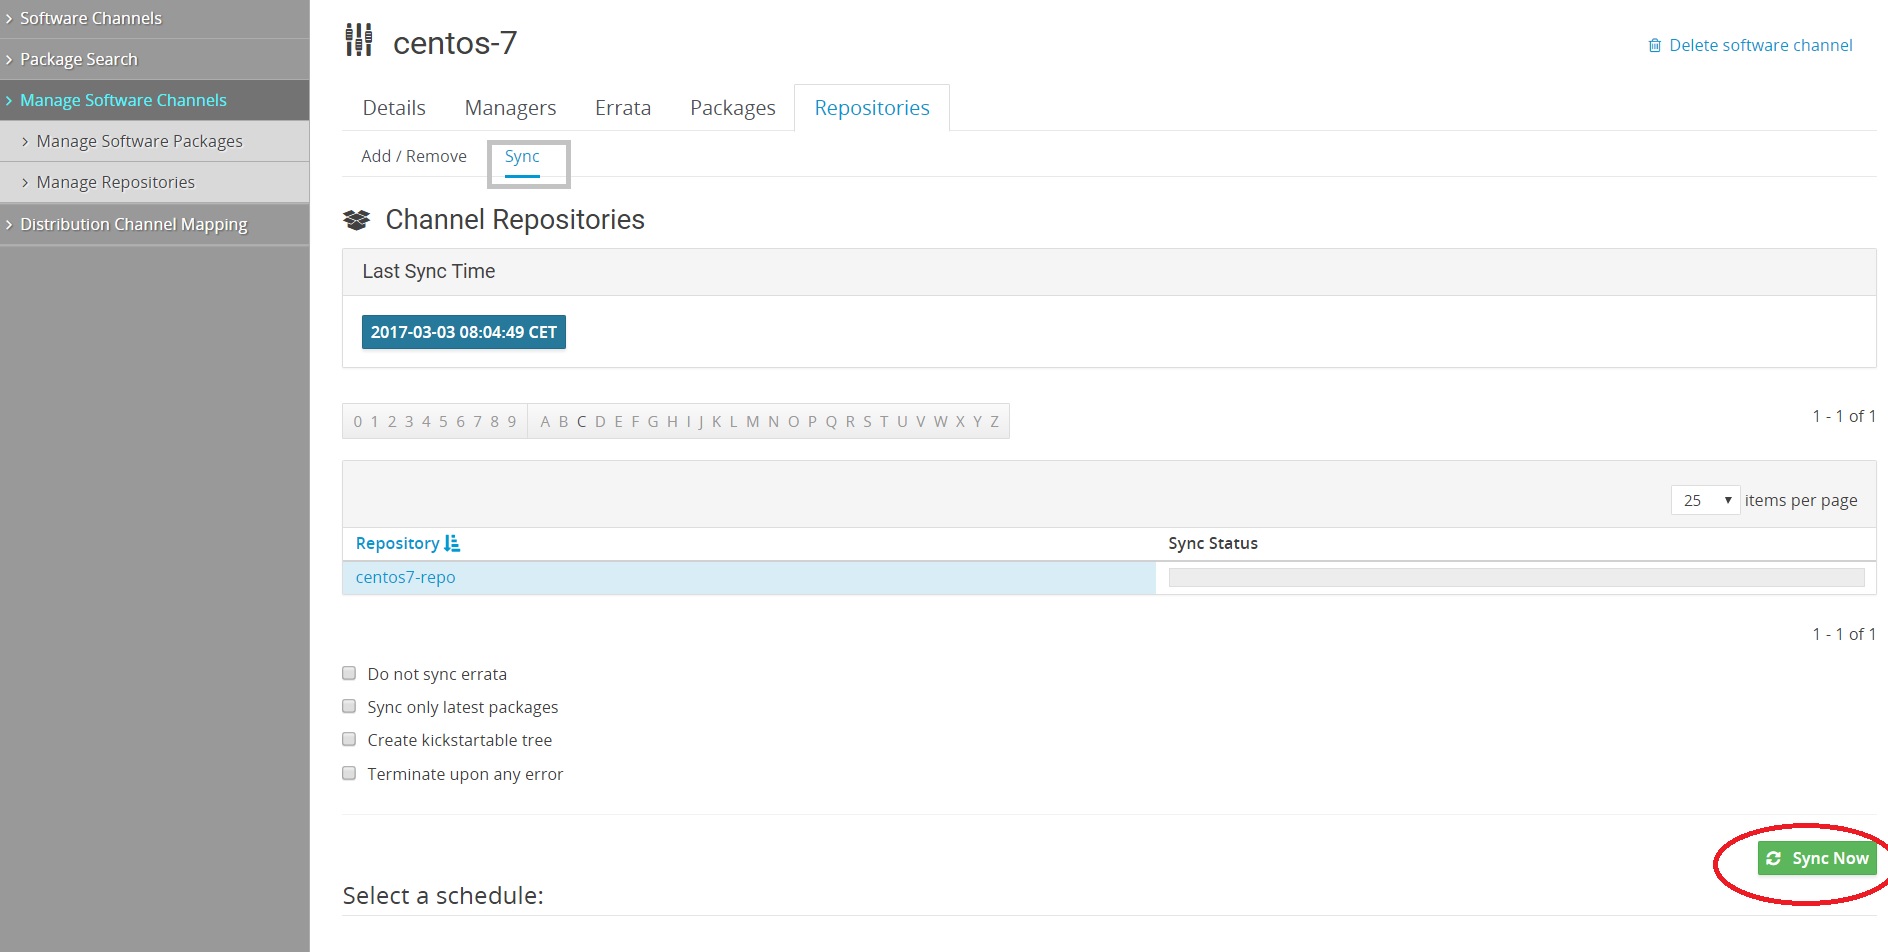
You can also schedule the sync daily or weekly for automatic sync in this page and also select sync only latest packages

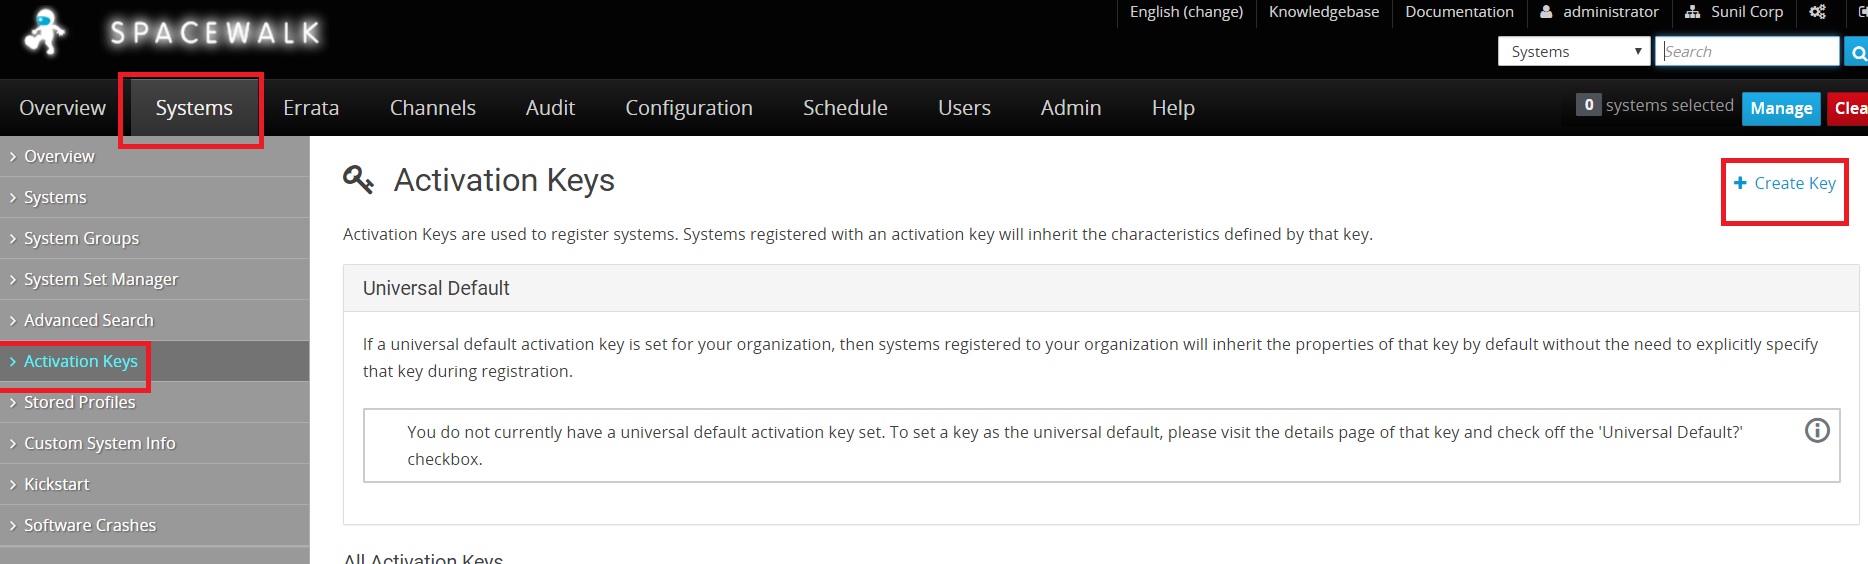
Creating Activation keys for Centos 6 and centos 7 hosts for authentication with spacewalk server
Go to Systems -> Activation Keys -> Create key
Now we need to create the key for centos 6 , here I use the key as centos-6 and choose the parent channel which I created earlier centos-6.8-parent
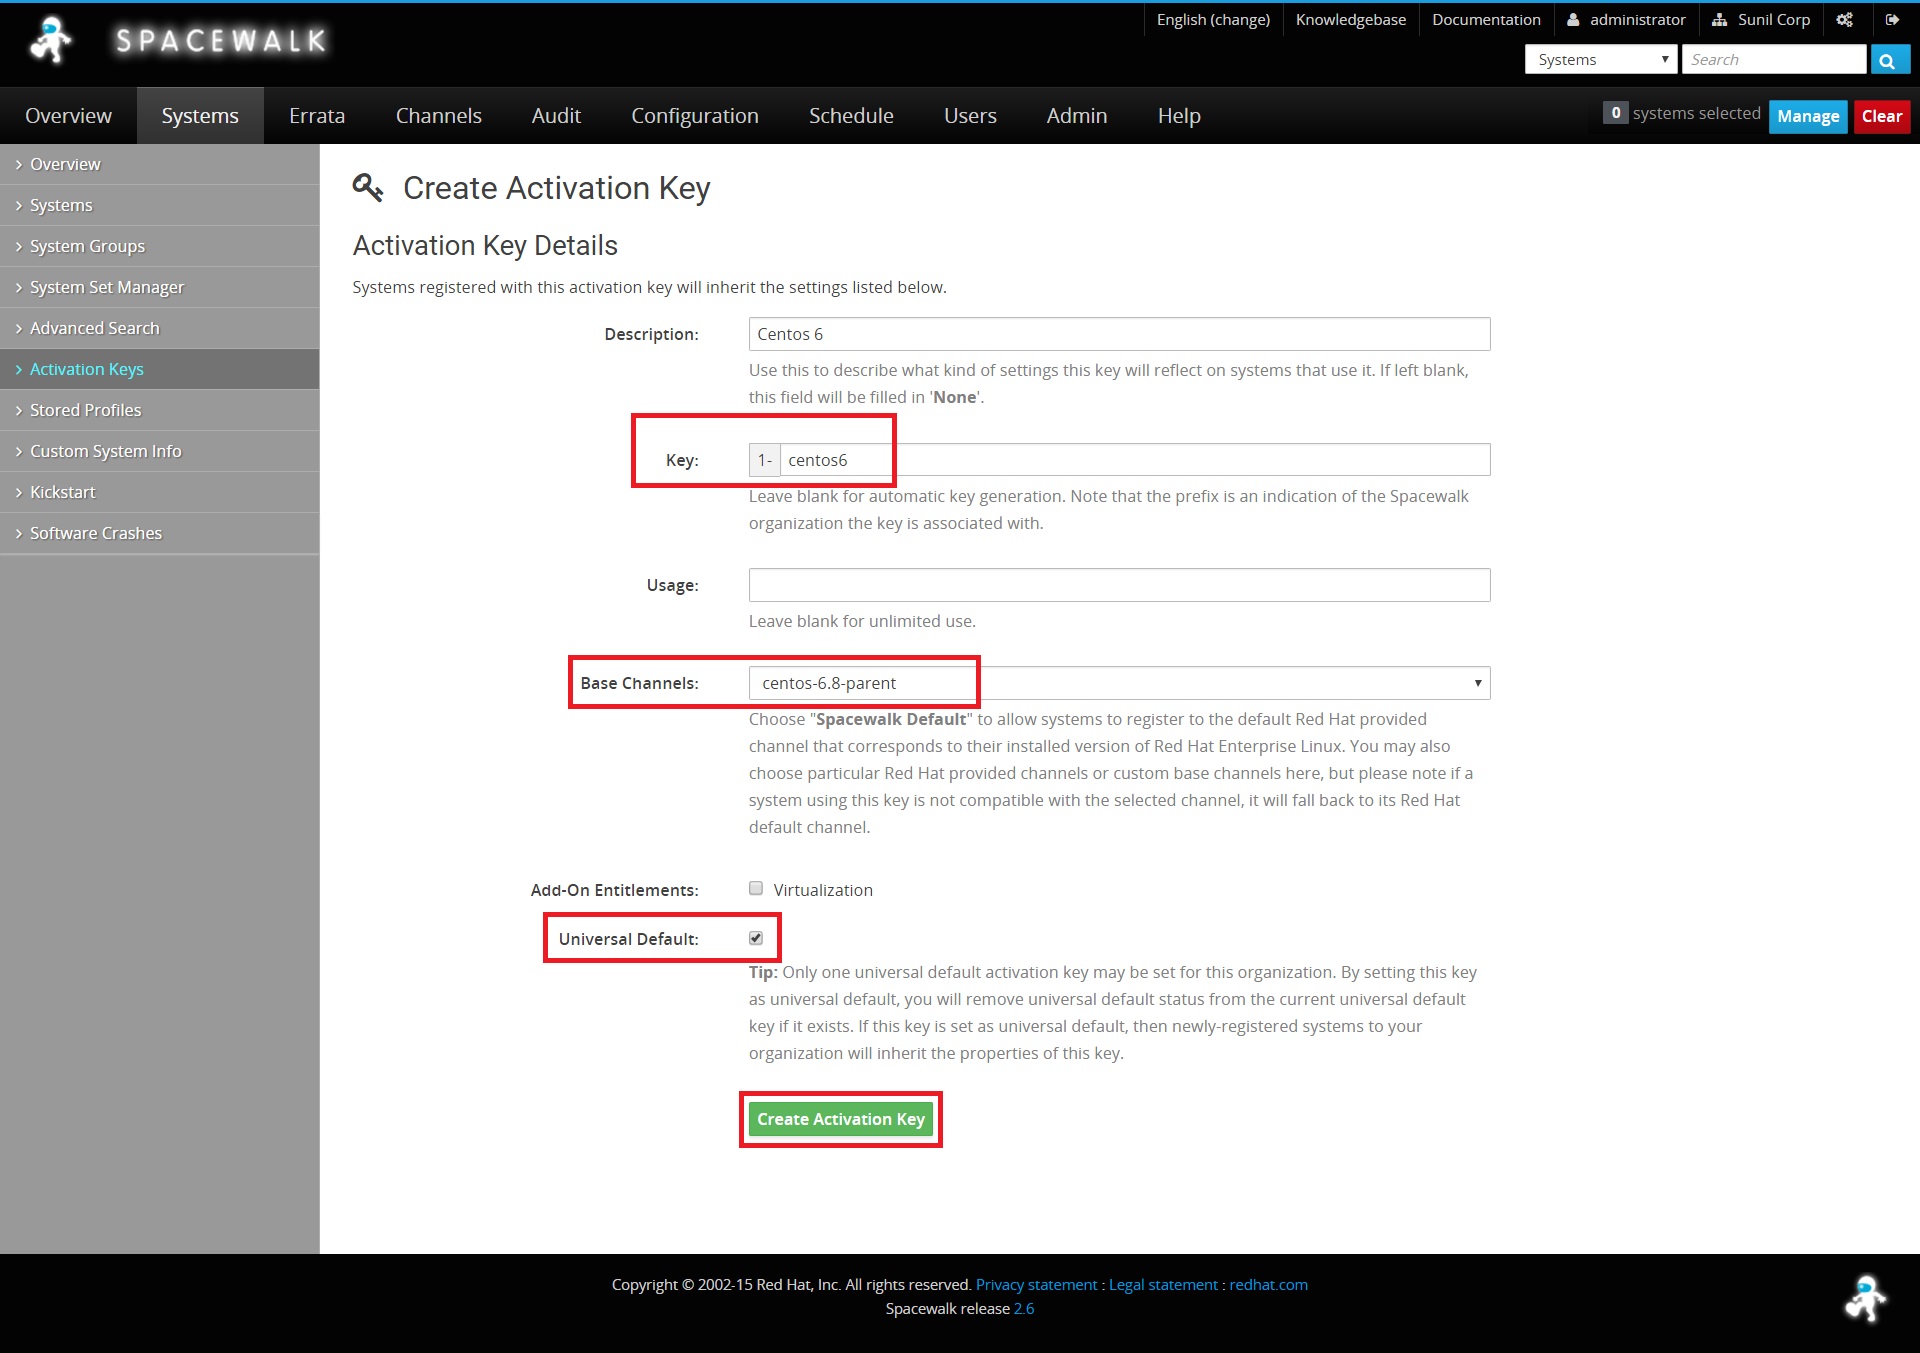
Do the same for centos 7
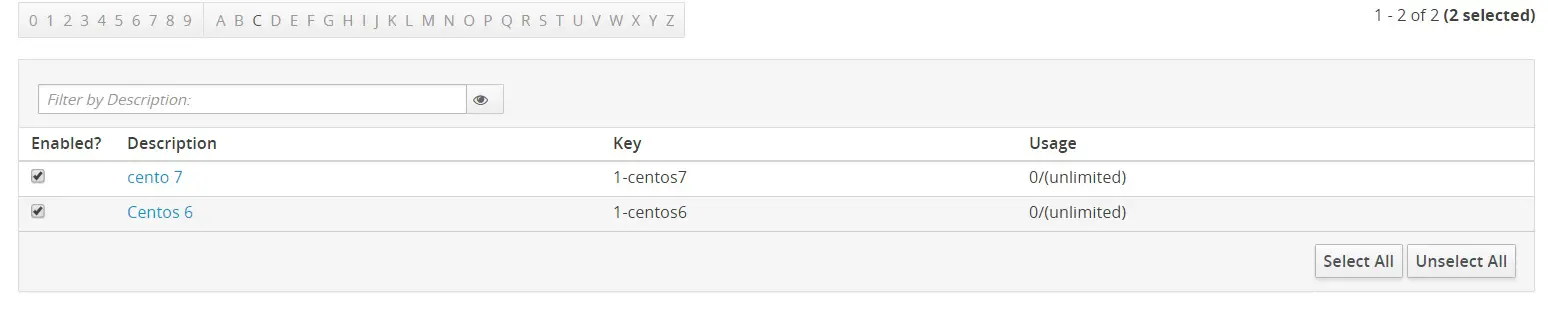
You should see two keys one for centos 6 and other for centos 7
Client Configuration
In this chapter, I will show you how to install and configure clients with spacewalk servers.
Cento6 - 192.168.1.21
Cento7 - 192.168.1.22
Configure yum client repo
Centos 6
[root@centos6 ~]# rpm -Uvh http://yum.spacewalkproject.org/2.6-client/RHEL/6/x86_64/spacewalk-client-repo-2.6-0.el6.noarch.rpm
Centos 7
[root@centos7 ~]# rpm -Uvh http://yum.spacewalkproject.org/2.6-client/RHEL/7/x86_64/spacewalk-client-repo-2.6-0.el7.noarch.rpm
Installing the packages needed.
Centos 6
Install both epel repo and the following packages on both centos6 and centos7 node.
Enable epel repo
[root@centos6 ~]# yum install epel-release -y
[root@centos6 ~]# yum install rhn-client-tools rhn-check rhn-setup rhnsd m2crypto yum-rhn-plugin osad rhncfg-actions rhncfg-management -y
Register with Spacewalk Server
Before we connect with spacewalk server we will need to download the ssl certificate from spacewalk server.
[root@centos6 ~]# wget -O /usr/share/rhn/RHN-ORG-TRUSTED-SSL-CERT http://spacewalk.sunil.cc/pub/RHN-ORG-TRUSTED-SSL-CERT
--2017-03-04 21:54:16--  http://spacewalk.sunil.cc/pub/RHN-ORG-TRUSTED-SSL-CERT
Resolving spacewalk.sunil.cc... 192.168.1.20
Connecting to spacewalk.sunil.cc|192.168.1.20|:80... connected.
HTTP request sent, awaiting response... 200 OK
Length: 5291 (5.2K)
Saving to: /usr/share/rhn/RHN-ORG-TRUSTED-SSL-CERT

100%[===================================================================================================================>] 5,291       --.-K/s   in 0s

2017-03-04 21:54:17 (630 MB/s) - /usr/share/rhn/RHN-ORG-TRUSTED-SSL-CERT saved [5291/5291]

[root@centos6 ~]#
Now we need to register with the activation key which we created earlier, we created 1-centos6 for centos6 and 1-centos7 for centos7.
Centos 6
[root@centos6 ~]# rhnreg_ks --force --activationkey="1-centos6" --serverUrl=http://spacewalk.sunil.cc/XMLRPC --sslCACert=/usr/share/rhn/RHN-ORG-TRUSTED-SSL-CERT --profilename=$HOSTNAME
Centos 7
[root@centos7 ~]# rhnreg_ks --force --activationkey="1-centos7" --serverUrl=http://spacewalk.sunil.cc/XMLRPC --sslCACert=/usr/share/rhn/RHN-ORG-TRUSTED-SSL-CERT --profilename=$HOSTNAME
Syncing the profile with spacewalk, run it on both centos6 and centos7 node.
[root@centos7 ~]# rhn-profile-sync
This can be used to run remote commands and file transfer from spacewalk and one of the cool features of using spacewalk server.
    [root@centos6 ~]# chkconfig osad on
[root@centos6 ~]# service osad restart
Shutting down osad:                                        [  OK  ]
Starting osad:                                             [  OK  ]
[root@centos6 ~]# rhn-actions-control --enable-all
[root@centos6 ~]#
[root@centos7 ~]# systemctl enable osad
Created symlink from /etc/systemd/system/multi-user.target.wants/osad.service to /usr/lib/systemd/system/osad.service.
[root@centos7 ~]# systemctl restart osad
[root@centos7 ~]# rhn-actions-control --enable-all
[root@centos7 ~]#
Now we can do a profile sync.
    [root@centos6 ~]# rhn-profile-sync
Updating package profile...
Updating hardware profile...
[root@centos6 ~]#
   [root@centos7 ~]# rhn-profile-sync
Updating package profile...
Updating hardware profile...
[root@centos7 ~]#
Now can check the same on the spacewalk dashboard.
Running Remote commands and managing files via spacewalk.
In this chapter, we will see how powerful spacewalk is when it comes to running remote commands and managing config files.
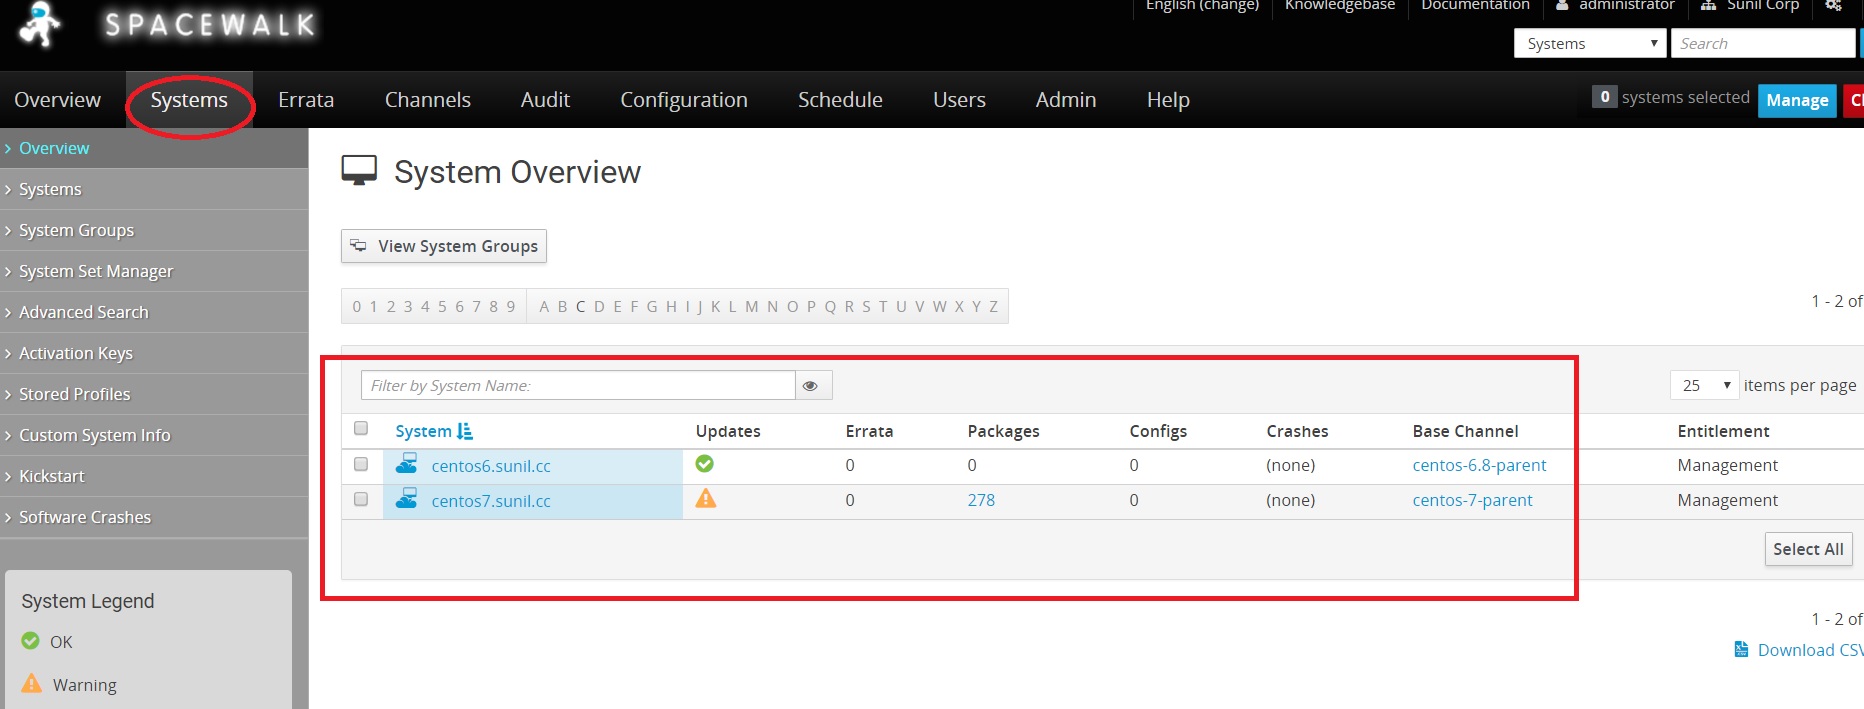
To Run Remote Commands login to spacewalk dashboard and search for the host where we will need to run the remote command.

Click on remote command and type the commands you will require to execute.
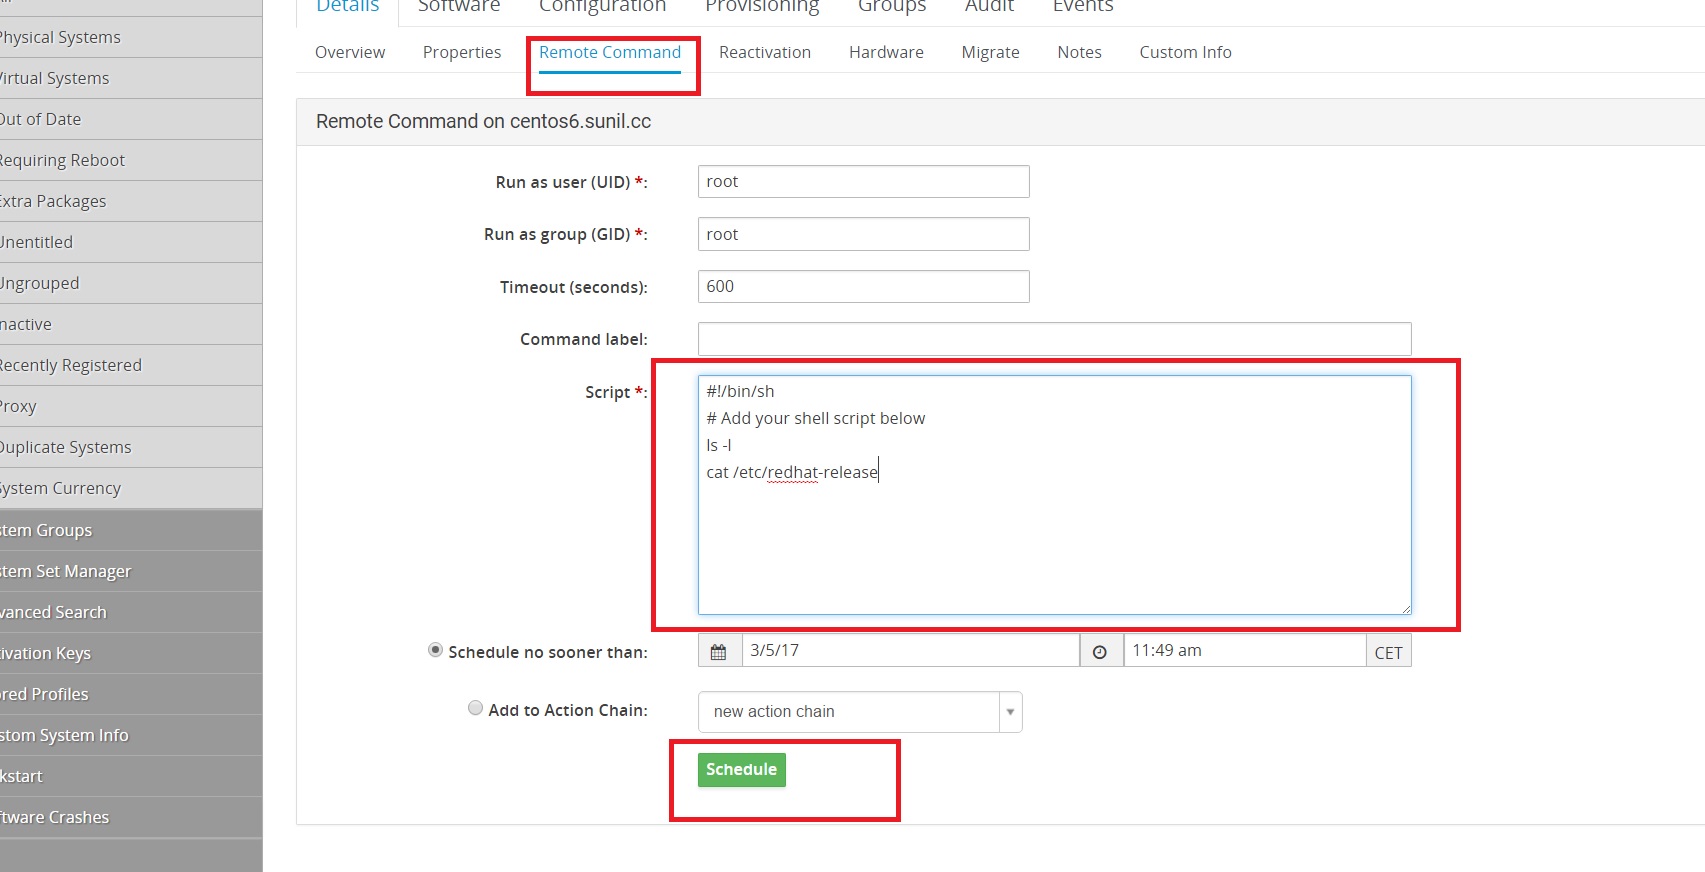
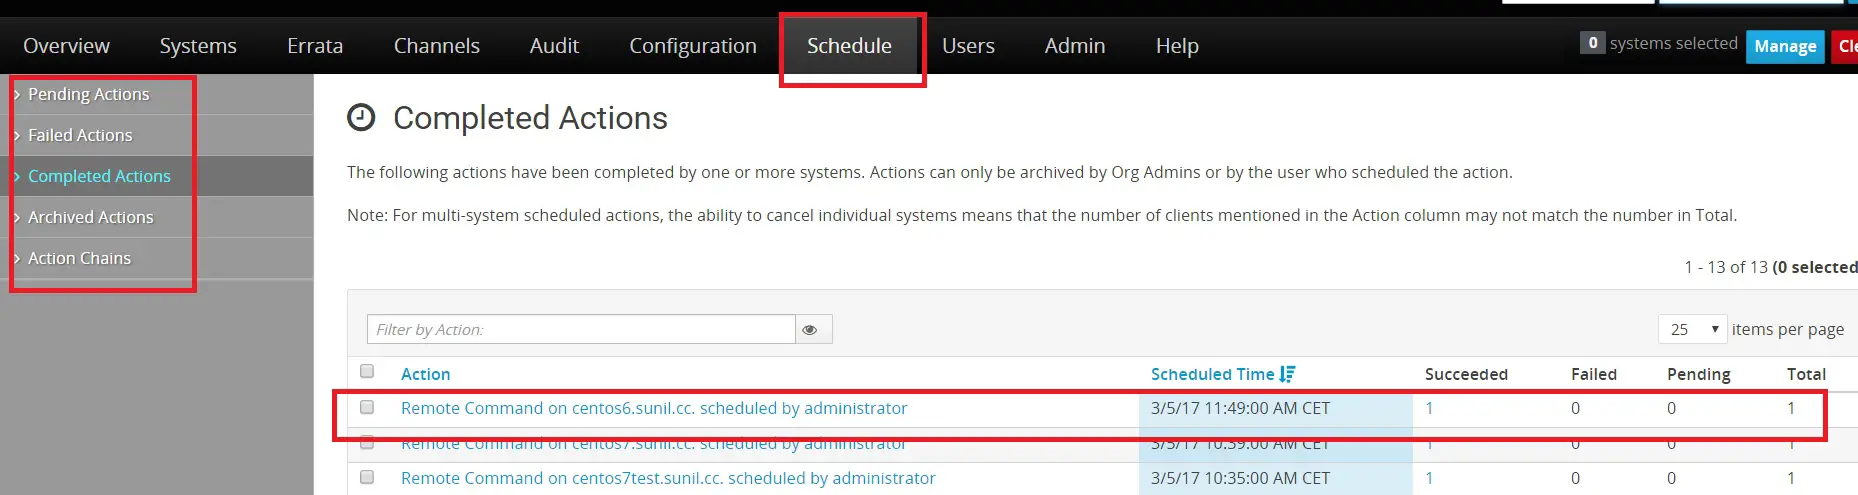
Once scheduled you can go to the scheduled tab and check the status.
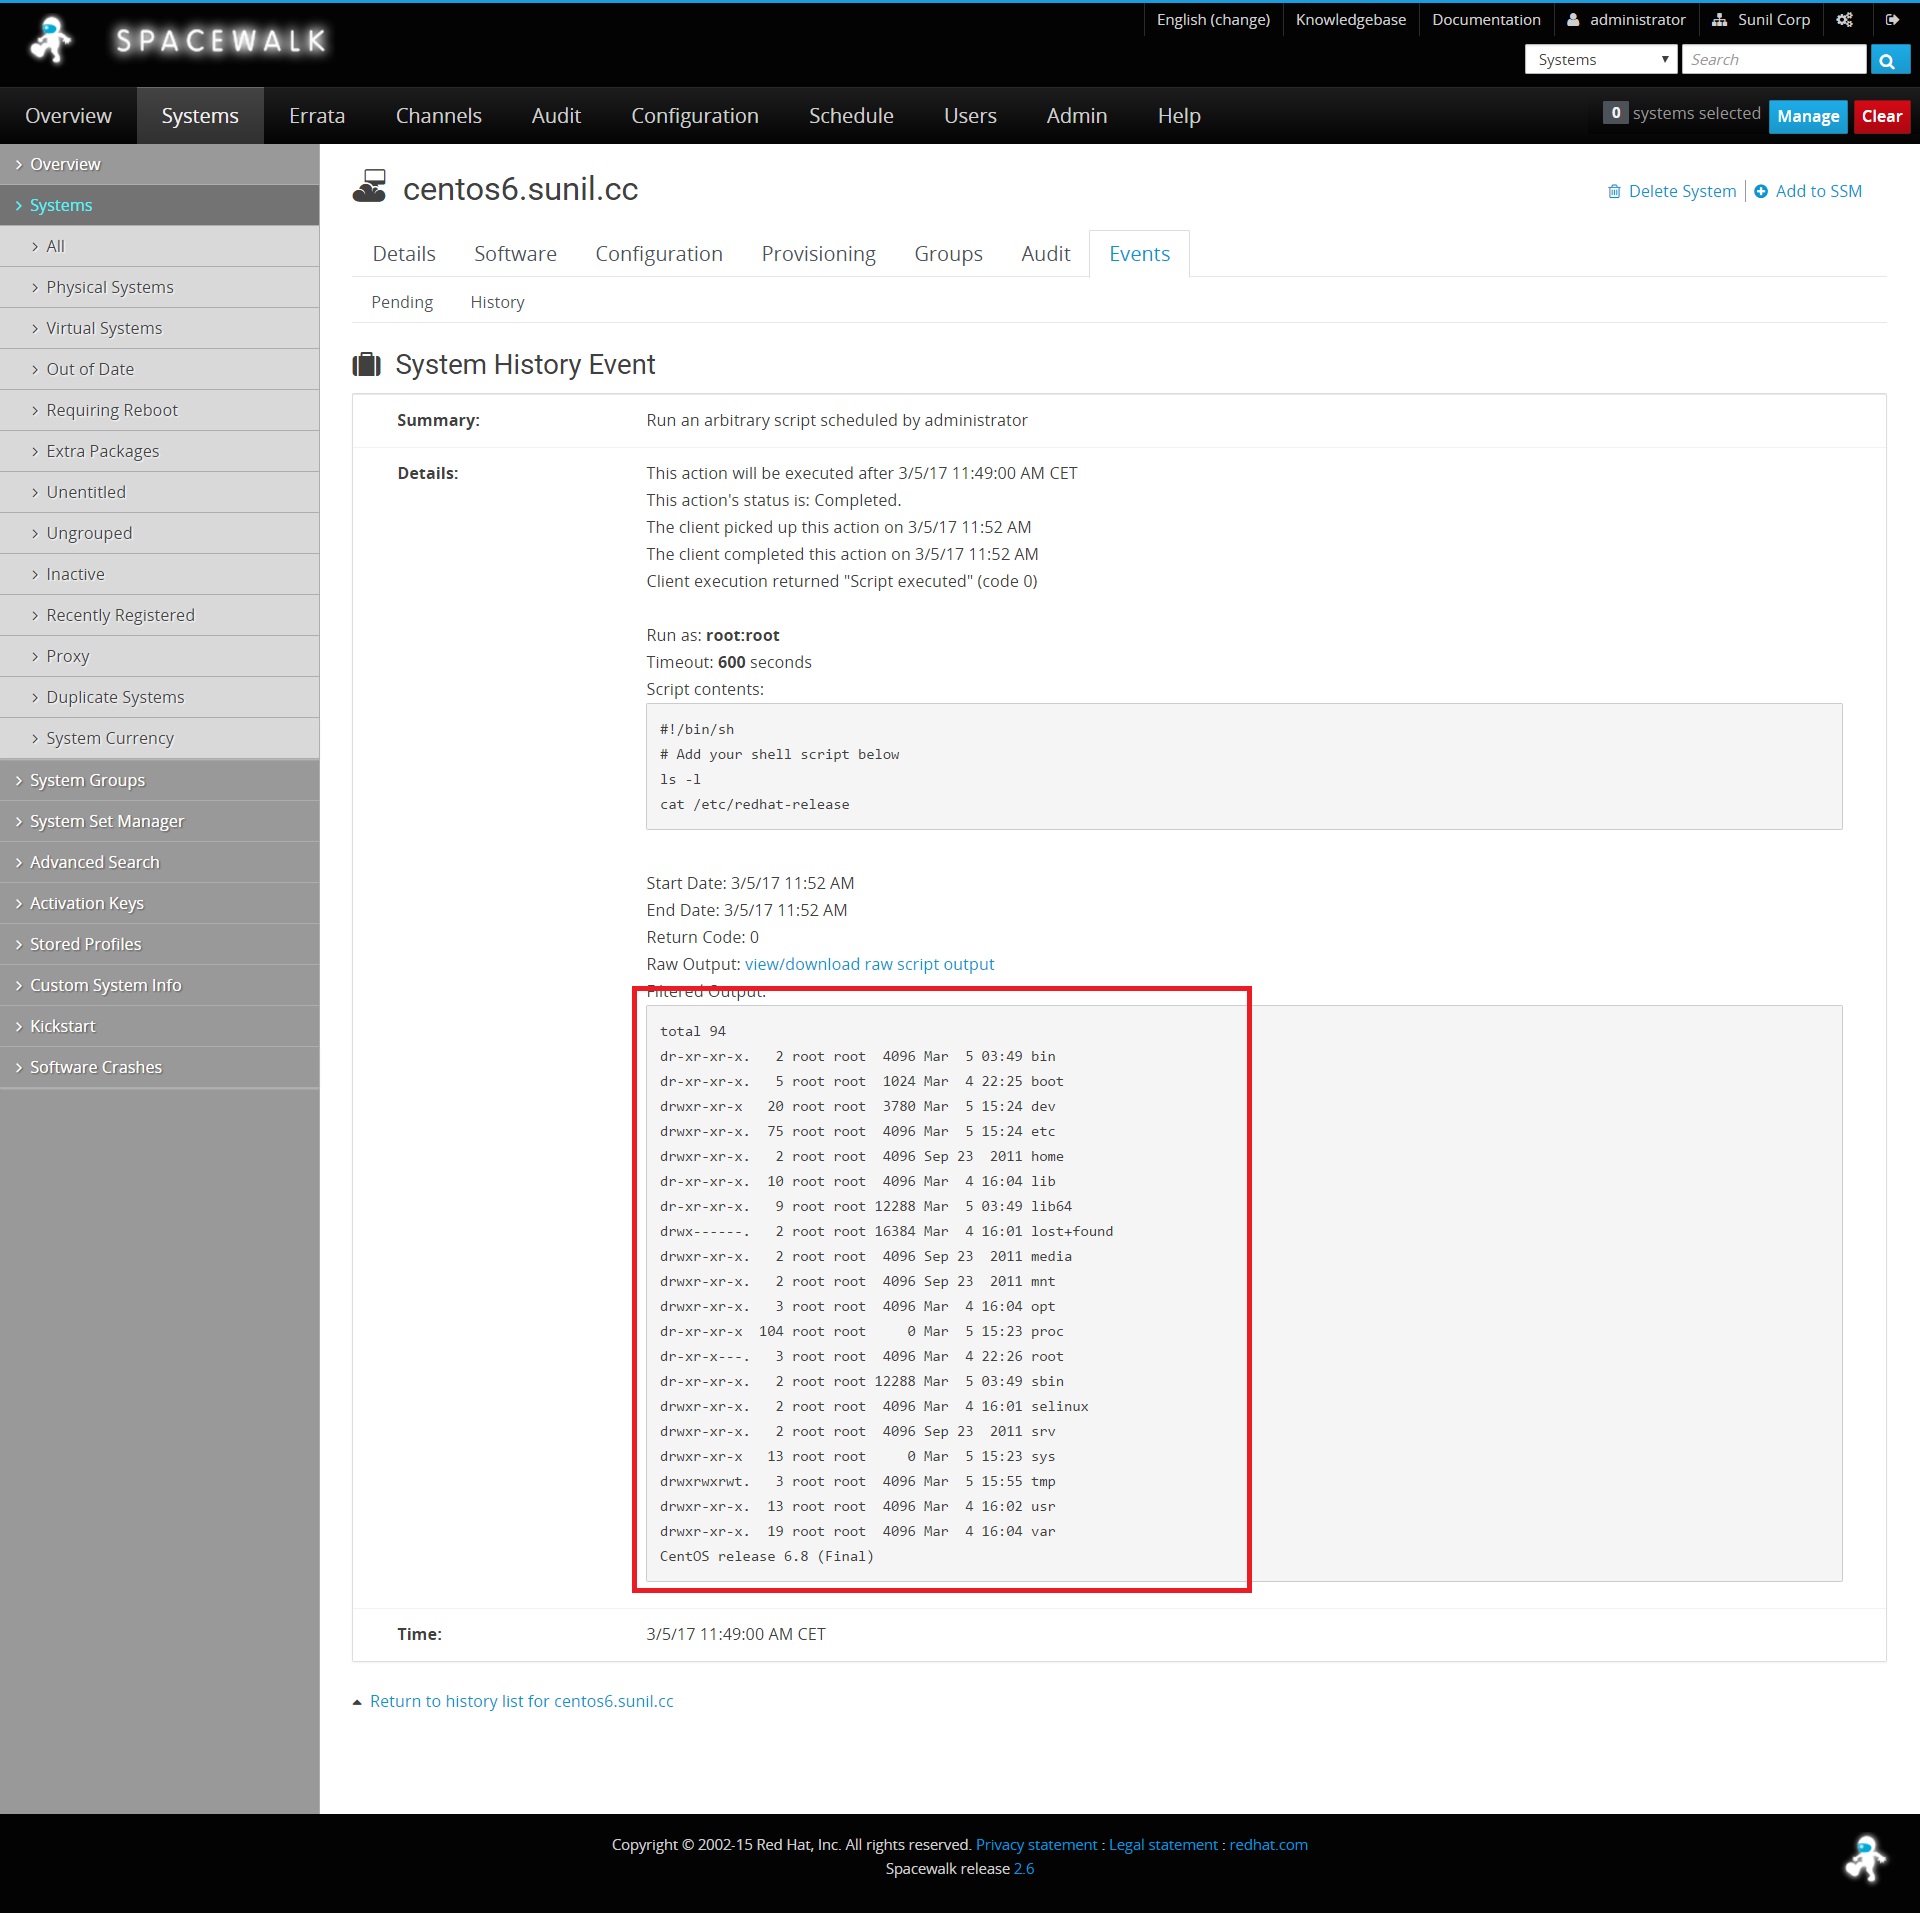
Click on the host to see the results.
Running remote commands from spacewalk.
We will need to install spacecmd to run remote commands.
[root@spacewalk ~]# yum install spacecmd -y
we will first add the system using ssm and before that lets login, you can use the same credentials as frontend.
[root@spacewalk ~]# spacecmd
Welcome to spacecmd, a command-line interface to Spacewalk.

Type: 'help' for a list of commands
      'help ' for command-specific help
      'quit' to quit

Spacewalk Username: administrator
Spacewalk Password:
INFO: Connected to https://spacewalk.sunil.cc/rpc/api as administrator
spacecmd {SSM:0}> system_list
centos6.sunil.cc
centos7.sunil.cc
centos7test.sunil.cc
spacecmd {SSM:0}> ssm_add centos6.sunil.cc
spacecmd {SSM:1}> ssm_list
centos6.sunil.cc
spacecmd {SSM:1}> exit
create a script called with any name here I named it ff.sh.
    [root@spacewalk ~]# cat ff.sh
#!/bin/bash
cat /etc/redhat-release
[root@spacewalk ~]#
Now to run the remote command.
[root@spacewalk ~]# spacecmd -y system_runscript "ssm -f ff.sh"
INFO: Connected to https://spacewalk.sunil.cc/rpc/api as administrator

User:       root
Group:      root
Timeout:    600 seconds
Start Time: 20170305T12:16:17
p
Script Contents
---------------
#!/bin/bash
cat /etc/redhat-release

Systems
-------
centos6.sunil.cc
INFO: Action ID: 33
INFO: Scheduled: 1 system(s)
[root@spacewalk ~]#
To check the output you can run the below command.
    [root@spacewalk ~]# spacecmd schedule_getoutput 33
INFO: Connected to https://spacewalk.sunil.cc/rpc/api as administrator
System:      centos6.sunil.cc
Start Time:  20170305T12:16:19
Stop Time:   20170305T12:16:19
Return Code: 0

Output
------
CentOS release 6.8 (Final)

[root@spacewalk ~]#
Troubleshooting
In case you see the commands are in pending state for a long time, the follow steps can be performed to fix this issue.
Make sure osa-dispatcher is running on the spacewalk server.
    [root@spacewalk ~]# systemctl status osa-dispatcher
? osa-dispatcher.service - OSA Dispatcher daemon
   Loaded: loaded (/usr/lib/systemd/system/osa-dispatcher.service; enabled; vendor preset: disabled)
   Active: active (running) since Sun 2017-03-05 09:59:55 CET; 2h 21min ago
  Process: 3470 ExecStart=/usr/sbin/osa-dispatcher --pid-file /var/run/osa-dispatcher.pid (code=exited, status=0/SUCCESS)
  Process: 3469 ExecStartPre=/bin/rm -f /var/run/osa-dispatcher.pid (code=exited, status=0/SUCCESS)
 Main PID: 3474 (osa-dispatcher)
   CGroup: /system.slice/osa-dispatcher.service
           ??3474 /usr/bin/python -s /usr/sbin/osa-dispatcher --pid-file /var/run/osa-dispatcher.pid

Mar 05 09:59:55 spacewalk.sunil.cc systemd[1]: Starting OSA Dispatcher daemon...
Mar 05 09:59:55 spacewalk.sunil.cc systemd[1]: PID file /var/run/osa-dispatcher.pid not readable (yet?) after start.
Mar 05 09:59:55 spacewalk.sunil.cc systemd[1]: Started OSA Dispatcher daemon.
[root@spacewalk ~]#
In case it is not running please restart spacewalk service.
[root@spacewalk ~]# spacewalk-service restart
Make sure firewall port is opened for 5222.
Please perform the following steps on the client side.
    [root@centos7test ~]# systemctl stop osad
    [root@centos7test ~]# rm -rf /etc/sysconfig/rhn/osad-auth.conf
    [root@centos7test ~]# rhn_check -vvv
[root@centos7test ~]# systemctl start osad
[root@centos7test ~]# systemctl status osad
? osad.service - OSAD daemon
   Loaded: loaded (/usr/lib/systemd/system/osad.service; enabled; vendor preset: disabled)
   Active: active (running) since Sun 2017-03-05 13:54:46 CET; 26s ago
  Process: 18696 ExecStart=/usr/sbin/osad --pid-file /var/run/osad.pid (code=exited, status=0/SUCCESS)
 Main PID: 18697 (osad)
   CGroup: /system.slice/osad.service
           ??18697 /usr/bin/python -s /usr/sbin/osad --pid-file /var/run/osad.pid

Mar 05 13:54:46 centos7test.sunil.cc systemd[1]: Starting OSAD daemon...
Mar 05 13:54:46 centos7test.sunil.cc systemd[1]: PID file /var/run/osad.pid not readable (yet?) after start.
Mar 05 13:54:46 centos7test.sunil.cc systemd[1]: Started OSAD daemon.
[root@centos7test ~]# netstat -aunltp|grep 5222
tcp     1698      0 192.168.1.23:48127      192.168.1.20:5222       ESTABLISHED 18697/python
[root@centos7test ~]#
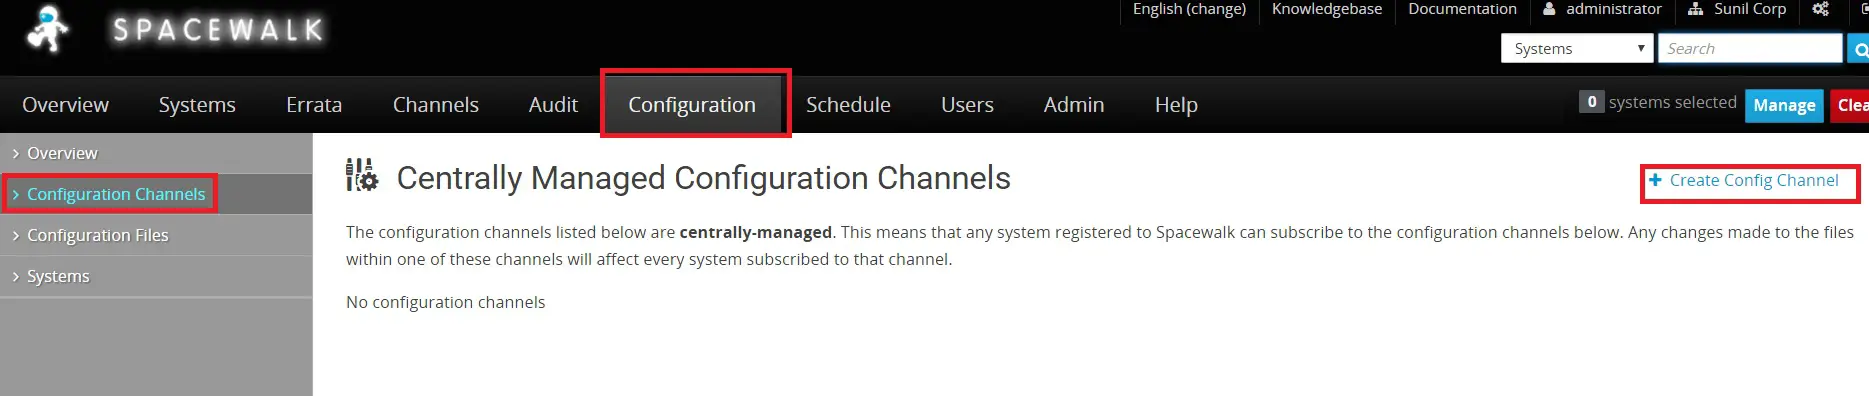
Deploying file through spacewalk.
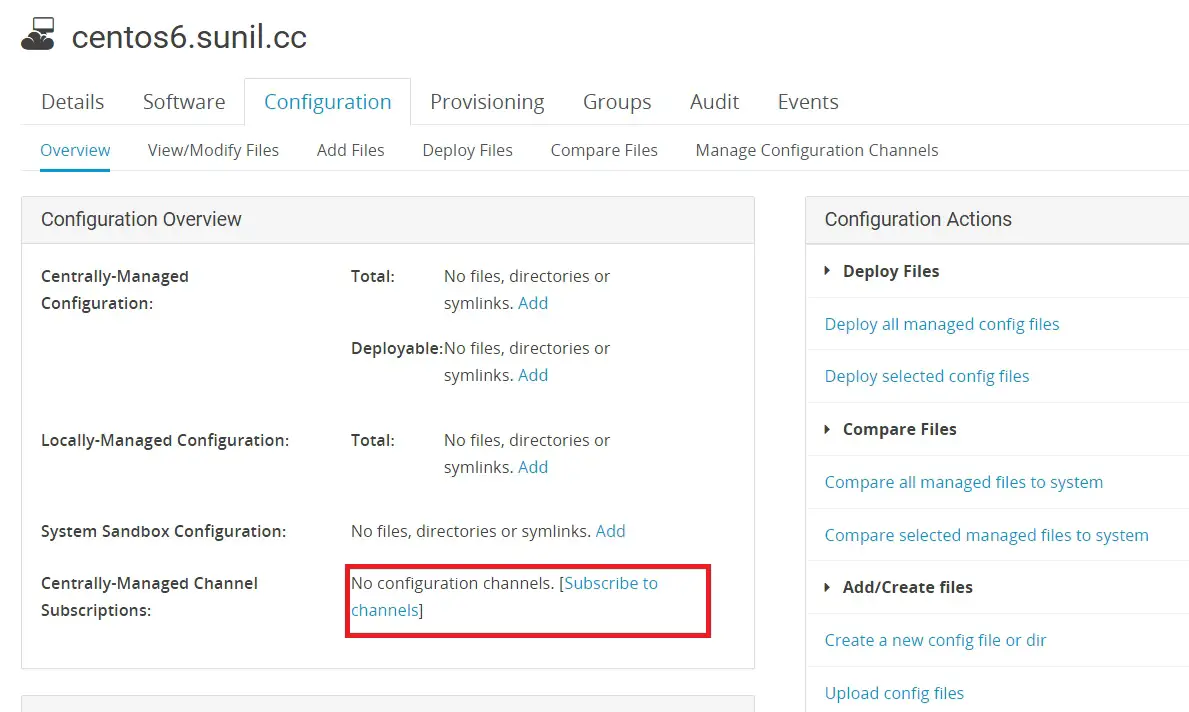
In this example, I will be changing the motd of centos 6 server.
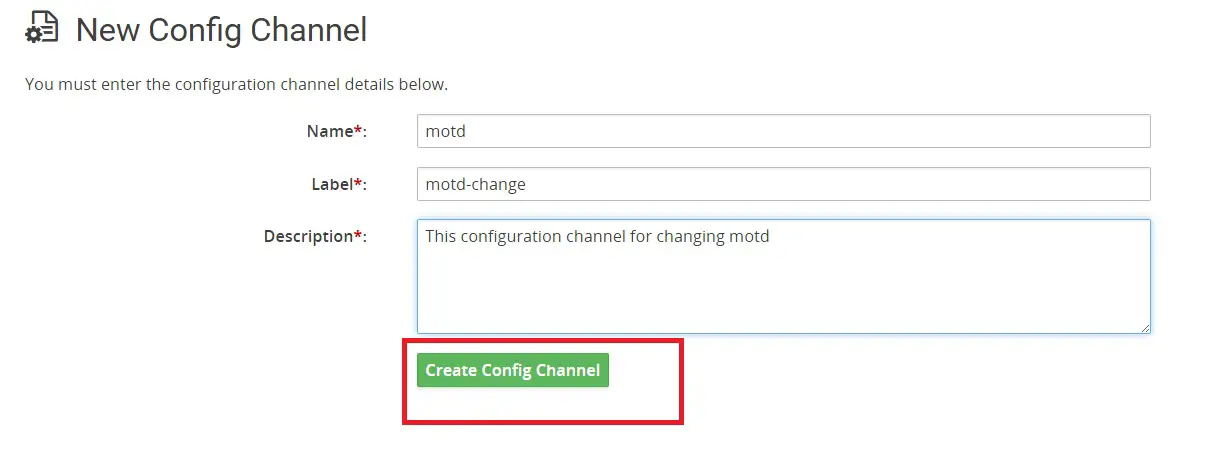
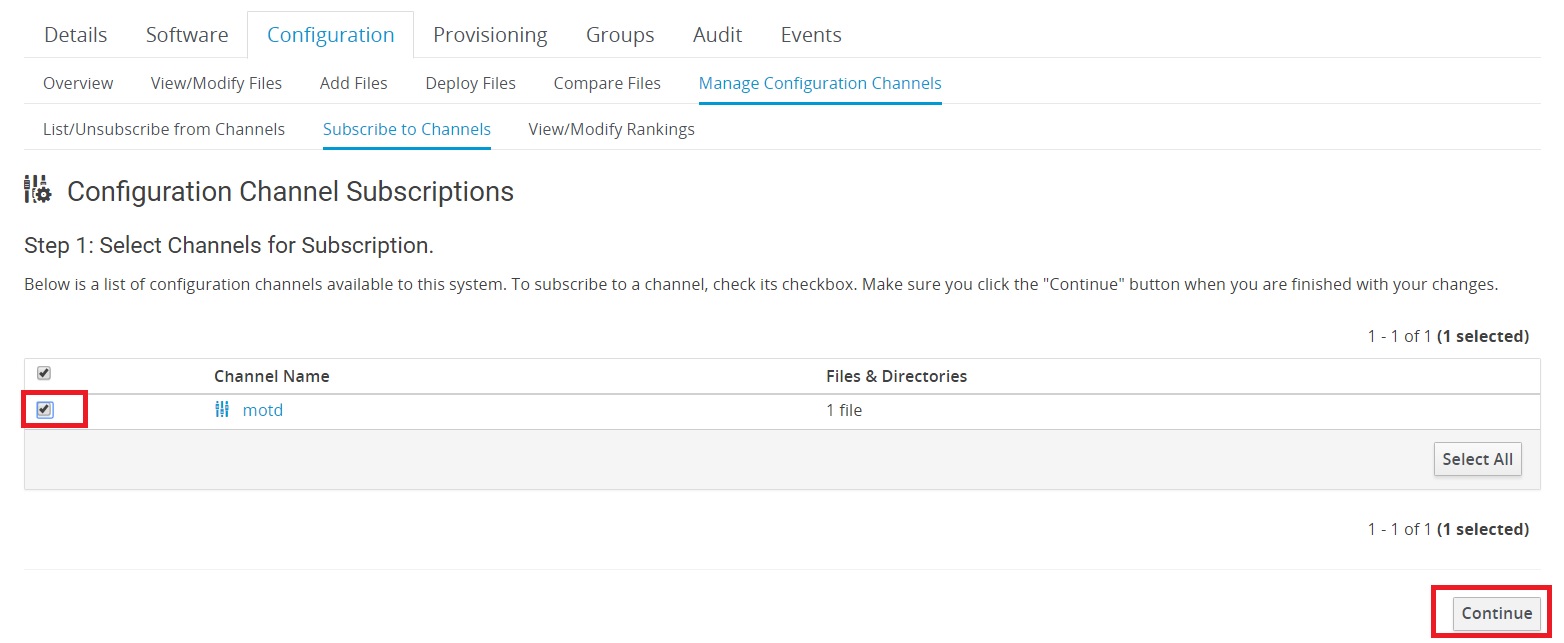
I will first create a configuration channel.
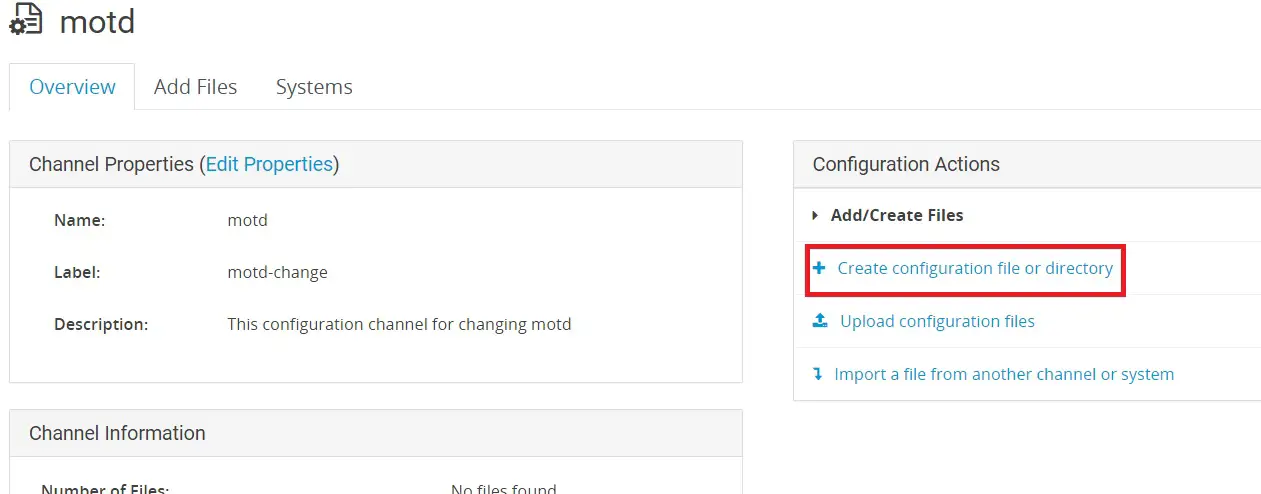
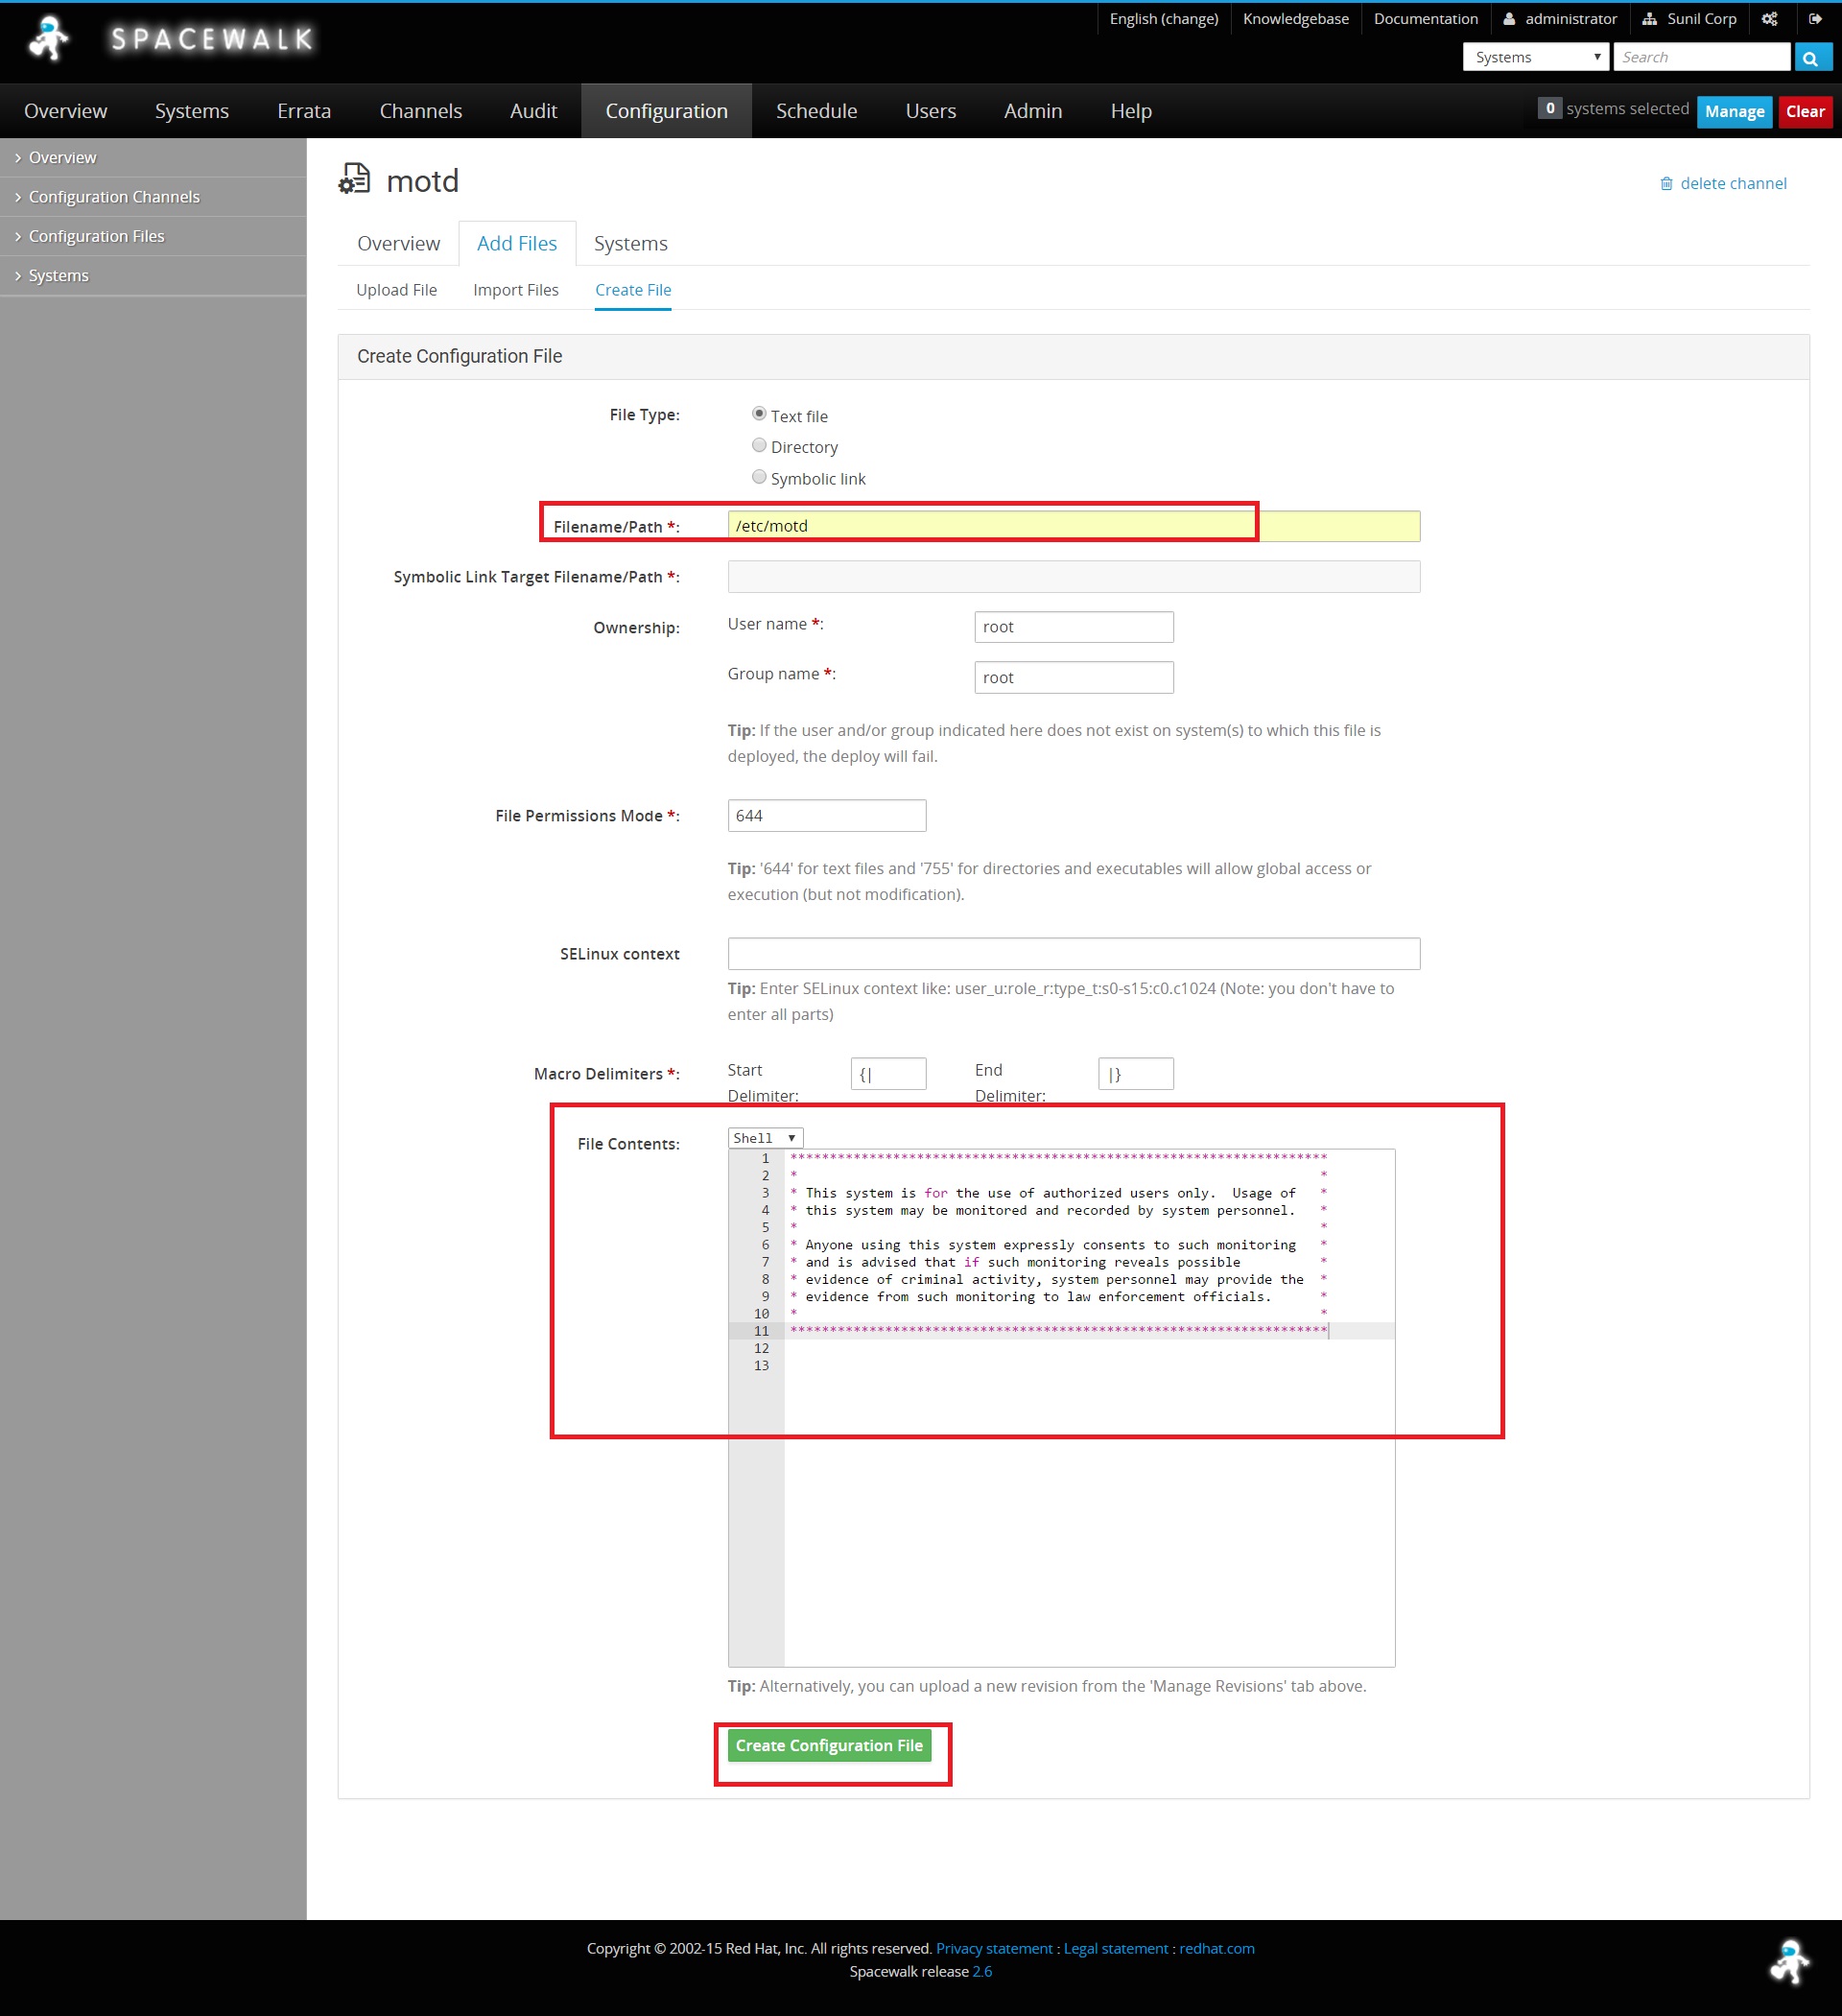
Creating a file with the below content.
Now we need to subscribe to the channel to which server it needs to be deployed.
The file can be pulled from the client.
    [root@centos6 ~]# rhncfg-client channels
Using server name spacewalk.sunil.cc
Config channels:
Label                           Name
-----                           ----
motd-change                     motd
[root@centos6 ~]#
[root@centos6 ~]# rhncfg-client get
Using server name spacewalk.sunil.cc
Deploying /etc/motd
[root@centos6 ~]#
[root@centos6 ~]# ls -l /etc/motd
-rw-r--r-- 1 root root 760 Mar  5 14:29 /etc/motd
[root@centos6 ~]# cat /etc/motd
********************************************************************
*                                                                  *
* This system is for the use of authorized users only.  Usage of   *
* this system may be monitored and recorded by system personnel.   *
*                                                                  *
* Anyone using this system expressly consents to such monitoring   *
* and is advised that if such monitoring reveals possible          *
* evidence of criminal activity, system personnel may provide the  *
* evidence from such monitoring to law enforcement officials.      *
*                                                                  *
********************************************************************

[root@centos6 ~]#

