How to Install Nginx with RTMP Module on CentOS 7
On this page
- Prerequisites
- What we will do?
- Step 1 - Install Dependencies
- Step 2 - Download Nginx with Additional Package and RTMP Module
- Step 3 - Compile Nginx and Install from Source
- Step 4 - Configure Nginx as a Service
- Step 5 - Configure Nginx RTMP Module
- Step 6 - Setup First RTMP Live Stream
- Step 7 - Testing
- Reference
RTMP (Real Time Messaging Protocol) is a high-performance protocol for transmission of data, audio, and video over the internet between flash-based platform technologies. Originally developed by Macromedia, and now owned by Adobe.
Nginx RTMP is a nginx-based media streamer with RTMP, HLS, and MPEG-DASH live streaming. Nginx RTMP module has lot of features, including H264/AAC support, HTTP callback support, HTTP control module for recording the audio/video etc.
In this tutorial, I will show you how to install and configure the Nginx web server with the RTMP module. We will be using the latest CentOS 7 server, and this guide will include the configuration of nginx and rtmp module and creating RTMP live stream and video on demand.
Prerequisites
- CentOS 7 Server
- Root privileges
What we will do?
- Install Dependencies
- Download Nginx with Additional Package and RTMP Module
- Compile Nginx and Install from Source
- Configure Nginx as a Service
- Configure Nginx RTMP Module
- Setup First RTMP Live Stream
- Testing
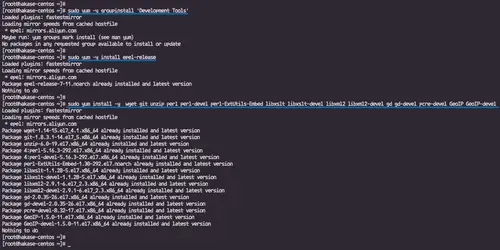
Step 1 - Install Dependencies
In this tutorial, we will build the Nginx web server from source. We need to install all packages dependencies needed, including development tools, EPEL repository, and other packages.
Install CentOS 'Development Tools'.
sudo yum -y groupinstall 'Development Tools'
Add the EPEL repository.
sudo yum -y install epel-release
Install Nginx dependencies.
sudo yum install -y wget git unzip perl perl-devel perl-ExtUtils-Embed libxslt libxslt-devel libxml2 libxml2-devel gd gd-devel pcre-devel GeoIP GeoIP-devel
Wait for all packages installed.
Step 2 - Download Nginx with Additional Package and RTMP Module
In this step, we will download nginx source code with the additional dependencies including pcre, zlib, and the OpenSSL.
Go to the '/usr/local/src' directory.
cd /usr/local/src
Download Nginx 1.14.0 and extract it.
wget https://nginx.org/download/nginx-1.14.0.tar.gz
tar -xzvf nginx-1.14.0.tar.gz
Download the pcre package and extract it.
wget https://ftp.pcre.org/pub/pcre/pcre-8.42.zip
unzip pcre-8.42.zip
Download the zlib package and extract it.
wget https://www.zlib.net/zlib-1.2.11.tar.gz
tar -xzvf zlib-1.2.11.tar.gz
Download the OpenSSL package and extract it.
wget https://www.openssl.org/source/openssl-1.1.0h.tar.gz
tar -xzvf openssl-1.1.0h.tar.gz
Next, clone the Nginx RTMP Module source code using git command.
git clone https://github.com/sergey-dryabzhinsky/nginx-rtmp-module.git
And remove all compressed tar.gz and .zip files.
rm -f *.tar.gz *.zip
Following are the directory details we have.
ls -lah
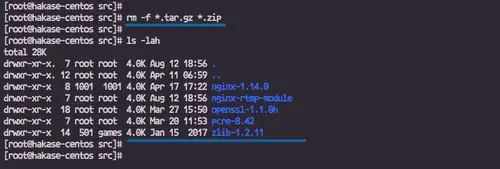
And we're ready to compile and install.
Step 3 - Compile Nginx and Install from Source
Go to the 'nginx-1.14.0' directory.
cd nginx-1.14.0/
Configure the nginx 1.14.0 using those parameters below.
./configure --prefix=/etc/nginx \
            --sbin-path=/usr/sbin/nginx \
            --modules-path=/usr/lib64/nginx/modules \
            --conf-path=/etc/nginx/nginx.conf \
            --error-log-path=/var/log/nginx/error.log \
            --pid-path=/var/run/nginx.pid \
            --lock-path=/var/run/nginx.lock \
            --user=nginx \
            --group=nginx \
            --build=CentOS \
            --builddir=nginx-1.14.0 \
            --with-select_module \
            --with-poll_module \
            --with-threads \
            --with-file-aio \
            --with-http_ssl_module \
            --with-http_v2_module \
            --with-http_realip_module \
            --with-http_addition_module \
            --with-http_xslt_module=dynamic \
            --with-http_image_filter_module=dynamic \
            --with-http_geoip_module=dynamic \
            --with-http_sub_module \
            --with-http_dav_module \
            --with-http_flv_module \
            --with-http_mp4_module \
            --with-http_gunzip_module \
            --with-http_gzip_static_module \
            --with-http_auth_request_module \
            --with-http_random_index_module \
            --with-http_secure_link_module \
            --with-http_degradation_module \
            --with-http_slice_module \
            --with-http_stub_status_module \
            --http-log-path=/var/log/nginx/access.log \
            --http-client-body-temp-path=/var/cache/nginx/client_temp \
            --http-proxy-temp-path=/var/cache/nginx/proxy_temp \
            --http-fastcgi-temp-path=/var/cache/nginx/fastcgi_temp \
            --http-uwsgi-temp-path=/var/cache/nginx/uwsgi_temp \
            --http-scgi-temp-path=/var/cache/nginx/scgi_temp \
            --with-mail=dynamic \
            --with-mail_ssl_module \
            --with-stream=dynamic \
            --with-stream_ssl_module \
            --with-stream_realip_module \
            --with-stream_geoip_module=dynamic \
            --with-stream_ssl_preread_module \
            --with-compat \
            --with-pcre=../pcre-8.42 \
            --with-pcre-jit \
            --with-zlib=../zlib-1.2.11 \
            --with-openssl=../openssl-1.1.0h \
            --with-openssl-opt=no-nextprotoneg \
            --add-module=../nginx-rtmp-module \
            --with-debug
Compile and install Nginx with RTMP module by running following commands.
sudo make
sudo make install
When the installation is complete, we need to create a new symlink module directory, create a new nginx user and group, and create a new nginx cache directory.
Create nginx symlink module to the '/etc/nginx' configuration directory.
sudo ln -s /usr/lib64/nginx/modules /etc/nginx/modules
Create a new 'nginx' system user and group.
sudo useradd -r -d /var/cache/nginx/ -s /sbin/nologin -U nginx
Now create a new Nginx cache directory '/var/cache/nginx' and change the owner of the directory to 'nginx' user and group.
mkdir -p /var/cache/nginx/
chown -R nginx:nginx /var/cache/nginx/
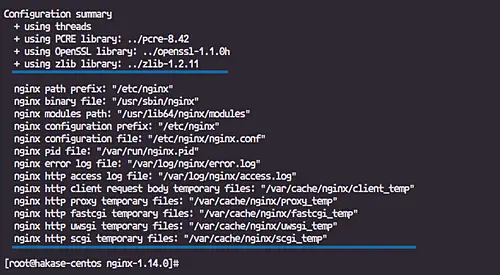
Test nginx configuration and the installed nginx version.
nginx -t
nginx -V
And the following is the result.
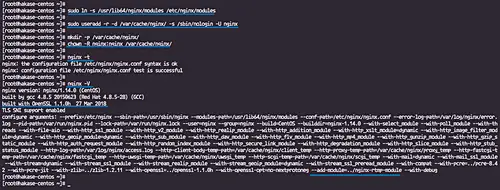
The Nginx web server has been installed on CentOS 7 with the RTMP Module enabled.
Step 4 - Configure Nginx as a Service
In this tutorial, we will be running nginx as a service and we need to create a new nginx service file to the systemd service directory.
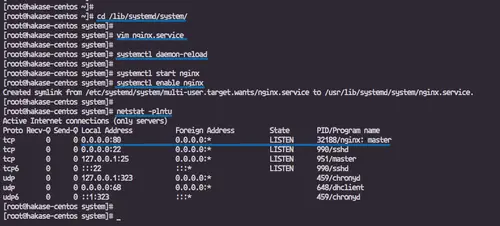
Go to the '/lib/systemd/system' directory and create a new 'nginx.service' file using vim.
cd /lib/systemd/system/
vim nginx.service
paste the configuration below.
[Unit]
Description=nginx - high performance web server
Documentation=https://nginx.org/en/docs/
After=network-online.target remote-fs.target nss-lookup.target
Wants=network-online.target

[Service]
Type=forking
PIDFile=/var/run/nginx.pid
ExecStartPre=/usr/sbin/nginx -t -c /etc/nginx/nginx.conf
ExecStart=/usr/sbin/nginx -c /etc/nginx/nginx.conf
ExecReload=/bin/kill -s HUP $MAINPID
ExecStop=/bin/kill -s TERM $MAINPID

[Install]
WantedBy=multi-user.target
Save and exit.
Now reload the systemd system.
systemctl daemon-reload
Start the nginx service and enable it to launch everytime at system boot.
systemctl start nginx
systemctl enable nginx
The Nginx web server is up and running as a service on CentOS 7 system.
Step 5 - Configure Nginx RTMP Module
In this step, we will create a new custom Nginx configuration for RTMP module.
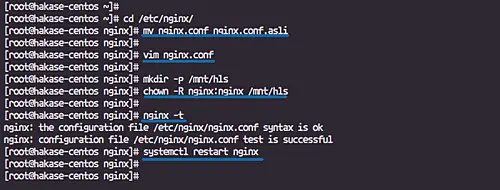
Go to the '/etc/nginx' configuration directory and backup the original 'nginx.conf' file.
cd /etc/nginx/
mv nginx.conf nginx.conf.asli
Now create a custom configuration 'nginx.conf'.
vim nginx.conf
Paste Nginx RTMP configuration below.
worker_processes  auto;
events {
    worker_connections  1024;
}

# RTMP configuration
rtmp {
    server {
        listen 1935; # Listen on standard RTMP port
        chunk_size 4000;

# Define the Application
        application show {
            live on;
            # Turn on HLS
            hls on;
            hls_path /mnt/hls/;
            hls_fragment 3;
            hls_playlist_length 60;
            # disable consuming the stream from nginx as rtmp
            deny play all;
        }

    }
}

http {
    sendfile off;
    tcp_nopush on;
    aio on;
    directio 512;
    default_type application/octet-stream;

    server {
        listen 8080;

        location / {
            # Disable cache
            add_header 'Cache-Control' 'no-cache';

            # CORS setup
            add_header 'Access-Control-Allow-Origin' '*' always;
            add_header 'Access-Control-Expose-Headers' 'Content-Length';

            # allow CORS preflight requests
            if ($request_method = 'OPTIONS') {
                add_header 'Access-Control-Allow-Origin' '*';
                add_header 'Access-Control-Max-Age' 1728000;
                add_header 'Content-Type' 'text/plain charset=UTF-8';
                add_header 'Content-Length' 0;
                return 204;
            }

            types {
                application/dash+xml mpd;
                application/vnd.apple.mpegurl m3u8;
                video/mp2t ts;
            }

            root /mnt/;
        }
    }
}
Save and exit.
Next, we need to create a new directory for the HLS configuration and we've defined the web root directory is on the '/mnt' directory.
Create the 'hls' directory under the '/mnt' directory and change the owner of the directory to the nginx user and group.
mkdir -p /mnt/hls
chown -R nginx:nginx /mnt/hls
Test the configuration and restart the nginx service.
nginx -t
systemctl restart nginx
Step 6 - Setup First RTMP Live Stream
In this tutorial, we will create new RTMP stream video on demand using the mp4 videos on the server, and create a new live RTMP stream that will be broadcasted from the local computer using the OBS software.
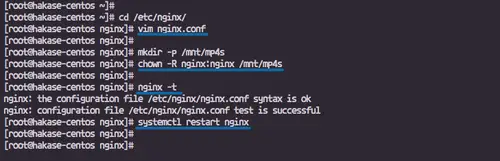
Go to the '/etc/nginx' configuration directory and edit the 'nginx.conf' file.
cd /etc/nginx/
vim nginx.conf
Paste configurations below in to the 'rtmp { ... }' bracket.
        # RTMP video on demand for mp4 files
        application vod {
            play /mnt/mp4s;
        }

        # RTMP stream using OBS
        application stream {
            live on;
        }
Save and exit.
Now create a new directory 'mp4s' for storing all vod videos, and change the owner to the nginx user group.
mkdir -p /mnt/mp4s
chown -R nginx:nginx /mnt/mp4s
Test nginx configuration and make sure there is no error, then restart the nginx service.
nginx -t
systemctl restart nginx
Nginx configuration for the RTMP live stream and the vod stream has been completed.
Step 7 - Testing
Test RTMP live stream and vod stream using the VLC player.
Video On Demand Stream
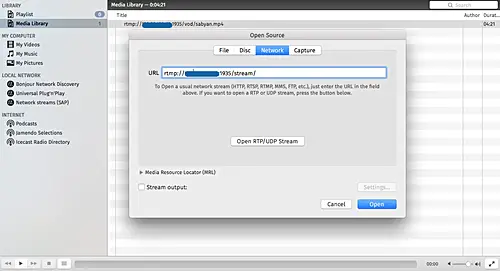
Open the VLC app on your computer.
Click the 'File' menu choose the 'Open Network' option.
Now type the RTMP URL for our vod stream.
rtmp://192.168.1.10:1935/vod/file.mp4
Click the 'Open' button.
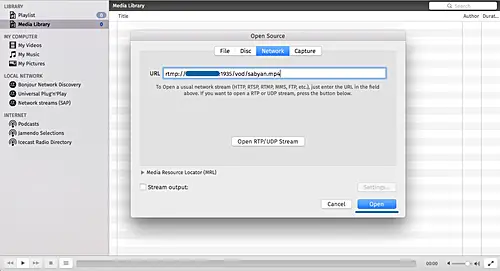
And the following are the results of the video stream.

Live Stream using OBS (Open Broadcaster Software)
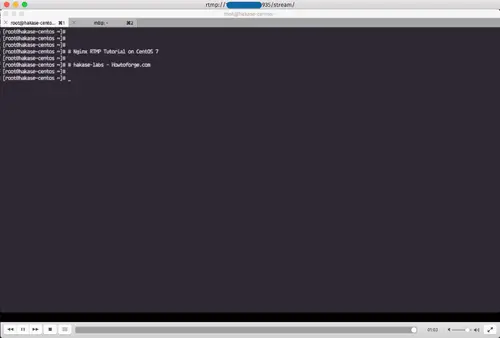
In this tutorial, we will test the RTMP live stream using the obs software, and the vlc player.
We will stream only the terminal window using the open broadcaster software, and try to watch the RTMP live stream using the VLC player.
Following is my configuration for the obs software.

Open the VLC app on your computer.
Click the 'File' menu, choose the 'Open Network' option.
Now type the RTMP URL for our live stream.
rtmp://192.168.1.10:1935/stream/
Click the 'Open' button.
And the following is the result of the live stream using open broadcaster through the nginx rtmp module.
Installation of the Nginx web server with RTMP module on CentOS 7 has been completed successfully.

