How to install Ansible AWX with Docker on CentOS 7

Ansible AWX is the OpenSource version of ansible tower. AWX provides a web-based user interface, REST API, and task engine built on top of Ansible. It is the upstream project for Tower, a commercial derivative of AWX.

In this tutorial, I will show you how to install and configure AWX using Docker.

I will be using 3 servers with centos 7 minimal installation and SELinux in permissive mode.

  • 192.168.1.25 AWX Server
  • 192.168.1.21 client1
  • 192.168.1.22 client2

System Requirements for AWX Server

  • At least 4GB of memory.
  • At least 2 cpu cores.
  • At least 20GB of space.
  • Running Docker, Openshift, or Kubernetes.

Check the SELinux configuration.

sestatus

Result:

[[email protected] ~]# sestatus
SELinux status:                 enabled
SELinuxfs mount:                /sys/fs/selinux
SELinux root directory:         /etc/selinux
Loaded policy name:             targeted
Current mode:                   permissive
Mode from config file:          permissive
Policy MLS status:              enabled
Policy deny_unknown status:     allowed
Max kernel policy version:      28
[[email protected] ~]#

Disable firewalld.

[[email protected] installer]# systemctl stop firewalld
[[email protected] installer]# systemctl disable firewalld
Removed symlink /etc/systemd/system/multi-user.target.wants/firewalld.service.
Removed symlink /etc/systemd/system/dbus-org.fedoraproject.FirewallD1.service.
[[email protected] installer]#

Adding the host entries in /etc/hosts

[[email protected] ~]# cat /etc/hosts
192.168.1.25 awx.sunil.cc awx
192.168.1.21 client1.sunil.cc client1
192.168.1.22 client2.sunil.cc client2
[[email protected] ~]#

Enable epel repo.

[[email protected] ~]# yum install -y epel-release

Install the packages.

[[email protected] ~]# yum install -y yum-utils device-mapper-persistent-data lvm2 ansible git python-devel python-pip python-docker-py vim-enhanced

Configure docker ce stable repository.

[[email protected] ~]# yum-config-manager --add-repo https://download.docker.com/linux/centos/docker-ce.repo

Installing docker.

[[email protected] ~]# yum install docker-ce -y

Start docker service.

[[email protected] ~]# systemctl start docker

Enable docker service.

[[email protected] ~]# systemctl enable docker

Cloning the AWX repo.

[[email protected] ~]# git clone https://github.com/ansible/awx.git
[[email protected] ~]# cd awx/
[[email protected] awx]# git clone https://github.com/ansible/awx-logos.git
[[email protected] awx]# pwd
/root/awx
[[email protected] awx]#

Go into the installer directory within /root/awx.

[[email protected] awx]# cd installer/

Edit the following parameters in inventory.

[[email protected] awx]# vim inventory
postgres_data_dir=/var/lib/pgdocker
awx_official=true
awx_alternate_dns_servers="4.2.2.1,4.2.2.2"
project_data_dir=/var/lib/awx/projects

Your configuration should look like this.

[[email protected] installer]# cat inventory |grep -v "#"
localhost ansible_connection=local ansible_python_interpreter="/usr/bin/env python"

[all:vars]

dockerhub_base=ansible
dockerhub_version=latest
rabbitmq_version=3.6.14


awx_secret_key=awxsecret


postgres_data_dir=/var/lib/pgdocker
host_port=80


docker_compose_dir=/var/lib/awx


pg_username=awx
pg_password=awxpass
pg_database=awx
pg_port=5432


awx_official=true


awx_alternate_dns_servers="4.2.2.1,4.2.2.2"

project_data_dir=/var/lib/awx/projects
[[email protected] installer]#

Now deploying AWX via Docker.

[[email protected] installer]# ansible-playbook -i inventory install.yml -vv

This will take a while depending upon the configuration of the server.

To check the deployment of ansible play for AWX run the below command.

[[email protected] installer]# docker container ls
CONTAINER ID        IMAGE                     COMMAND                  CREATED             STATUS              PORTS                                NAMES
318c7c95dcbb        ansible/awx_task:latest   "/tini -- /bin/sh -c."   12 minutes ago      Up 12 minutes       8052/tcp                             awx_task
642c2f272e31        ansible/awx_web:latest    "/tini -- /bin/sh -c."   12 minutes ago      Up 12 minutes       0.0.0.0:80->8052/tcp                 awx_web
641b42ab536f        memcached:alpine          "docker-entrypoint.s."   18 minutes ago      Up 18 minutes       11211/tcp                            memcached
b333012d90ac        rabbitmq:3                "docker-entrypoint.s."   19 minutes ago      Up 19 minutes       4369/tcp, 5671-5672/tcp, 25672/tcp   rabbitmq
ada52935513a        postgres:9.6              "docker-entrypoint.s."   19 minutes ago      Up 19 minutes       5432/tcp                             postgres
[[email protected] installer]#

AWX is ready and can be accessed from the browser.

AWX Login

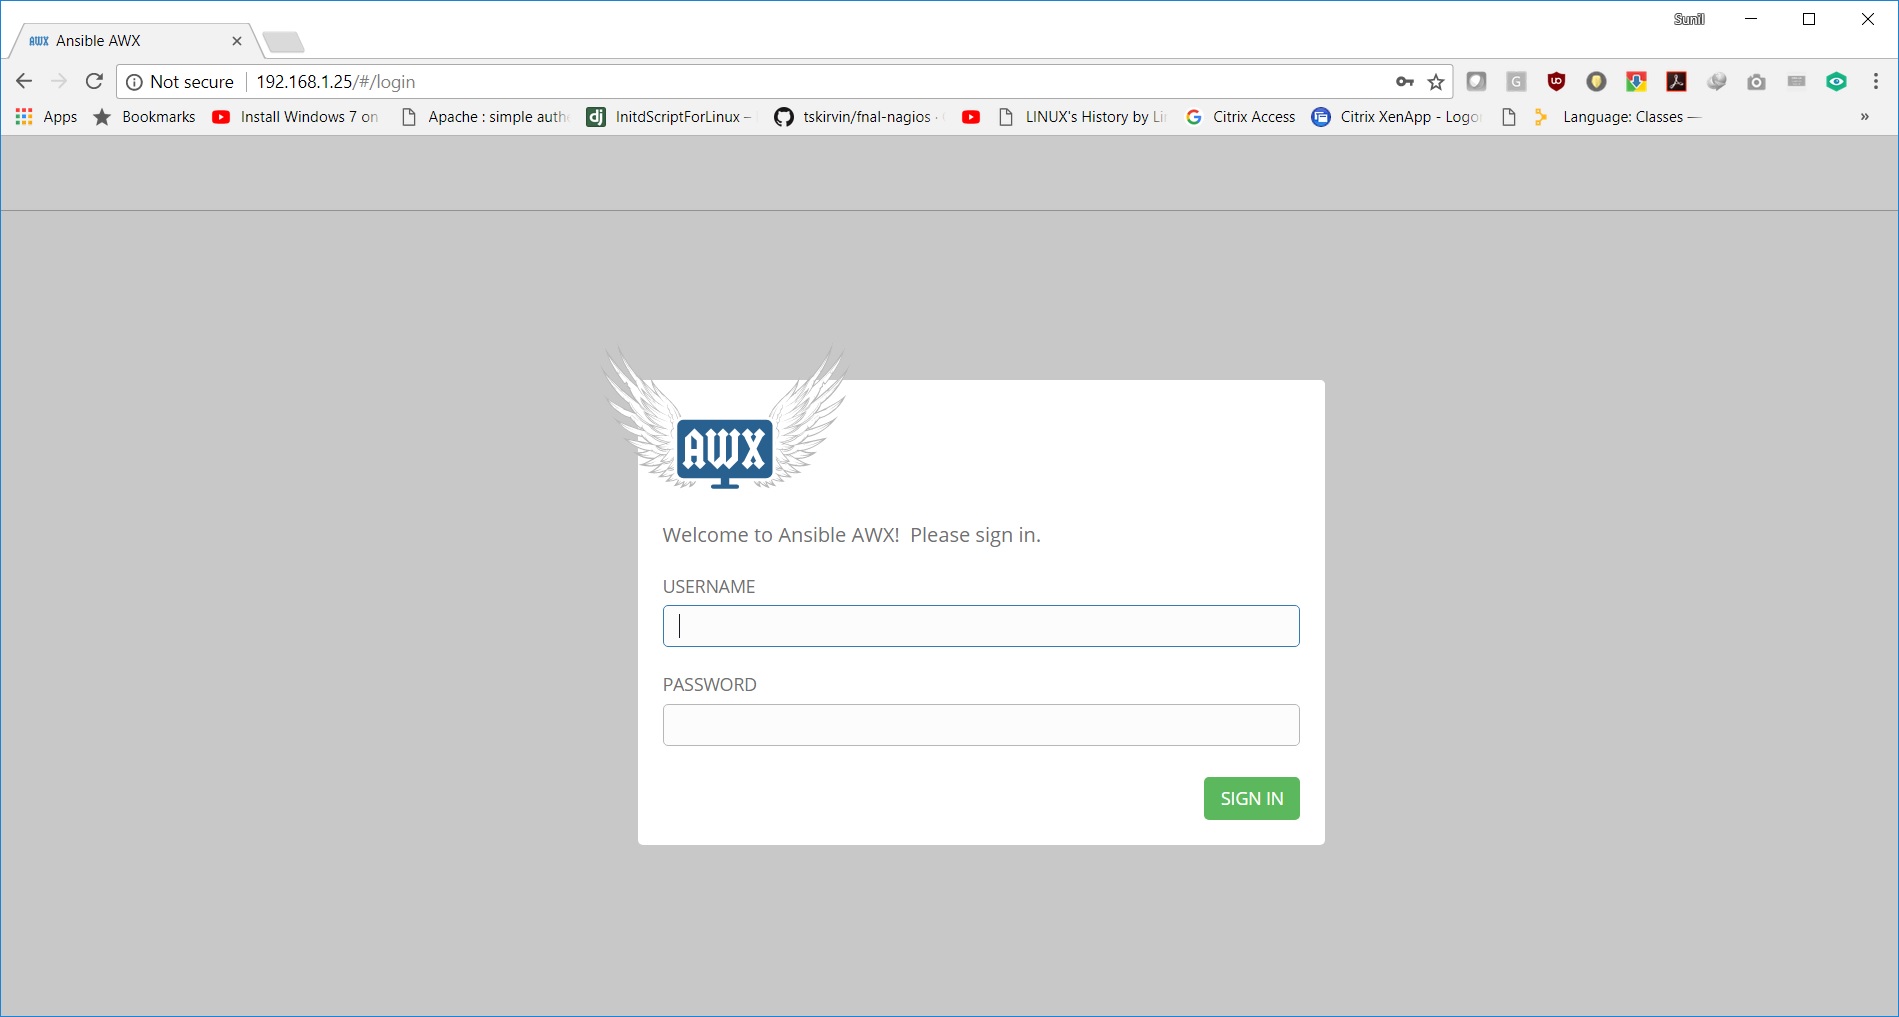
username is "admin" and the password is "password".

Configure passwordless login from AWX server

Create a user on all 3 hosts. Follow the steps below on all 3 servers.

[[email protected] ~]# useradd ansible
[[email protected] ~]# useradd ansible
[[email protected] ~]# useradd ansible

Generating ssh key:

[[email protected] ~]# su - ansible
[[email protected] ~]$ ssh-keygen
Generating public/private rsa key pair.
Enter file in which to save the key (/home/ansible/.ssh/id_rsa):
Created directory '/home/ansible/.ssh'.
Enter passphrase (empty for no passphrase):
Enter same passphrase again:
Your identification has been saved in /home/ansible/.ssh/id_rsa.
Your public key has been saved in /home/ansible/.ssh/id_rsa.pub.
The key fingerprint is:
SHA256:j30gyTVQxcWIocdKMbVieZvfJzGkCjXhjtc5qu+fE8o [email protected]
The key's randomart image is:
+---[RSA 2048]----+
|        +o==.+.  |
|         O.oo .  |
|        * @   .  |
|       + @ * +   |
|        S * = o  |
|         B =.o o |
|        ..=.o.o .|
|         .E... o |
|        .oo.o.   |
+----[SHA256]-----+
[[email protected] ~]$

Adding the sudoers entry on all 3 servers as a last entry to the file.

[[email protected] ~]# visudo
ansible ALL=(ALL) NOPASSWD: ALL

Copy the content of id_rsa.pub to authorized_keys on all the 3 servers.

[[email protected] .ssh]$ cat id_rsa.pub
ssh-rsa AAAAB3NzaC1yc2EAAAADAQABAAABAQC4QmuzjVnGUnT1o6xGXD3DCDPUMiTf0xUkOU4kYrkpxHYZ1nWG1MBNGWChyWobnTKYDh4c80+ftSyPHAdeV6KOwADOu6MXvMXHMK3EDe4jn+R0ZArQTEF2qKSBgve23wQu5IoqdWjvBoIEGqxw3LkYbdGxZ5dqKlP5ePkRKal4TncV+tlhueDaKz8QfvXgz+y2jc3HMWAH6a7UYsDKutDttmDDVUwfMcvoS9j2VYOUHkTCenx/2Y3296ULmWCREW9e6fTXLmOowIBDAar01CThmAzYCnBDNAFOsolh9dL1CKwLCvOyK1UBgJlfrzdGI/+fS7aFiaqhXpt6hI4xndJf [email protected]
[[email protected] .ssh]$ pwd
/home/ansible/.ssh
[[email protected] ~]$ cat .ssh/authorized_keys
ssh-rsa AAAAB3NzaC1yc2EAAAADAQABAAABAQC4QmuzjVnGUnT1o6xGXD3DCDPUMiTf0xUkOU4kYrkpxHYZ1nWG1MBNGWChyWobnTKYDh4c80+ftSyPHAdeV6KOwADOu6MXvMXHMK3EDe4jn+R0ZArQTEF2qKSBgve23wQu5IoqdWjvBoIEGqxw3LkYbdGxZ5dqKlP5ePkRKal4TncV+tlhueDaKz8QfvXgz+y2jc3HMWAH6a7UYsDKutDttmDDVUwfMcvoS9j2VYOUHkTCenx/2Y3296ULmWCREW9e6fTXLmOowIBDAar01CThmAzYCnBDNAFOsolh9dL1CKwLCvOyK1UBgJlfrzdGI/+fS7aFiaqhXpt6hI4xndJf [email protected]
[[email protected] ~]$chmod 600 .ssh/authorized_keys

client1

[[email protected] ~]# su - ansible
[[email protected] ~]$ ls
[[email protected] ~]$ mkdir .ssh
[[email protected] ~]$ cat .ssh/authorized_keys
ssh-rsa AAAAB3NzaC1yc2EAAAADAQABAAABAQC4QmuzjVnGUnT1o6xGXD3DCDPUMiTf0xUkOU4kYrkpxHYZ1nWG1MBNGWChyWobnTKYDh4c80+ftSyPHAdeV6KOwADOu6MXvMXHMK3EDe4jn+R0ZArQTEF2qKSBgve23wQu5IoqdWjvBoIEGqxw3LkYbdGxZ5dqKlP5ePkRKal4TncV+tlhueDaKz8QfvXgz+y2jc3HMWAH6a7UYsDKutDttmDDVUwfMcvoS9j2VYOUHkTCenx/2Y3296ULmWCREW9e6fTXLmOowIBDAar01CThmAzYCnBDNAFOsolh9dL1CKwLCvOyK1UBgJlfrzdGI/+fS7aFiaqhXpt6hI4xndJf [email protected]
[[email protected] ~]$ chmod 700 .ssh
[[email protected] ~]$ chmod 600 .ssh/authorized_keys

client2

[[email protected] ~]# su - ansible
[[email protected] ~]$ ls
[[email protected] ~]$ mkdir .ssh
[[email protected] ~]$ cat .ssh/authorized_keys
ssh-rsa AAAAB3NzaC1yc2EAAAADAQABAAABAQC4QmuzjVnGUnT1o6xGXD3DCDPUMiTf0xUkOU4kYrkpxHYZ1nWG1MBNGWChyWobnTKYDh4c80+ftSyPHAdeV6KOwADOu6MXvMXHMK3EDe4jn+R0ZArQTEF2qKSBgve23wQu5IoqdWjvBoIEGqxw3LkYbdGxZ5dqKlP5ePkRKal4TncV+tlhueDaKz8QfvXgz+y2jc3HMWAH6a7UYsDKutDttmDDVUwfMcvoS9j2VYOUHkTCenx/2Y3296ULmWCREW9e6fTXLmOowIBDAar01CThmAzYCnBDNAFOsolh9dL1CKwLCvOyK1UBgJlfrzdGI/+fS7aFiaqhXpt6hI4xndJf [email protected]
[[email protected] ~]$ chmod 700 .ssh
[[email protected] ~]$ chmod 600 .ssh/authorized_keys

Validating the keyless login:

[[email protected] .ssh]$ ssh client1
The authenticity of host 'client1 (192.168.1.21)' can't be established.
ECDSA key fingerprint is SHA256:TUQNYdF4nxofGwFO7/z+Y5dUETVEI0xPQL4n1cUcoCI.
ECDSA key fingerprint is MD5:5d:73:1f:64:0e:03:ac:a7:7b:33:76:08:6d:09:90:26.
Are you sure you want to continue connecting (yes/no)? yes
Warning: Permanently added 'client1,192.168.1.21' (ECDSA) to the list of known hosts.
Last login: Sun Mar  4 13:39:33 2018
[[email protected] ~]$ exit
logout
Connection to client1 closed.
[[email protected] .ssh]$
[[email protected] .ssh]$ ssh client2
The authenticity of host 'client2 (192.168.1.22)' can't be established.
ECDSA key fingerprint is SHA256:7JoWzteeQBwzc4Q3GGN+Oa4keUPMca/jtqv7gmmEZxg.
ECDSA key fingerprint is MD5:85:77:3a:a3:07:31:d4:c1:41:ed:30:db:74:b4:ce:67.
Are you sure you want to continue connecting (yes/no)? yes
Warning: Permanently added 'client2,192.168.1.22' (ECDSA) to the list of known hosts.
Last login: Sun Mar  4 13:51:27 2018
[[email protected] ~]$ exit
logout
Connection to client2 closed.
[[email protected] .ssh]$ 

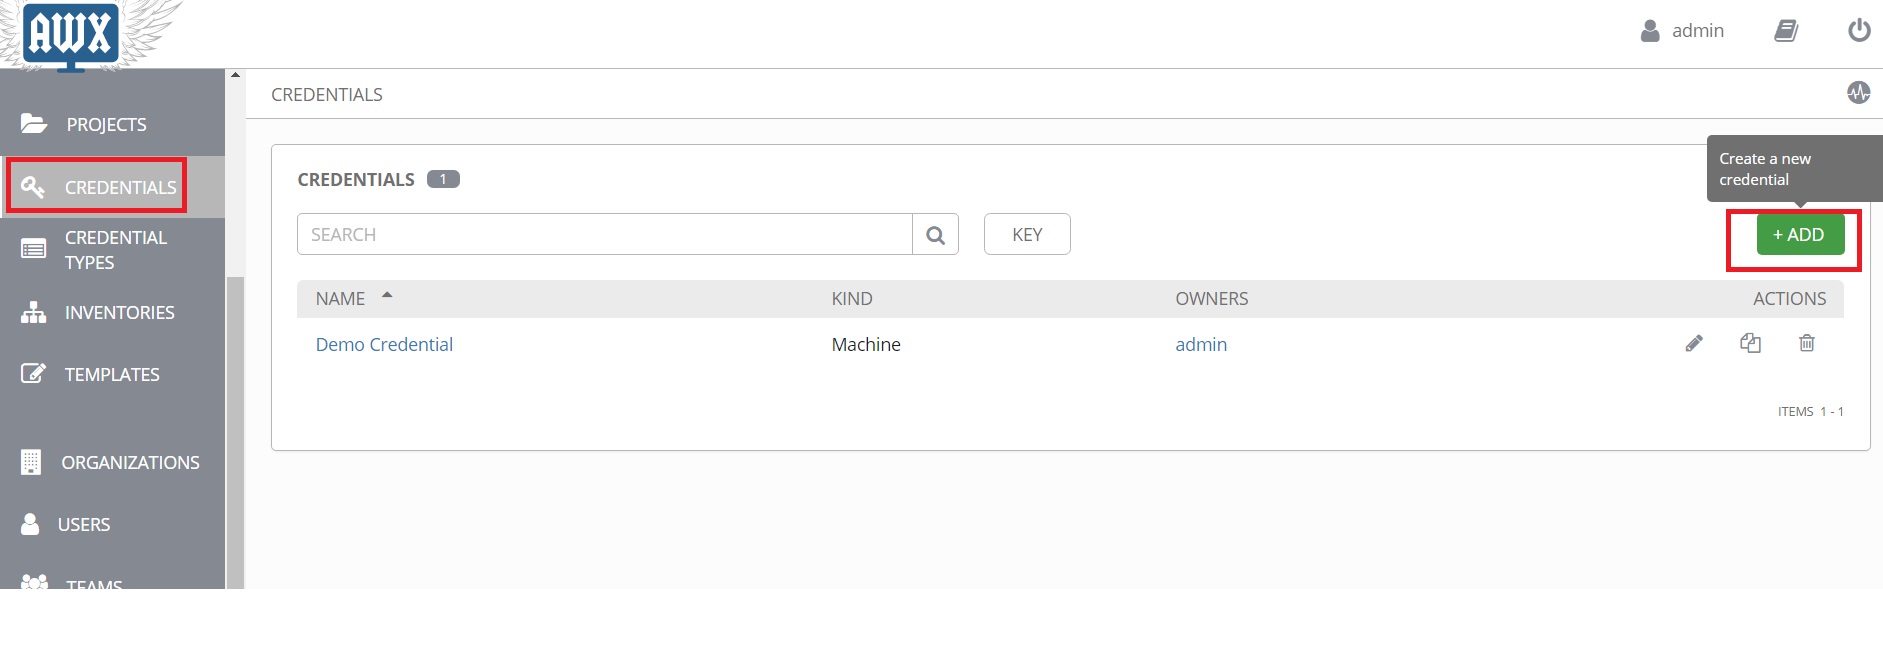
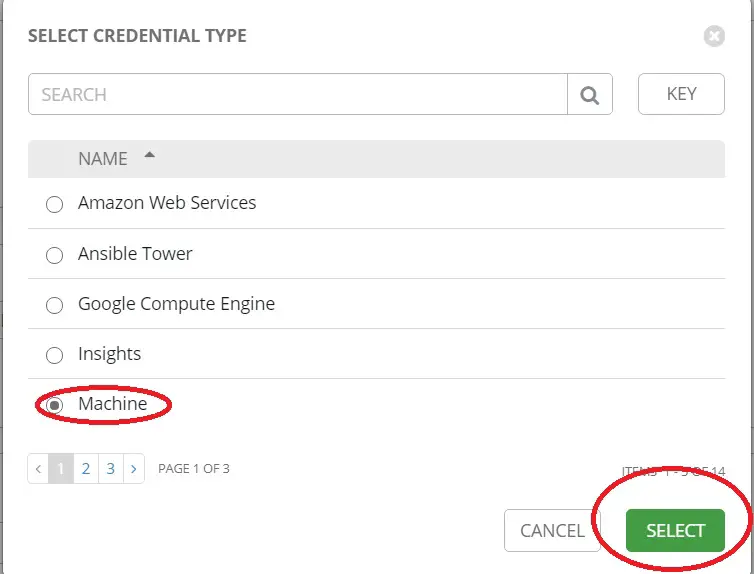
Now click on this icon and go to credentials -> add

Add Credentials

Add button

Choose an organization and fill in the username and description.

Here the username is "ansible"

Ansible user

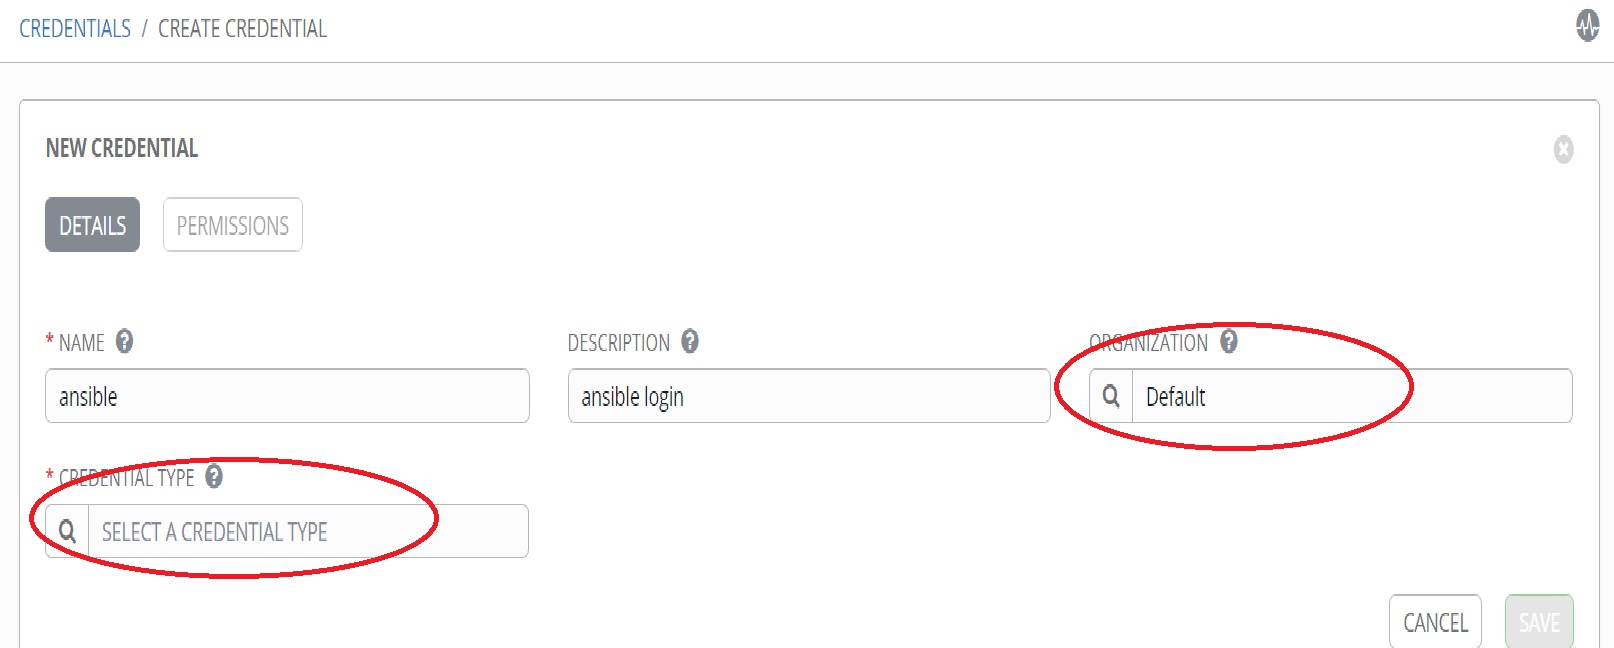
Choose 'machine' under credential type and fill the details.

Credential type

Get the private key from AWX server.

[[email protected] .ssh]$ pwd
/home/ansible/.ssh
[[email protected] .ssh]$ cat id_rsa
id_rsa      id_rsa.pub
[[email protected] .ssh]$ cat id_rsa
-----BEGIN RSA PRIVATE KEY-----
MIIEpAIBAAKCAQEAuEJrs41ZxlJ09aOsRlw9wwgz1DIk39MVJDlOJGK5KcR2GdZ1
htTATRlgoclqG50ymA4eHPNPn7UsjxwHXleijsAAzrujF7zFxzCtxA3uI5/kdGQK
0ExBdqikgYL3tt8ELuSKKnVo7waCBBqscNy5GG3RsWeXaipT+Xj5ESmpeE53FfrZ
Ybng2is/EH714M/sto3NxzFgB+mu1GLAyrrQ7bZgw1VMHzHL6EvY9lWDlB5Ewnp8
f9mN9velC5lgkRFvXun01y5jqMCAQwGq9NQk4ZgM2ApwQzQBTrKJYfXS9QisCwrz
sitVAYCZX683RiP/n0u2hYmqoV6beoSOMZ3SXwIDAQABAoIBAQCcfiUU6S9fJfca
DTmqxHrcIyJJzZDN3GvvSRBaDNLwa2BWz3Mf4Z+1m6Ebp4IME/W9ePgQZIGyxeAj
Z43Gja2Nifrlmi2JYpWjeG+MvLwN26XfSHx6rtlGmzKkoIQc98qIvSevqepGYAOa
0sC0VnKKEfNvtei+jVam4hy/e9/oQWHV8c/yueLWpCx2pWOy5m7WVLdwNQSK+8pu
sxHLFTNCSC9wddBN80FVxhJQ7L4D2DzcprhcfUz6Uz7Ju7v8MtSksirDnaGliWJ3
NvxhntJYKvgQ30pvBr//y0lYnAB+O0jJhOpHlgD2hNSlI8sgUxmVyl+gC9Dhnq+v
1uKm3CThAoGBAOx+YIGGT/ymqJ53k8Dj4keKctI4+E3p/7Tr2jEyRff177VUjITQ
UnrRTw1W+XSE5cszitVYbv0WUwTJoSSrKaRaVG7iORaqcv0LkG8gnlcrcifRXSl5
5xMsPCw0adwtoyhrHQLbENntMl+iQw2JbE6fvldvNe2kPdL3B2T7Jw1RAoGBAMd1
GvsOHLaKtTD0me+wgGnql0GIp90elE7rQ1p6VMxZkE68b+0jX9xHAt2zxocR84+L
Gi6uAZvBqnwmH48c7Do6/oulrJXH2OcT6S8+F/kM7PWNT0Z0J0MW/+npVoPwSihZ
N4/uanR47L0YYVlTRgxmakSUZnitrEz754V+YjivAoGBAM1qtC6tWHrO0/XZTbik
+F5FrphVLbCXiSlAF6TV0xqfP5gUmX2faZUOi4i9vC3uZZ9L5NKNXtJseq3U6Sht
l90PLPmnfAjpArozOkCcZ4y1yxE09KPbI9BugtGusSizZ13rNCbP22I/eprA2Vc/
v5jHflB547DIEX9WXNDkqjYRAoGACD3ag40tuo04t3Ej+zd71uSOo3KWHRjqX+hw
vAhaAKeiwt4ecdoIV/3HLIoFJgej3MaOqmceQeVaug6JN0ympjFR20tZOkcru0Cj
XgRe0Tergun34J1kEe2dXXj6zjDbn5cwKI5db7qfbaDYROyf9Fs3AOZw5YOnnva5
tlZmkJkCgYB0tuVLQSOWsqjTAgkw7tDIMOds9o8dpGJTvXxcs2qWJIDQPQWxHVSl
Qimh5DFBkrNDAYKKC386KaZOEKwG7G1YuGbh1+ns3piscJaBi2lPaeA1Y/QA6pCT
t9Hbdzre5x0gDbKSHOk+QLJkVdfQX9jamRE6W0k0pXVF6ur8N5zfxA==
-----END RSA PRIVATE KEY-----
[[email protected] .ssh]$

Private key (example).

-----BEGIN RSA PRIVATE KEY-----
MIIEpAIBAAKCAQEAuEJrs41ZxlJ09aOsRlw9wwgz1DIk39MVJDlOJGK5KcR2GdZ1
htTATRlgoclqG50ymA4eHPNPn7UsjxwHXleijsAAzrujF7zFxzCtxA3uI5/kdGQK
0ExBdqikgYL3tt8ELuSKKnVo7waCBBqscNy5GG3RsWeXaipT+Xj5ESmpeE53FfrZ
Ybng2is/EH714M/sto3NxzFgB+mu1GLAyrrQ7bZgw1VMHzHL6EvY9lWDlB5Ewnp8
f9mN9velC5lgkRFvXun01y5jqMCAQwGq9NQk4ZgM2ApwQzQBTrKJYfXS9QisCwrz
sitVAYCZX683RiP/n0u2hYmqoV6beoSOMZ3SXwIDAQABAoIBAQCcfiUU6S9fJfca
DTmqxHrcIyJJzZDN3GvvSRBaDNLwa2BWz3Mf4Z+1m6Ebp4IME/W9ePgQZIGyxeAj
Z43Gja2Nifrlmi2JYpWjeG+MvLwN26XfSHx6rtlGmzKkoIQc98qIvSevqepGYAOa
0sC0VnKKEfNvtei+jVam4hy/e9/oQWHV8c/yueLWpCx2pWOy5m7WVLdwNQSK+8pu
sxHLFTNCSC9wddBN80FVxhJQ7L4D2DzcprhcfUz6Uz7Ju7v8MtSksirDnaGliWJ3
NvxhntJYKvgQ30pvBr//y0lYnAB+O0jJhOpHlgD2hNSlI8sgUxmVyl+gC9Dhnq+v
1uKm3CThAoGBAOx+YIGGT/ymqJ53k8Dj4keKctI4+E3p/7Tr2jEyRff177VUjITQ
UnrRTw1W+XSE5cszitVYbv0WUwTJoSSrKaRaVG7iORaqcv0LkG8gnlcrcifRXSl5
5xMsPCw0adwtoyhrHQLbENntMl+iQw2JbE6fvldvNe2kPdL3B2T7Jw1RAoGBAMd1
GvsOHLaKtTD0me+wgGnql0GIp90elE7rQ1p6VMxZkE68b+0jX9xHAt2zxocR84+L
Gi6uAZvBqnwmH48c7Do6/oulrJXH2OcT6S8+F/kM7PWNT0Z0J0MW/+npVoPwSihZ
N4/uanR47L0YYVlTRgxmakSUZnitrEz754V+YjivAoGBAM1qtC6tWHrO0/XZTbik
+F5FrphVLbCXiSlAF6TV0xqfP5gUmX2faZUOi4i9vC3uZZ9L5NKNXtJseq3U6Sht
l90PLPmnfAjpArozOkCcZ4y1yxE09KPbI9BugtGusSizZ13rNCbP22I/eprA2Vc/
v5jHflB547DIEX9WXNDkqjYRAoGACD3ag40tuo04t3Ej+zd71uSOo3KWHRjqX+hw
vAhaAKeiwt4ecdoIV/3HLIoFJgej3MaOqmceQeVaug6JN0ympjFR20tZOkcru0Cj
XgRe0Tergun34J1kEe2dXXj6zjDbn5cwKI5db7qfbaDYROyf9Fs3AOZw5YOnnva5
tlZmkJkCgYB0tuVLQSOWsqjTAgkw7tDIMOds9o8dpGJTvXxcs2qWJIDQPQWxHVSl
Qimh5DFBkrNDAYKKC386KaZOEKwG7G1YuGbh1+ns3piscJaBi2lPaeA1Y/QA6pCT
t9Hbdzre5x0gDbKSHOk+QLJkVdfQX9jamRE6W0k0pXVF6ur8N5zfxA==
-----END RSA PRIVATE KEY-----

Copy the private key under ssh private key and click on save.

Sek key

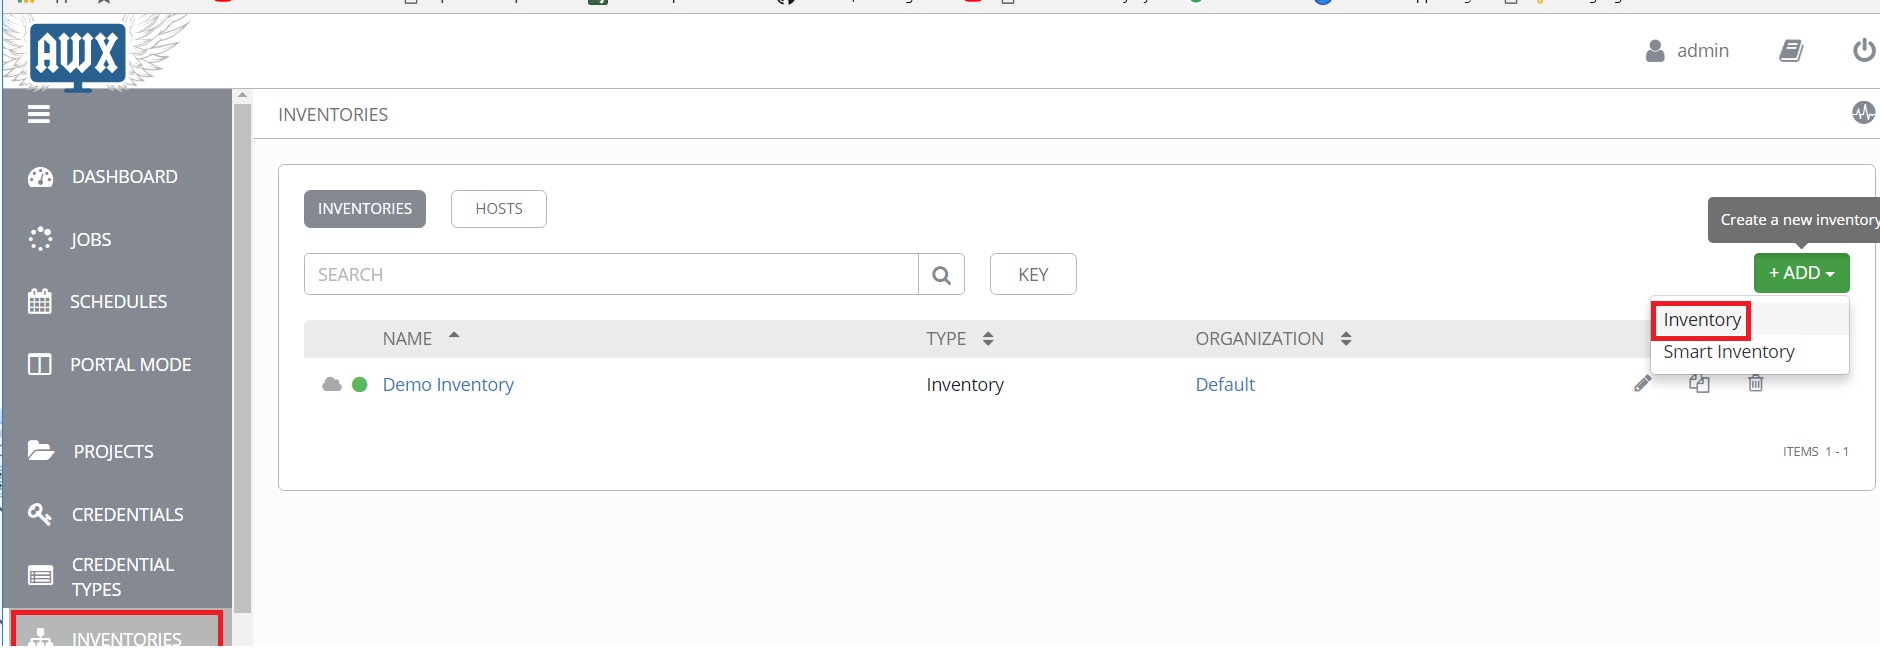
Click on Inventories and click on add inventory.

Add inventory

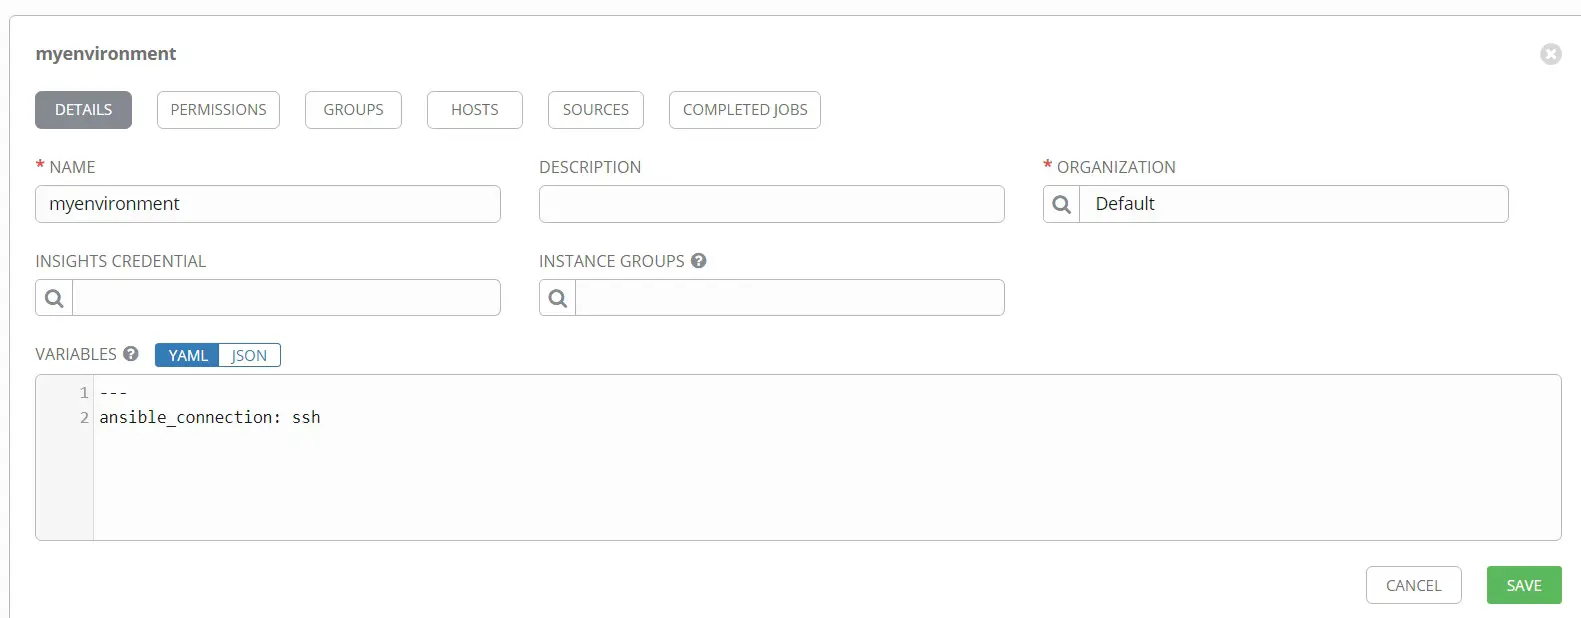
Fill the details accordingly.

Fill inventory details

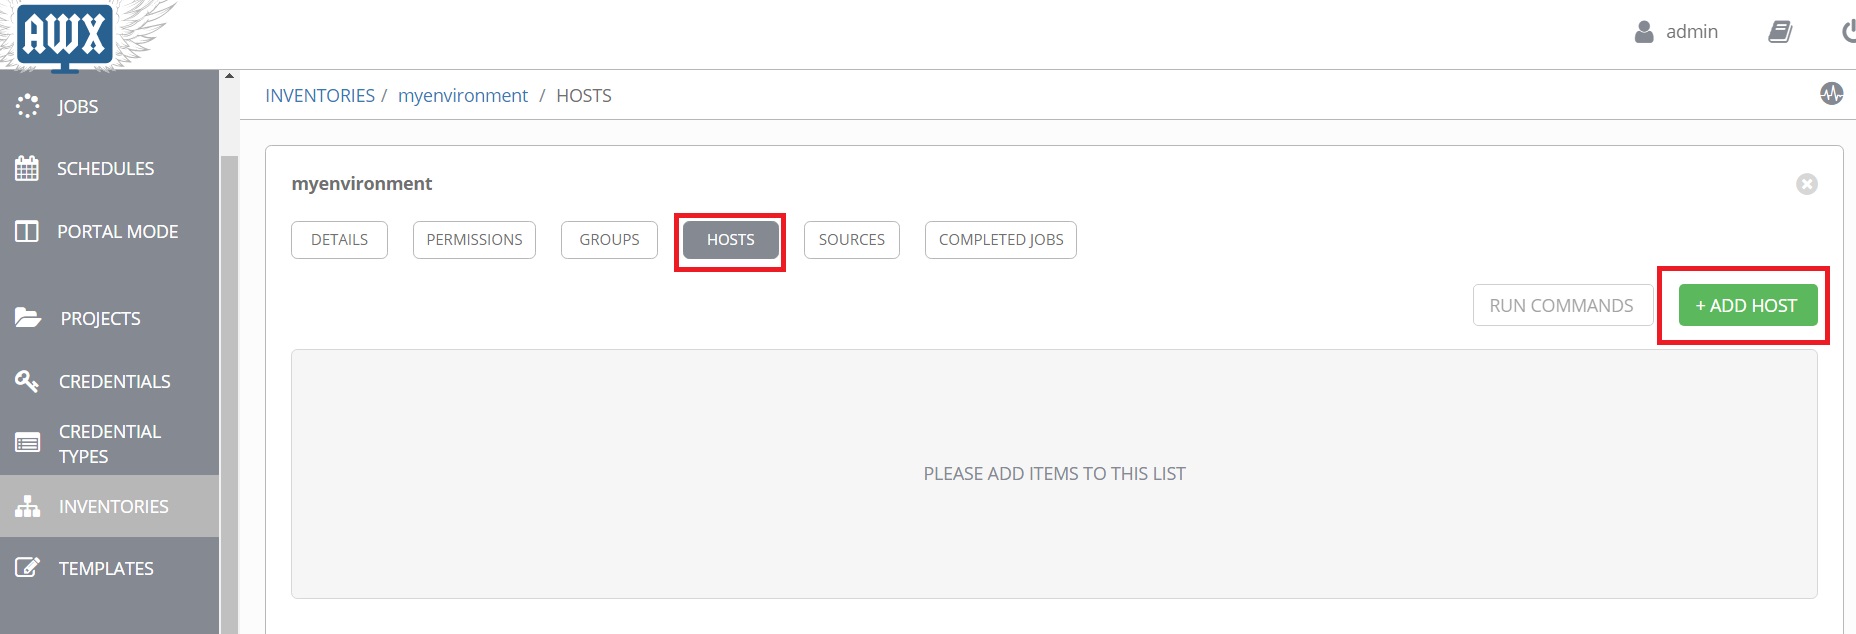
Click on hosts -> add host.

Add host

Add the below details:

Host details

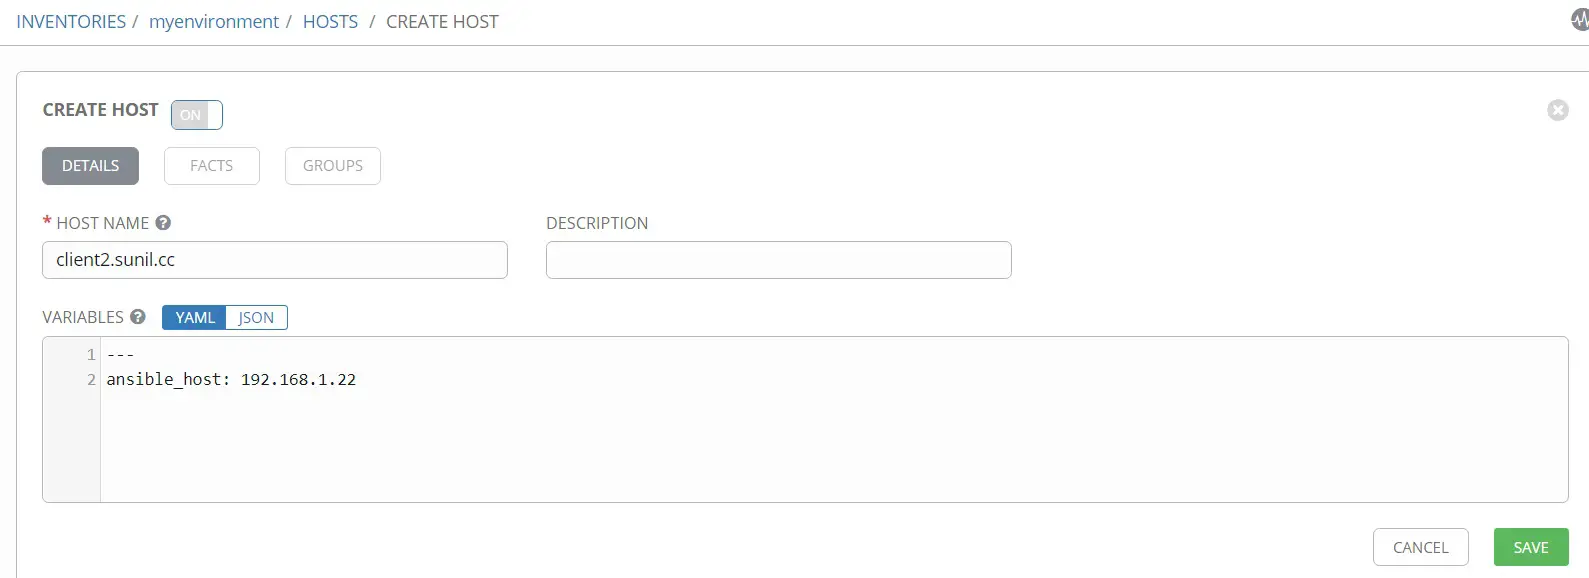
Add the below details for client2.

Details for client 2

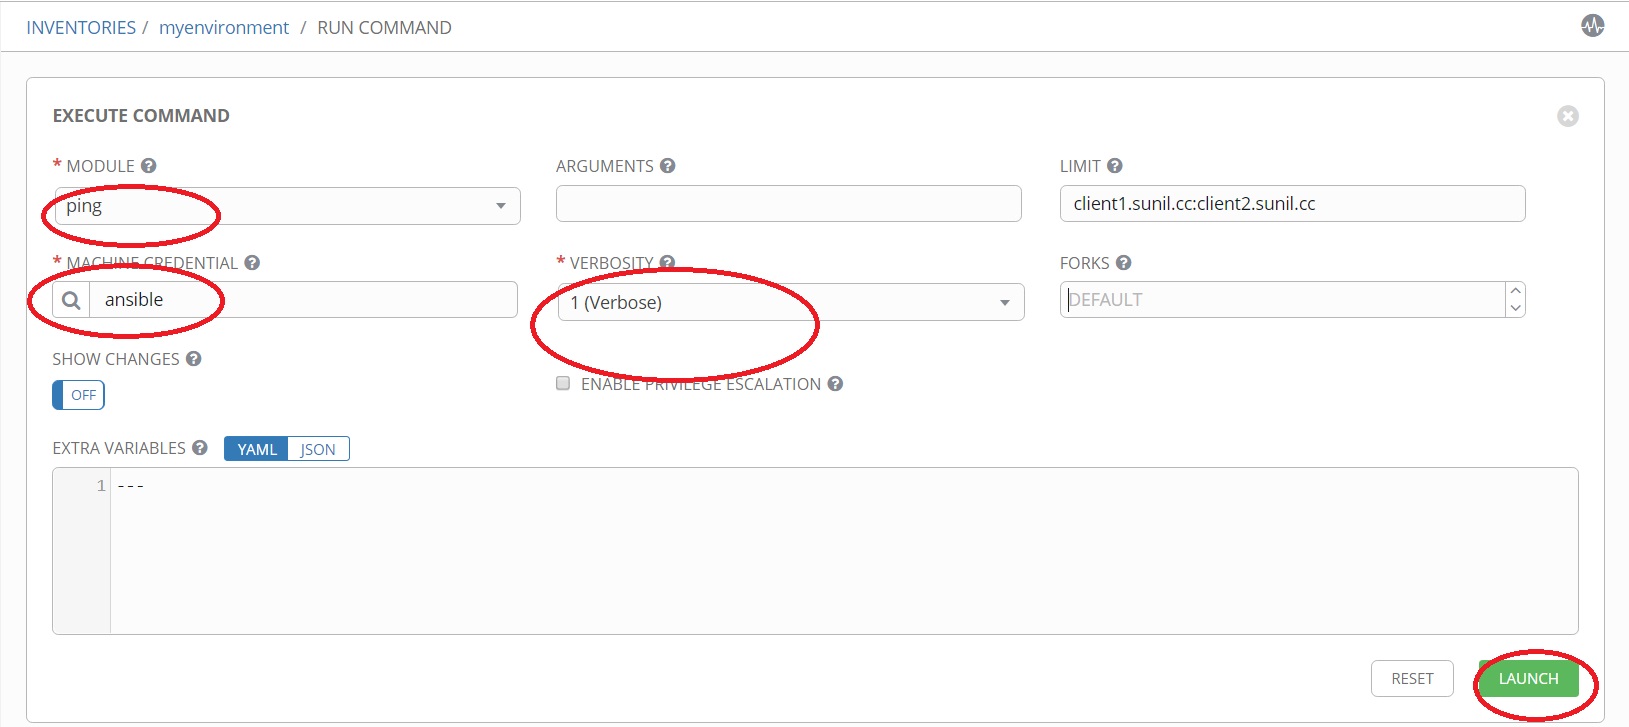
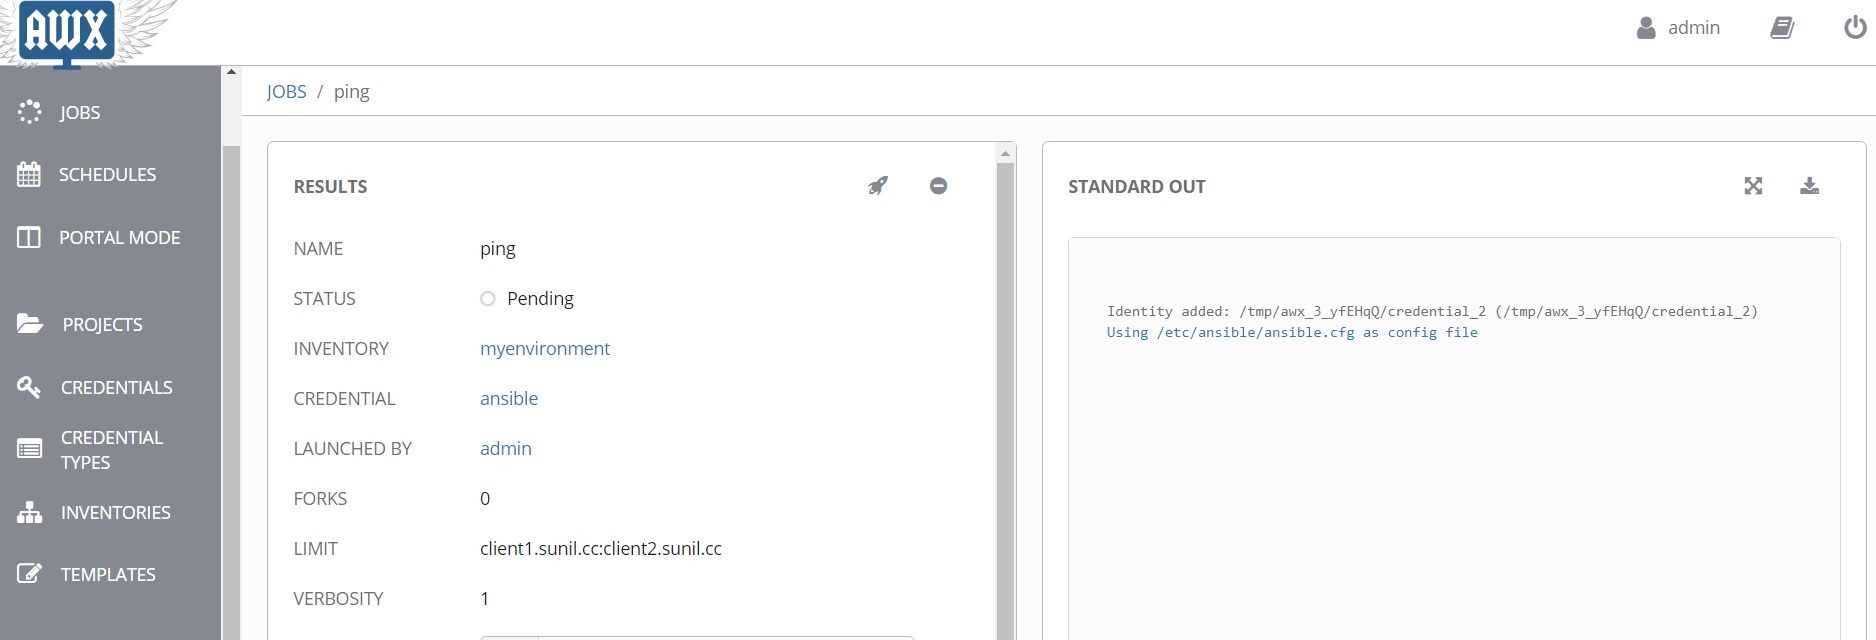
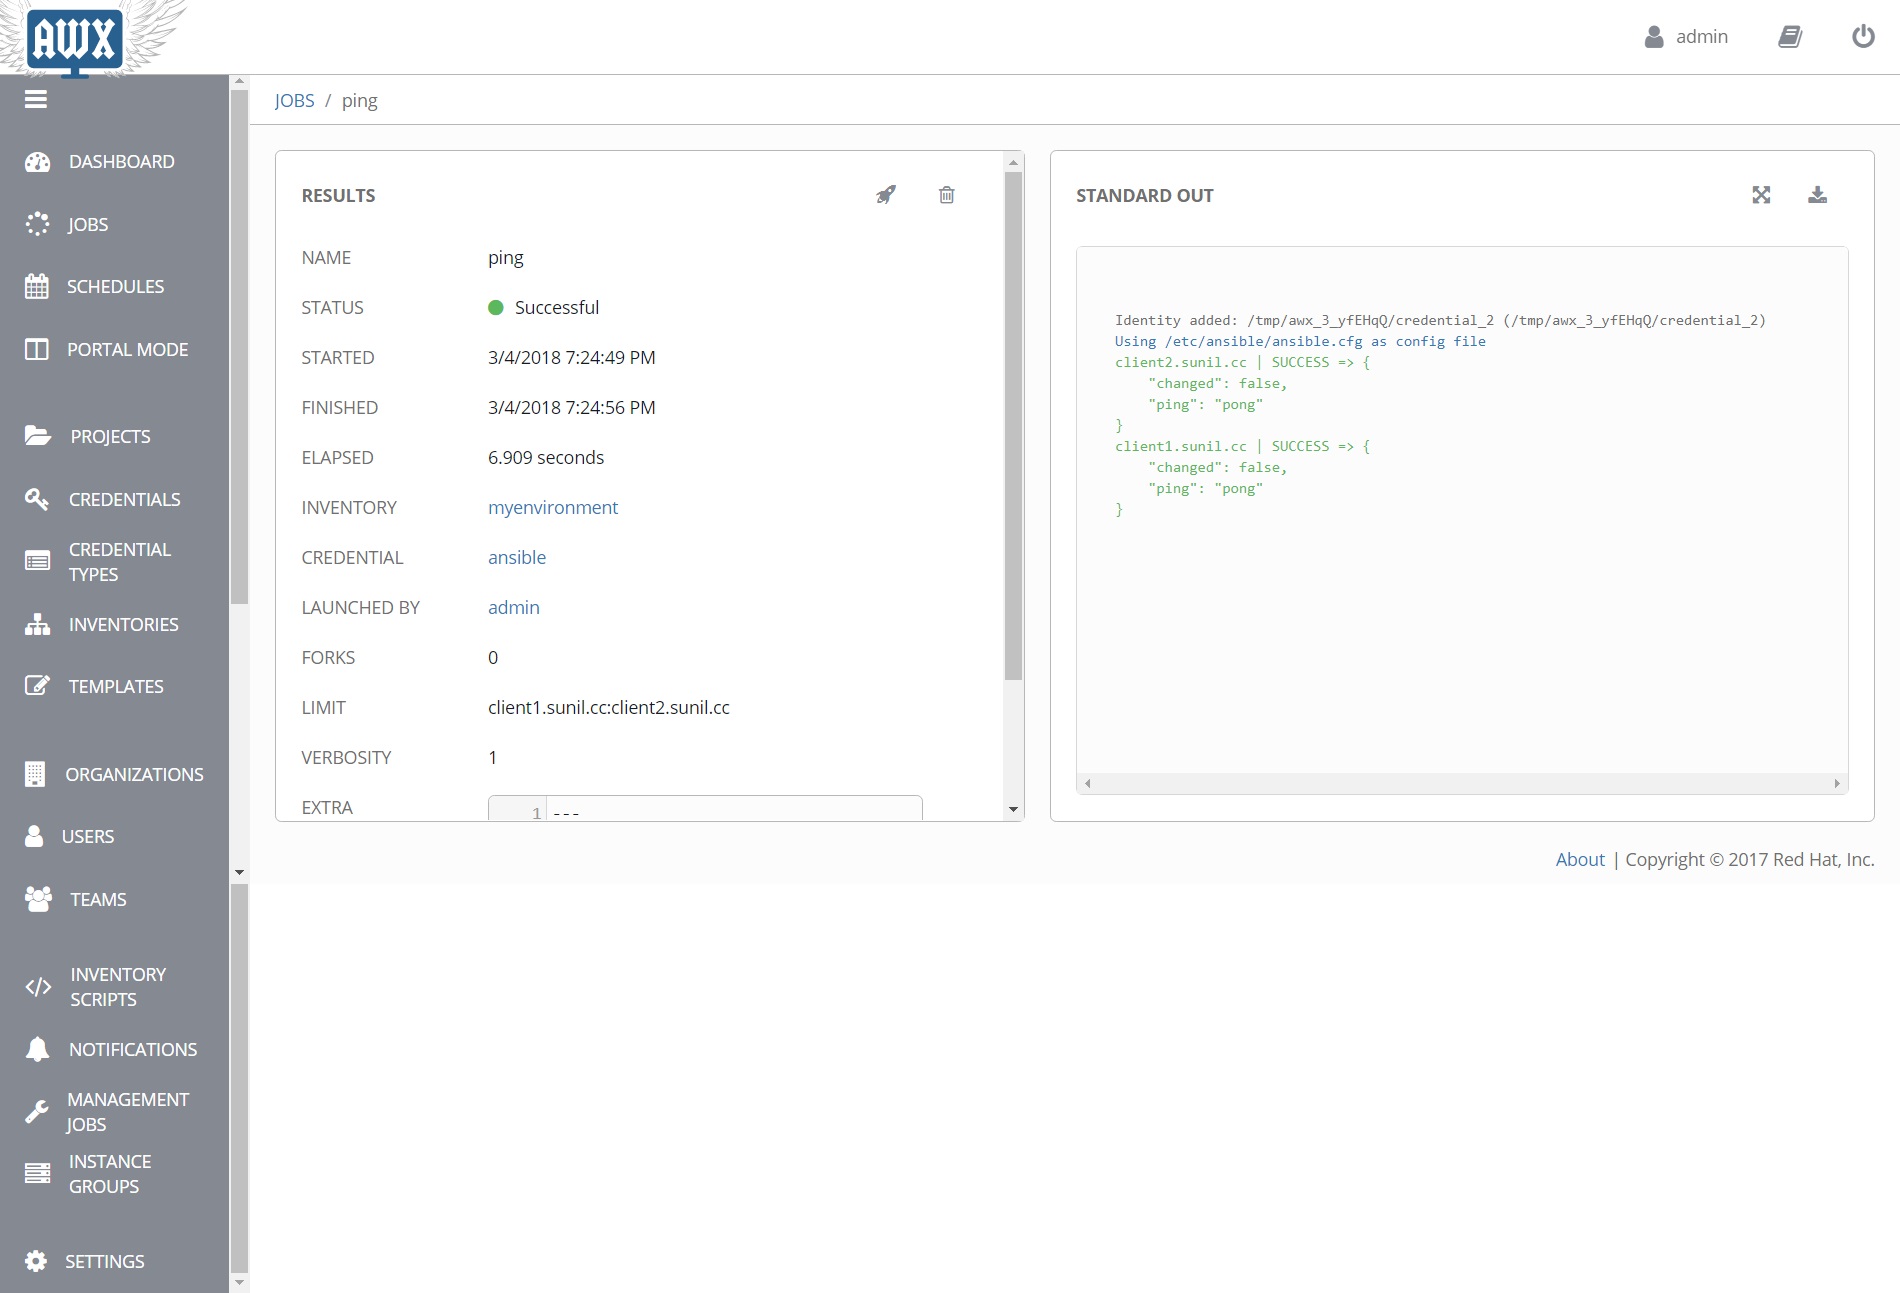
Test the connectivity via AWX.

Select both the hosts and click on run commands.

Choose ping and other details and click on Launch.

That's it for this tutorial. I will show you in the next tutorial how to install AWX via rpm and also how to run playbooks, doing API calls in further tutorials.

Reference

Share this page:

36 Comment(s)

Add comment

Please register in our forum first to comment.

Comments

By: Tom

This line: awx_alternate_dns_servers="4.2.2.1,4.2.2.1" in the "Edit the following parameters in inventory." section is wrong. The 2nd IP should be .2

By: till

Thank you for the hint. I've corrected that in the tutorial.

By: steve johnson

Nice article .

By: Ron HD

Why the requirement to disable the firewall? That's a non-starter for me.

By: Jobling

+1 for the same doubt.

By: adam

crazy-town.  Docker can't run with SELinux enabled.  SELinux is NOT a firewall.  If you want a firewall then manage IP tables on your box or work with an external device (even another server) to be the route to your host.  

By: Daniel

First, in the turorial SELinux and FirewallD is deaktivated. I wouldn't recommend that in production.. 

Second, of course you can run SELinux with Docker.. at least on CentOS there is absolutely no problem with it, if you know what you do. 

By: David Trigo

After installation, it's necessary to wait until containers are updated.

docker logs -f awx_task

By: koko

Hi,

It's want to user root user. What's wrong ?

#######

Identity added: /tmp/awx_15_oXU0eR/credential_2 (/tmp/awx_15_oXU0eR/credential_2) ansible 2.5.0 config file = /etc/ansible/ansible.cfg configured module search path = [u'/var/lib/awx/.ansible/plugins/modules', u'/usr/share/ansible/plugins/modules'] ansible python module location = /usr/lib/python2.7/site-packages/ansible executable location = /usr/bin/ansible python version = 2.7.5 (default, Aug 4 2017, 00:39:18) [GCC 4.8.5 20150623 (Red Hat 4.8.5-16)] Using /etc/ansible/ansible.cfg as config file Parsed /tmp/awx_15_oXU0eR/tmptGLInl inventory source with script plugin META: ran handlers Using module file /usr/lib/python2.7/site-packages/ansible/modules/system/ping.py <192.168.122.21> ESTABLISH SSH CONNECTION FOR USER: root <192.168.122.21> SSH: EXEC ssh -o StrictHostKeyChecking=no -o KbdInteractiveAuthentication=no -o PreferredAuthentications=gssapi-with-mic,gssapi-keyex,hostbased,publickey -o PasswordAuthentication=no -o User=root -o ConnectTimeout=10 192.168.122.21 '/bin/sh -c '"'"'echo ~ && sleep 0'"'"'' Using module file /usr/lib/python2.7/site-packages/ansible/modules/system/ping.py <192.168.122.22> ESTABLISH SSH CONNECTION FOR USER: root <192.168.122.22> SSH: EXEC ssh -o StrictHostKeyChecking=no -o KbdInteractiveAuthentication=no -o PreferredAuthentications=gssapi-with-mic,gssapi-keyex,hostbased,publickey -o PasswordAuthentication=no -o User=root -o ConnectTimeout=10 192.168.122.22 '/bin/sh -c '"'"'echo ~ && sleep 0'"'"'' <192.168.122.21> (255, '', 'Permission denied (publickey,gssapi-keyex,gssapi-with-mic,password).\\r\\n') client1 | UNREACHABLE! => { "changed": false, "msg": "Failed to connect to the host via ssh: Permission denied (publickey,gssapi-keyex,gssapi-with-mic,password).\\r\\n", "unreachable": true } client2 | UNREACHABLE! => { "changed": false, "msg": "Failed to connect to the host via ssh: Permission denied (publickey,gssapi-keyex,gssapi-with-mic,password).\\r\\n", "unreachable": true }


By: koko

It's Ok ,

It was ansible user 

By: martin

Hi 

Thanks for the guide.  It broke at the awx install stage.  After some mucking around I discovered that if I reverted to an earlier ansible version it worked fine.  2.6.1 was installed - which I removed sudo yum remove ansible then installed 2.5.1 using pip sudo pip install 'ansible==2.5.1' .  After that all was well. Hopefully this might save someone a bit of time

By: manjul

Hello There,


I'm getting below an error while adding host awx.


Call to /api/v2/hosts/. GET returned: undefined A server error has occurred.


When i checked in rabbitmq container's logs file getting below an error.


=INFO REPORT==== 7-Aug-2018::07:55:36 ===closing AMQP connection (172.17.0.5:54772 -> 172.17.0.3:5672)=INFO REPORT==== 7-Aug-2018::07:55:39 ===accepting AMQP connection (172.17.0.6:37076 -> 172.17.0.3:5672)=ERROR REPORT==== 7-Aug-2018::07:55:39 ===Error on AMQP connection (172.17.0.6:37076 -> 172.17.0.3:5672, state: starting):AMQPLAIN login refused: user 'guest' - invalid credentials

By: hailt1

Hi you;

I can not ping or ssh to host client when user ansible.

=======ERROR LOG==============TASK [Gathering Facts] *********************************************************fatal: [192.168.59.37]: UNREACHABLE! => {"changed": false, "msg": "Failed to con          nect to the host via ssh: Permission denied (publickey,gssapi-keyex,gssapi-with-          mic,password).\r\n", "unreachable": true}        to retry, use: --limit @/etc/ansible/site.retryPLAY RECAP *********************************************************************192.168.59.37              : ok=0    changed=0    unreachable=1    failed=0TASK [Gathering Facts] *********************************************************fatal: [192.168.59.37]: UNREACHABLE! => {"changed": false, "msg": "Failed to con          nect to the host via ssh: Permission denied (publickey,gssapi-keyex,gssapi-with-          mic,password).\r\n", "unreachable": true}        to retry, use: --limit @/etc/ansible/site.retryPLAY RECAP *********************************************************************192.168.59.37              : ok=0    changed=0    unreachable=1    failed=0=======================================================

Pls, help me. as soon as possible.


Thanks.

Hai Le

By: Steve

The install playbook fails with missing variables for awx_web & awx_task.

By: Siva

Hi Manjul


Were you able to find a solution for this ?

By: Kamil

Hi!

How can I update it to the latest version?

By: Todd S

Do we have to install the docker-ce with a particular filesystem. There is an error that surfaced during the "systemctl start docker" process. I had the docker application running before, I removed it and then installed docker-ce. I ran into a number of errors from this process.

It gives me an error message that states an aspect of the filesystem is not supported.

Todd


By: sathwik

how to change the hostport for awx_web container

By: Geoffrey M

Got AWX installed OK on Centos 7 but could not get the basic ping connectivity test working, ssh failed

Issue caused by 'ansible' userid on client computers needs a file called ' ~/.ssh/config' with the contents:

Host *IdentityFile ~/.ssh/id_rsaAddKeysToAgent yes


Then run 'chmod 600 ~/.ssh/config' (should be owned by 'ansible' obviously)

Reference: https://github.com/ansible/ansible/issues/22745

Now the ping connectivity works


By: Geoffrey M

Formatting on the lines needed in the file called '~/.ssh/config' should be on 3 seperate lines ie:


Host *


IdentityFile ~/.ssh/id_rsa


AddKeysToAgent yes


By: Lok

Getting error while installing AWX via ansible command.

fatal: [localhost]: FAILED! => {"changed": false, "msg": "Cannot have both the docker-py and docker python modules (old and new version of Docker SDK for Python) installed together as they use the same namespace and cause a corrupt installation. Please uninstall both packages, and re-install only the docker-py or docker python module. It is recommended to install the docker module if no support for Python 2.6 is required. Please note that simply uninstalling one of the modules can leave the other module in a broken state."}

Installing collected packages: pip  Found existing installation: pip 8.1.2    Uninstalling pip-8.1.2:      Successfully uninstalled pip-8.1.2Successfully installed pip-19.1.1

By: Raghava

Hi Admin,


After installing all the steps I am getting the below error. Please help me to take this forward.


[DEPRECATION WARNING]: The 'docker_service' module has been renamed to 'docker_compose'.. This feature will be removed in version2.12. Deprecation warnings can be disabled by setting deprecation_warnings=False in ansible.cfg.fatal: [localhost]: FAILED! => {"changed": false, "msg": "Unable to load docker-compose. Try `pip install docker-compose`. Error: No module named compose"}

By: Raghava

Hi Admin,

I am getting the following error. Kindly help in getting the below issue resolved.

"Error connecting: Error while fetching server API version: Timeout value connect was Timeout(connect=10, read=10, total=None), but it must be an int or float."


By: Thanga

Hello Raghava, 

Even I am facing the same issue, were u able to fix it ?

By: Raghava

Hi Team,

I see docker images as

postgres

memcached

ansible/awx_task

ansible/awx_web

hello_world

But when I run the docker ps command I see only below. i dont see that postgres, awx_task, awx_web are not running. Please help me in fixing this issue.

By: Raghava

Hi Team,

I observe that Postgres is keep on trying to restart but it is not coming up. Please hel pme to fix this issue

By: Matt

 Hello,


I've got the error : 

TASK [local_docker : Start the containers] ***************************************************************************************************************************************************************************************************************************************************

task path: /root/awx/installer/roles/local_docker/tasks/compose.yml:25

fatal: [localhost]: FAILED! => {"changed": false, "errors": [], "module_stderr": "", "module_stdout": "", "msg": "Error starting project 500 Server Error: Internal Server Error (\"Get https://registry-1.docker.io/v2/: net/http: request canceled while waiting for connection (Client.Timeout exceeded while awaiting headers)\")"}


We're using a proxy in my company. I set it for pip, yum, git... But it's not working in that case. I added it in the install.yml, but still the same. 

Where should I set the proxy ?


Thanks

By: raj

*

fatal: [localhost]: FAILED! => {"changed": false, "errors": [], "module_stderr": "", "module_stdout": "", "msg": "Error starting project 500 Server Error: Internal Server Error (\"Get https://registry-1.docker.io/v2/: net/http: request canceled while waiting for connection (Client.Timeout exceeded while awaiting headers)\")"}

I am getting the above error, not sure how to troubleshoot.  No i am not using proxy at all.

By: Matt

I found out.

Proxy must be added in /etc/sysconfig/docker :

HTTP_PROXY="http://user01:[email protected]:8080" HTTPS_PROXY="https://user01:[email protected]:8080"

By: Wally

In my environment, before launching ansible-playbook command ("ansible-playbook -i inventory install.yml -vv"), I needed to clean up some python modules for docker as follows:

# pip uninstall docker docker-py docker-compose

and then install just "docker-compose" again, otherwise ansible fails:

# pip install docker-compose

By: Jeremy

This worked for me with CentOS 7.7.

By: Joseph

I got a hint from you. Thank you.

I needed to do like this : 

# pip uninstall docker

# pip uninstall docker-py

# pip uninstall docker-compose

# pip install docker==3.7.3 docker-compose


BTW, Task "local_docker : Start the containers" took a really long time for my environment.

By: penguinpages

Fresh install CentOS7 7.7.1908 fully updated.  ansible00 3.10 and docker-ce-19.03.5-3installed.


per instructions above noted deviation on the output options on inventory file:

(base) [[email protected] installer]# cat inventory |grep -v "#"

#########

localhost ansible_connection=local ansible_python_interpreter="/usr/bin/env python"

[all:vars]

dockerhub_base=ansible

awx_task_hostname=awx

awx_web_hostname=awxweb

postgres_data_dir="/var/lib/pgdocker"

host_port=80

host_port_ssl=443

docker_compose_dir="~/.awx/awxcompose"

pg_username=awx

pg_password=awxpass

pg_database=awx

pg_port=5432

rabbitmq_password=awxpass

rabbitmq_erlang_cookie=cookiemonster

admin_user=admin

admin_password=password

create_preload_data=True

secret_key=awxsecret

awx_official=true

equires cloning awx-logos repo as a sibling of this project.

awx_official=true

awx_official=true

awx_alternate_dns_servers="172.16.100.40,8.8.8.8"

project_data_dir=/var/lib/awx/projects

##


Nothing jumped out as bad but lack of section from example of the postgres database account info did have me scratch head a bit:

pg_username=awx pg_password=awxpass pg_database=awx pg_port=5432


Ran through install and get the following errors

(base) [[email protected] installer]# ansible-playbook -i inventory install.yml -vv


TASK [local_docker : Create Docker Compose Configuration] *******************************************************************************************************************************************************************************

task path: /opt/awx/installer/roles/local_docker/tasks/compose.yml:7

failed: [localhost] (item=environment.sh) => {"ansible_loop_var": "item", "changed": false, "checksum": "e369ef7b0186eef5f38dc16027878a3a6a0d9f0c", "item": "environment.sh", "msg": "Aborting, target uses selinux but python bindings (libselinux-python) aren't installed!"}

failed: [localhost] (item=credentials.py) => {"ansible_loop_var": "item", "changed": false, "checksum": "9d8c48ec0e65f6cc2aa8d1e2720f826b0f65551a", "item": "credentials.py", "msg": "Aborting, target uses selinux but python bindings (libselinux-python) aren't installed!"}

failed: [localhost] (item=docker-compose.yml) => {"ansible_loop_var": "item", "changed": false, "checksum": "992c9032bb1c9236819ab991bcab6beffcc0bdf2", "item": "docker-compose.yml", "msg": "Aborting, target uses selinux but python bindings (libselinux-python) aren't installed!"}

failed: [localhost] (item=nginx.conf) => {"ansible_loop_var": "item", "changed": false, "checksum": "5706491c1c00d32dd0a1b96a88c12a842ccbf32c", "item": "nginx.conf", "msg": "Aborting, target uses selinux but python bindings (libselinux-python) aren't installed!"}


PLAY RECAP ******************************************************************************************************************************************************************************************************************************

localhost                  : ok=9    changed=0    unreachable=0    failed=1    skipped=100  rescued=0    ignored=0

###


I followed down rat hole of package missing https://github.com/ansible/ansible/issues/34340  

(base) [[email protected] tasks]# rpm -qa |grep libselinux-python

libselinux-python-2.5-14.1.el7.x86_64

(base) [[email protected] installer]# getenforce

Permissive


Any suggestions as to what issue is with AWX on docker for CentOS related to a permissive SELinux set system with noted libselinux-python module?


Thanks,


By: linuxpause

If you meet this error : "Aborting, target uses selinux but python bindings (libselinux-python) aren't installed!" in the docker compose creation task, you can test this tips:

check you can import selinux with python :

ansible --version           for check the version of python you use

python (supposed my version is python3)

import selinux


if you got an error on import, you can consider your module selinux are not successfully install, so to must resolve it, do :

pip3 install selinux , and replay the previously steps for check. If all is ok, you can replay the playbook

By: sneha

Hi,

I have successfully installed awx ansible tower.I am able to add ssh key. But hen i am trying to ping my localhost i am getting error :Failed to launch adhoc command. POST returned status: 500 A server error has occurred.

Project is getting created but it is throwing the same 500 error. I have follwed this document till the end and i need only localhost.

By: SaiIsah

I'm getting install.yml file not found moreover insstall directory was not there under /root/awx, I have created and then added invetory file.

can you suggest where I can I find yuml file and how to resolve this issue.


Note: CentOS 7.7


[[email protected] installer]# ansible-playbook -i inventory install.yml -vvansible-playbook 2.9.27  config file = /etc/ansible/ansible.cfg  configured module search path = [u'/root/.ansible/plugins/modules', u'/usr/share/ansible/plugins/modules']  ansible python module location = /usr/lib/python2.7/site-packages/ansible  executable location = /usr/bin/ansible-playbook  python version = 2.7.5 (default, Nov 16 2020, 22:23:17) [GCC 4.8.5 20150623 (Red Hat 4.8.5-44)]Using /etc/ansible/ansible.cfg as config fileERROR! the playbook: install.yml could not be found