How to Install Taiga.io Project Management Software on CentOS 7
On this page
- Prerequisites
- What we will do
- Step 1 - Install Packages
- Step 2 - Install and Configure PostgreSQL
- Step 3 - Add Taiga User
- Step 4 - Configure Taiga Back
- Step 5 - Configure Taiga Frontend
- Step 6 - Configure Taiga Events
- Step 7 - Install and Configure Circus
- Step 8 - Configure Taiga Nginx Virtual Host
- Step 9 - Allowing Nginx to Access the Taiga Frontend
- Step 10 - Testing
- Reference
Taiga.io is an open source project management system for agile developers, designers, and project managers. It's a beautiful project management tool that can handle both simple and complex projects for startups, software developers etc.
The Taiga platform has three main components, and each component has its own dependencies.
- Taiga-back: Backend of the application that provides an API. Written in Python and Django.
- Taiga-front-dist: Taiga Frontend written in AngularJS and CoffeeScript.
- Taiga-events: Taiga WebSocket server to show real-time changes in the apps. And using RabbitMQ as a message broker.
In this tutorial, I will show you step-by-step how to install the Taiga.io project management tools on the CentOS 7 server. We will also learn how setup and configure CentOS 7 server for Taiga.io installation.
Prerequisites
- CentOS 7
- Root privileges
What we will do
- Install Packages
- Install and Configure PostgreSQL
- Add Taiga User
- Configure Taiga Back
- Configure Taiga Frontend
- Configure Taiga Events
- Configure Circus Process Management
- Configure Nginx Virtual Host for Taiga.io
- Allow Nginx to Access the Taiga Frontend
- Testing
Step 1 - Install Packages
Before installing all of the Taiga.io components, we need to prepare the system by installing some packages. In this first step, we will install packages that needed for all Taiga components and modules, including Nginx, RabitMQ, Redis etc.
- Install Dependencies
We need 'Development Tools' for CentOS 7 that will be used for compiling some python modules.
Install the required packages using the yum command below.
sudo yum -y install gcc gcc-c++ make openssl-devel binutils autoconf flex bison libjpeg-devel freetype-devel zlib-devel perl-ZMQ-LibZMQ3 gdbm-devel ncurses-devel automake libtool libffi-devel curl git tmux gettext
- Install EPEL Repository
Now we need to install the EPEL (Extra Packages for Enterprise Linux) repository. It's needed for installing the Nginx web server, RabbitMQ and Redis.
Install EPEL Repository on the CentOS 7 system using the following command:
sudo yum -y install epel-release
- Install Python
Taiga.io needs Python 3.5 for installation. We will be using a third party repository - 'ius community' - to install Python 3.5.
Add the 'ius community' repository in the following way.
sudo yum install -y https://centos7.iuscommunity.org/ius-release.rpm
Now install Python 3.5 using the following yum command.
sudo yum -y install python35u python35u-pip python35u-devel python-devel python-pip python-virtualenvwrapper libxml2-devel libxslt-devel
- Install Nginx
Taiga.io is a web application tool, and it's running under the web server. And for this guide, we will be using Nginx as the web server.
Install Nginx from EPEL repository using the yum command below.
sudo yum -y install nginx
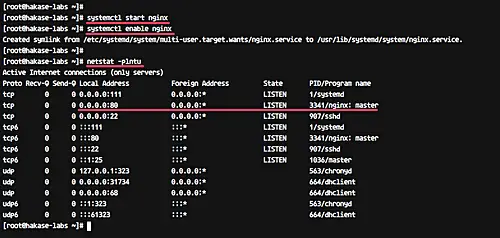
After the installation is complete, start the service and enable it to launch at system boot.
systemctl start nginx
systemctl enable nginx
Now check the open port using the netstat command.
netstat -plntu
And make sure you get the HTTP port 80 on the list as shown below.
- Install Redis and RabbitMQ
This is optional, as you can still run Taiga.io without these packages. Basically, the Redis and RabbitMQ packages will be used by taiga-events.
Install Redis and RabbitMQ from the EPEL repository using the yum command below.
yum -y install rabbitmq-server redis
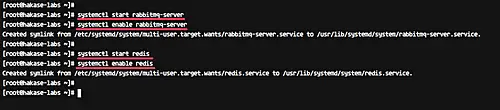
If the installation is complete, start both Redis and RabbitMQ services, then enable them to launch at system boot.
systemctl start rabbitmq-server
systemctl enable rabbitmq-server

systemctl start redis
systemctl enable redis
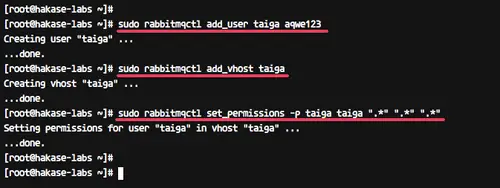
Next, we need to create a new user and virtual host named 'taiga' for the RabbitMQ, and it will be used for 'taiga-events'.
Run the following commands for creating new user and vhost named 'taiga' with password 'aqwe123', then set the permission for the 'taiga' user.
sudo rabbitmqctl add_user taiga aqwe123
sudo rabbitmqctl add_vhost taiga
sudo rabbitmqctl set_permissions -p taiga taiga ".*" ".*" ".*"
- Install Nodejs
Node is needed by 'taiga-events' - add the nodejs nodesource repository and install it with the yum command.
curl --silent --location https://rpm.nodesource.com/setup_6.x | sudo bash -
sudo yum -y install nodejs
All basic packages that are needed for Taiga.io installation have been installed on the system.
Step 2 - Install and Configure PostgreSQL
Taiga.io is a web application based on Python Django web framework, and it uses PostgreSQL as the database. We need PostgreSQL version 9.5 for Taiga.io installation.
Add the PostgreSQL 9.5 repository to the system.
sudo rpm -Uvh http://yum.postgresql.org/9.5/redhat/rhel-7-x86_64/pgdg-centos95-9.5-2.noarch.rpm
Now install PostgreSQL 9.5 using the yum command below.
sudo yum -y install postgresql95 postgresql95-devel postgresql95-contrib postgresql95-docs postgresql95-server
After installation is complete, we need to initialize the PostgreSQL database.
sudo /usr/pgsql-9.5/bin/postgresql95-setup initdb
Now start the PostgreSQL service and enable it to launch everytime at system boot.
systemctl start postgresql-9.5
systemctl enable postgresql-9.5

Next, we must create a new database for Taiga.io installation. We need to create a new database and a user named 'taiga'.
Login as the 'postgres' user.
su - postgres
Now create new database and user for Taiga.io using the following commands.
createuser taiga
createdb taiga -O taiga
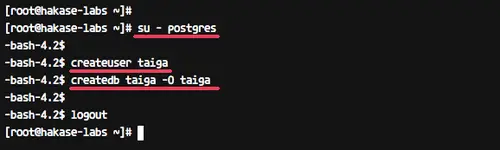
New PostgreSQL database for Taiga.io installation has been created.
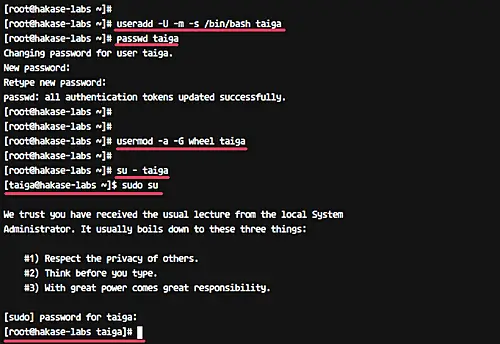
Step 3 - Add Taiga User
In this step, we will create a new system user and group named 'taiga', and then add it to the wheel group for sudo command access.
Use the 'useradd' command below to create the 'taiga' user and group.
useradd -U -m -s /bin/bash taiga
passwd taiga
Now ad the 'taiga' user to the 'wheel' group.
usermod -a -G wheel taiga
Test the 'taiga' user for sudo access.
su - taiga
sudo su
Type your password and make sure you get the root privileges for the 'taiga' user.
Step 4 - Configure Taiga Back
Taiga-back is the backend of Taiga.io that provides an API to the Taiga frontend. It's written in Python and Django Web Framework.
In this step, we will install and configure the taiga component 'taiga-back'.
Login to the 'taiga' user and download the 'taiga-back' source code from GitHub.
su - taiga
git clone https://github.com/taigaio/taiga-back.git taiga-back
Now go to the 'taiga-back' directory and change the branch to the 'stable' branch.
cd taiga-back
git checkout stable
Before going any further, we need to update the virtualenv package.
sudo pip install --upgrade virtualenv
Next, create new python environment 'taiga' using the mkvirtualenv command.
mkvirtualenv -p /usr/bin/python3.5 taiga
New virtualenv for 'taiga-back' has been created.
Before installing all modules for taiga-back, we need to create a new link for the 'pg_config' command to the '/usr/bin' directory.
sudo ln -s /usr/pgsql-9.5/bin/pg_config /usr/bin/pg_config
Now install all python modules that are needed by the 'taiga-back' using the commands below.
workon taiga
pip install -r requirements.txt
After the installation is complete, we need to populate the database with initial basic data.
Run all of the following commands.
python manage.py migrate --noinput
python manage.py loaddata initial_user
python manage.py loaddata initial_project_templates
python manage.py compilemessages
python manage.py collectstatic --noinput
These commands will automatically create an administrator account 'admin' with password '123123'.
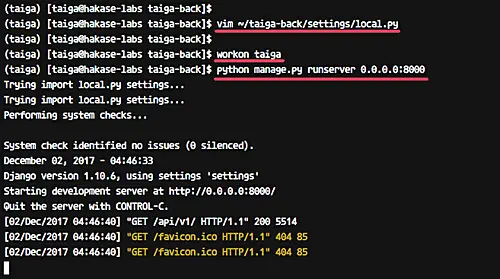
Next, create a new configuration for 'taiga-back' using vim.
vim ~/taiga-back/settings/local.py
Paste the following configuration there.
from .common import *

 MEDIA_URL = "http://taiga.hakase-labs.co/media/"
 STATIC_URL = "http://taiga.hakase-labs.co/static/"
 SITES["front"]["scheme"] = "http"
 SITES["front"]["domain"] = "taiga.hakase-labs.co"

 SECRET_KEY = "theveryultratopsecretkey"

 DEBUG = False
 PUBLIC_REGISTER_ENABLED = True

 DEFAULT_FROM_EMAIL = "[email protected]"
 SERVER_EMAIL = DEFAULT_FROM_EMAIL

 #CELERY_ENABLED = True

 EVENTS_PUSH_BACKEND = "taiga.events.backends.rabbitmq.EventsPushBackend"
 EVENTS_PUSH_BACKEND_OPTIONS = {"url": "amqp://taiga:PASSWORD_FOR_EVENTS@localhost:5672/taiga"}

 # Uncomment and populate with proper connection parameters
 # for enable email sending. EMAIL_HOST_USER should end by @domain.tld
 #EMAIL_BACKEND = "django.core.mail.backends.smtp.EmailBackend"
 #EMAIL_USE_TLS = False
 #EMAIL_HOST = "localhost"
 #EMAIL_HOST_USER = ""
 #EMAIL_HOST_PASSWORD = ""
 #EMAIL_PORT = 25

 # Uncomment and populate with proper connection parameters
 # for enable github login/singin.
 #GITHUB_API_CLIENT_ID = "yourgithubclientid"
 #GITHUB_API_CLIENT_SECRET = "yourgithubclientsecret"
Save and exit.
Note:
- Change the 'MEDIA_URL' and 'STATIC_URL' with your own domain name.
- Change the 'SECRET_KEY' with your own very secret key.
- Change the EVENTS_PUSH_BACKEND_OPTIONS password value to your own RabbitMQ value. For this guide, we are using password 'aqwe123'.
Now test 'taiga-back' with the command below.
workon taiga
python manage.py runserver 0.0.0.0:8000
The command will run taiga-back under the server public IP with port 8000.
Open the web browser and visit the following address.
http://192.168.33.10:8000/api/v1/
And you will get the 'taiga-back' API with JSON format as below.
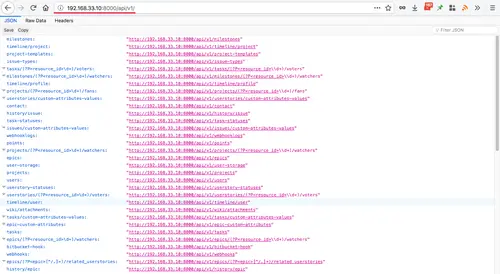
The 'taiga-back' installation and configuration has been completed.
Step 5 - Configure Taiga Frontend
In this step, we will download and configure the taiga frontend. The Frontend will handle all taiga interfaces.
Login to the taiga user.
su - taiga
Download the 'Taiga frontend' source code using git.
cd ~
git clone https://github.com/taigaio/taiga-front-dist.git taiga-front-dist
Goto the 'taiga-front-dist' directory and change the branch to 'stable'.
cd taiga-front-dist
git checkout stable
Copy default configuration file and edit it using vim.
cp ~/taiga-front-dist/dist/conf.example.json ~/taiga-front-dist/dist/conf.json
vim ~/taiga-front-dist/dist/conf.json
Copy the following configuration:
{
     "api": "http://taiga.hakase-labs.co/api/v1/",
     "eventsUrl": "ws://taiga.hakase-labs.co/events",
     "debug": "true",
     "publicRegisterEnabled": true,
     "feedbackEnabled": true,
     "privacyPolicyUrl": null,
     "termsOfServiceUrl": null,
     "maxUploadFileSize": null,
     "contribPlugins": []
 }
Save and exit.
The 'Taiga frontend' configuration has been completed.
Step 6 - Configure Taiga Events
Taiga-events is a WebSocket server that allows you to show real-time changes in the Taiga.io Dashboard, and it uses RabbitMQ as a message broker. In this step, we will download and configure 'taiga-events'.
Login to the 'taiga' user.
su - taiga
Download the 'Taiga Events' source code and go to the directory.
git clone https://github.com/taigaio/taiga-events.git taiga-events
cd taiga-events
Now we need to download and install all javascript libraries that are needed by 'taiga-events' using the npm command in the following way.
npm install
sudo npm install -g coffee-script
Note: We need to install the 'coffee-script' under root system.
Next, copy the JSON configuration file to 'config.json', then edit it using vim.
cp config.example.json config.json
vim config.json
Paste the following configuration there.
{
     "url": "amqp://taiga:aqwe123@localhost:5672/taiga",
     "secret": "theveryultratopsecretkey",
     "webSocketServer": {
         "port": 8888
     }
 }
Save and exit.
Note:
- Change the 'url' value with your own rabbitmq user and password.
- For the 'secret' value, make sure it matches with the 'SECRET_KEY' on 'local.py' - the configuration file of 'taiga-back'.
Taiga-events configuration has been completed.
Step 7 - Install and Configure Circus
Circus will be used for controlling and managing 'taiga-back' and 'taiga-events' process. 'taiga-events' is running as a coffee script, and 'taiga-back' is running under Gunicorn.
In this step, we will install Circus manually from the source code.
Login to as the taiga user.
su - taiga
Now download the circus source code using git.
cd ~/
git clone https://github.com/circus-tent/circus.git circus
Before installing circus on the system, we need to create a new directory for circus configuration.
Create new 'conf' directory under the taiga user.
mkdir -p ~/conf
And create new circus configuration for Taiga.io named 'taiga.ini'.
vim ~/conf/taiga.ini
Paste the following configuration.
[circus]
 check_delay = 5
 endpoint = tcp://127.0.0.1:5555
 pubsub_endpoint = tcp://127.0.0.1:5556
 statsd = true

 [watcher:taiga-events]
 working_dir = /home/taiga/taiga-events
 cmd = /usr/bin/coffee
 args = index.coffee
 uid = taiga
 numprocesses = 1
 autostart = true
 send_hup = true
 stdout_stream.class = FileStream
 stdout_stream.filename = /home/taiga/logs/taigaevents.stdout.log
 stdout_stream.max_bytes = 10485760
 stdout_stream.backup_count = 12
 stderr_stream.class = FileStream
 stderr_stream.filename = /home/taiga/logs/taigaevents.stderr.log
 stderr_stream.max_bytes = 10485760
 stderr_stream.backup_count = 12

 [watcher:taiga]
 working_dir = /home/taiga/taiga-back
 cmd = gunicorn
 args = -w 3 -t 60 --pythonpath=. -b 127.0.0.1:8001 taiga.wsgi
 uid = taiga
 numprocesses = 1
 autostart = true
 send_hup = true
 stdout_stream.class = FileStream
 stdout_stream.filename = /home/taiga/logs/gunicorn.stdout.log
 stdout_stream.max_bytes = 10485760
 stdout_stream.backup_count = 4
 stderr_stream.class = FileStream
 stderr_stream.filename = /home/taiga/logs/gunicorn.stderr.log
 stderr_stream.max_bytes = 10485760
 stderr_stream.backup_count = 4

 [env:taiga]
 PATH = /home/taiga/.virtualenvs/taiga/bin:$PATH
 TERM=rxvt-256color
 SHELL=/bin/bash
 USER=taiga
 LANG=en_US.UTF-8
 HOME=/home/taiga
 PYTHONPATH=/home/taiga/.virtualenvs/taiga/lib/python3.5/site-packages
Save and exit.
Now create the directory for circus log files.
mkdir -p ~/logs
Go to the circus directory and install the software with root privileges.
cd ~/circus
sudo python3.5 setup.py install
After the installation is complete, we will configure circus as a service on the system.
Run the sudo command, then create a new service file 'circusd.service'.
sudo su
vim /usr/lib/systemd/system/circusd.service
Paste the following configuration there.
[Unit]
 Description=circus

 [Service]
 ExecStart=/usr/bin/circusd /home/taiga/conf/taiga.ini
Save and exit.
Now reload systemd system using command below.
systemctl daemon-reload
Make sure there is no error, then start the circusd service and enable it to launch everytime at system boot.
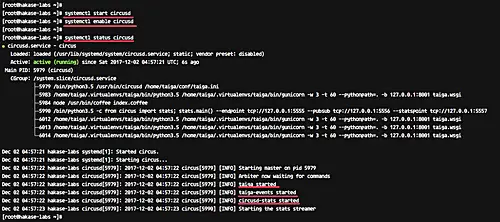
systemctl start circusd
systemctl enable circusd
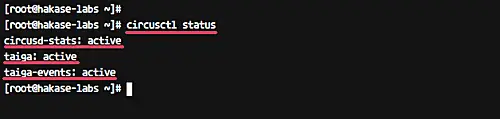
Circus installation and configuration for Taiga.io has been completed. Check it using the circusctl command below.
circusctl status
And make sure you get the taiga-back and taiga-events on the circus process list.
Or you can use the systemctl command as below.
systemctl status circusd
Step 8 - Configure Taiga Nginx Virtual Host
In this step, we will configure the Nginx virtual host for Taiga.io. We will create a new virtual host file under the 'conf.d' directory for our Taiga.io installation.
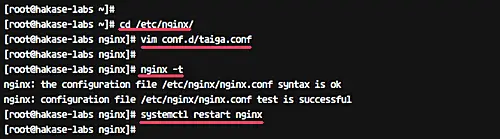
Go to the nginx configuration directory and create a new file 'taiga.conf' under the 'conf.d' directory.
cd /etc/nginx/
vim conf.d/taiga.conf
Paste the following configuration there.
server {
    listen 80;
    server_name taiga.hakase-labs.co;

    large_client_header_buffers 4 32k;
    client_max_body_size 50M;
    charset utf-8;

    access_log /var/log/nginx/taiga.access.log;
    error_log /var/log/nginx/taiga.error.log;

    # Frontend
    location / {
        root /home/taiga/taiga-front-dist/dist/;
        try_files $uri $uri/ /index.html;
    }

    # Backend
    location /api {
        proxy_set_header Host $http_host;
        proxy_set_header X-Real-IP $remote_addr;
        proxy_set_header X-Scheme $scheme;
        proxy_set_header X-Forwarded-Proto $scheme;
        proxy_set_header X-Forwarded-For $proxy_add_x_forwarded_for;
        proxy_pass http://127.0.0.1:8001/api;
        proxy_redirect off;
    }

    # Django admin access (/admin/)
    location /admin {
        proxy_set_header Host $http_host;
        proxy_set_header X-Real-IP $remote_addr;
        proxy_set_header X-Scheme $scheme;
        proxy_set_header X-Forwarded-Proto $scheme;
        proxy_set_header X-Forwarded-For $proxy_add_x_forwarded_for;
        proxy_pass http://127.0.0.1:8001$request_uri;
        proxy_redirect off;
    }

    # Static files
    location /static {
        alias /home/taiga/taiga-back/static;
    }

    # Media files
    location /media {
        alias /home/taiga/taiga-back/media;
    }

    # Taiga-events
    location /events {
    proxy_pass http://127.0.0.1:8888/events;
    proxy_http_version 1.1;
    proxy_set_header Upgrade $http_upgrade;
    proxy_set_header Connection "upgrade";
    proxy_connect_timeout 7d;
    proxy_send_timeout 7d;
    proxy_read_timeout 7d;
    }
}
Save and exit.
Now run the test nginx configuration and make sure there is no error. Then restart the web server service.
nginx -t
systemctl restart nginx
The virtual host configuration for Taiga.io has been completed.
Step 9 - Allowing Nginx to Access the Taiga Frontend
Sometimes you may get an error about the Nginx web server saying it can't access taiga-frontend files - you'll see the Nginx '500 Internal Server Error' in this case.
To solve this issue, we need to change the owner or group of all taiga-frontend files and give the Nginx access to all files.
By default on CentOS 7, the Nginx web server is running under the 'nginx' user and the Taiga.io installation is running under the 'taiga' user.
Following is the example of the Nginx error we're talking about.
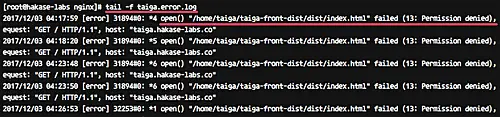
Nginx web server cannot read all content on the '/home/taiga/taiga-front-dist/dist' directory.
Check this using the command below.
sudo -u nginx stat /home/taiga/taiga-front-dist/dist
And you will get the permission denied result.
Now we need to add the 'nginx' user to the 'taiga' group and give nginx user required permissions for the taiga-front-dist directory.
Add 'nginx' user to the 'taiga' group.
sudo gpasswd -a nginx taiga
Give the web server permissions to read all content on the taiga-front-dist directory.
sudo chmod g+x /home/taiga
sudo chmod g+x /home/taiga/taiga-front-dist
sudo chmod g+x /home/taiga/taiga-front-dist/dist
And restart the Nginx web server.
systemctl restart nginx
Step 10 - Testing
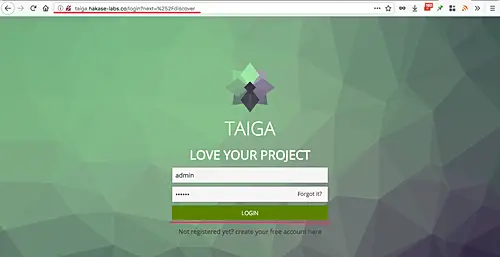
Open your web browser and visit your Taiga installation domain name, mine is http://taiga.hakase-labs.co
And you should get the Taiga default home page a shown below.
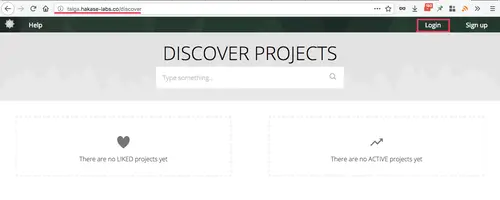
Here, type the default user 'admin' with password '123123', and then click on the 'Login' button.
And you will get to the admin dashboard.
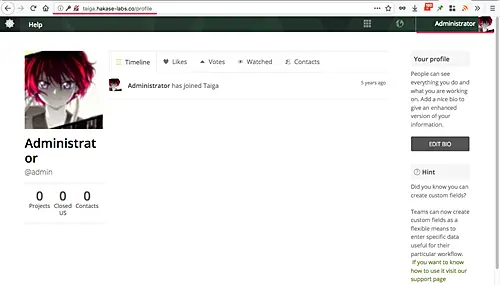
Taiga.io installation on CentOS 7 with Nginx web server has been completed successfully.

