How to Install Pure-FTPd with TLS and virtual users on OpenSUSE Leap 42.1
Pure-FTPd is a free and lightweight FTP server based on Troll-FTPd, the development started in 2001 and it runs on many Unix-like OS including Linux, *BSD, Solaris, and HP-UX. Pure-FTPd has many features like virtual domains, chroot home directory, virtual users, TLS/SSL support, virtual quota and many more.
In this tutorial, I will show you how to install and configure pure-ftpd on OpenSUSE Leap 42.1. I will show you how to set-up pure-ftpd with TLS/SSL and then set-up virtual-users.
Prerequisite
- OpenSUSE Leap 42.1
- Root privileges
- OpenSUSE, Zypper Knowledge
Step 1 - Install and Configure SuSEfirewall2
SuSEfirewall2 is a script to generate the firewall configuration in the file '/etc/sysconfig/SuSEfirewall2'. We will install SuSEfirewall2 and then open the ports for SSH and the FTP service.
Install SuSEfirewall2 with zypper:
zypper in SuSEfirewall2
Next, edit the configuration file '/etc/sysconfig/SuSEfirewall2' with vim:
vim /etc/sysconfig/SuSEfirewall2
Add the new services ssh and FTP to line 253:
FW_SERVICES_EXT_TCP="ssh ftp"
Save and exit.
Now Start SuSEfirewall2 with the systemctl command:
systemctl start SuSEfirewall2
Step 2 - Install and Configure Pure-FTPd
In this step, we will install pure-ftpd with OpenSSL for the TLS/SSL configuration and configure the pure-ftpd user and group.
Install the applications with zypper as shown below:
zypper in pure-ftpd openssl
Now add the new group 'ftpgroup' and the new user for the master 'FTP user' called 'ftpuser' to the group.
groupadd ftpgroup
useradd -g ftpgroup -d /dev/null -s /etc ftpuser
Go to the pure-ftpd directory and edit the configuration file 'pure-ftpd.conf' with the vim editor:
cd /etc/pure-ftpd/
vim pure-ftpd.conf
Change the value in line 81 to 'yes' for the disabling the anonymous user.
NoAnonymous yes
Uncomment line 131 to configure the backend. Pure-ftpd has support for MySQL, PostgreSQL, and LDAP as backend, but in this tutorial, we will use 'PureDB' for the backed.
PureDB /etc/pure-ftpd/pureftpd.pdb
Comment out the PAMAuthentication line to disable PAM authentication on line 141 as we will use PureDB as authentication source.
#PAMAuthentication yes
Save and exit.
Step 3 - Configure TLS/SSL for Pure-FTPd
Generate a new self signed certificate file in the '/etc/ssl/private' directory with the openssl command:
openssl req -x509 -nodes -newkey rsa:2048 -keyout /etc/ssl/private/pure-ftpd.pem -out /etc/ssl/private/pure-ftpd.pem -days 365
Change the permissions of the certificate file to 0600:
chmod 600 /etc/ssl/private/pure-ftpd.pem
Next, go back to the pure-ftpd directory and edit the configuration file to enable TLS/SSL support for the client connection.
cd /etc/pure-ftpd/
vim pure-ftpd.conf
Uncomment line 439 to enable TLS.
TLS 1
Uncomment line 449 and add a new option to make it more secure.
TLSCipherSuite HIGH:MEDIUM:+TLSv1:!SSLv2:!SSLv3
Uncomment line 445 to define the certificate file.
CertFile /etc/ssl/private/pure-ftpd.pem
Save and exit.
Now start pure-ftpd with the systemctl command:
systemctl start pure-ftpd
Step 4 - Configure Virtual Users
Pure-FTPd provides features to create and use virtual users instead of real system (Linux) users. Pure-FTPd provide several auth backends and the virtual user configuration depends on the backend that is used by the server. In step 2 we have set 'PureDB' as the backend.
We can create a new virtual user with the 'pure-pw' command provided by pure-ftpd. In this step, we will create a new virtual user named 'shiro' with directory '/srv/ftp/shiro' as the ftp home directory and the user is chrooted to that directory so that he can not access the other system directories.
Create the new virtual user with pure-pw:
pure-pw useradd shiro -u ftpuser -d /srv/ftp/shiro
Create the directory for the virtual user and change the owner of that directory to the master 'FTP user'.
mkdir -p /srv/ftp/shiro
chown -R ftpuser.ftpgroup /srv/ftp/shiro
Next, we must save the changes with command below:
pure-pw mkdb
Now the user shiro is ready to be used, we can useFTPp from the command line or FileZilla for GUI interface to connect to the server.
Note:
pure-pw has more command options, you can use 'pure-pw help' to see all the useful commands.
Step 5 - Testing
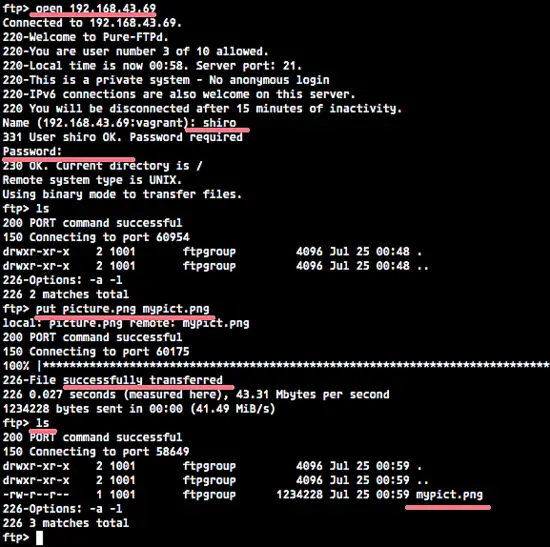
I will use the FTP command in the terminal for the testing. Open your terminal and type "ftp":
ftp
Next enter the pure-ftpd server ip:
open 192.168.43.69
Login with user 'shiro' and the password and then press 'Enter'.
Try to upload file with the 'put' command:
put picture.png mypict.png
Now you will see the file mypict.png on the server with the ls command below:
ls


