Setup simple CI/CD pipeline using Github and Jenkins on an AWS EC2 Linux instance
On this page
- Pre-requisites
- What will we do?
- Create a VM or an EC2 Instance
- Install Java
- Install Jenkins
- Setup Apache Tomcat
- Fork Github Repo
- Access and Configure Jenkins
- Setup a Jenkins Job for .war deployment
- Add Github Repo under General Tab
- Add Github URL under Source Code Management
- Add Build Steps
- Test Build
- Test Manual Build
- Application
- Setup Webhook on the Github Repo
- Conclusion
In this article we will see the steps to implement a simple CI/CD pipeline using Jenkins. We will be using a sample Java code and we will be deploying that code onto Apache Tomcat Web-Server as a .war file. We will be using Maven as a build tool. You can find the sample Java code on my Github Repository(repo). Before we proceed, let's understand the basics of the tools and technologies that we will be using in setting up the CI/CD pipeline.
- EC2 Instance: EC2 instance is a Virtual Machine(VM) in AWS Cloud. We will be deploying Apache Tomcat and Jenkins onto an EC2 instance.
- Apache Tomcat: Apache Tomcat is an open-source Web-Server. We will be deploying our sample Java Application into Apache Tomcat as a .war file.
- Github: Github is a Code hosting platform. It is basically a Version/Source Control Management System. We will be having our sample Java code on to Github.
- Github Webhook: Github Webhook is used to build and set up integrations. We will be creating a webhook which will trigger a Jenkins Job whenever a new commit takes place on Github repo.
- Jenkins: Jenkins is a free open-source automation tool. We will be writing a job on Jenkins which will build and deploy a .war file of the sample Java application code onto Apache Tomcat server.
- Maven: Maven is a build automation tool used primarily to build Java projects.
Pre-requisites
- AWS Account (Create if you don’t have one)
- Basic understanding of Github.
- Basic understanding of Jenkins.
- Basic understanding of Linux Server and Commands
What will we do?
- Create an EC2 Instance
- Install Java
- Install Jenkins
- Setup Apache Tomcat
- Fork my Github Repo
- Access and Configure Jenkins
- Setup a Jenkins Job for .war deployment
- Setup Webhook on the Github Repo
- Test Auto Build on every Commit
Create a VM or an EC2 Instance
To create an EC2 instance you can refer to the document available here.
Here, I have created a new EC2 Instance on my AWS account. This instance has Ubuntu 18 OS on it.
You can see that the instance is up and running. I shall be using this instance to install Java or the dependencies and Apache Tomcat and Jenkins as well.

Install Java
To install Java onto your Ubuntu 18 system you can use the following commands. The following command will install Java 8. Once installed you can even check its version.
sudo apt-get update
sudo apt install openjdk-8-jdk
java -version
Install Jenkins
Use the following commands to install Jenkins on to your instance.
sudo apt-get update
wget -q -O - https://pkg.jenkins.io/debian/jenkins.io.key | sudo apt-key add -
sudo sh -c 'echo deb http://pkg.jenkins.io/debian-stable binary/ > /etc/apt/sources.list.d/jenkins.list'
sudo apt-get update
sudo apt-get install jenkins
Once you have installed Jenkins use the following command to start it and check its status.
sudo systemctl start jenkins #Start Jenkins
service jenkins status #Check Jenkins Status
In the following screenshot you can see that the Jenkins service has been started. This Jenkins service has started on port 8080.

Setup Apache Tomcat
Install Apache Tomcat
Before we download and install Apache Tomcat, let's create a directory where we can download the Apache Tomcat package.
Use the following commands to create a directory in /opt
cd /opt/
sudo mkdir Innovecture
Change the ownership of the directory using the following command. We are changing the ownership to user Ubuntu and group Ubuntu so that the Ubuntu user can start Apache Tomcat service and we don't need to use root or user or sudo privileges.
sudo chown -R ubuntu:ubuntu Innovecture
cd Innovecture/
Download and extract Apache Tomcat using the following commands. If you want to use any other version of Apache Tomcat you can download and extract.
wget https://downloads.apache.org/tomcat/tomcat-9/v9.0.31/bin/apache-tomcat-9.0.31.tar.gz
tar -zxvf apache-tomcat-9.0.31.tar.gz
cd apache-tomcat-9.0.31/
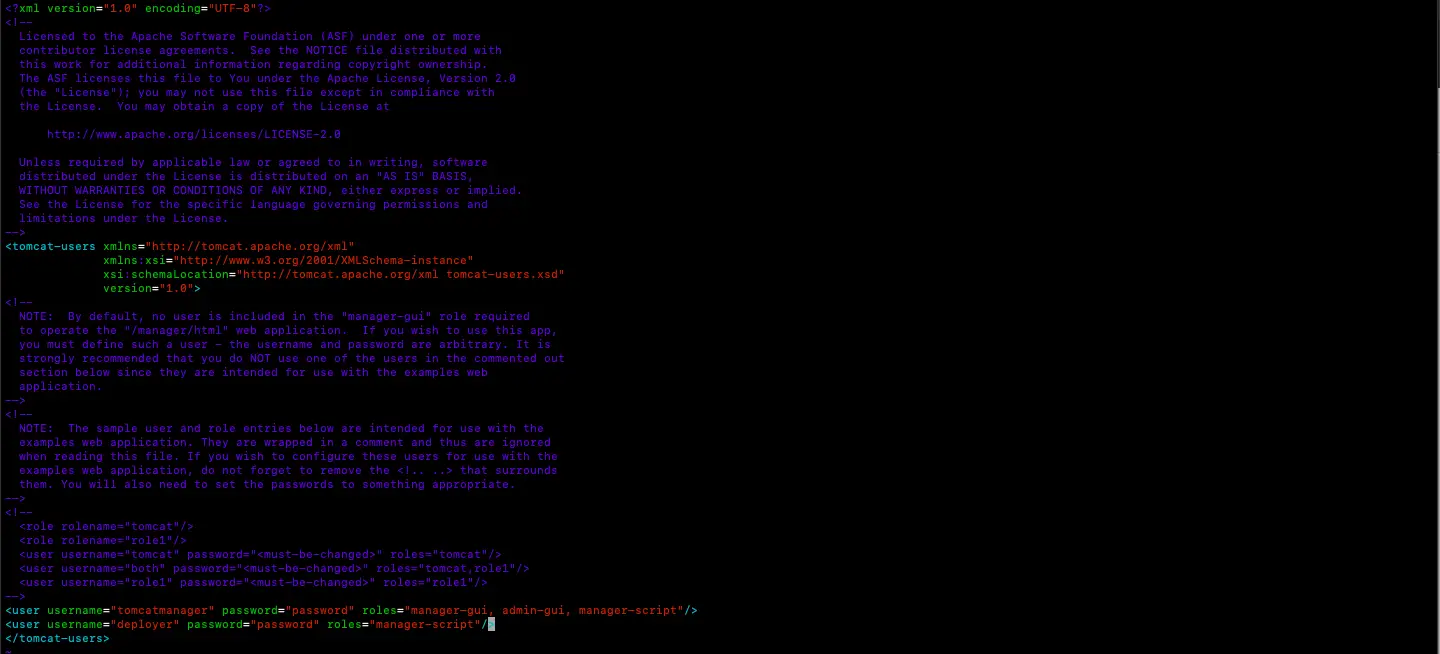
Make the required configurations in Apache Tomcat using the following command. Refer the following screenshots for the configurations that need to be done. In the following configurations we are assigning a user and a password which can be used to login into the manager application of Apache Tomcat. Make a note of this username and password as we will need these credentials later.
Configure Apache Tomcat
vim conf/tomcat-users.xml
Refer the following screenshot and make sure your context.xml has the same configuration.
vim webapps/manager/META-INF/context.xml

In server.xml under conf directory change the port on which Apache Tomcat runs,i.e. change port 8080 to 8090 as our Jenkins service is already running on port 8080.
vim conf/server.xml
Also change the localhost configuration in server.xml file with the IP of the server so that you server can be accessed from the Internet.
Start Apache Tomcat
Use the following command to start Apache Tomcat service.
bin/startup.sh
In the following screenshot you can see that the Apache Tomcat service is running on port 8090 And on port 8080 Jenkins service is running. To check on your system, use the following command.
netstat -tulpn

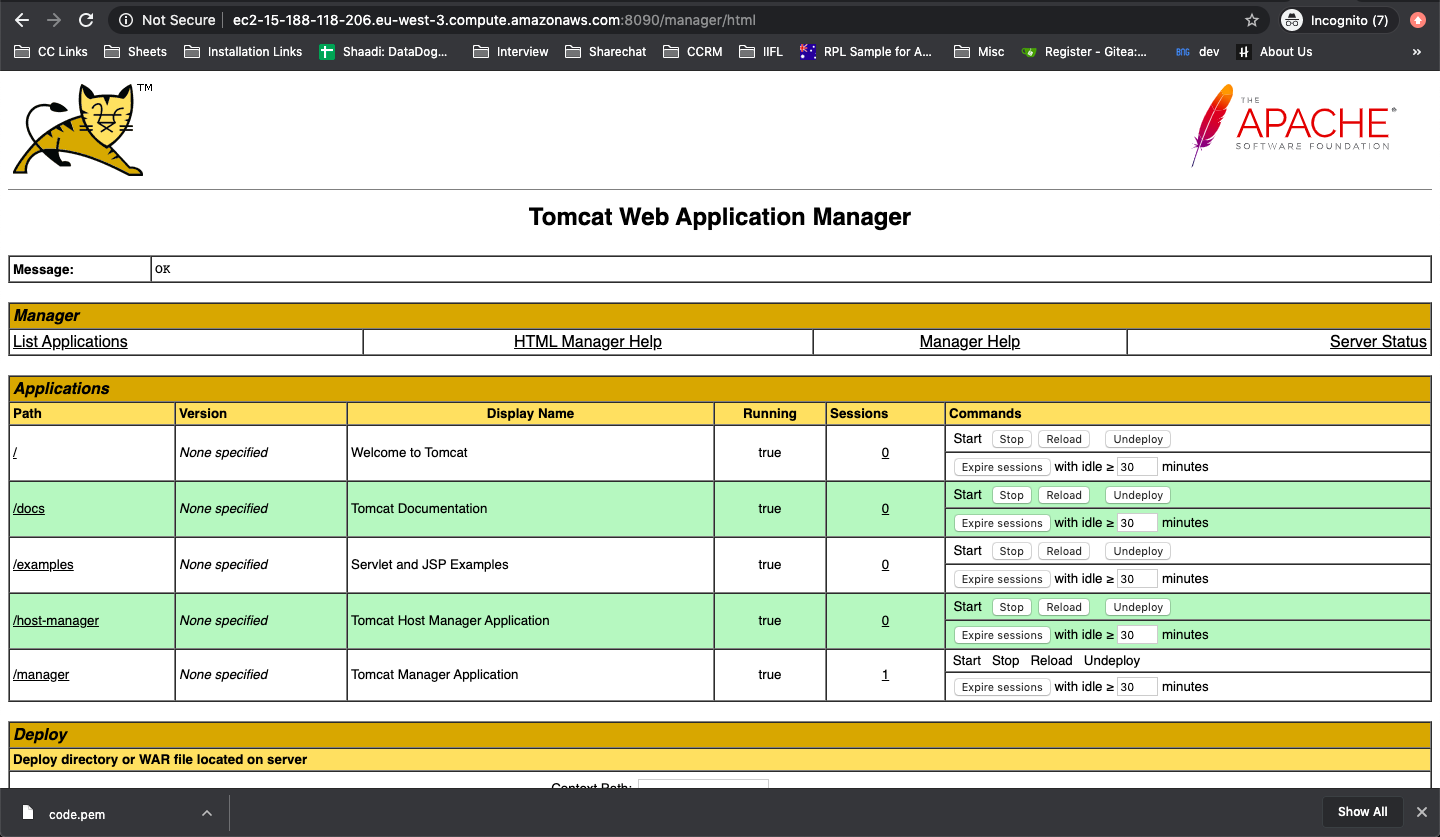
Log in to Tomcat Manager App
To see if we are able to login into the manager application of Apache Tomcat using the credentials that we have specified earlier, hit the URL of Apache Tomcat http://IP-of-Apache-Tomcat:8090/manager. You will be prompted with a credentials screen just enter the username 'tomcat-manager' and password that we have configured in conf/tomcat-users.xml.
Once you login successfully you will see the screen as follows
Fork Github Repo
You can fork or clone my repo mentioned below. This repo contains the sample Java code, you can either use this code or if you have your own repository you can use that as well.
URL of the repo: https://github.com/shivalkarrahul/Innovecture.git
Access and Configure Jenkins
To access the Jenkins, hit the URL http://IP-of-Jenkins:8080.
Follow the screens you get to Unlock Jenkin and Install suggested Plugins
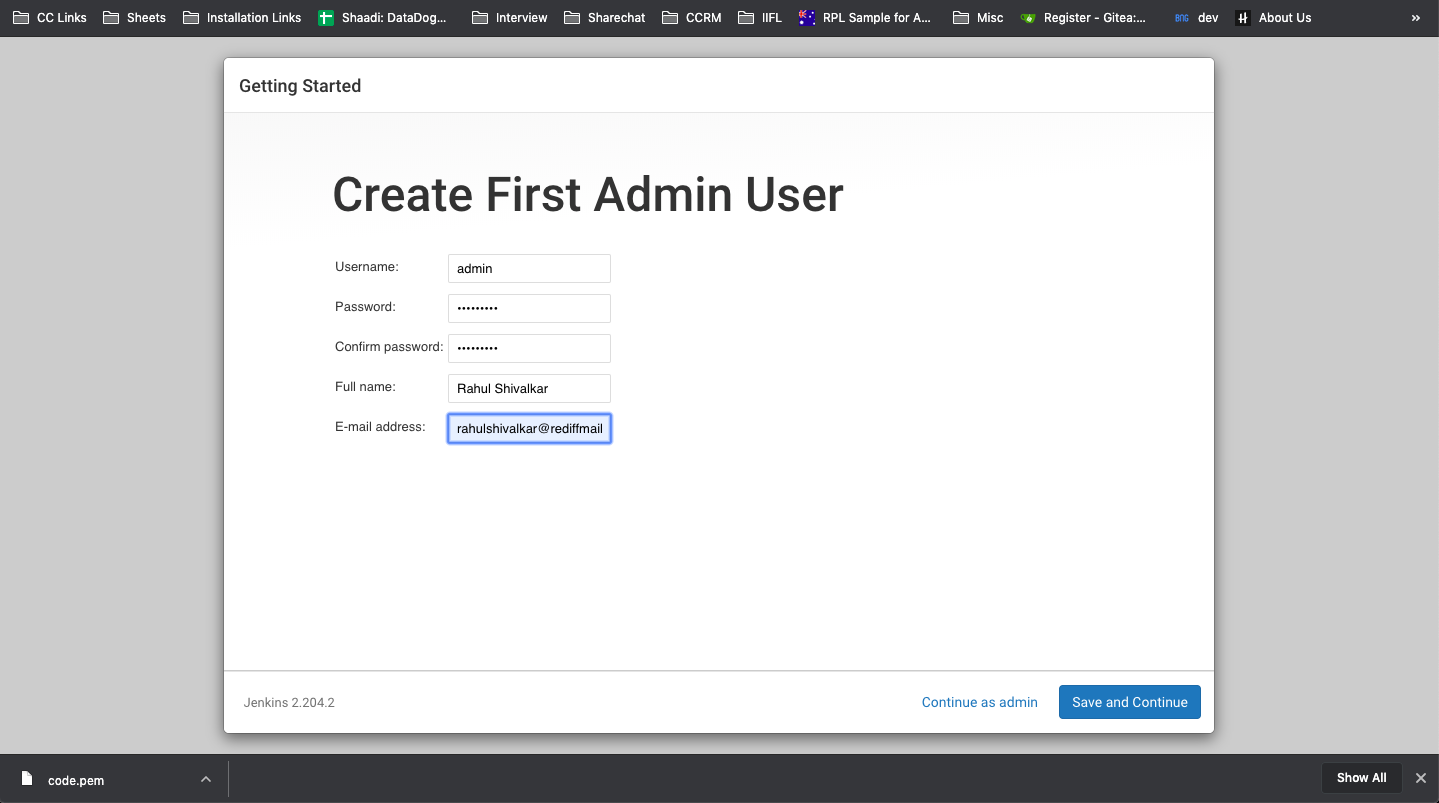
Once you unlock Jenkin and install the suggested plugins, you will see the following screen.
You need to enter the username and password that you need to configure and click on save and continue to proceed.
Install Github Authentication Plugin without restart
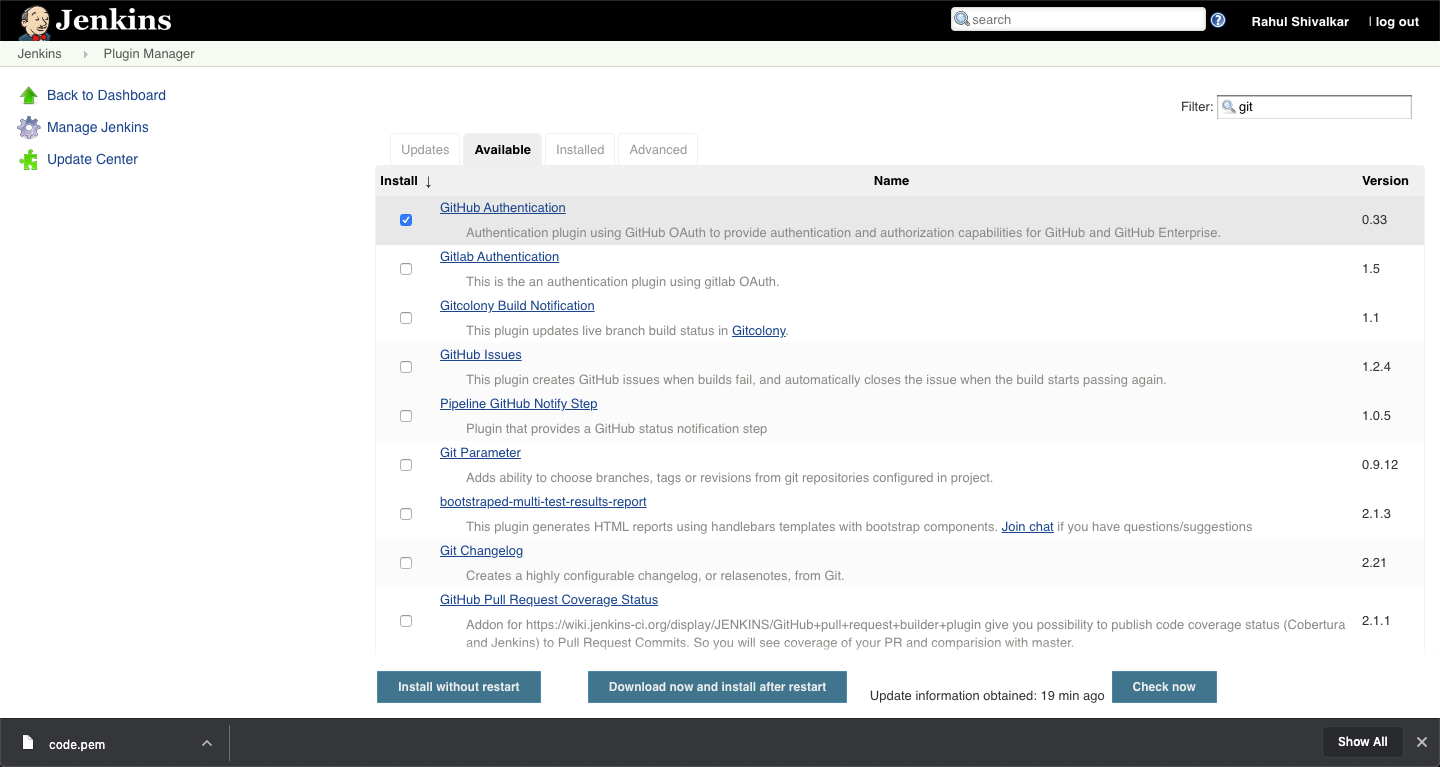
Once you login successfully go to Manage Jenkins > Manage Plugins. Under the Available tab Search for git. Select "GithubAuthentication" plug-in and click on install without restart.
Install Maven Integration Plugin without restart
In the same way, install maven integration plug-in and install it without restart

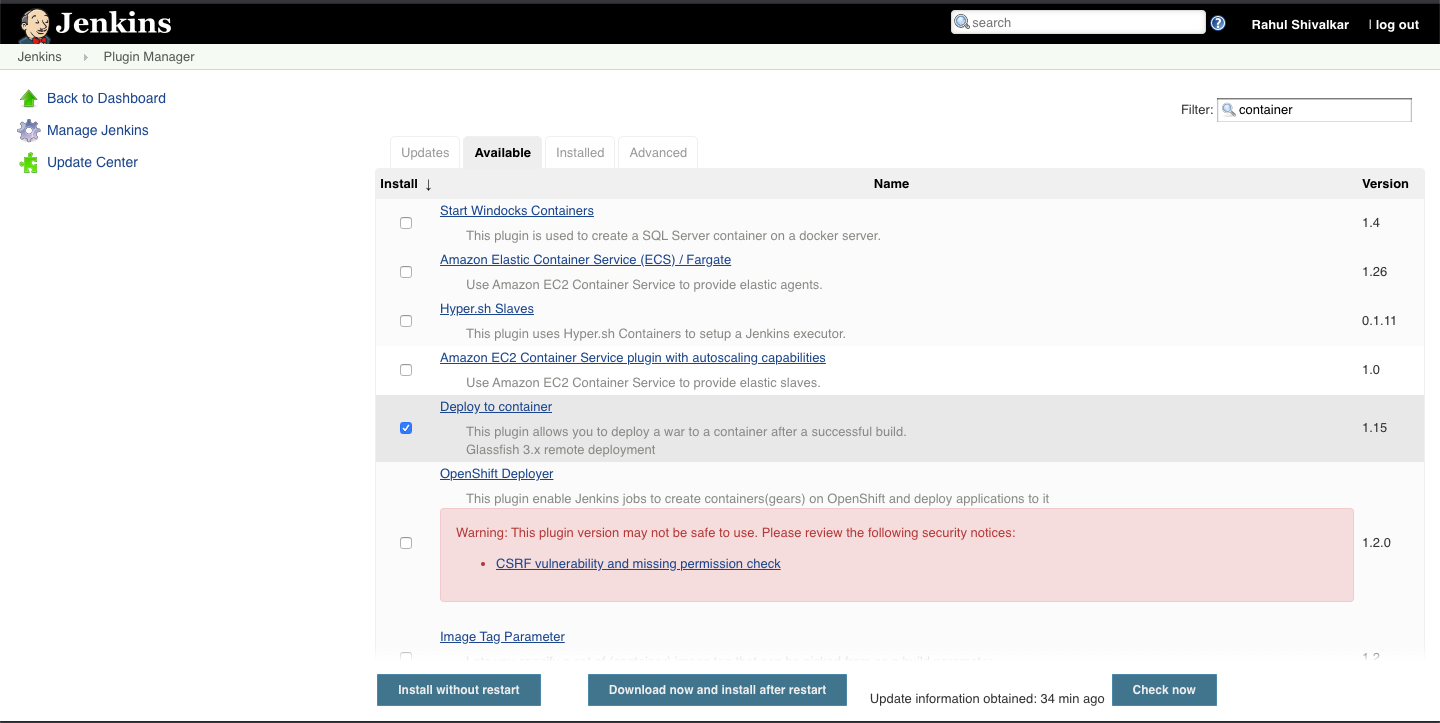
Install Deploy to container Plugin without restart
To automate the deployment of a .war file onto Apache Tomcat we would need a "Deploy to container" plug-in. Install "Deploy to container" plug-in in the same way we installed git and maven plug-in.
Setup a Jenkins Job for .war deployment
Now it's time to create a freestyle Job. Go to the main dashboard and click on create job. Select the freestyle job and proceed further.
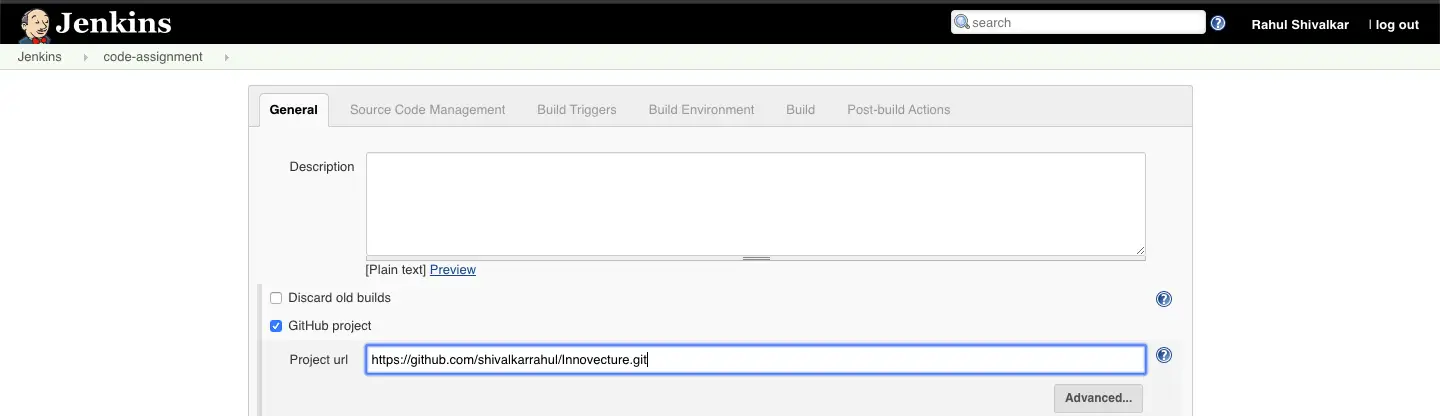
Add Github Repo under General Tab
Under general tab check "Github project" checkbox and add the URL of your source code repo or the URL of the repo you forked from my repo.
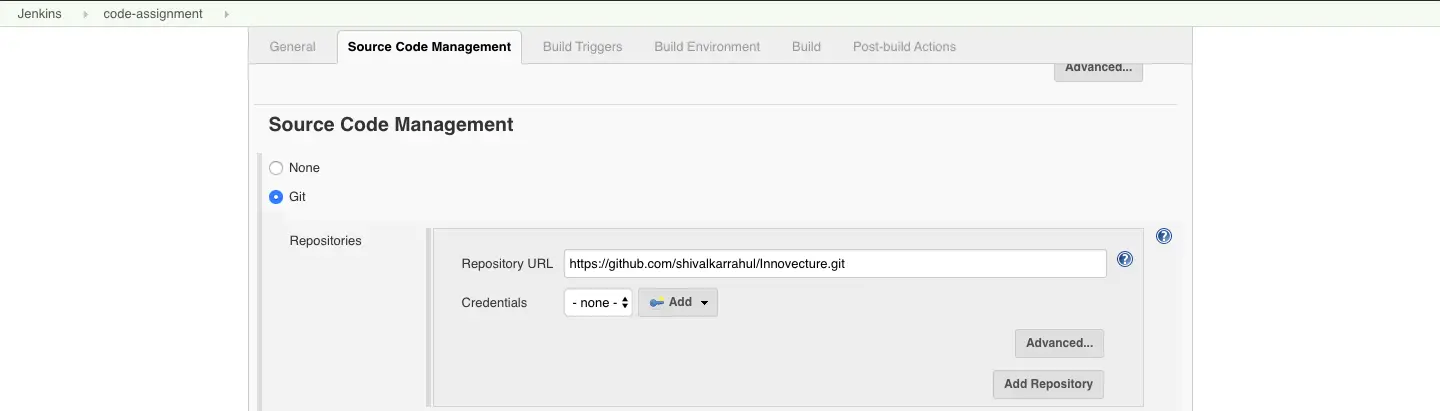
Add Github URL under Source Code Management
Under the source code management tab click on "Git" radio button and add the repository URL as shown below. Since my repository is not private and it is public I did not need to add credentials.
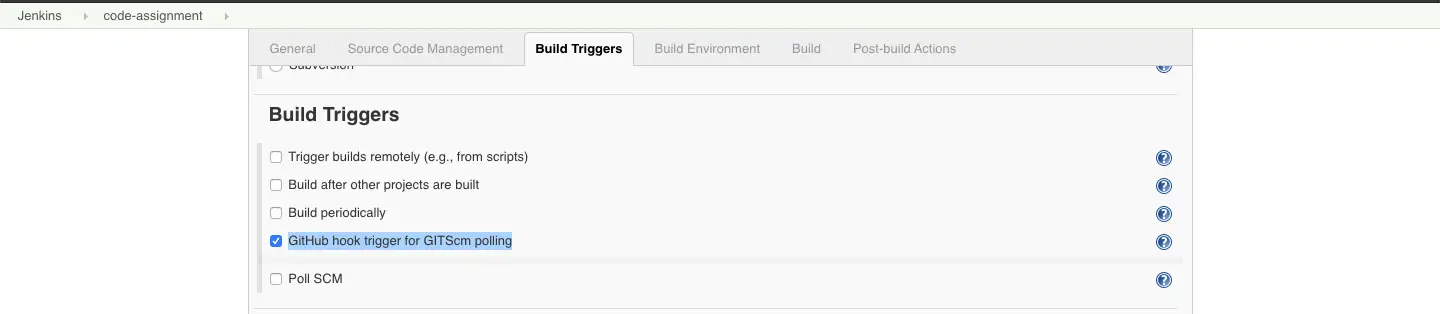
Choose Github hook trigger
Select “GitHub hook trigger for GitSCM polling” under Build Triggers tab
Add Build Steps
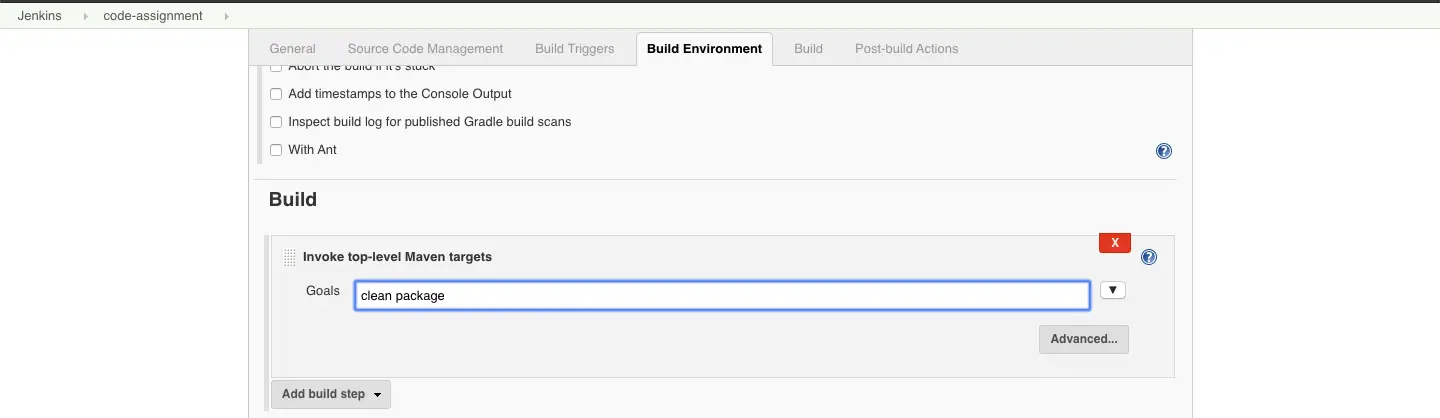
Under the build environment click on add build step and select "Invoke top-level Maven targets"
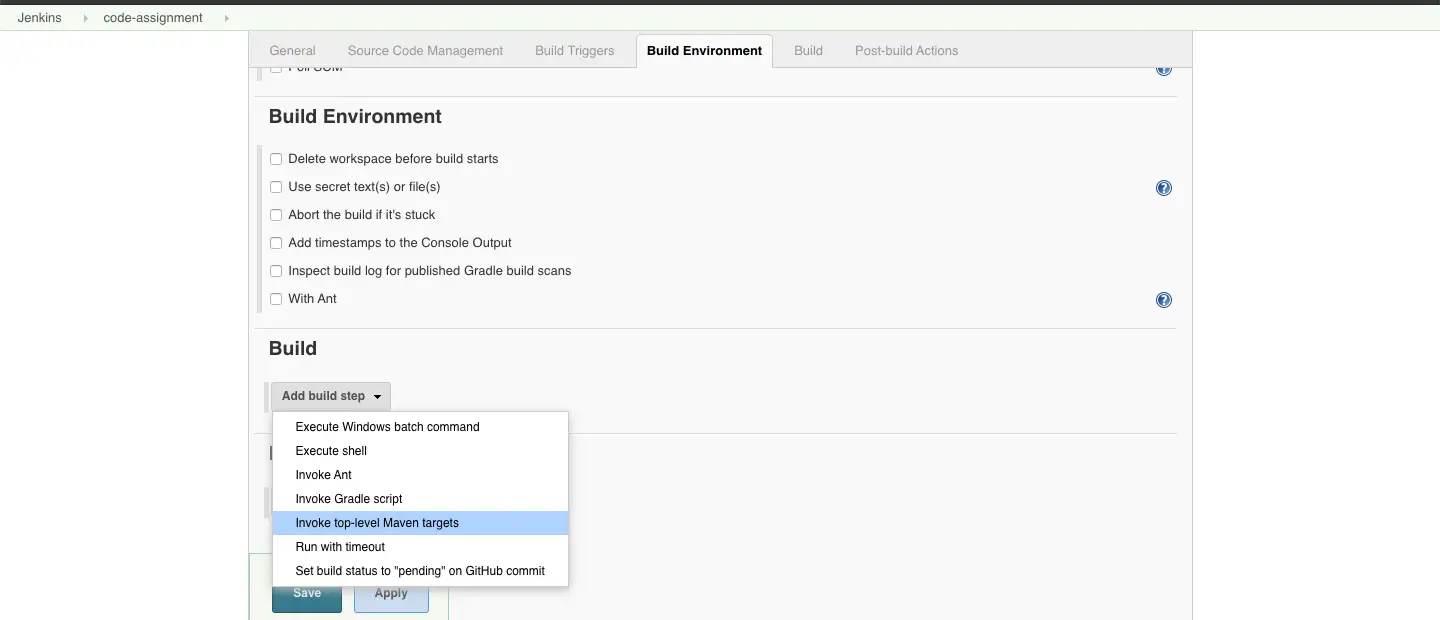
For goals specify clean and package and save the Job.
Test Build
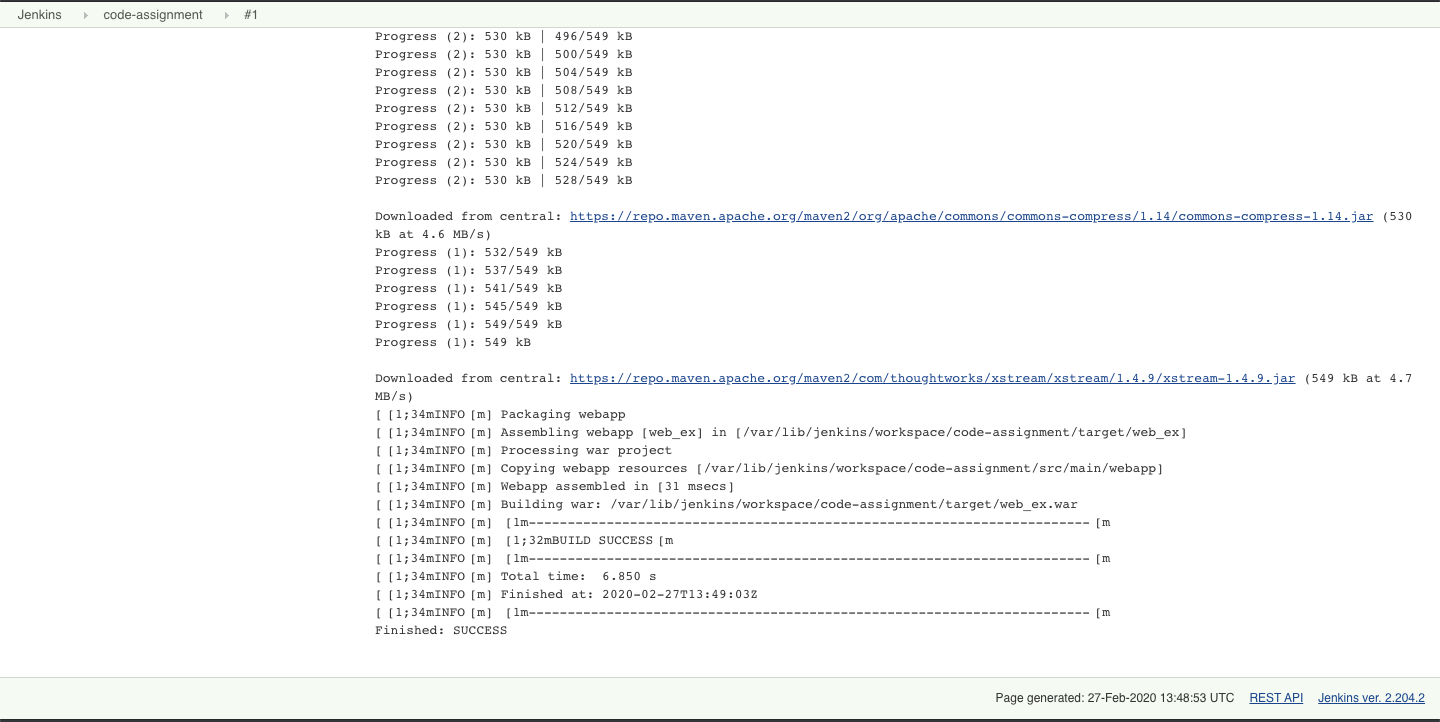
To test the job if it is able to pull and build our code, click on Build Now.
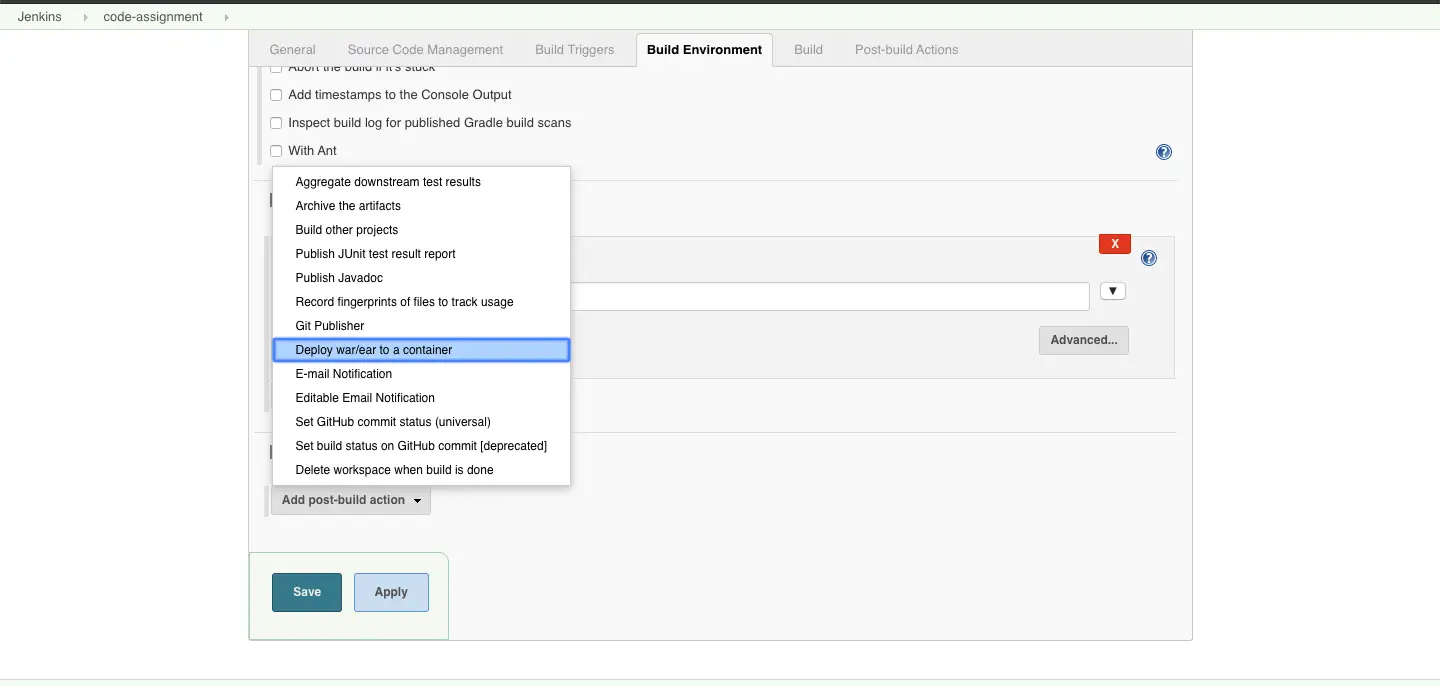
Add Deployment Post Build Actions
Now as we are sure that our code is being pulled and built now we are ready to add a post-build action. To add a post-build action click on post-build action under build environment and select "Deploy war to a container".
Then add the URL of the tomcat server along with the credentials. To add credentials click on "Add" and follow the steps you see and save the Job.

Test Manual Build
Now test if our job is able to pull, build and deploy the code on Apache Tomcat server. Click on build now to test our job.
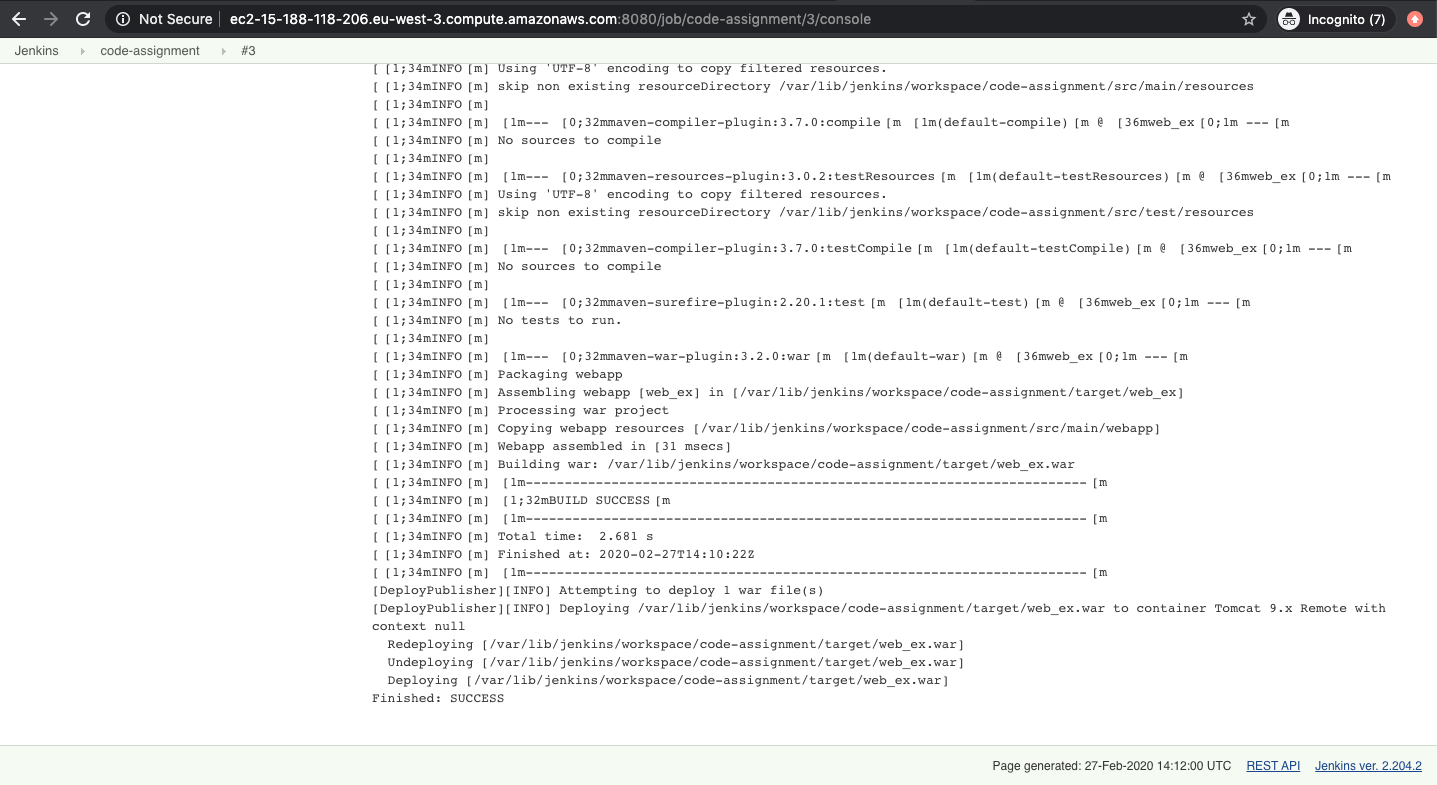
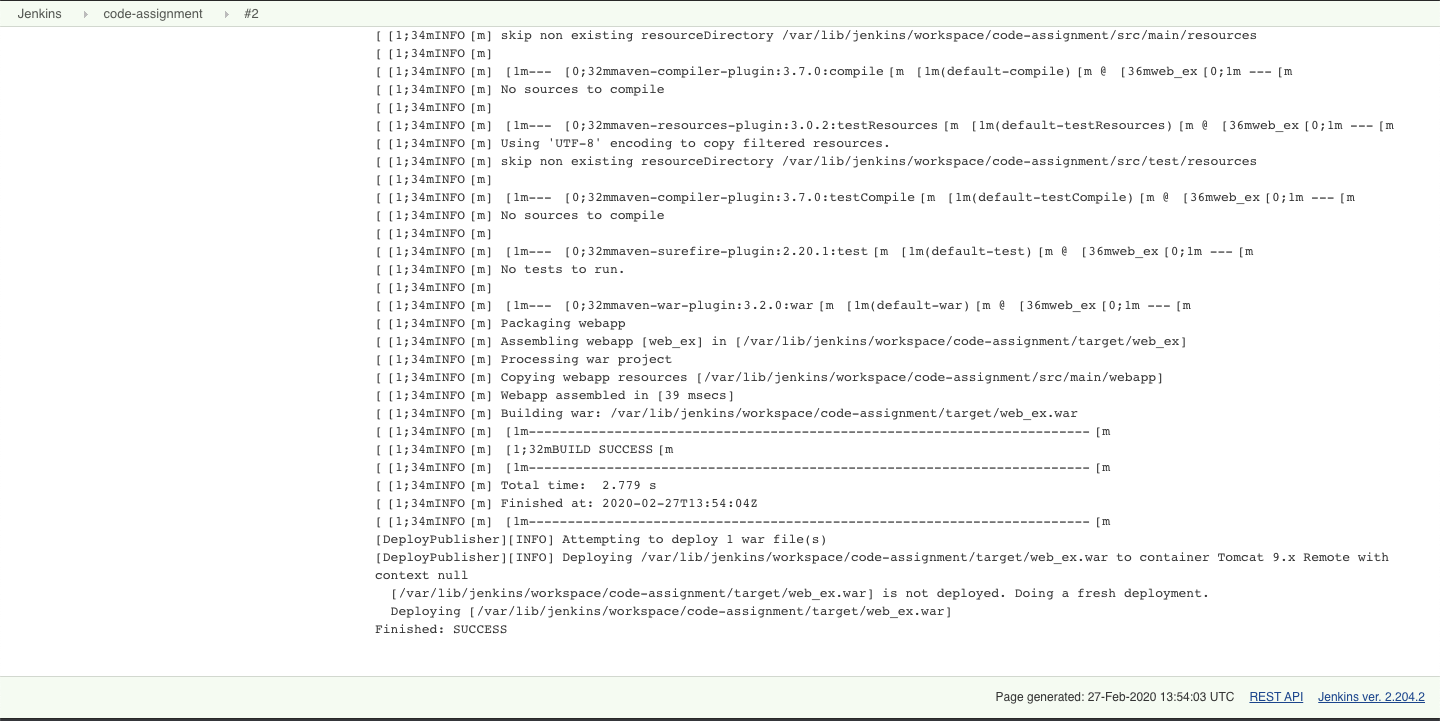
As you in the above screenshot, the manual build was successful and has been deployed on the Apache Tomcat Server.
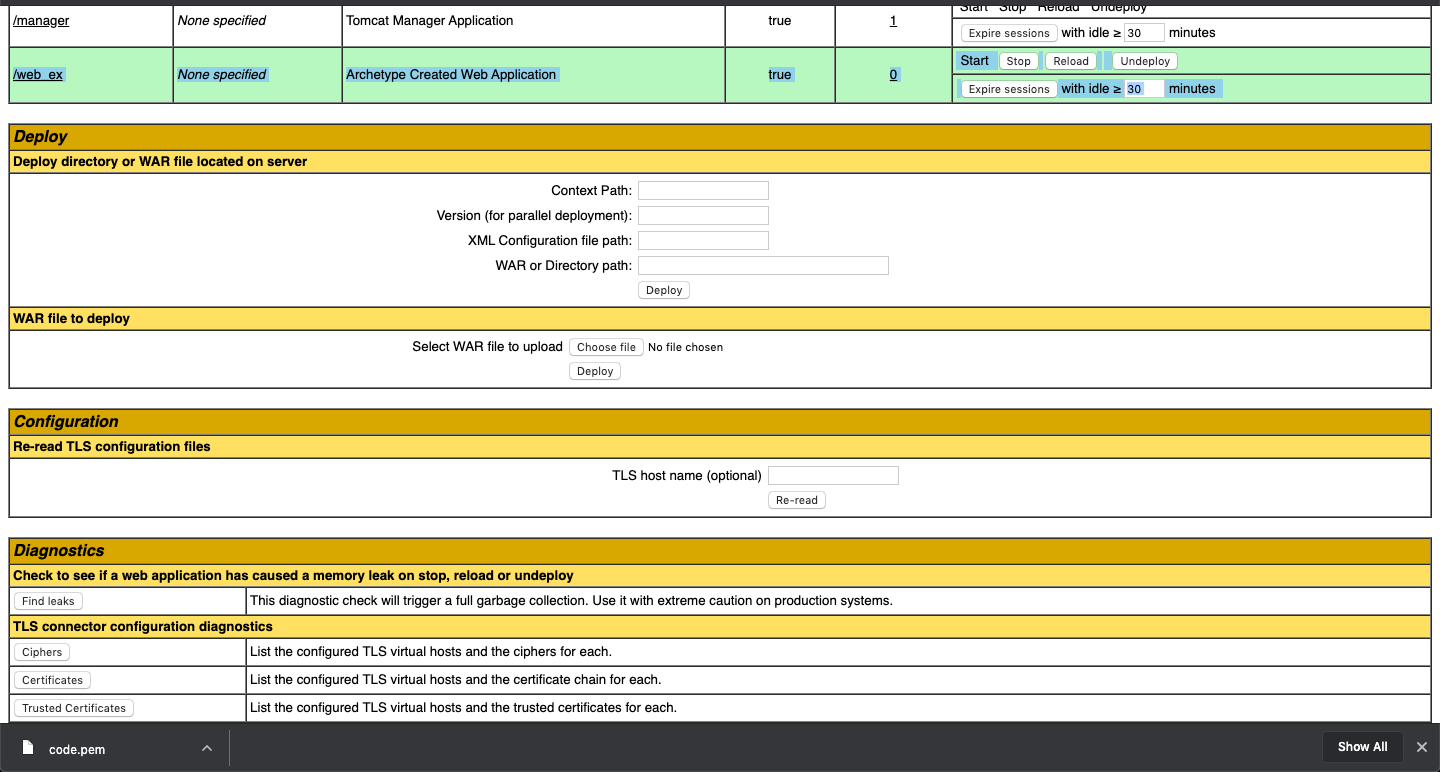
To test if the war has really been deployed hit the Apache Tomcat http://IP-of-Apache-Tomcat:8090/manager to access the manager application.
Here you can see that the web_ex.war file has been deployed on Apache Tomcat server successfully.
Test Sample Java Application
To test if the Java application is running hit the URL http://IP-of-Apache-Tomcat:8090/web_ex.

Setup Webhook on the Github Repo
Create a webhook
To create a babe book on the tab visit get her website login into your account and follow the steps mentioned below.
Go to settings of your repo, in the left panel click on web hooks and then click on "Add Webhook"
In the Payload URL add http://Jenkins-URL:8080/github-webhook.
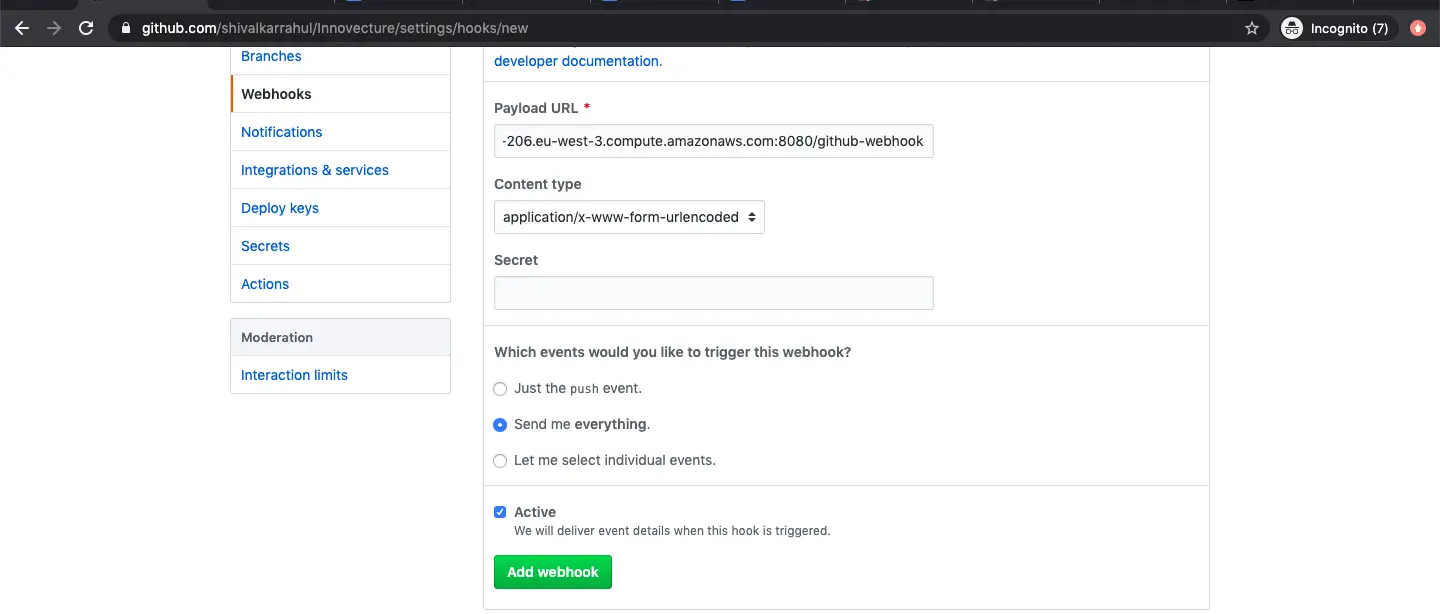
You can choose the events that you would like to trigger this Webhook or you can select "Send me everything" if you wish to trigger the Jenkins job on every event, click on update Webhook to save it.
Test Auto Build on Commit
Now we are ready to test our auto build job.
To test if our Jenkins job pulls the code from our github repo on every commit use the following commands.
To clone the repo locally I have used the following command. If you have your own report just go on it to your local system.
git clone https://github.com/shivalkarrahul/Innovecture.git
cd Innovecture/
Make some changes to the repository so that we can push them. Here, I have added a new file locally which I will push in my remote repo
touch README.md
To configure username and email ID for git use the following commands.
git config user.name "Rahul Shivalkar"
git config user.email "[email protected]"
To commit and push your changes use the following to commands
git commit -m "Test Commit"
git push
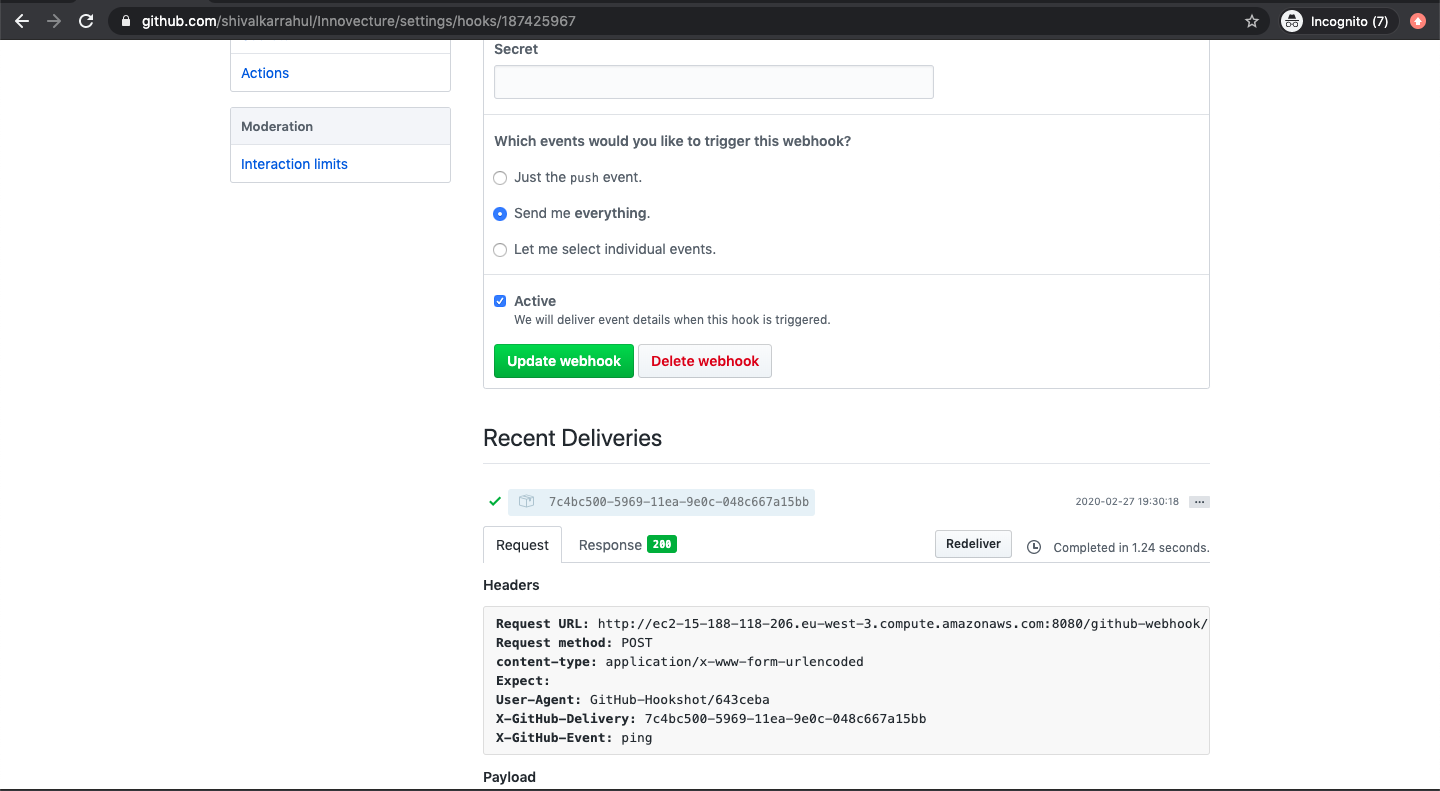
As soon as we push our changes to the repository on Github it will trigger our Jenkins job which we have added in the Github Webhook.
You can see this under "Polling Log" of the job, refer to the following screenshot for the same.

If you go to the console output of the job you can see that the job has been successfully executed and the war has been deployed to Apache Tomcat.
Re-Test
Now change the code to test if the latest code gets deployed or not. I will change the message that gets displayed on the browser.
If you are using your own report then make the required changes in your code, here I am just changing a sample index.jsp file which prints the message on the browser.
vim src/main/webapp/index.jsp
Now let’s see if the changed code gets reflected or not.
Commit the changes that you have made in your code using the following commands.
git add src/main/webapp/index.jsp
git commit -m "Changed Code to Hello World New!”
git push
Hit Apache Tomcat URL http://IP-of-Apache-Tomcat:8090/web_ex to access our sample application.
You can see that the latest code has been built and deployed on Apache Tomcat which means the application has been deployed successfully and the pipeline was also successfully triggered.
If you noticed my previous code displayed just "Hello World!" and now when I made changes in my index.jsp and committed it, the latest application shows "Hello World New!".

Conclusion
In this article we saw the steps of creating a simple CI/CD pipeline which can pull your code from Github repo and deploy it on Apache Tomcat server on every commit. We also saw the steps of installing Jenkins, Apache Tomcat, Java, Plug-ins in Jenkins.

