RESTORE-EE (Enterprise Edition) User Manual - Page 2
On this page
3 Setting up Filestores
Overview
Restore is able to back up a variety of types of data over a variety of protocols. In this chapter, we will discuss how to go about setting up Filestores for the varous types of systems and connections Restore supports.
3.1 Different Protocols
Restore supports a wide range of types of data that can be backed up. You can backup data from a MySQL server, Windows Server/workstion, Novell Netware/OES, UNIX/Linux files via ftp or ssh. Below is a list and description of each one. If at anytime you have a question about the protocol, in Step 1 of the Target (Figure 2) Wizard, you may click on the ? button next to each one to get a detailed description.
- MySQL - Backup databases on a MySQL database server. This is the recommended and only *safe* method for backing up a MySQL database.
- Windows File Share - The Windows File Share option uses a protocol called SMB to back up shared directories on Windows, UNIX, Netware, and OES using NSS.
NOTE: To get a greater detailed explanation of how to set permissions on your Windows or Netware machines, go to the following links.
- Windows - Windows Permission Settings (Opens in same Window. Open in a new tab or Windows for easy access back to this page)
- Netware - Netware Permission Settings (Opens in same Window. Open in a new tab or Windows for easy access back to this page) - FTP - The FTP module can be used to backup files available through the File Transfer Protocol. Typically, FTP is used for transferring files like webservers and repositories. NOTE: Use the SFTP option if you can.
- SFTP - The SFTP module is similar to the FTP module and can be used to backup files through Secure File Transfer protocol over SSH.
3.2 Getting Started
The Process for backing up files and directories in Restore is very simple. With Restore's easy to use target Wizard you have the ability to create targets to manage with a few simple steps. To get started, after you log in to the Restore system, click on the "Filestores" button on the top toolbar. You will be taken to a screen (Figure 1) where you will be able to add new Filestores.
To add a new Filestore, click on the "Add Target" button on the right of the screen. This will bring up the Target Wizard which we will discuss next.
3.3 Target Wizard
Once you click on the "Add Target" button, the Filestore Wizard will begin. (Figure 2). This is a very easy to use 4 step process and we will guide you through each step in this section.
Step 1 - Choosing your protocol. Here you will select which protocol your Filestore will use. This will be discussed in greater detail in section 3.3.
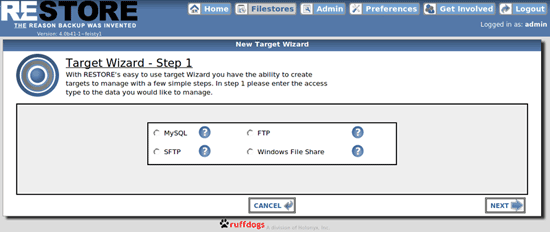
Figure 2 - Target Wizard Step 1
Step 2 - (Figure 3) Here you will put in your credentials to authenticate to your server / workstation. You will need to provide the hostname, username, password. (The port number will be chosen automatically based on your selection from Step 1). The host name can be either an IP Address or the FQN of the server. The username should be that of a user that has full rights to the shares your are wishing to backup.
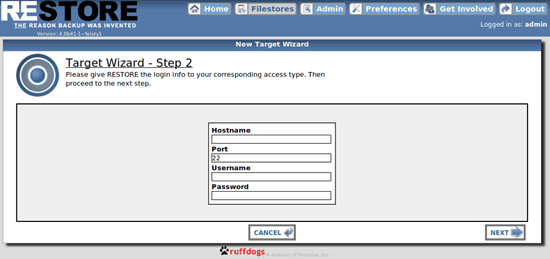
Figure 3 - Target Wizard Step 2
Step 3 - Next you will choose the particular files and or directories you want in your backup (Figure 4). You will see a hierarchical structure of your remote machine in which you can select your files / directories. You will notice a "+" and "-" symbol next to each file / directory. A "+" symbol indicates that the directory is collapsed. A "- "symbol indicates that the directory has been expanded. If you do not see a "+" or "-" symbol, that indicates that it is a file and there is nothing underneath it. Next you will notice boxes next to each file and or directory. A box with a check mark in it indicates that the file/directory is currently selected for inclusion. An empty box indicates that it is not. You may click on the box in the top level of your hierarchy to de-select everything. In this case, the box next to (ssh://[email protected]) You may then go through and choose what you want included.
NOTE: Do not worry if you don't select everything. If you need to add or subtract any file or directory in your backup, you can do so later on. We will discuss editing your filestores in a later chapter.
NOTE: Selecting a directory implicitly selects all items beneath that directory. Be sure you know what is beneath the directory you are selecting so you don't end up backing up significatly more than you intend.
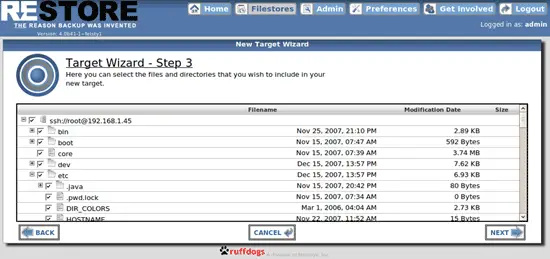
Figure 4 - Target Wizard Step 3
Step 4 - The next and final step is to name your Filestore. On this screen (Figure 5), you will be asked to give a name to your new Filestore. The name does not necessarily have to be the same as that of the machine and can be anything you like. The important thing is that the name be something that will remind you of what is being backup up by the Filestore. When you are satisfied with the name you have chosen for your Filestore, click save and this will create your Filestore and take you to the main Filestore page (Figure 1 above) where it will be listed.
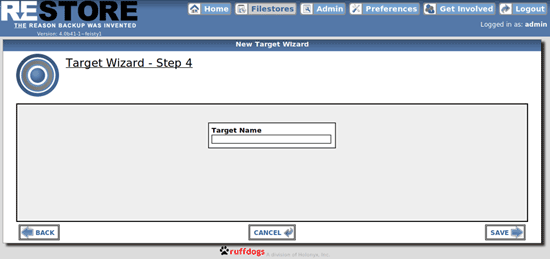
Figure 5 - Target Wizard Step 4 - Naming
4 Managing Backups / Snapshots
Overview
Lets face it: Sometimes things go wrong. But thats what Restore is here for. Whether your server suffered a security breach and everything is missing, or you simply want to see what your big presentation looked like last week before you completely re-did it. Restore can help you recover from those big (and not so big) disasters. In this chapter we will discuss such things as how to run a backup, modify it, and restore your files.
4.1 Manually Running a backup
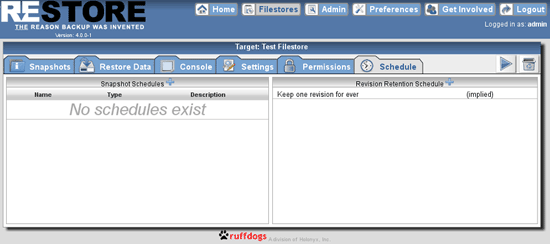
From the Main Restore Dashboard, you will see a list of all the filestores you have created. Click on the corresponding filestore you wish to back up. You will see a screen that has a Snapshots, Restore Data, Console, Settings, Permissions, and Schedule Tab. (Figure 1). To start your backup, click on the blue arrow to the right of the page to start it immediately.
Yes, it really is that simple. With one click, your files are backup up to the Restore system. Can it get any easier? You bet! How about backups starting automatically with virtually any frequency you like?
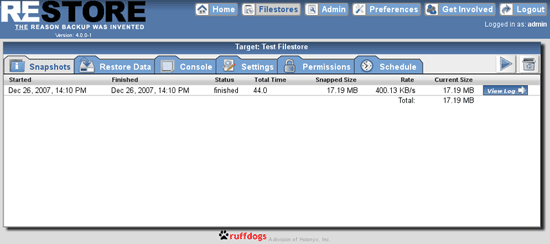
Figure 1 - Filestores Settings
4.2 Scheduling Backups to Run Automatically
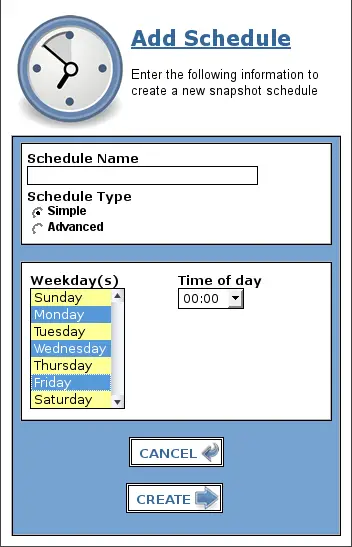
Manually starting backups is great for when you're about to make a major change to yoru system and want protection just in case something goes wrong. But who wants to remember to start one at 4:59 PM every day? That's where scheduling comes in. Restore has 2 different modes in which you can schedule your backups to run. Simple Scheduling and the hour in which to start it. allows you to select the day(s) you want your Filestore to be backed up. Advanced Scheduling allows you to set up extremely complex rules about when to run backups. To set any of these schedules, click on the "Schedule" tab from Figure 1 and you will be take to a screen where you will set up your schedule. (Figure 2) Click the + sign next to Snapshot Schedules and create either a Simple or Advanced Schedule.
Simple Scheduling
Select on the days you wish your Filestore to be backed up by clicking them. To select multiple days, hold down the CTRL key while selecting. From the drop down, select the hour you wish your schedule to start.
Advanced Scheduling
RESTORE utilizes a standard cron syntax for advanced backup scheduling. While RESTORE does allow for simple scheduling, the cron syntax allows for endless possible schedules and gives you more flexibility than most basic scheduling algorithms.
An Example of different expressions in the "hour" field using CRON: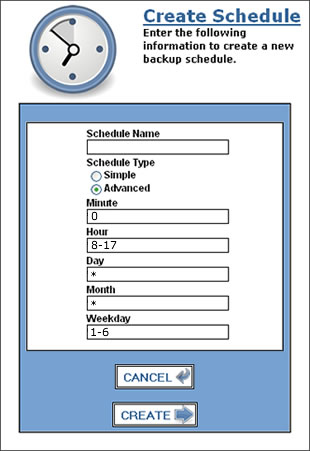
| The Expression | Would Mean |
| 15 | 3 PM |
| * | Every hour |
| 0,6,12,18 | Midnight, 6 AM, Noon, and 6 PM |
| 8-17 | Every hour between 8 AM and 5 PM |
| 8-17,22 | Every hour between 8 AM and 5 PM, and 10 PM |
Name your schedule and hit create. You may then set up a Revision Retention Schedule which we will cover next.
Need to put Revision Retention Info Here
4.3 Checking the status of a backup
It's easy to check on the status of a backup that you are running. Simply click on the "Console" button up in the tool bar of Figure 1.This will list for you the current status of the snapshot you have chosen to view. Keep in mind, though, that frequent backups will take place very quickly, and its possible it may be complete before you are even able to click the "Console" button. To Confirm that your backup ran, check the time under the "Snapshots" tab for the correlating filestore.
4.4 Modifying Filestores
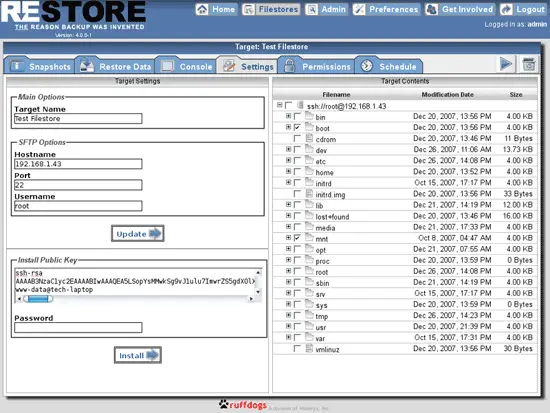
One of the new features of RESTORE 4 is the ability to edit your Filestore after you have created it. Lets say the password has changed on the remote machine or you have added a directory that needs to be included in the backup, maybe the IP address of server has changed, or you decide you want to completely rename your Filestore. With a few simple clicks, you can edit any of those things . From figure 1 above, click on the "Settings" tab and it will bring you to a page where you can edit your Filestore. (Figure3)
To change the name of a Filestore, simply enter a new name for it and click the "Update" button. The next section enables you to change the IP if need be as well as the username you want to use for the backup. In this example, ssh is used as the protocol and you can install a new Public Key if it changes. Below that, is the option to change the password of the user that you are using to backup. On the right hand side of the screen, you can include or exclude any file or directory in your backup. When you are finished, hit the Update button.
4.5 Restoring Files
This is what its all about, right? Brining back what was once lost. We sincerely hope you never have to use this functionality of Restore, but we also hope you'll enjoy the confidence of knowing its there just in case.
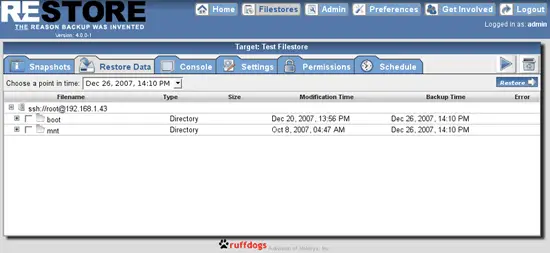
To Restore a file, from the Filestore Dashboard, click on the "Restore Data" tab. This will bring up the hierarchy of files that are backed up by that Filestore. In much the same way as you selected the files when you set the Filestore up, select the files you wish to restore. Also notice that at the top of the screen, there is a drop down menu labled "Choose a Point in time". (Figure 4) Just drop down and choose the most recent snapshot form before your files were damaged or lost.
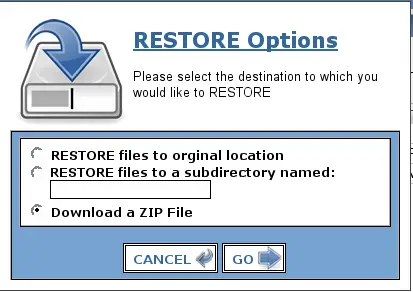
When you've selected the files you want to restore and the point in time you would like to restore them from, click the "Restore" button on the right side of the page. Upon clicking the Restore button, you will have three options to choose from on how to restore the files. (Figure 5)
-The first option, Restore files to original location, will restore the files back to exactly the place they were on the original machine. NOTE: If some of these files have been modified on the host computer, Restore may overwrite them with the copy being restored, so use this option with caution.
-The Second option, Restore to original machine in subdirectory, will restore the files to the original machine they came from in a newly-create directory, the name of which you supply in the text field. This is probably a safer method than number one as it prevents the overwriting of existing files, allowing you to later go into the host machine and place the files exactly where you wish.
-The Third option, Download as a ZIP file, will bundle your requested files into a ZIP file and download them to the computer you are using. Note that this does not necessarily have to be the computer from which the files were backed up.
4.6 Deleting a Filestore
If the time has come that a particular Filestore has become unnecessary, you can remove it. On your Filestore Dashboard, you can click on the "Trash" icon (next to the start snapshot button). This will take you to a screen asking you to confirm that you really want to delete the Filestore.
NOTE: Once you delete a Filestore, it is gone permanently. There is no way to bring back either the entry in Restore or the actual files.
NOTE: Upon confirming the removal of a Filestore, you will be returned to the Restore Filestores Main page. The Filestore you just deleted may still be listed. This is nothing to be concerned about. It will disappear in a moment after it has finished removing all the archived files.


