The Perfect Setup - Debian Sarge (3.1) - Page 4
MySQL
apt-get install mysql-server mysql-client libmysqlclient12-dev
mysqladmin -u root password yourrootsqlpassword
When you run netstat -tap you should now see a line like this:
tcp 0 0 localhost.localdo:mysql *:* LISTEN 2449/mysqld |
which means that MySQL is accessible on 127.0.0.1 on port 3306. You can go to the next section (Postfix). If you do not see this line, edit /etc/mysql/my.cnf and comment out skip-networking:
# skip-networking |
If you want MySQL to listen on all available IP addresses, edit /etc/mysql/my.cnf and comment out bind-address = 127.0.0.1:
#bind-address = 127.0.0.1 |
If you had to edit /etc/mysql/my.cnf you have to restart MySQL:
/etc/init.d/mysql restart
If MySQL is listening on all interfaces, you must now also set a MySQL password for server1.example.com because otherwise anybody could access your database:
mysqladmin -h server1.example.com -u root password yourrootsqlpassword
Postfix/POP3/IMAP
In order to install Postfix with SMTP-AUTH and TLS as well as a POP3 server that also does POP3s (port 995) and an IMAP server that is also capable of IMAPs (port 993) do the following steps:
apt-get install postfix postfix-tls libsasl2 sasl2-bin libsasl2-modules ipopd-ssl uw-imapd-ssl (1 line!)
<- pop3 and pop3s
<- No
<- Internet Site
<- NONE
<- server1.example.com
<- server1.example.com, localhost.example.com, localhost
<- No
postconf -e 'smtpd_sasl_local_domain
='
postconf -e 'smtpd_sasl_auth_enable = yes'
postconf -e 'smtpd_sasl_security_options = noanonymous'
postconf -e 'broken_sasl_auth_clients = yes'
postconf -e 'smtpd_recipient_restrictions = permit_sasl_authenticated,permit_mynetworks,reject_unauth_destination'
postconf -e 'inet_interfaces = all'
echo 'pwcheck_method: saslauthd' >> /etc/postfix/sasl/smtpd.conf
echo 'mech_list: plain login' >> /etc/postfix/sasl/smtpd.conf
mkdir /etc/postfix/ssl
cd /etc/postfix/ssl/
openssl genrsa -des3 -rand /etc/hosts -out smtpd.key 1024
chmod 600 smtpd.key
openssl req -new -key smtpd.key -out smtpd.csr
openssl x509 -req -days 3650 -in smtpd.csr -signkey smtpd.key -out smtpd.crt
openssl rsa -in smtpd.key -out smtpd.key.unencrypted
mv -f smtpd.key.unencrypted smtpd.key
openssl req -new -x509 -extensions v3_ca -keyout cakey.pem -out cacert.pem -days
3650
postconf -e 'smtpd_tls_auth_only
= no'
postconf -e 'smtp_use_tls = yes'
postconf -e 'smtpd_use_tls = yes'
postconf -e 'smtp_tls_note_starttls_offer = yes'
postconf -e 'smtpd_tls_key_file = /etc/postfix/ssl/smtpd.key'
postconf -e 'smtpd_tls_cert_file = /etc/postfix/ssl/smtpd.crt'
postconf -e 'smtpd_tls_CAfile = /etc/postfix/ssl/cacert.pem'
postconf -e 'smtpd_tls_loglevel = 1'
postconf -e 'smtpd_tls_received_header = yes'
postconf -e 'smtpd_tls_session_cache_timeout = 3600s'
postconf -e 'tls_random_source = dev:/dev/urandom'
The file /etc/postfix/main.cf should now look like this:
# See /usr/share/postfix/main.cf.dist for a commented, more complete version smtpd_banner = $myhostname ESMTP $mail_name (Debian/GNU) biff = no # appending .domain is the MUA's job. append_dot_mydomain = no # Uncomment the next line to generate "delayed mail" warnings #delay_warning_time = 4h myhostname = server1.example.com alias_maps = hash:/etc/aliases alias_database = hash:/etc/aliases myorigin = /etc/mailname mydestination = server1.example.com, localhost.example.com, localhost relayhost = mynetworks = 127.0.0.0/8 mailbox_command = procmail -a "$EXTENSION" mailbox_size_limit = 0 recipient_delimiter = + inet_interfaces = all smtpd_sasl_local_domain = smtpd_sasl_auth_enable = yes smtpd_sasl_security_options = noanonymous broken_sasl_auth_clients = yes smtpd_recipient_restrictions = permit_sasl_authenticated,permit_mynetworks,reject_unauth_destination smtpd_tls_auth_only = no smtp_use_tls = yes smtpd_use_tls = yes smtp_tls_note_starttls_offer = yes smtpd_tls_key_file = /etc/postfix/ssl/smtpd.key smtpd_tls_cert_file = /etc/postfix/ssl/smtpd.crt smtpd_tls_CAfile = /etc/postfix/ssl/cacert.pem smtpd_tls_loglevel = 1 smtpd_tls_received_header = yes smtpd_tls_session_cache_timeout = 3600s tls_random_source = dev:/dev/urandom |
/etc/init.d/postfix restart
Authentication will be done by saslauthd. We have to change a few things to make it work properly. Because Postfix runs chrooted in /var/spool/postfix we have to do the following:
mkdir -p /var/spool/postfix/var/run/saslauthd
Now we have to edit /etc/default/saslauthd in order to activate saslauthd. Remove # in front of START=yes and add the line PARAMS="-m /var/spool/postfix/var/run/saslauthd -r":
# This needs to be uncommented before saslauthd will be run automatically START=yes PARAMS="-m /var/spool/postfix/var/run/saslauthd -r" # You must specify the authentication mechanisms you wish to use. # This defaults to "pam" for PAM support, but may also include # "shadow" or "sasldb", like this: # MECHANISMS="pam shadow" MECHANISMS="pam" |
We must also edit /etc/init.d/saslauthd and change the location of saslauthd's PID file. Change the value of PIDFILE to /var/spool/postfix/var/run/${NAME}/saslauthd.pid:
PIDFILE="/var/spool/postfix/var/run/${NAME}/saslauthd.pid"
|
Now start saslauthd:
/etc/init.d/saslauthd start
Next we create the file /etc/c-client.cf with the following contents:
I accept the risk set disable-plaintext 0 |
and restart inetd:
/etc/init.d/openbsd-inetd restart
If we don't do this, then our POP3/IMAP logins will fail.
To see if SMTP-AUTH and TLS work properly now run the following command:
telnet localhost 25
After you have established the connection to your postfix mail server type
ehlo localhost
If you see the lines
250-STARTTLS
and
250-AUTH
everything is fine.
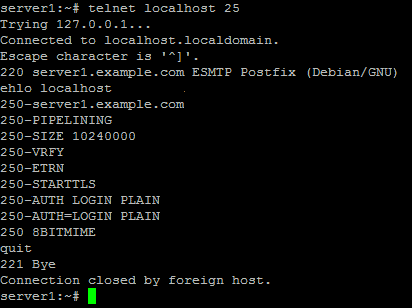
Type
quit
to return to the system's shell.
Courier-IMAP/Courier-POP3
If you want to use a POP3/IMAP daemon that has Maildir support (if you do not want to use the traditional Unix mailbox format) you can install Courier-IMAP/Courier-IMAP-SSL (for IMAPs on port 993) and Courier-POP3/Courier-POP3-SSL (for POP3s on port 995). Otherwise you can proceed with the Apache configuration.
apt-get install courier-imap courier-imap-ssl courier-pop courier-pop-ssl
<- No
ipopd and UW-IMAP will then be replaced.
Then configure Postfix to deliver emails to a user's Maildir*:
postconf -e 'home_mailbox
= Maildir/'
postconf -e 'mailbox_command ='
/etc/init.d/postfix restart
*Please note: You do not have to do this if you intend to use ISPConfig on your system as ISPConfig does the necessary configuration using procmail recipes. But please go sure to enable Maildir under Management -> Settings -> EMail in the ISPConfig web interface.

