OpenSSH Security Hardening Guide for Linux
SSH is one of the most widely used protocols for system administration on Linux platforms. It is available for many operating systems based on Unix, Linux and MacOS. It is based on the client-server model, where one machine runs the server component and the other uses a client tool to access it.
How does SSH work?
The client (ssh) initiates the connection by sending a request to the server. The server listens for the incoming requests using the server daemon (sshd). It uses its public key to authenticate itself to the client trying to connect to it:
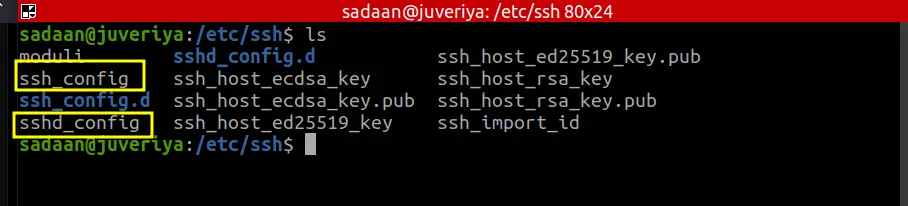
In this way, the client is assured that it is connecting to the right SSH server. When this is done, the client can access the server. If you are on a Windows client, you will have to use tools like putty to connect to the server. Both the client and server can be installed on the same system, this means you can use the client tool to access other machines or your system can be the server itself which can be accessed by others. In such a case the config file is placed in the same directory but with a slightly different name. The directory location is ‘/etc/ssh’ and the name for ssh client config file is ‘ssh_config’ and that of the server’s config file is ‘sshd_config’:
In case you have both the files on your system, you should wisely choose which file you need to configure. In most cases, it is the server we need to configure for security as it opens the door to potential access on the system.
We first start with checking the status of the SSH daemon or sshd on our server. In this way we can see if it is running and enabled to automatically start at boot. The below command will check the sshd status:
$ systemctl status ssh.service
Or use the below one:
$ systemctl status sshd.service
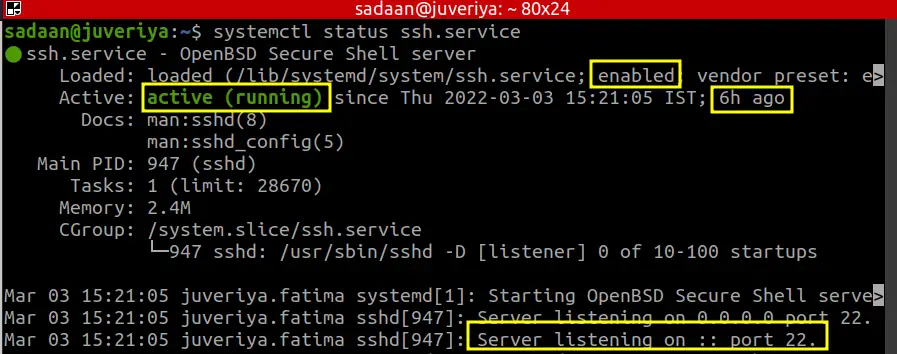
From the screenshot we can see the service is active and enabled. It has been running for the past 6 hours. When you expand the terminal view by pressing the right arrow, you will notice that it is listening on the default port 22.
Sometimes we make changes to the SSH config file of the remote system while we are connected to it using the SSH itself. In such a case we should use the reload command instead of the restart one. In this way we are less likely to get disconnected.
Configuring SSH using the Best Practices
I think it's now time to get started with configuring SSH server configuration. Before we get our hand dirty with the SSH config file, we should make a backup of the file with the default settings:
$ sudo cp /etc/ssh/sshd_config ~/sshd_config.bkp
After performing the backup we are assured that if we mess up with the main file and break our SSH, we can use the backup file to get back to normalcy.
1. Changing the Default Port
The sshd daemon by default listens on port 22 of the server. It is recommended to change this value to some other number in a way to reduce the scope of automated attacks using scripts. This approach is called security through obscurity. For this open the below file and look for the line containing the text ‘#Port 22’.
$ sudo nano /etc/ssh/sshd_config
Uncomment the line ‘#Port 22’ and change ‘22’ to some other port number, not in use on your system. We have to change it to '222' and restarted the service. Now use the ssh command with the option 'p' to specify the new port:
$ ssh user@system_ip -p 222

2. Disabling login as Root user
Root is the ultimate user on any Linux system with access to every resource on your system. In case you do not require a strict root access, you should disable the root login facility on your server. For this open the same above file:
$ sudo nano /etc/ssh/sshd_config
and set the ‘PermitRootLogin’ parameter to ‘no’. This will ensure that the server will be protected from the random attacks targeting the root account. The default option is ‘prohibit-password’ which allows for login based on public-key authentication but denies the password based logins.
3. Setting the Protocol Version
The older protocol version of SSH is 1 and it is less secure as compared to SSH2 and they do have different networking implementations and are also not compatible with each other. To check which protocol version is active on your server, open the sshd_config file again and look for the line 'Protocol':
$ cat /etc/ssh/sshd_config | grep 'Protocol'
In case you have an empty output, the OpenSSH may be probably using version 2 as this was so in our case. Another way is to use the netcat command utility:
$ nc localhost 22
Sample Output:
SSH-2.0-OpenSSH_8.2p1 Ubuntu-4ubuntu0.4
From the output we can see that SSH2 is active on our system.
To check which protocols version a remote server is running, try to connect to it using a ssh client with the -Q (query) option:
$ ssh -Q protocol-version user@server_name
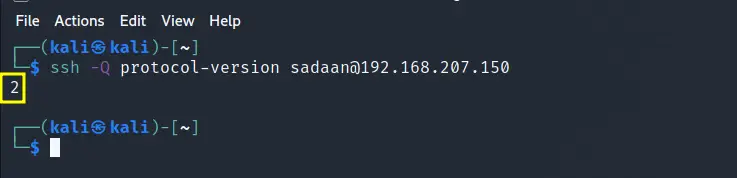
The above image shows an SSH version 2 while accessing a Ubuntu ssh server from a Kali Linux.
4. Password Complexity
Weak passwords are always vulnerable to be exploited, so empty passwords are more likely to be exploited. The PermitEmptyPasswords option should therefore be set to ‘no’ in the sshd_config file. In the same way the number of login attempts with wrong password should be limited to reduce the chances of brute force attack. This can be achieved with the ‘MaxAuthTries’ option set to some smaller value like 3.
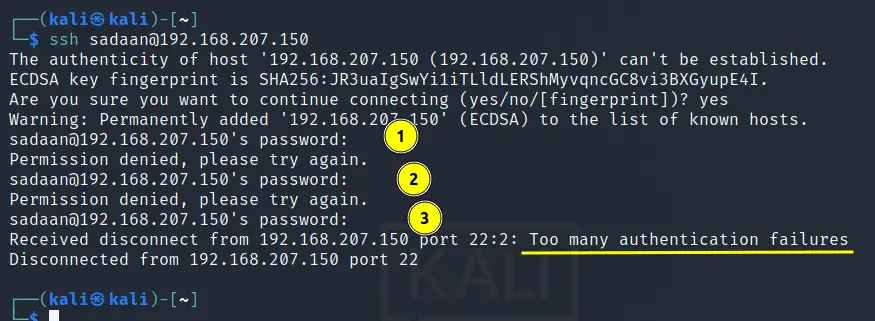
From the picture above we can see that when we set the ‘MaxAuthTries’ value to 3, we are denied SSH after three wrong passwords. Another major security aspect is to use public key authentication for login. The key-based authentication models are less vulnerable to brute force attacks. Similarly, we can use the PAM authentication module for even more fortifying the SSH server.
Conclusion
In this guide, we have tried to cover the most important points to securing an SSH server and sum them up into four major points. Although this guide is not a complete one, you can even find more areas to further strengthen your SSH server. For e.g. you can try adding a banner message to alert the users about using your system over SSH. You can also deny login with a password and use key-based authentication for passwordless login. Another interesting thing is that you can limit the number of SSH users and their connection time.

