How to Configure OpenLDAP for the AXIGEN Mail Server
What is LDAP?
LDAP stands for Lightweight Directory Access Protocol. This protocol is used to access a directory listing. It is being implemented in Web browsers and e-mail programs to enable lookup queries (searches for certain types of information). When compared to other querying architectures such as SQL databases, lookup speed is the major advantage of using LDAP. In large companies, a huge number of requests are made and storing the information in a database becomes a very resource consuming approach. The basic principle behind LDAP is the optimization toward many record reads and few additions or modifications. From an administrator's point of view, LDAP is fairly easy to use as long as the concepts behind the system are understood. It is not the most user-friendly application to use, but the benefits it provides are worth the extra effort.
Why use LDAP?
LDAP can be used along side AXIGEN to provide three functionalities: LDAP Address Directory, User Authentication and Connection Routing. The main benefits this integration entails are less time spent searching for contacts when sending an e-mail, especially within large contact databases, less stress on the server and increased end-user productivity. Authentication is a widely used method of preventing unauthorized access to the mail server. In a mail environment with hundreds or thousands of accounts, a long authentication time can prevent other users from logging onto the system and can thus lead to poor service. When managing several AXIGEN servers, LDAP comes as a means of controlling all authentication processes from a single location.
OpenLDAP (an open source implementation of the LDAP protocol) should be used alongside AXIGEN Mail Server if you are looking for a shared address book and you want to have user accounts spread on several AXIGEN servers.
If you decide to use a LDAP system with your mail server, there are a few aspects you should take into account. A fair understanding of the LDAP system is required before actually starting to install and configure it. The additional workload needed to configure and implement an LDAP server is considerable, thus it is typically used only in scenarios involving a large number of mailboxes spread across several AXIGEN servers.
How does LDAP work?
A client starts a LDAP session by connecting to a LDAP server, by default on the 389 TCP port. The client then sends operation requests (queries) to the server which returns a certain response. Apart from specific situations, the client is not required to wait for a response before sending subsequent requests, and the server may send the responses in any order.
An LDAP server generally supports the following actions:
- Bind (authentication and protocol version specification)
- Search (search for elements in the directory)
- Add (add an element to the directory)
- Modify (edit the contents of an element)
- Delete (remove an element from the directory)
- Abandon (cancel a previous request)
- Unbind (close the connection)
When using a secure connection the default port is 636. Secured connections have been deprecated officially in 2003 along with the second version (ldapv2) of the LDAP protocol. Even though this version has been deprecated, many applications still use it and therefore it is still supported.
An LDAP Directory resembles a tree of entries. These entries have their own attributes and unique identifiers. Attributes have names that are defined in the schemas used by the server. Unique identifiers are in fact the DN (distinguished name) of the entry containing an attribute of the entry (such as CN – common name) followed by the identifier of the parent entry. Here is an example:
	dn: cn=Someone,dc=example,dc=org
	cn: Someone
	givenName: Someone
	mail: [email protected]
	manager: cn=Some manager,dc=example,dc=org
	objectClass: inetOrgPerson
	objectClass: organizationalPerson
	objectClass: person
In this example, the name of the entry is "Someone" and the parent entry name is "example.org". "dc" stands for domain component, and is specific to domain names. The rest of the lines are the attributes of this particular entry. Attributes have generally easy to guess names, such as “mail”.
Configuring LDAP for AXIGEN
Before changing the authentication type to LDAP you have to make sure that you have AXIGEN Mail Server version 3.0 or higher installed, a LDAP server running and the LDAP directory set up.
Hands-on example - Debian 3.1 and AXIGEN 3.0
1. Install AXIGEN 3.0 and configure your domain of choice (example.org in this configuration example). Make sure you have some accounts active in that domain.
2. Install the LDAP server:
- Install the required packages:
apt-get -y install slapd ldap-utils
- Enter the domain name defined in your AXIGEN mail server (example.org). This will result in "dc=example,dc=org";
- Enter the same "example.org" for the organization;
- Choose a password for your server;
- Choose to enable support for the LDAPv2 protocol.
3. Configure LDAP
- With your favorite text processor edit the file:
/etc/ldap/slapd.conf
- Uncomment the line:
#allow bind_v2
- Under the lines where schemas are defined include the “misc schema” by inserting the following line:
include /etc/ldap/schema/misc.schema
- Restart the LDAP server:
/etc/init.d/slapd restart
4. Setup the LDAP Directory structure:
- Create a file that will be the template for subsequent users you will add:
touch user.ldiff
- Edit the newly created file and insert the following lines into it:
dn: cn=example-user,dc=example,dc=org
objectClass: inetOrgPerson
objectClass: inetLocalMailRecipient
cn: example-user
sn: example-user
mail: [email protected]
userPassword: userpass
mailHost: 127.0.0.1 - Save and close the file. Make sure that no trailing spaces exist on any of the lines and that the file ends with a ‘newline’ character. If these requirements are not met, LDAP will return syntax errors. When you want to add a new user into the directory database, all you have to do is change the contents of the above file to fit the new identity;
- Add the user in the directory listing use the following command:
ldapadd -x -D "cn=admin,dc=example,dc=org" -W -f user.ldiff
- Important! Make sure you use the "-x" switch when connecting to the LDAP server to use plain authentication.
- The server will ask for the password and then the output of that command should resemble: adding new entry "cn=example-user,dc=example,dc=org"
- If you receive an error here, youeither used a wrong password or you need to check the file again for errors;
- Edit the file and add a few more users to the directory, to test the setup.
5. Make sure the LDAP directory contains the needed information:
Perform a search on the LDAP directory with the following command:
ldapsearch -b "dc=example,dc=org" -W -D "cn=admin, dc=example,dc=org" -x
This command will display all the entries that currently exist in the directory. You should be able to identify the admin user you have used to log on the server and all the accounts you've been creating. If this is not the case, please review the previous steps before continuing.
6. Configure AXIGEN to use the LDAP directory for authentication and routing
First configure a new LDAP Connector:
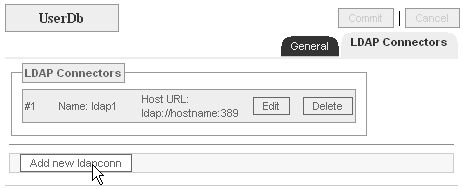
- Log into the WebAdmin interface;
- Go to the "UserDB" context;
- Click the "LDAP Connectors" tab;
- Click the "Add new ldapconn" button;
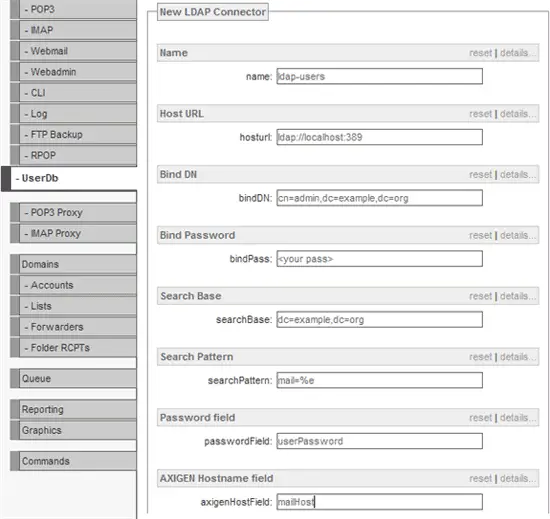
- Set the following atributes:
	Name: ldap-users
	Host URL: ldap://localhost:389
	bindDN: cn=admin,dc=example,dc=org
	bindPass: <your_LDAP_password>
	searchBase: dc=example,dc=org
	searchPattern: mail=%e
	passwordField: userPassword
	axigenHostField: mailHost
- Click the "Add" button;
- Click the "Commit" button;
- Click the "Save Config" button;
Then create a new User Map:
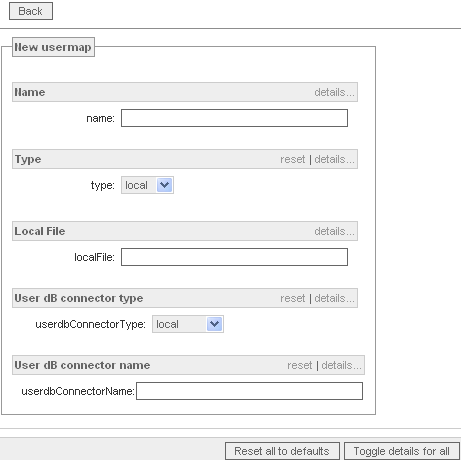
- In the "Server" context, click the "User Maps" tab;
- Click the "Add new map" button;
- Set the following atributes:
	Name: ldap-users
	Host URL: ldap://localhost:389
	bindDN: cn=admin,dc=example,dc=org
	bindPass: <your_LDAP_password>
	searchBase: dc=example,dc=org
	searchPattern: mail=%e
	passwordField: userPassword
	axigenHostField: mailHost
- Click the "Add" button;
- Click the "Commit" button;
- Click the "Save Config" button.
7. Enable LDAP authentication for a specific service (IMAP in this example)
- Log into the WebAdmin interface;
- Go to the IMAP context;
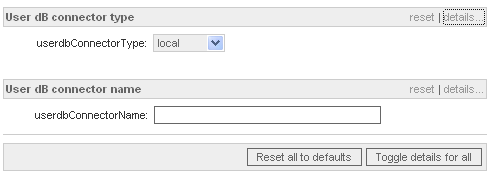
- Select "ldap" in the "User dB connector type" section;
- Set the "userdbConnectorName" to "ldap-users";
- Click the "Add" button;
- Click the "Commit" button;
- Click the "Save Config" button.
Important! The password set in the LDAP Directory must be used to log into the accounts when using LDAP authentication. Normally these two passwords should not differ in any way.


