Network Diagnostic Tool (NDT) On Ubuntu 7.10 Server - Page 3
Install web100 userland
I am not going to get overly wordy with this as it is fairly straight forward. Simply run the following commands:
cd /usr/src/
tar -xvzf web100_userland-1.6.tar.gz
cd web100_userland-1.6
./configure --enable-python
make
make install
cd ..
rm -Rf web100_userland-1.6
rm web100_userland-1.6.tar.gz
Install NDT
It is finally time for NDT! The true goal of this guide. Again, I will refrain from getting wordy. Just issue the following commands:
tar -xvzf ndt-3.4.4.tar.gz
cd ndt-3.4.4
./configure
make
make install
Edit textual preferences for your ndt page
There are some portions of the NDT web page that you will host that you might wish to change. Adding things such as your name, site name, email address, etc...
Fortunately, you no longer have to do this manually as a shell script has been included to automate the process somewhat. Issue the following commands to get started:
cd conf/
./create-html.sh
Below is a screen dump of how the process looked on my system.
Welcome to the NDT server configuration program. This program will create a custom tcpbw100.html file for your site.
Enter your site name [Internet2] : My NDT Server (You, of course, need to tailor this to your needs.)
Enter your site's location [Ann Arbor - MI] : Anytown (Again, you will want to set this to your location.)
Server connection info, enter 1 for 100 Mbps, 2 for 1 Gbps [2] : 1 (I Chose "1", but if you are on a Gigabit network, you would want to choose "2")
Information for email trouble reporting
Enter email userid [rcarlson] : SomeUser (Change this to your account)
Enter email domain name [internet2.edu] : localhost (Or the server that you wish to receive mail on)
Enter default subject line [Trouble report from ndt] : Enter (Enter for default unless you wish to customize it)
The base web page 'tcpbw100.html' has now been created. You must move this file into the ndt_DATA directory [/usr/local/ndt] created during the 'make' process.
Do you want to install this file now? [yes] : Enter (This should move the file created above for you)
Enter location [/usr/local/ndt] : Enter (Unless you have changed the default install directory)
Perform a little cleanup
Issue the following commands to clean up the directories and files that are no longer needed:
cd ../..
rm -Rf ndt-3.4.4
rm ndt-3.4.4.tar.gz
rm web100-2.5.18-200711151130.tar.gz
Start the processes
Congratulations on sticking with it! You are very nearly done. The only thing left to do is to start the fakewww and web100srv processes. Issue the following commands to do so:
/usr/local/sbin/fakewww >& /dev/null &
/usr/local/sbin/web100srv -a --ipv4 >& /dev/null &
Visit your web page
That's it! You should now be ready to visit your new ndt server's web page. Keep in mind that this is not running on Apache though, so you need to point your browser to the port that the web100srv process listens on - 7123.
An example (since I don't know what IP address you assigned to your server), would be:
http://192.168.2.173:7123
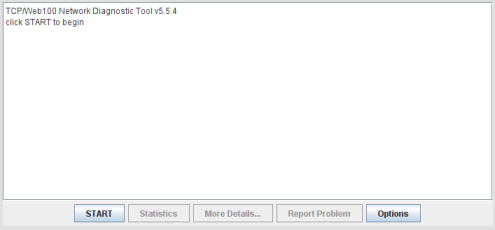
If all has gone well, you should be presented with a page with the following applet embedded into it.
Click the start button and hope for the best. Keep in mind that this is a Java based application, so you need to have Java installed on the system that you are running the test from.
I truly hope that this works for you. Please keep in mind though that it is a fairly complicated build and was very trying to make into a guide. I almost gave up several times... Good luck.
Security Warning
Although I used the root account during this build, I do not recommend leaving the root account enabled, due to the very real security threats that it poses. To disable the root account once the build is complete and your NDT server is running, you can run the following command to disable it.
sudo passwd -l root
This will place your root account into a disabled state to prevent brute force attempts.


