Network Diagnostic Tool (NDT) On Ubuntu 7.10 Server
This guide will walk you through the setup process for implementing NDT running under Ubuntu 7.10 server. For those unfamiliar with NDT, it is a network performance testing application. NDT will measure the throughput between your server and the desktops that you run the java client from.
Some of the issues that NDT can identify on your network, include:
- The slowest link in the end-to-end path (Dial-up modem to 10 Gbps Ethernet/OC-192)
- The Ethernet duplex setting (full or half)
- If congestion is limiting end-to-end throughput
- Duplex Mismatch
- Excessive packet loss due to faulty cables
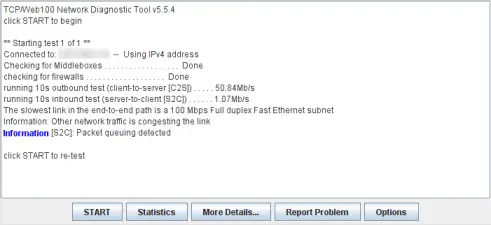
An example of the output that you can expect is shown in the image below.
WARNING! Before you begin, I need to make sure that a few things are understood first. This is a very complicated process that involves recompiling and patching the kernel. As such, you should NEVER attempt this on a production server (or even an existing server, for that matter). You could very well wind up with a bricked operating system. I take absolutely no responsibility whatsoever should this go awry. That being said, I have stepped through this guide several times, since I got the initial sequence down and it has worked for me. I hope that it will do the same for you. Once again though, just to be sure, ONLY perform this on a new server that you are willing to re-install the OS on should things go bad!
With that said, let's get started (you did read the warning, right?).
Install the base operating system
This guide requires starting with a fresh installation of Ubuntu 7.10 Server. I would recommend following pages one and two of the The Perfect Server - Ubuntu Gutsy Gibbon (Ubuntu 7.10) guide, as this is what I used. Be sure to install openssh-server as the guide recommends as you will be performing most of this process remotely. My preferred SSH tool is PuTTY.
Post installation
Using putty, login to your newly built Ubuntu server. The first step you need to take is to edit your sources.list and comment out the cdrom entry. Run the following commands to do so:
sudo nano /etc/apt/sources.list
You will now be prompted for the password that you created during the installation. Once you have entered it, you need to find the following line and comment it out by placing a "#" in front of it.
deb cdrom:[Ubuntu-Server 7.10 _Gutsy Gibbon_ - Release i386 (20071016)]/ gutsy main restricted
When done, it should look like this:
# deb cdrom:[Ubuntu-Server 7.10 _Gutsy Gibbon_ - Release i386 (20071016)]/ gutsy main restricted
Press Ctrl-O to write out your changes and Ctrl-X to exit the nano editor.
Update and upgrade
Run the following two commands to make sure that your server is up to date.
sudo apt-get update
sudo apt-get upgrade
Prepare root access
I understand that there are some who say that root access is completely unnecessary as the sudo command should suffice. I tend to agree, but as this guide calls for patching and recompiling the kernel, I felt that it was justified.
Run the following command to set the password for root.
sudo passwd root
You will now be prompted to enter the new root password.
Once done, become root by issuing the following command.
su
Install pre-requisite software
You now need to install some software that is necessary for further compilations.
Run the following command to install everything that you will need.
apt-get install binutils cpp sendmail flex gcc libarchive-zip-perl libc6-dev libcompress-zlib-perl libdb4.3-dev libpcre3 libpopt-dev lynx m4 make ncftp nmap openssl perl perl-modules unzip zip zlib1g-dev autoconf automake1.9 libtool bison autotools-dev g++ build-essential libstdc++2.10-glibc2.2 rcconf libio-pty-perl libnet-ssleay-perl libauthen-pam-perl libmd5-perl gcc cpp libpcap-dev kernel-package libncurses5-dev fakeroot wget bzip2 python2.4-dev libncurses5-dev libreadline5-dev libimlib2 libimlib2-dev sun-java5-bin sun-java5-jdk sun-java5-jre csh


