Monitoring With Groundwork Open Source On CentOS 5.1 - Page 2
Install Java
Groundwork requires Java SDK version 1.5 and can be obtained from the following URL: http://java.sun.com/javase/downloads/index_jdk5.jsp. The file that you are after is jdk-1_5_0_15-linux-i586-rpm.bin.
To upload the file to your server using Webmin, login to Webmin at http://IP Address:10000. From there, click on "Others" on the menu on the left hand side, them "Upload and Download" and finally on the "upload to server" tab. Use the "Browse" button to locate the jdk-1_5_0_15-linux-i586-rpm.bin file, and set the "File or directory to upload to" directive to the /tmp directory and click on the "upload" button.
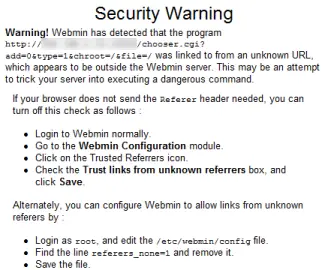
If you receive an error like the following, you will need to disable the "Trusted Referrers" directive in the Webmin configuration.
You can disable the "Trusted Referrers" directive by going to "Webmin" in the left hand menu, then clicking on "Webmin Configuration" and clicking on "Trusted Referrers" (should be on the far right hand side). Set "Referrer checking enabled?" to "No" and check the box next to "Trust links from unknown referrers" Once you have done this, try your upload again.
Once the jdk-1_5_0_15-linux-i586-rpm.bin file is in your tmp directory, issue the following commands to install it.
cd /tmp/
chmod +x jdk-1_5_0_15-linux-i586-rpm.bin
./jdk-1_5_0_15-linux-i586-rpm.bin
You will be prompted to agree to the license agreement - Simply type "yes" and hit the Enter key to proceed. Once the installation has completed, you need to verify that you do not have other Java packages installed. Issue this command:
rpm -qa | grep -i java
If you see something resembling this output, you will need to remove them.
java-1.4.2-gcj-compat-1.4.2.0-27jpp
gcc-java-3.4.6-3
You can remove them by issuing a command similar to this:
rpm -e java-1.4.2-gcj-compat-1.4.2.0-27jpp
With that done, you need to reboot your server before proceeding. Issue this command now:
shutdown -r now
Once the system has rebooted, you can finalize the Java installation. First, you need to edit your profile and insert the paths to your Java installation.
nano /etc/profile
When the editor is open, add these lines at the bottom of the open file:
export JAVA_HOME=/usr/java/jdk1.5.0_15

export PATH=$PATH:$JAVA_HOME/bin
Press Ctrl-O to write out your changes and Ctrl-X to exit the editor. Now, we need to update the profile by issuing this command:
source /etc/profile
To ensure that Java is working, issue this command:
which java
You should see output similar to this:
/usr/java/jdk1.5.0_15/bin/java
Almost there, we just need to create a few shortcuts so that Groundwork finds Java where it expects too.
ln -sf $JAVA_HOME/bin/java /etc/alternatives/java
ln -sf /etc/alternatives/java /usr/bin/java
Now, if you issue the "which java" command again, you should see output such as this:
/usr/bin/java
If you do, then it is time to move onto setting the host file. If not, then look back over these steps to see if you missed something.
Set Hosts File
Groundwork requires that the host file be set up in a specific manner (and is the opposite of the perfect setup guides that you will find here). Issue the following command to edit the host file.
nano /etc/hosts
Now make sure the IP Addresses and the hostname are set up like the following example.
127.0.0.1 localhost localhost.localdomain
192.168.1.117 Groundwork Groundwork.Server
You will, of course, want to substitute your server's IP Address in place of the 192.168.1.117 address and your server's name in place of Groundwork.Server (although I would highly recommend keeping a format similar to Groundwork.*, where the * represents your local domain). Everything else within the host file should stay the same. Once your modifications are complete, press Ctrl-O to write out your changes and Ctrl-X to exit the editor.
Obtain And Install Groundwork Open Source
It is now time to obtain and install Groundwork. This should be the most painless part of the whole build process. Simply issue the following commands to obtain and install Groundwork.
mkdir /usr/local/groundwork
cd /usr/local/groundwork
wget http://superb-east.dl.sourceforge.net/sourceforge/gwmos/groundwork-monitor-os-5.1.3-3.rhel5.i386.tar.gz
tar -xvzf groundwork-monitor-os-5.1.3-3.rhel5.i386.tar.gz
rpm -Uvh groundwork-foundation-pro-1.6.1-67.noarch.rpm
rpm -Uvh groundwork-monitor-core-5.1.3-8.rhel5.i386.rpm
If there are no errors, it is time to visit your new Groundwork based monitoring solution. If however; You receive an error such as the following:
Couldn't connect to localhost:4913: IO::Socket::INET: connect: Connection refused
Then you need to check your host file and make sure that it is set up properly. This error is due to Apache not being able to properly resolve your host name and not starting.
If you had to reconfigure your host file, then you will need to issue the following commands before proceeding:
/etc/init.d/httpd restart
rpm -e groundwork-monitor-core-5.1.3-8.rhel5
rpm -Uvh groundwork-monitor-core-5.1.3-8.rhel5.i386.rpm
Accessing GroundWork
To access Groundwork, all you need to do is open your favorite web browser and point it to the IP Address of the server as shown in the example below.
http://192.168.1.117
The default user ID and password are:
Username: admin
Password: admin
Configuration
I am not going to go into the full configuration of Groundwork, because that would simply take to much time. I will help you get started though.
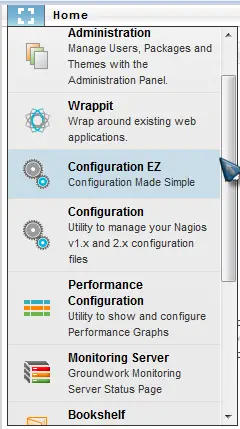
Once you have logged in, you will see a menu area in the top left hand side of your browser (look for "Home") - Click on the square to the left of it to access a menu.
On the menu, look for and click on "Configuration EZ". From there, click on "Discover" and enter the IP range that you wish to scan for hosts. For example 192.168.1.*-110 and then click on the "Next" button. Once the scan has completed, simply choose the hosts that you wish to monitor, by placing a check mark next to their names and clicking on the "Add" button.
With your hosts chosen, it is time to commit your configuration. In the menu near the top of the page, you should see where it says "Commit" - Click there. On the left hand side of the screen, you should have two options - Pre flight test and Commit. First choose "Pre flight test" to test your configuration. If you get a statement such as this - "Things look okay - No serious problems were detected during the pre-flight check", then your configuration is good to go. Click on "Commit" and then in the new section that opens, click on the "Commit" button there.
That's it! Now if you go back to the menu and go to the "Monitoring Server" option in the menu, you will see your new monitoring solution in action.
For information concerning extending Groundwork to meet your needs (or any other questions that you may have), they have an excellent community forum - GroundWork Community Support.
Setting Root MySQL Password
If everything is working as it should, then you can set the root password for MySQL now (only do this after you are sure that everything is working though). The command is as follows:
mysqladmin -u root password put_your_password_here
I hope that you have found my guide useful.


