Monitoring With Groundwork Open Source On CentOS 5.1
Nagios is (in my opinion) one of the finest availability and monitoring solutions available. The stability, extendability and cost effectiveness (it is free under the GPL), are second to none (again, my opinion). That being said, it is far from being the easiest monitoring solution to implement. The build process itself, while not being overly complicated, can be vexing to new Linux users. That doesn't even include the configuration, which sometimes still makes me cringe.
Fortunately, there are a few projects that aim to ease both the installation and configuration of Nagios. There is Centreon (formerly Oreon), fruity and then there is GroundWork Open Source. For me, it seems to be the most intuitive tool that I have found to implement and configure Nagios and is the subject of this guide.
Having run through this guide several times, I can honestly say that you will spend more time getting CentOS 5.1 installed and updated, than you will installing Groundwork. My rough estimate is that by following this guide, you can have Nagios running and monitoring your network within three hours. Let's get started, shall we...
Installing CentOS 5.1
Since I do not have VMware installed, I cannot produce screen shots of the base installation. Basically, I did a base install with the exception of the following:
Edit and set IP manually
Disable IPv6 support (This is kind of up to you, but since it is not used in our environment, I disable it)
Set hostname to Groundwork.DOMAIN
Set Gateway, Primary and Secondary DNS
When you come to the software selection options, install the following:
uncheck Desktop-Gnome
check server
choose "customize now"
Choose these options:
Applications - Editors, text based Internet
Development - Development tools
Servers - MySQL Database, Server Configuration Tools, Web Server
Base System - Administration Tools, Base, System Tools
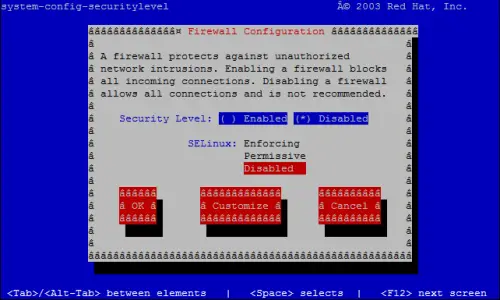
Disable The Firewall And SELinux
Both the firewall and SELinux will interfere with Groundwork, so you must disable them. Perform the following steps to do so:
system-config-securitylevel
Select "Disabled" for both the "Security Level" and for "SELinux".
Once you have completed this step, you must reboot the server to make the change take effect. Perform the following command:
shutdown -r now
Enable [CentOSPlus] Repo
You need to enable the Enable [CentOSPlus] repo so that MySQL 5 is available (as this is one of the requirements of Groundwork).
vi /etc/yum.repos.d/CentOS-Base.repo
To enable [CentOSPlus], find the following section and change "enabled=0" to "enabled=1", so that it resembles the text below (this should be at the very bottom of the file).
[centosplus]
name=CentOS-$releasever - Plus
mirrorlist=http://mirrorlist.centos.org/?release=$releasever&arch=$basearch&repo=centosplus
#baseurl=http://mirror.centos.org/centos/$releasever/centosplus/$basearch/
gpgcheck=1
enabled=1
gpgkey=http://mirror.centos.org/centos/RPM-GPG-KEY-CentOS-5
Install Apache, MySQL, PHP And Some Other Necessary Software
It is time now to begin preparing the server with the software necessary to run Groundwork. Issuing the following commands should get you everything that you need (at least that is available from the repositories).
rpm --import /etc/pki/rpm-gpg/RPM-GPG-KEY*
yum update
yum install fetchmail wget bzip2 unzip zip nmap openssl lynx fileutils ncftp gcc gcc-c++ bison flex byacc nano mysql mysql-devel mysql-server php php-devel php-gd php-imap php-ldap php-mysql php-odbc php-pear php-xml php-xmlrpc curl curl-devel perl-libwww-perl ImageMagick libxml2 libxml2-devel
First warning: Do not set a password for the root MySQL user yet! It will interfere with the Groundwork install. It will be taken care of later in the guide.
Once everything is up to date and installed, issue the following commands to set Apache and MySQL to start at boot and also to start them now:
Apache
chkconfig --levels 235 httpd on
/etc/init.d/httpd start
MySQL
chkconfig --levels 235 mysqld on
/etc/init.d/mysqld start
You also need to edit the httpd.conf file make sure that Apache can serve .php and .cgi files. Issue the command:
nano /etc/httpd/conf/httpd.conf
Now, find the DirectoryIndex directive and change it from:
DirectoryIndex index.html index.html.var
to
DirectoryIndex index.html index.htm index.shtml index.cgi index.php index.php3 index.pl
Now, restart Apache to make the changes take effect.
/etc/init.d/httpd restart
Install Webmin
I'm sure there are going to be questions as to why Webmin is needed. My short answer is "you may not need it." My longer answer is that we need to install Java later in the guide and I find that uploading the file to my server is easiest done via Webmin. If you have another method, please feel free to skip this section. Installing Webmin is simple and can be done by issuing these commands:
cd /tmp/
wget http://www.webmin.com/jcameron-key.asc
gpg --import jcameron-key.asc
wget http://superb-east.dl.sourceforge.net/sourceforge/webadmin/webmin-1.400-1.noarch.rpm
rpm -U webmin-1.400-1.noarch.rpm
If, after, you have completed the guide and gotten Groundwork functional, you wish to remove Webmin, you can do so by issuing this command: (I guess that I don't have to tell you not to do this until after the Groundwork install is complete...)
rpm -e webmin-1.400-1.noarch.rpm
You should now be able to access Webmin at:
http://your_servers_ip_address:10000


