Linux Basics - Set a Static IP on Ubuntu
This tutorial explains how to set up a static IP address on an Ubuntu system from the command line. It covers network configuration for all current versions of Ubuntu and includes instructions for configuring a static IP address, setting the hostname, and configuring name resolution.
Network configuration on Ubuntu 22.04, Ubuntu 20.04, and Ubuntu 18.04
The network configuration in Ubuntu is made with a tool called netplan. It replaced the traditional /etc/network/interfaces file.
Configure a Static IP Address with Netplan on Ubuntu
Here are the steps to configure a static IP address with Netplan. The Netplan configuration files are in the directory /etc/netplan/. The default configuration file is /etc/netplan/01-netcfg.yaml.
Open the network config file with an editor. The netplan configuration filename differs depending on the Ubuntu version.
Ubuntu 22.04 and Ubuntu 20.04:
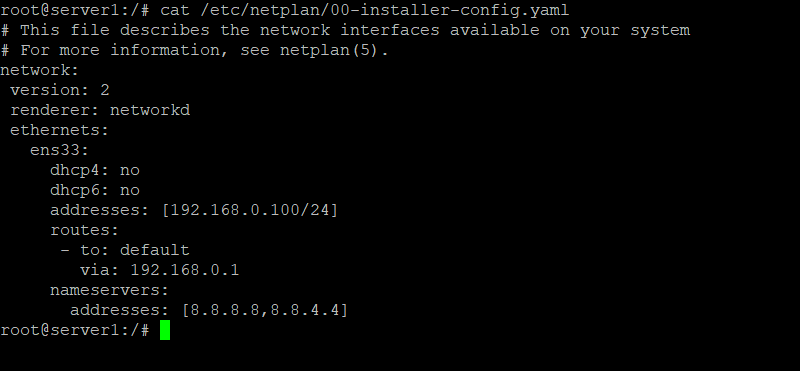
sudo nano /etc/netplan/00-installer-config.yaml
Ubuntu 18.04:
sudo nano /etc/netplan/01-netcfg.yaml
The configuration syntax is in Python programming language (.yaml format), so the indentation of the lines is important!
The content of the file is the same on Ubuntu 22.04 - 18.04.
Here is an example of a static IPv4 address 192.168.1.100 on the first network interface ens33 and gateway IP 192.168.1.1. The server will use the free Google DNS servers 8.8.8.8 and 8.8.4.4 to for name resolving.
# This file describes the network interfaces available on your system
# For more information, see netplan(5).
network:
  version: 2
  renderer: networkd
  ethernets:
    ens33:
      dhcp4: no
      dhcp6: no
      addresses: [192.168.1.100/24]
      gateway4: 192.168.1.1
      nameservers:
        addresses: [8.8.8.8,8.8.4.4]
Or, as Screenshot from an Ubuntu server:
An IPv6 address can be added in the addresses line, separated by a comma. Example:
# This file describes the network interfaces available on your system
# For more information, see netplan(5).
network:
  version: 2
  renderer: networkd
  ethernets:
    ens33:
      dhcp4: no
      dhcp6: no
      addresses: [192.168.1.100/24, '2001:1::1/64']
      gateway4: 192.168.1.1
      nameservers:
        addresses: [8.8.8.8,8.8.4.4]
You must wrap the IPv6 address into single quotes. You will get a syntax error otherwise.
To apply the changes, run the following:
sudo netplan apply
Or use it with the --debug switch to get some useful output if parsing of the netplan config file was successful.
sudo netplan --debug apply
Configure a DHCP address with Netplan
Here is the configuration to get the network configuration for IPv4 and IPv6 from a DHCP server.
# This file describes the network interfaces available on your system
# For more information, see netplan(5).
network:
 version: 2
 renderer: networkd
 ethernets:
   ens33:
     dhcp4: yes
     dhcp6: yes
To apply the changes, run:
sudo netplan apply
More Netplan config options
Netplan is a complex new configuration system configuring network cards, virtual devices, VLANs and bridges in Ubuntu 18.04. See the man page for more examples and an in-depth explanation of the syntax.
Network configuration on Ubuntu 12.04 - 17.04 (incl. Ubuntu 16.04 LTS)
Step 1: Configure the network interface
In this step, you will manually configure your network interface by editing the following files using your preferred text editor(nano gedit vi). For this example, I'm using the "nano" editor. You can edit the appropriate file by entering the following command into the terminal:
You can copy and paste directly from this line.
sudo nano /etc/network/interfaces
Enter your root password, once your preferred editor opens the file you can see this on older Ubuntu versions:
auto lo eth0
iface lo inet loopback
iface eth0 inet dynamic
Ubuntu Systems with systemd (like Ubuntu 16.04 and newer), the network interface is named ens33 instead of eth0 now and the word 'dynamic' has been replaced with 'dhcp'.
A configuration where the IP address get's assigned automatically by DHCP will look like this:
# This file describes the network interfaces available on your system
# and how to activate them. For more information, see interfaces(5).

source /etc/network/interfaces.d/*

# The loopback network interface
auto lo
iface lo inet loopback

# The primary network interface
auto ens33
iface ens33 inet dhcp
Statically configured network cards will have a section like this on older Ubuntu versions:
auto lo eth0
iface lo inet loopback
iface eth0 inet static
        address xxx.xxx.xxx.xxx(enter your ip here)
        netmask xxx.xxx.xxx.xxx
        gateway xxx.xxx.xxx.xxx(enter gateway ip here,usually the address of the router)
Here is an example for an older Ubuntu Release:
auto lo eth0
iface lo inet loopback
iface eth0 inet static
	address 192.168.1.100
	netmask 255.255.255.0
	gateway 192.168.1.1
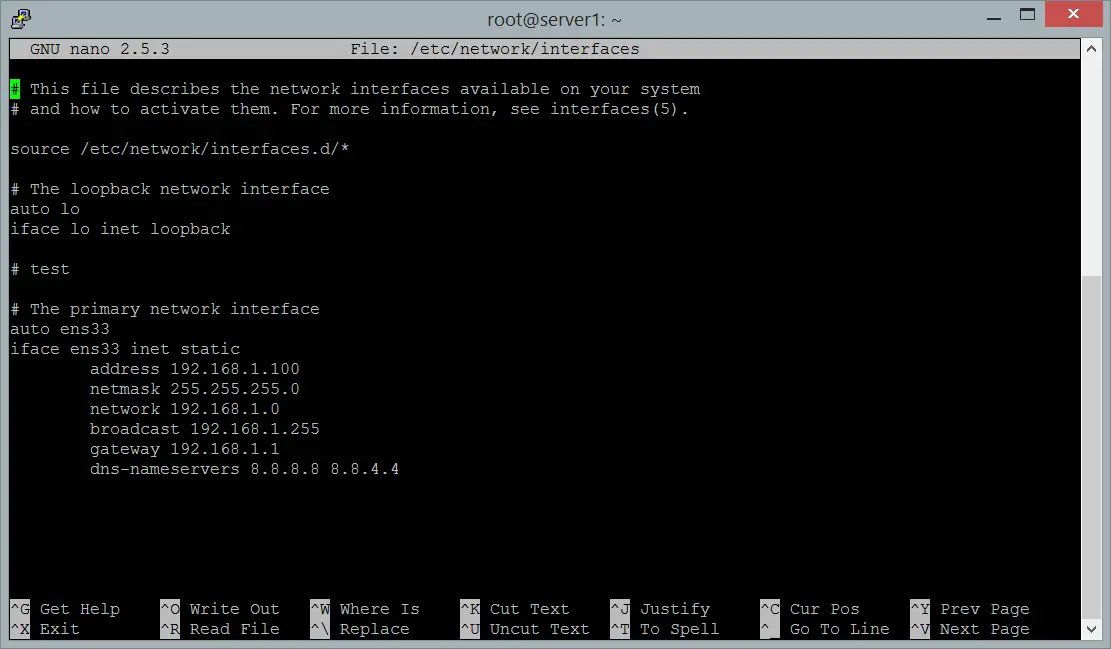
And here an example for Ubuntu 16.04 and newer:
# This file describes the network interfaces available on your system
# and how to activate them. For more information, see interfaces(5).

source /etc/network/interfaces.d/*

# The loopback network interface
auto lo
iface lo inet loopback

# test

# The primary network interface
auto ens33
iface ens33 inet static
 address 192.168.1.100
 netmask 255.255.255.0
 network 192.168.1.0
 broadcast 192.168.1.255
 gateway 192.168.1.1
 dns-nameservers 8.8.8.8 8.8.4.4
And here the complete network configuration file from an Ubuntu 16.04 system.
If you use "nano" editor to edit the configuration file, type Ctrl+x to save changes.
Save modified buffer (ANSWERING "No" WILL DESTROY CHANGES) ?
<---Type "y"
File Name to Write: interfaces
<---ENTER
Step 2: Configure the DNS servers
Changes in /etc/resolv.conf are required only on Systems with Ubuntu < 14.04, for newer Ubuntu versions the nameservers get configured in the /etc/network/interfaces file or the netplan config file.
a) Ubuntu 20.04
Open the netplan configuration file with an Editor. I will use the nano editor in this example:
sudo nano /etc/netplan/00-installer-config.yaml
I've marked the DNS server IP addresses bold:
# This file describes the network interfaces available on your system
# For more information, see netplan(5).
network:
  version: 2
  renderer: networkd
  ethernets:
    ens33:
      dhcp4: no
      dhcp6: no
      addresses: [192.168.1.100/24]
      gateway4: 192.168.1.1
      nameservers:
        addresses: [8.8.8.8,8.8.4.4]
b) Ubuntu 18.04
Open the netplan configuration file with the nano editor:
sudo nano /etc/netplan/01-netcfg.yaml
I've marked the DNS server IP addresses bold:
# This file describes the network interfaces available on your system
# For more information, see netplan(5).
network:
  version: 2
  renderer: networkd
  ethernets:
    ens33:
      dhcp4: no
      dhcp6: no
      addresses: [192.168.1.100/24]
      gateway4: 192.168.1.1
      nameservers:
        addresses: [8.8.8.8,8.8.4.4]
c) Ubuntu versions 14.04 and 16.04
Open the /etc/network/interfaces file again and add a line dns-nameservers 8.8.8.8 right after the gateway line.
sudo nano /etc/network/interfaces
auto lo
iface lo inet loopback
iface ens33 inet static
        address xxx.xxx.xxx.xxx(enter your ip here)
        netmask xxx.xxx.xxx.xxx
        gateway xxx.xxx.xxx.xxx(enter gateway ip here,usually the address of the router)
        dns-nameservers 8.8.8.8
The nameservers 8.8.8.8 and 8.8.4.4 are provided by Google for public use, so you can use them in your network configuration.
If you use "nano" editor, type Ctrl+x to save changes.
Save modified buffer (ANSWERING "No" WILL DESTROY CHANGES) ?
<---Type "y"
File Name to Write: interfaces
<---ENTER
d) Ubuntu versions < 14.04
In this step, you will manually configure your dns configuration file.
sudo nano /etc/resolv.conf
Once your editor opens the file you want to enter the following information...
nameserver xxx.xxx.xxx.xxx(enter your dns server ip)
nameserver xxx.xxx.xxx.xxx(enter your alt dns server ip)
If you use "nano" editor, type Ctrl+x to save changes.
Save modified buffer (ANSWERING "No" WILL DESTROY CHANGES) ?
<---Type "y"
File Name to Write: resolv.conf
<---ENTER
Here is an example:
nameserver 8.8.8.8
nameserver 8.8.4.4
Step 3: Restart networking
Manually restart your network interface with the new settings.
For Ubuntu 20.04 and 18.04, use the netplan command to apply changes and restart the network. The command is:
sudo netplan apply
For Ubuntu versions 14.04 and 16.04 we use systemctl instead:
systemctl restart ifup@eth0
At this point you can check if the settings are correct:
ifconfig
If everything is correct you will get this result.
eth0      Link encap:Ethernet  direcciónHW 00:33:27:46:2v:34
          Direc. inet:192.168.1.101  Difus.:0.0.0.0  Másc:255.255.255.0
 ...
For Ubuntu < 14.04 use the networking init script:
sudo /etc/init.d/networking restart
This should return a result that looks like the following:
*Reconfiguring network interfaces… [OK]
Configure the Hostname
The hostname of an Ubuntu Server or Desktop is being configured in the files /etc/hostname and /etc/hosts. The /etc/hostname file sets the actual system hostname while /etc/hosts is used for the local name resolution.
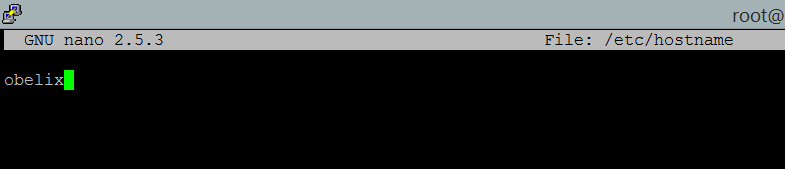
In this example, I will change the hostname of my system to obelix.example.com.
First, edit the /etc/hostname file
sudo nano /etc/hostname
The hostname file contains the local part of the hostname only. The local part here is "obelix". Change the content of the /etc/hostname file to:
obelix
and save the file. The hostname file as it looks in nano after editing:
Then open the /etc/hosts file with an editor:
sudo nano /etc/hosts
and change the line that starts with the IP address of the system like this:
192.168.1.100 obelix.example.com obelix
Here a screenshot of the /etc/hosts file.
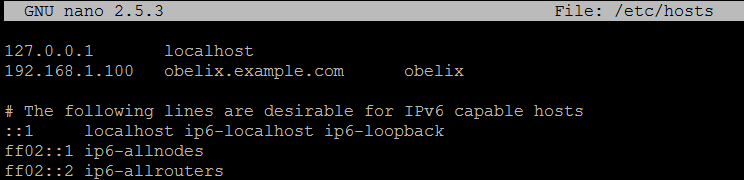
The format is like this:
[IP Addesss] [full hostname incl. domain] [local part of the hostname]
Finally, restart the system to apply the hostname change.

