ISPConfig 2.x - First Steps (Creating Web Sites, Email Addresses, Etc.) - Page 2
On this page
- 2.4 Configuration Tweaks
- 2.4.1 Let ISPConfig Configure Your Network Card
- 2.4.2 Proper Disk Stats
- 2.4.3 Reduce Apache Error Messages
- 2.4.4 Password Encryption
- 2.5 Add A Reseller
- 2.5.1 Master Data
- 2.5.2 Limits
- 2.5.3 Login Data
- 2.5.4 Statistics
- 2.5.5 Other
- 2.6 Add A Client
- 2.6.1 Master Data
- 2.6.2 Site Management
- 2.6.3 Login Data
- 2.6.4 Bill
- 2.6.5 Statistics
2.4 Configuration Tweaks
Some configuration options are set to a default value or disabled by default. Depending on your system configuration and the distribution you're using you might want to enable one or more of these options or change the default value. Open the configuration file:
vi /home/admispconfig/ispconfig/lib/config.inc.php
2.4.1 Let ISPConfig Configure Your Network Card
ISPConfig is able to configure your network card automatically. Be sure that ONLY ONE network card is built-in into your server before you enable this option - otherwise your network configuration will be corrupted. Change "0" to "1" within the corresponding line to enable this option - it should look like this:
$go_info["server"]["network_config"] = 1
2.4.2 Proper Disk Stats
In order that ISPConfig is able to create proper disk stats you have to enable this option. Before you can enable this option you have to install "sudo" on your system. The user "admispconfig" must be able to run the command "du" with root privileges and without password query. The corresponding line within the sudoers file could look like this one (Debian Etch):
visudo
admispconfig ALL=(root) NOPASSWD:/usr/bin/du
Afterwards you can enable this option - change "0" to "1" within the corresponding line. It should look like this:
$go_info["server"]["sudo_du_enabled"] = 1
2.4.3 Reduce Apache Error Messages
By default the "apache2_php" option within the configuration file is set to "both" - which means that "addtype" AND "filter" are set. On some systems the apache log will be flooded with error messages (... [error] an unknown filter was not added: PHP). If you have such errors in your apache log, you should change the default value of this option. If you're running OpenSUSE 10.1 on your server set 'both' to 'addhandler', for all other distributions change 'both' to 'addtype'. The corresponding line within the configuration file should look like this (OpenSUSE 10.1 = 'addhandler'):
$go_info["server"]["apache2_php"] = 'addtype'
2.4.4 Password Encryption
By default ISPConfig will use "crypt" to encrypt passwords - which is a problem if you want to use passwords with more than eight charakters, because "crypt" will only use the first eight charakters of your chosen password for the encryption. To solve this you have to set this option to "md5" - afterwards "crypt-md5" will be used to encrypt the passwords which has no charakter limitation. The corresponding line within the configuration file should look like this:
$go_info["server"]["password_hash"] = 'md5'
2.5 Add A Reseller
If you want to add a new reseller click on "ISP Manager" in the top menu and afterwards on "New reseller" (the big icon below the top menu). Now you have to fill the form within the main window. The group for resellers is fixed to "admin", so you can't change it. Enter a title for the new reseller - this title will be shown in the "ISP Manager" menu on the left side. Choose a folder - this option defines to which folder (in the "ISP Manager" menu on the left side) the reseller will be added - please note that also a "main folder" will be created for this reseller. Now you have to configure a few settings for the new reseller - they are divided in five tabs.
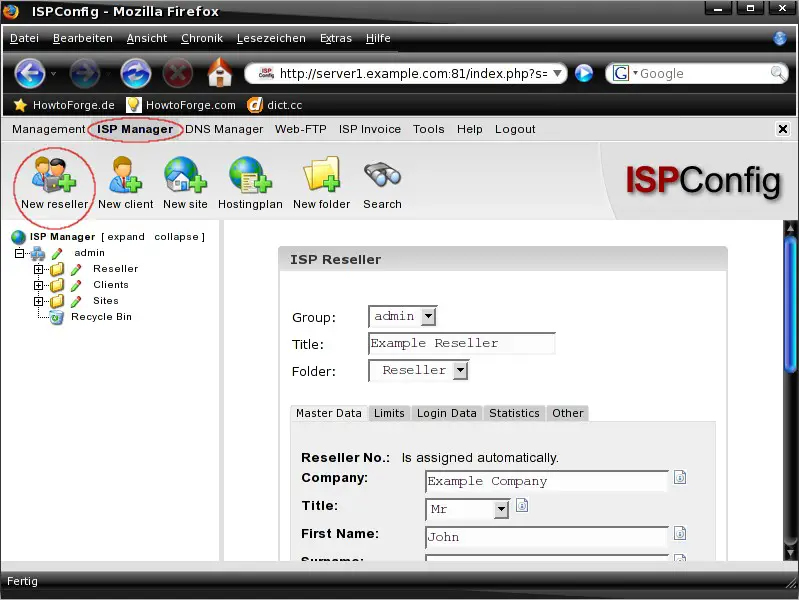
2.5.1 Master Data
The "Master Data" tab contains the personal information of the reseller like the address or the telephone number. The "First Name" and the "Surname" is required - all other fields are optional.
2.5.2 Limits
The "Limits" tab contains the limitation settings for the reseller. You can adjust things like traffic limit or the maximum number of allowed sites. Please note, that "-1" means unlimited.
2.5.3 Login Data
The "Login Data" tab contains a form with two fields where you have to set a username and a password for the reseller. Please have a look at step 2.4.4 if you want to set passwords longer than eight charakters.
2.5.4 Statistics
The "Statistics" tab contains, as its name implies, statistics for this reseller account. At the moment it's empty - later, when this account is in use, it'll contain information.
2.5.5 Other
The "Other" tab contains a few forms for standard messages - for example the properties of the salutatory email for clients or the properties of the web site suspend notification if the trafic limit is exceeded. You can work with different variables - they are explained in the single forms.
When all settings are complete click on "Save" to apply them.
2.6 Add A Client
If you want to add a new client click on "ISP Manager" in the top menu and afterwards on "New client" (the big icon below the top menu). Now you have to fill the form within the main window. First you have to choose a group for the new client - you can add him to an existing reseller or to the group "admin" if he doesn't belong to a reseller. Enter a title for the new client - this title will be shown in the "ISP Manager" menu on the left side. Choose a folder - this option defines to which folder (in the "ISP Manager" menu on the left side) the client will be added - please note, that if you chose a reseller as group, the client will be added within the main folder of this reseller - otherwise the client will belong to the admin (which is fine if you don't need resellers). Now you have to configure a few settings for the new client - they are divided in five tabs.
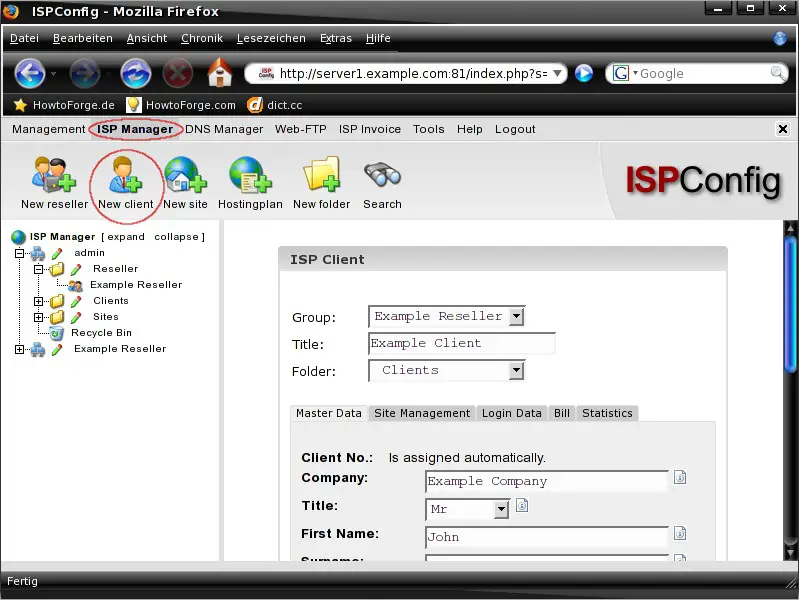
2.6.1 Master Data
The "Master Data" tab contains the personal information of the client like the address or the telephone number. The "First Name" and the "Surname" is required - all other fields are optional.
2.6.2 Site Management
On the "Site Management" tab you can create a new site for the client - I'll explain this detailed in step 2.7.
2.6.3 Login Data
The "Login Data" tab contains a form with two fields where you have to set a username and a password for the client. Please have a look at step 2.4.4 if you want to set passwords longer than eight charakters.
2.6.4 Bill
The "Bill" tab contains the settings for the payment. You can enter a billing address and choose a payment option - "netto seven days" for example.
2.6.5 Statistics
The "Statistics" tab contains statistics for this client account. At the moment it's empty - later, when this account is in use, it'll contain information.
When all settings are complete click on "Save" to apply them.

