How to Setup Private Docker Registry on Ubuntu 18.04 LTS
This tutorial exists for these OS versions
- Ubuntu 22.04 (Jammy Jellyfish)
- Ubuntu 17.10 (Artful Aardvark)
On this page
Docker Registry or 'Registry' is an open source and highly scalable server-side application that can be used to store and distribute Docker images. It was a server-side application behind the Docker Hub. In most use cases, a Docker Registry is a great solution if you want to implement the CI/CD system on your application development. The Private Docker Registry gives more performances for the development and production cycle by centralizing all your custom Docker images of application in one place.
In this tutorial, we're going to show you how to install and configure a Private Docker Registry on a Ubuntu 18.04 server. We will use an Nginx web server and protect the Registry with a username and password (basic auth).
Prerequisites
- Ubuntu 18.04 server
- Root privileges
What we will do?
- Install Dependencies
- Install Docker and Docker-compose
- Setup Private Docker Registry
- Testing
Step 1 - Install Package Dependencies
First of all, we're going to install some packages dependencies for deploying the Private Docker Registry.
Install packages dependencies using the following command.
sudo apt install -y gnupg2 pass apache2-utils httpie
The gnupg2 and pass packages will be used to store the password authentication to the docker registry. And the apache2-utils will be used to generate the basic authentication, and httpie will be used for testing.
Step 2 - Install Docker and Docker-compose
Now we're going to install the docker and docker-compose from the official Ubuntu repository.
Install Docker and Docker-compose by running the following command.
sudo apt install -y docker.io docker-compose -y
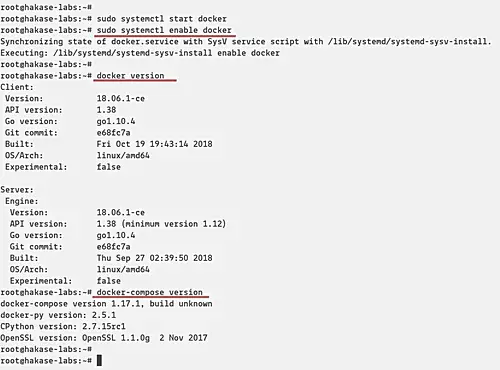
Once the installation is finished, start the docker service and add it to the boot time.
sudo systemctl start docker
sudo systemctl enable docker
The Docker is up and running, and the Docker-compose has been installed. Check using the command below.
docker version
docker-compose version
And you will be displayed version of Docker and Docker-compose installed on your system.
Step 3 - Setup Private Docker Registry
In this step, we're going to configure the Docker Registry environment by creating some directories environment, and create some configuration including the docker-compose.yml, nginx virtual host and additional configuration etc.
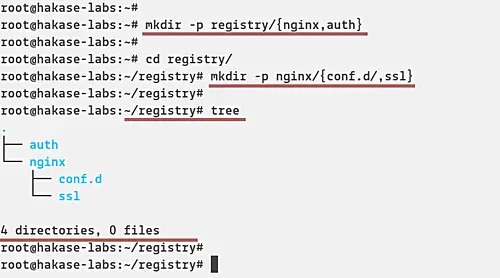
- Create Project Directories
Create a new directory for the project called 'registry' and create the 'nginx' and 'auth' directories inside.
mkdir -p registry/{nginx,auth}
After that, go to the directory 'registry' and create new directories again inside 'nginx'.
cd registry/
mkdir -p nginx/{conf.d/,ssl}
And as a result, the project directories look like the following picture.
tree
- Create Docker-compose Script
Now we want to create a new docker-compose.yml script for deploying the Docker Registry.
Go to the 'registry' directory and create a new configuration file 'docker-compose.yml'.
cd registry/
vim docker-compose.yml
Firstly, define the compose version that you want to use and the service.
version: '3'
services:
After that, add the first service named 'registry'. The Docker Registry service will be using the docker image that's provided by docker team 'registry:2. It will mount the docker volume 'registrydata' and the local directory named 'auth' that contains basic authentication file 'registry.passwd'. And the last, it will run on the custom docker image named 'mynet' and expose the port 5000 on both container and host.
#Registry
  registry:
    image: registry:2
    restart: always
    ports:
    - "5000:5000"
    environment:
      REGISTRY_AUTH: htpasswd
      REGISTRY_AUTH_HTPASSWD_REALM: Registry-Realm
      REGISTRY_AUTH_HTPASSWD_PATH: /auth/registry.passwd
      REGISTRY_STORAGE_FILESYSTEM_ROOTDIRECTORY: /data
    volumes:
      - registrydata:/data
      - ./auth:/auth
    networks:
      - mynet
Next, the configuration of 'nginx' service that will run HTTP and HTTPS ports and mount the local directory 'conf.d' for virtual host configuration, and the 'ssl' for ssl certificates.
#Nginx Service
  nginx:
    image: nginx:alpine
    container_name: nginx
    restart: unless-stopped
    tty: true
    ports:
      - "80:80"
      - "443:443"
    volumes:
      - ./nginx/conf.d/:/etc/nginx/conf.d/
      - ./nginx/ssl/:/etc/nginx/ssl/
    networks:
      - mynet
And the last, define the custom network 'mynet' with bridge driver and the 'registrydata' with a local driver.
#Docker Networks
networks:
  mynet:
    driver: bridge
#Volumes
volumes:
  registrydata:
    driver: local
Save and close the configuration.
Below is the complete configuration:
version: '3'
services:

#Registry
  registry:
    image: registry:2
    restart: always
    ports:
    - "5000:5000"
    environment:
      REGISTRY_AUTH: htpasswd
      REGISTRY_AUTH_HTPASSWD_REALM: Registry-Realm
      REGISTRY_AUTH_HTPASSWD_PATH: /auth/registry.passwd
      REGISTRY_STORAGE_FILESYSTEM_ROOTDIRECTORY: /data
    volumes:
      - registrydata:/data
      - ./auth:/auth
    networks:
      - mynet

#Nginx Service
  nginx:
    image: nginx:alpine
    container_name: nginx
    restart: unless-stopped
    tty: true
    ports:
      - "80:80"
      - "443:443"
    volumes:
      - ./nginx/conf.d/:/etc/nginx/conf.d/
      - ./nginx/ssl/:/etc/nginx/ssl/
    networks:
      - mynet

#Docker Networks
networks:
  mynet:
    driver: bridge
#Volumes
volumes:
  registrydata:
    driver: local
- Configure Nginx Virtual Host
After creating the docker-compose script, we will create the virtual host and additional configuration for the nginx service.
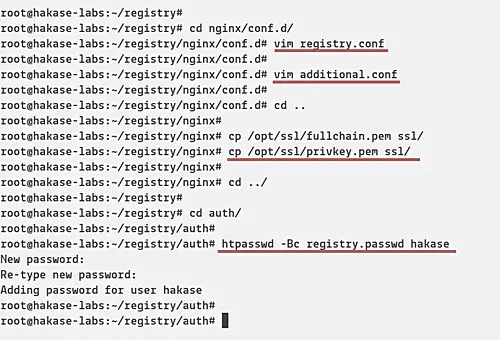
Go to 'nginx/conf.d/' directory and create a new virtual host file called 'registry.conf'.
cd nginx/conf.d/
vim registry.conf
Paste the following configuration.
upstream docker-registry {
    server registry:5000;
}

server {
    listen 80;
    server_name registry.hakase-labs.io;
    return 301 https://registry.hakase-labs.io$request_uri;
}

server {
    listen 443 ssl http2;
    server_name registry.hakase-labs.io;

    ssl_certificate /etc/nginx/ssl/fullchain.pem;
    ssl_certificate_key /etc/nginx/ssl/privkey.pem;

    # Log files for Debug
    error_log  /var/log/nginx/error.log;
    access_log /var/log/nginx/access.log;

    location / {
        # Do not allow connections from docker 1.5 and earlier
        # docker pre-1.6.0 did not properly set the user agent on ping, catch "Go *" user agents
        if ($http_user_agent ~ "^(docker\/1\.(3|4|5(?!\.[0-9]-dev))|Go ).*$" )  {
            return 404;
        }

        proxy_pass                          http://docker-registry;
        proxy_set_header  Host              $http_host;
        proxy_set_header  X-Real-IP         $remote_addr;
        proxy_set_header  X-Forwarded-For   $proxy_add_x_forwarded_for;
        proxy_set_header  X-Forwarded-Proto $scheme;
        proxy_read_timeout                  900;
    }

}
Save and close.
Next, create an additional configuration to increase the max_body_size on nginx. This will allow you to upload docker images with max size 2GB.
vim additional.conf
Paste configuration below.
client_max_body_size 2G;
Save and close.
- Configure SSL Certificate and Basic Authentication
Copy SSL certificate files of your domain to the 'ssl' directory.
cp /path/to/ssl/fullchain.pem ssl/
cp /path/to/ssl/privkey.pem ssl/
Now go to the 'auth' directory and generate the new password file 'registry.passwd'.
cd auth/
Generate a new password for user hakase.
htpasswd -Bc registry.passwd hakase
TYPE THE STRONG PASSWORD
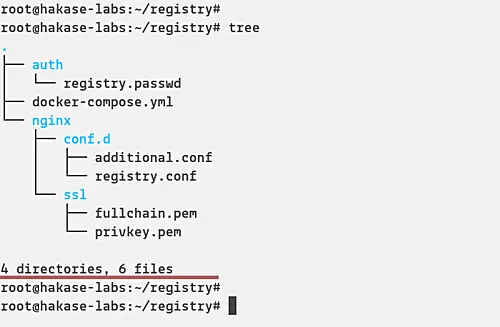
And the environment setup for deploying Private Docker Registry has been completed.
Below is the screenshot of our environment files and directories.
tree
- Run Docker Registry
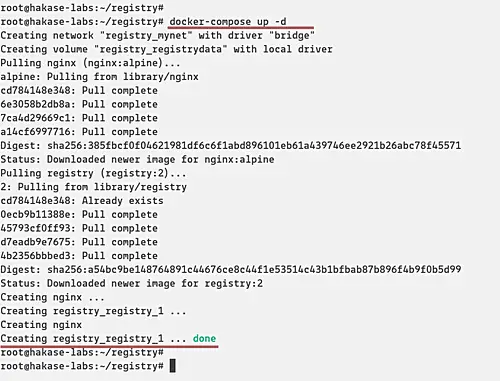
Run the Docker Registry using the docker-compose command below.
docker-compose up -d
And you will get the result as below.
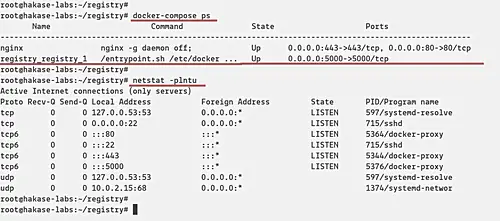
After that, make sure the registry and nginx service is up and running. Check using the following command.
docker-compose ps
netstat -plntu
And you will be shown the 'registry' service is running on port '5000', and the 'nginx' service will expose the HTTP and HTTPS ports as below.
Step 4 - Testing
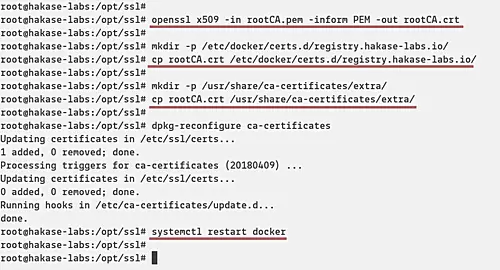
Before we test our Private Docker Registry, we need to add the Root CA certificate to the docker itself and to the system.
If you're using the pem file certificate, export it to the .crt file using the OpenSSL command.
openssl x509 -in rootCA.pem -inform PEM -out rootCA.crt
Now create a new directory for docker certificate and copy the Root CA certificate into it.
mkdir -p /etc/docker/certs.d/registry.hakase-labs.io/
cp rootCA.crt /etc/docker/certs.d/registry.hakase-labs.io/
And then create a new directory '/usr/share/ca-certificate/extra' and copy the Root CA certificate into it.
mkdir -p /usr/share/ca-certificates/extra/
cp rootCA.crt /usr/share/ca-certificates/extra/
After that, reconfigure the 'ca-certificate' package and restart the Docker service.
dpkg-reconfigure ca-certificates
systemctl restart docker
- Download Docker Image
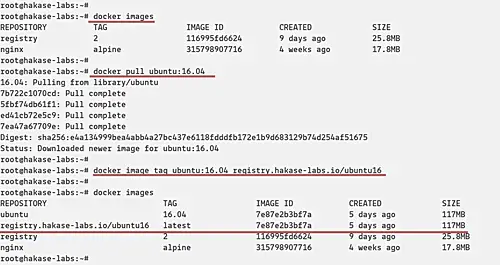
Download new Docker image using the following command.
docker pull ubuntu:16.04
When it's complete, tag the image for the private registry with the command below.
docker image tag ubuntu:16.04 registry.hakase-labs.io/ubuntu16
Check again the list of Docker images on the system and you will get new images as below.
docker images
- Push Image to Private Local Registry
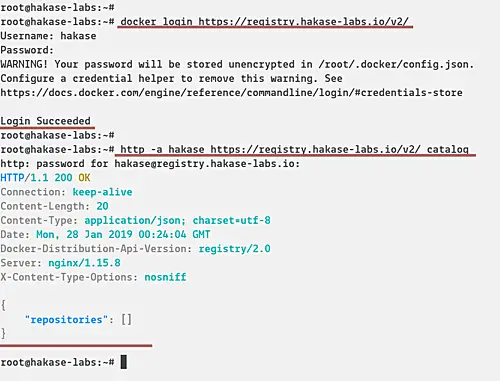
Log in to the Private Docker Registry using the following command.
docker login https://registry.hakase-labs.io/v2/
Type the username and password based on the 'registry.htpasswd' file.
Now check the available of docker image on the Registry.
http -a hakase https://registry.hakase-labs.io/v2/_catalog
And there is no docker image on the Registry.
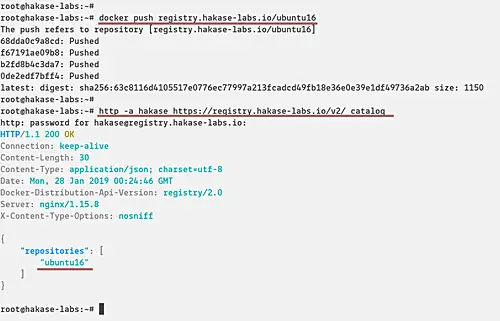
Now push our custom image to the Private Docker Registry.
docker push registry.hakase-labs.io/ubuntu16
Check again and make sure you get the 'ubuntu16' docker image on the Private Repository.
http -a hakase https://registry.hakase-labs.io/v2/_catalog
And finally, the installation and configuration of Private Docker Registry with Nginx and Basic Authentication has been completed successfully.

