How to Setup IPFW Firewall on FreeBSD
The IPFIREWALL (IPFW) is a FreeBSD-sponsored firewall application. It is a stateful firewall written for the FreeBSD system and supports both IPv4 and IPv6. The IPFW is included in the basic FreeBSD installation; you just need to load the module through the '/etc/rc.conf' file to enable it.
This tutorial will show you how to set up the Basic IPFW Firewall on FreeBSD 12.0. We will first set up the firewall with the default rules provided by FreeBSD and then with a custom rule.
What we will do:
- Basic Setup IPFW
- Setup IPFW with Custom Rule
- Enable Logging
1. Basic Setup IPFW
Firstly, we will set up the basic ipfw firewall. We will enable the ipfw with the default firewall types provided by FreeBSD.
Below are the default firewall types provides by FreeBSD:
- open: passes all traffic.
- client: protects only this machine.
- simple: protects the whole network.
- closed: entirely disables IP traffic except for the loopback interface.
- workstation: protects only this machine using stateful rules.
- UNKNOWN: disables the loading of firewall rules.
- filename: full path of the file containing the firewall ruleset.
For this section, we will be using the default type 'workstation' and then define services port that will be opened.
To enable the ipfw firewall, you can add the 'firewall_enable="YES"' to the '/etc/rc.conf' file.
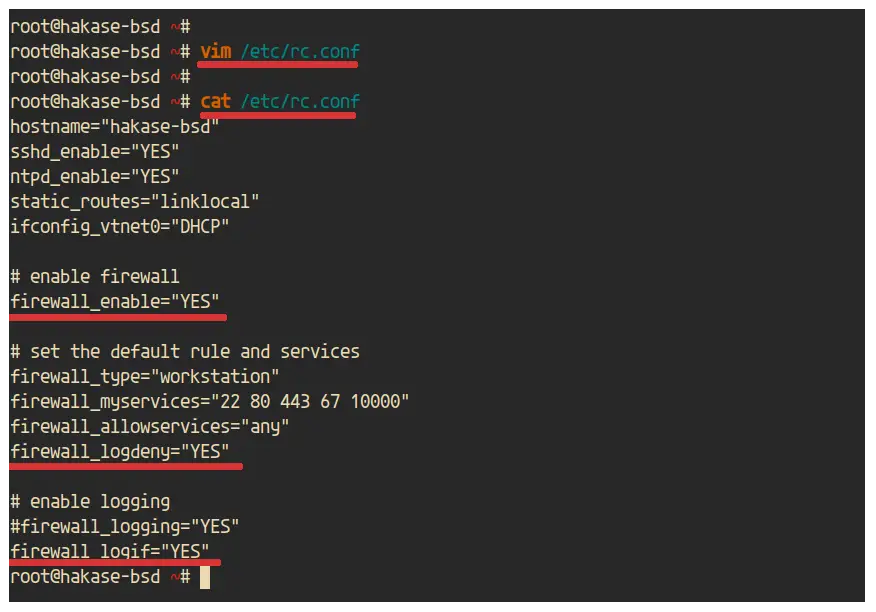
Edit the '/etc/rc.conf' file using vim editor.
vim /etc/rc.conf
Enable the ipfw firewall.
# enable firewall
firewall_enable="YES"
Define the default firewall type that will be used.
# set the default rule and services
firewall_type="workstation"
Now define ports that you want to open for your services.
# services port
firewall_myservices="22 80 443 67 10000"
firewall_allowservices="any"
firewall_logdeny="YES"
Enable logging for the firewall. You can use the logging through file or logging to the 'ipfw0' interface.
# enable logging
#firewall_logging="YES"
firewall_logif="YES"
Save and close.
Next, start the ipfw service using the service command below.
service ipfw start
And you will be disconnected from the server, now you need to log in again.
After logging in to the server, check the firewall rules using the following command.
ipfw list
And you will get the result as below.
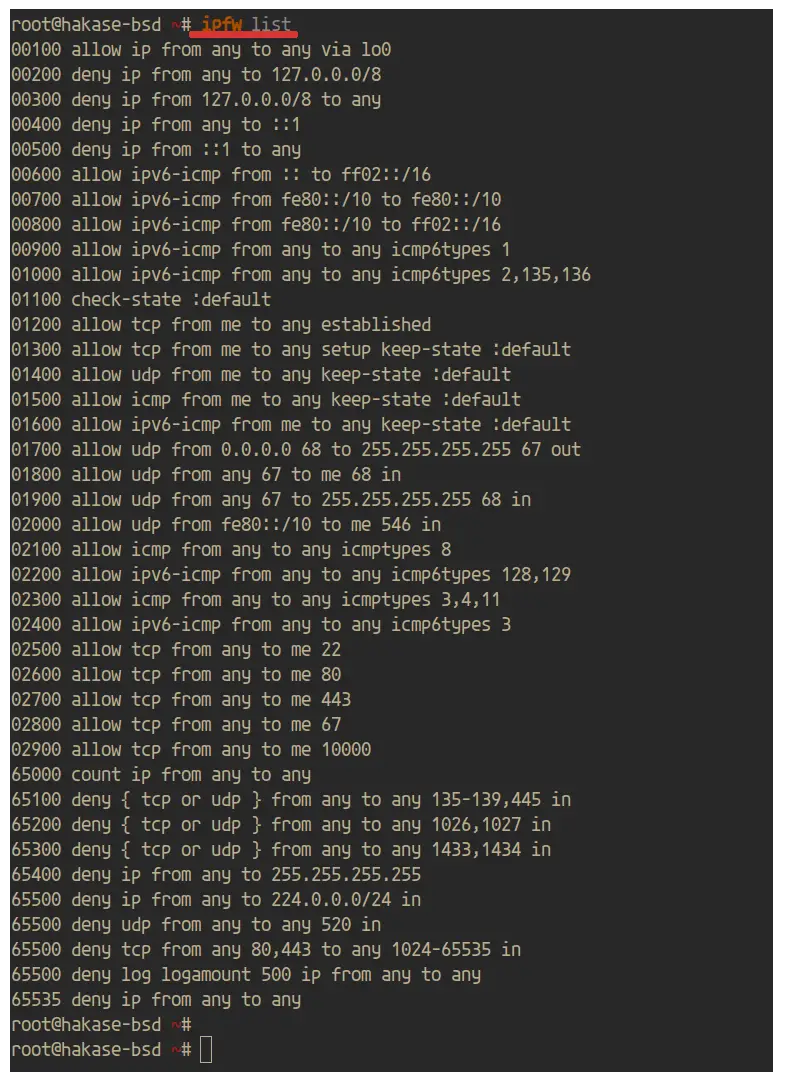
As a result, the ipfw firewall on FreeBSD 12.0 system has been enabled with the default type 'workstation'. And ports services that defined are on the list.
2. Setup IPFW with Custom Rules
In this step, we're going to set up the ipfw firewall with the custom configuration.
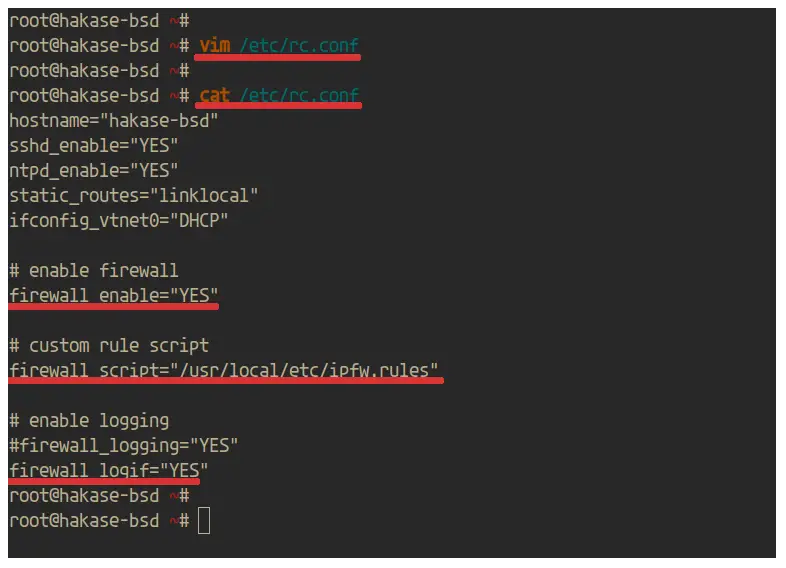
Edit the '/etc/rc.conf' using vim editor.
vim /etc/rc.conf
Now enable the ipfw firewall.
# enable firewall
firewall_enable="YES"
Define the firewall script that you want to use.
# custom rule script
firewall_script="/usr/local/etc/ipfw.rules"
Enable logging for the firewall to the 'ipfw0' interface.
# enable logging
firewall_logif="YES"
Save and close.
Next, we need to create the ipfw rules configuration '/usr/local/etc/ipfw.rules'.
The file configuration is a bash script that contains ipfw rules syntax. It contains the ipfw command for adding the rule, and the rule itself.
Below is the basic rule syntax of the ipfw firewall.
CMD RULE_NUMBER set SET_NUMBER ACTION log LOG_AMOUNT PROTO from SRC SRC_PORT to DST DST_PORT OPTIONS
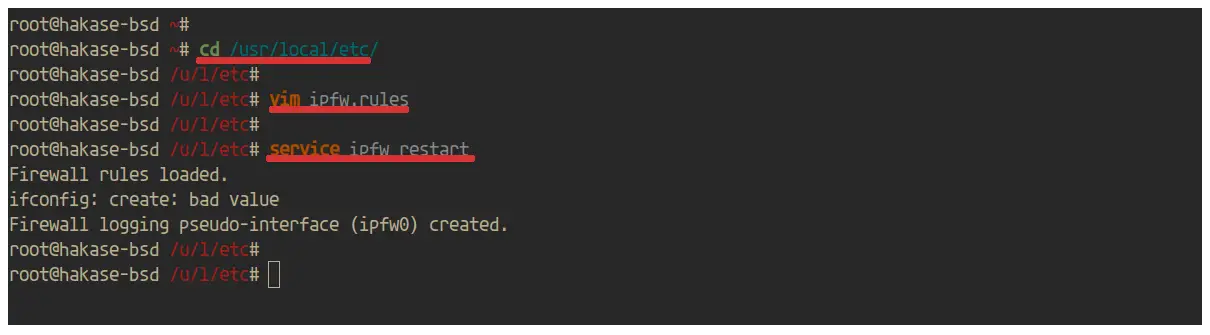
Now, go to the '/usr/local/etc/' directory and create the 'ipfw.rules' file using vim editor.
cd /usr/local/etc/
vim ipfw.rules
Define the first rule of firewall and define the environment variable for adding the firewall rule and the external network interface.
#!/bin/sh
# Flush out the list before we begin.
ipfw -q -f flush

# Set rules command prefix
cmd="ipfw -q add"
pif="vtnet0"
Allow everything on the localhost 'lo0' interface.
# Disable Restriction on localhost
$cmd 0010 allow all from any to any via lo0
Allow outgoing internet to any, DHCP, and the ICMP ping from the internet.
# Allow Outgoing, DHCP, Ping
$cmd 0011 allow all from any to any out keep-state
$cmd 0012 allow log udp from any to any 67 out via $pif keep-state
$cmd 0013 allow log icmp from any to me icmptype 0,8 in via $pif keep-state
Now checks the packet against the dynamic state table.
# Allows the packet through if it matches an existing entry
$cmd check-state
Allow basic services port that you want to open.
# Allow Services FTP, SSH, MAIL, DNS, HTTP, HTTPS
$cmd 110 allow tcp from any to any 21 in
$cmd 120 allow log tcp from any to any 22 in
$cmd 130 allow tcp from any to any 25 in
$cmd 140 allow udp from any to any 53 in
$cmd 150 allow tcp from any to any 80 in
$cmd 160 allow tcp from any to any 443 in
Now deny everything and log all of it.
# deny everything else and log it
$cmd 001000 deny log ip from any to any in via $pif
Save and close.
Now start the ipfw service using the following command.
service ipfw start
And you will be disconnected from the server.
Now log in again to the server and check the ipfw rules.
ipfw list
And you will be shown the result as below.
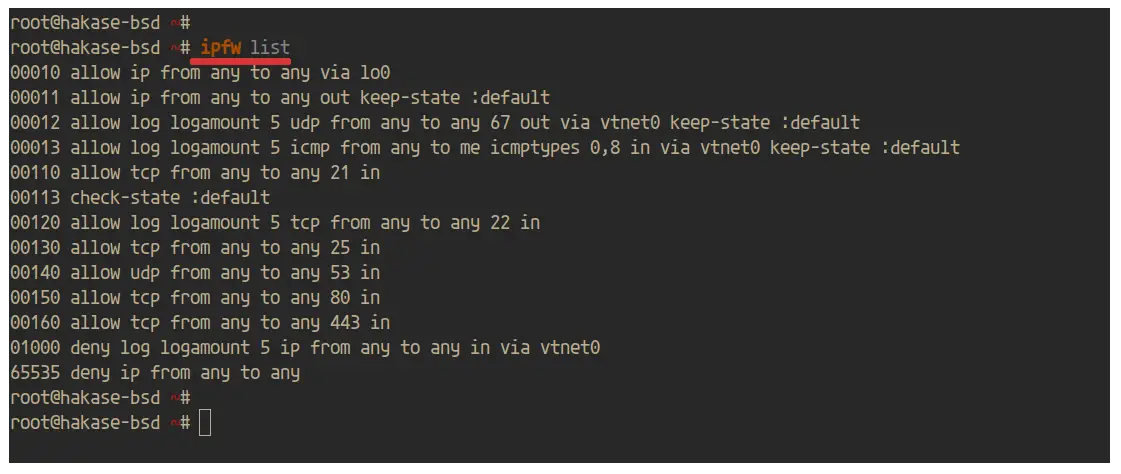
As a result, the ipfw firewall has been enabled with the customs rules defined in the configuration '/usr/local/etc/ipfw.rules'.
3. Enable IPFW Firewall Logs
The ipfw firewall supports two types of logs, the event log and the pseudo log using the 'ipfw0' interface. And it's can be enabled through the '/etc/rc.conf' file.
For the normal event log, you can use the following configuration.
https://www.howtoforge.com/images/how_to_setup_ipfw_firewall_on_freebsd_120/1.pngfirewall_logging="YES"
And for the pseudo logging through the 'ipfw0' interface, you can use the following configuration.
firewall_logif="YES"
After that, we need to limit the logging through the kernel parameter '/etc/sysctl.conf'.
Run the following command.
echo "net.inet.ip.fw.verbose_limit=5" >> /etc/sysctl.conf
Now reboot the server.
sudo reboot
And the ipfw firewall logging has been enabled, and all rules that contain 'log' option will be logged.

If you're using the event logging, you can check the log on the '/var/log/security' log file.
tail -f /var/log/security
And you will get the result as below.

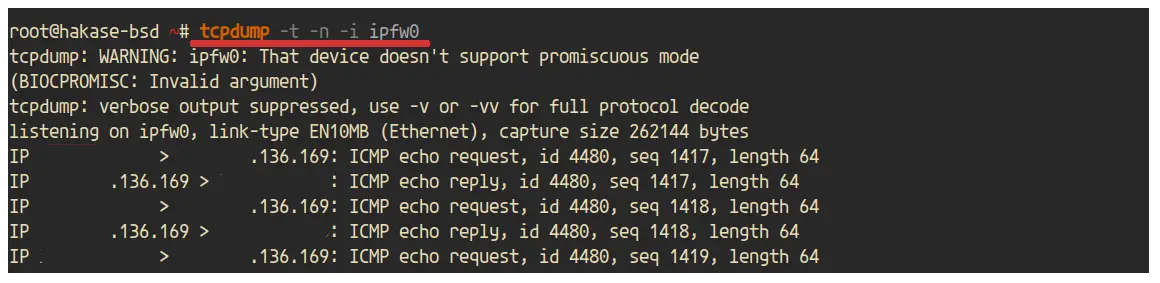
And if you're using the pseudo log interface 'ipfw0', you can check logs using the tcpdump command below.
tcpdump -t -n -i ipfw0
And you will get the result as below.
Now the basic configuration of ipfw firewall on FreeBSD 12.0 has been completed successfully.

