How to Setup Apache Virtual Host on FreeBSD
Virtual Host is a term for hosting and running multiple websites, such as 'site1.co', 'site2.co', and 'site3.co', on a single node server. On the Apache web server, we can create 'Name-Based' virtual hosts and 'IP-based' virtual hosts.
Name-based virtual hosts can create multiple websites with a single IP address on different domain names. And with the IP Based virtual hosts, we can assign for each website an IP address. And it all on the single server.
In this tutorial, we will show you how to set up a 'Name-Based' Virtual Host on the FAMP (FreeBSD, Apache, MySQL/MariaDB, and PHP) Stack. We will guide you through setting up an Apache web server for both HTTP protocol and HTTPS with SSL enabled on FreeBSD 12.0.
Prerequisite:
You will need the FAMP Stack installed on your FreeBSD system for this guide. Or you can the link below to set up the FAMP Stack on FreeBSD 12.0.
Install FAMP Stack on FreeBSD 12.0
What we will do:
- Initialize Apache Virtual Host Directory
- Create Basic Apache Virtual Host
- Create Apache Virtual Host with SSL Enabled
Step 1 - Initialize Apache Virtual Host Directory
Firstly, we will define the virtual host directory for storing all virtual host configurations.
Go to the Apache configuration directory '/usr/local/etc/apache24' and create a new directory called 'vhost'.
cd /usr/local/etc/apache24
mkdir -p vhost
After that, edit the 'httpd.conf' configuration file using vim editor.
vim httpd.conf
Paste the configuration below to end of the line.
Include etc/apache24/vhost/*.conf
Save and close.

Now all configuration file '.conf' inside the 'vhost' directory will be loaded by the Apache web server, and we're ready to add a new virtual host to the FAMP Stack.
Step 2 - Create Basic Apache Virtual Host
In this step, we're going to create a basic Apache virtual host for a domain name 'vhost1.hakase-labs.io'. the virtual host will have a document root directory '/usr/local/www/vhost1' and have specific log files for both access and error logs.
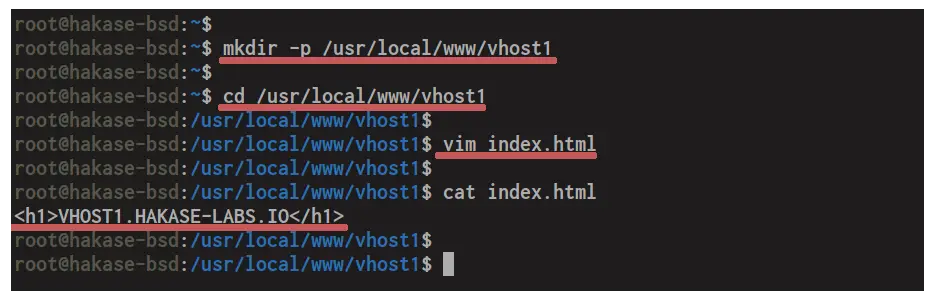
Before creating the Apache virtual host configuration, let's create the web root directory and create the index.html file.
Create a new document root directory for domain 'vhost1.hakase-labs.io' and go into it.
mkdir -p /usr/local/www/vhost1
cd /usr/local/www/vhost1
After that, create the index.html file using vim editor.
vim index.html
Paste the HTML script below.
<h1>VHOST1.HAKASE-LABS.IO</h1>
Save and close.
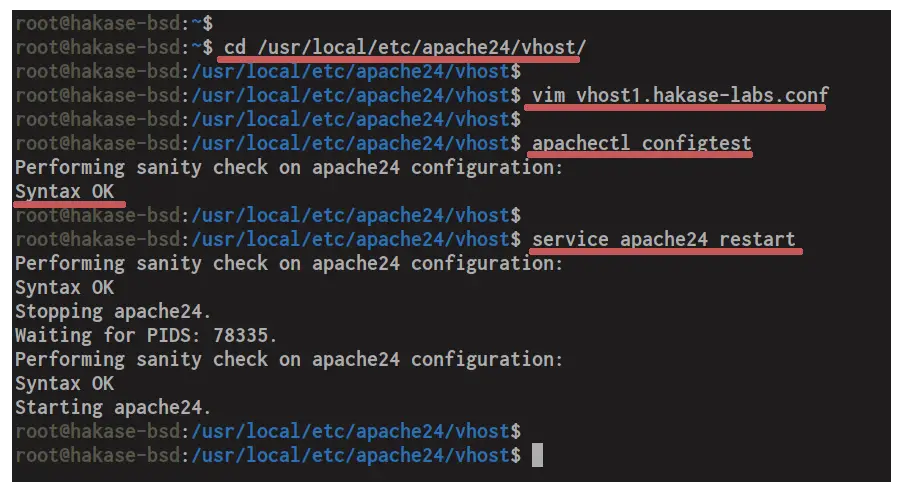
Next, go to the '/usr/local/etc/apache24/vhost/' directory and create the virtual host file named 'vhost1.hakase-labs.conf'.
cd /usr/local/etc/apache24/vhost/
vim vhost1.hakase-labs.conf
Paste the following configuration.
<VirtualHost *:80>
    ServerAdmin [email protected]

    ServerName vhost1.hakase-labs.io
    ServerAlias www.vhost1.hakase-labs.io

    DocumentRoot "/usr/local/www/vhost1"

    ErrorLog "/var/log/vhost1.hakase-labs.io-error_log"
    CustomLog "/var/log/vhost1.hakase-labs.io-access_log" common

    <Directory /usr/local/www/vhost1>
        Order allow,deny
        Allow from all
        Require all granted
    </Directory>
</VirtualHost>
Save and exit.
Now test the Apache configuration and make sure there is no error, then restart the Apache service.
apachectl configtest
service apache24 restart
And you will get the result as below.
As a result, the Apache virtual host for the domain name 'vhost1.hakase-labs.io' has been created and loaded. And now you can access the domain name from your web browser.
Open your web browser and type the domain name 'vhost1.hakase-labs.io' on the address bar.
And you will get the index page such as below.

As a result, the basic Apache virtual host of FAMP Stack for domain name 'vhost1.hakase-labs.io' has been created. And for the next step, we're going to set up the Apache virtual host with SSL enabled.
Step 3 - Create Apache Virtual Host with SSL Enabled
In this step, we're going to set up the Apache virtual host with SSL enabled on it. And in order to do that, you will be required to enable the 'mod_ssl' and 'mod_rewrite', generate SSL certificates and create the basic SSL configuration.
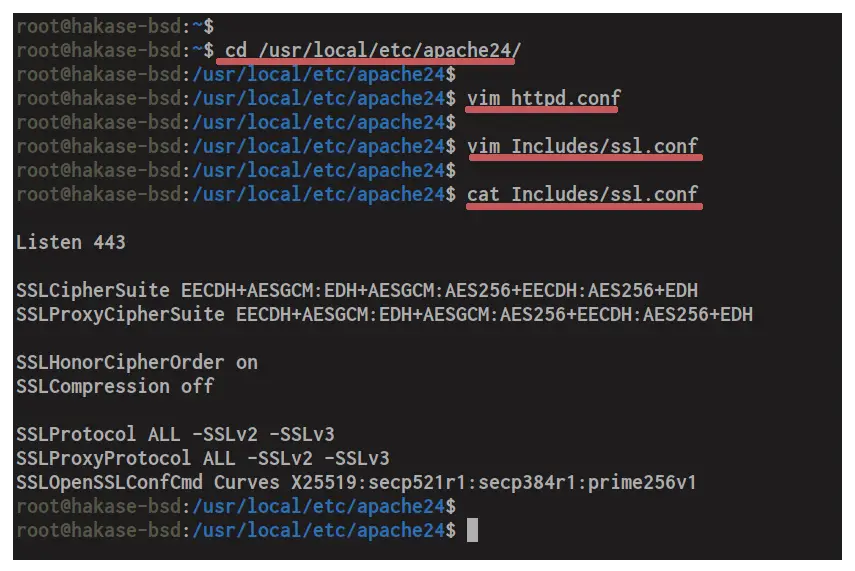
Now go to the '/usr/local/etc/apache24/' directory and edit the 'httpd.conf' file.
cd /usr/local/etc/apache24/
vim httpd.conf
Uncomment the 'LoadModule' lines for the 'mod_ssl' and 'mod_rewrite'.
LoadModule ssl_module libexec/apache24/mod_ssl.so
LoadModule rewrite_module libexec/apache24/mod_rewrite.so
Save and close.
Now we need to create a new SSL configuration 'ssl.conf' under the 'Includes' directory.
vim Includes/ssl.conf
Paste the SSL configuration below.
Listen 443

SSLCipherSuite EECDH+AESGCM:EDH+AESGCM:AES256+EECDH:AES256+EDH
SSLProxyCipherSuite EECDH+AESGCM:EDH+AESGCM:AES256+EECDH:AES256+EDH

SSLHonorCipherOrder on
SSLCompression off

SSLProtocol ALL -SSLv2 -SSLv3
SSLProxyProtocol ALL -SSLv2 -SSLv3
SSLOpenSSLConfCmd Curves X25519:secp521r1:secp384r1:prime256v1
Save and close.
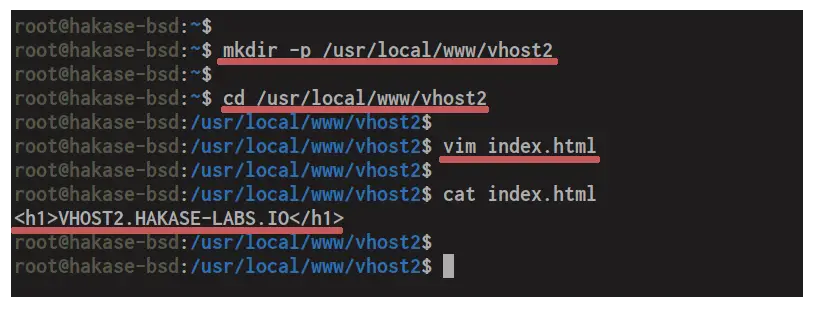
After that, create a new web root directory '/usr/local/www/vhost2' for the second virtual host domain name 'vhost2.hakase-labs.io' and go into it.
mkdir -p /usr/local/www/vhost2
cd /usr/local/www/vhost2
Create the index.html file using vim editor.
vim index.html
Paste the HTML script below.
<h1>VHOST2.HAKASE-LABS.IO</h1>
Save and close.
Next, go to the '/usr/local/etc/apache24/vhost/' directory and create a new virtual host configuration 'vhost2.hakase-labs.conf'.
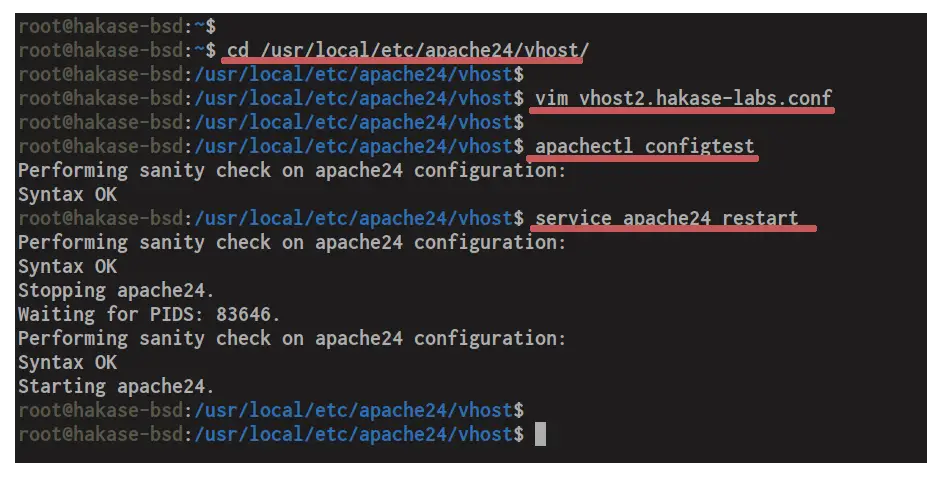
cd /usr/local/etc/apache24/vhost/
vim vhost2.hakase-labs.conf
Change the SSL path with your own certificates and paste into it.
# Automatic Redirect
<VirtualHost *:80>
ServerName vhost2.hakase-labs.io
DocumentRoot "/usr/local/www/vhost2"
Redirect permanent / https://vhost2.hakase-labs.io
</VirtualHost>

# HTTPS Config
<VirtualHost *:443>
    SSLEngine On
    SSLCertificateFile /usr/local/etc/ssl/fullchain.pem
    SSLCertificateKeyFile /usr/local/etc/ssl/privkey.pem

    ServerAdmin [email protected]
    DocumentRoot "/usr/local/www/vhost2"

    ServerName vhost2.hakase-labs.io
    ServerAlias www.vhost2.hakase-labs.io

    ErrorLog "/var/log/vhost2.hakase-labs.io-error_log"
    CustomLog "/var/log/vhost2.hakase-labs.io-access_log" common

    <Directory /usr/local/www/vhost2>
        Order allow,deny
        Allow from all
        Require all granted
    </Directory>
</VirtualHost>
Save and exit.
Now test the Apache configuration and make sure there is no error, then restart the Apache service.
apachectl configtest
service apache24 restart
The new Apache virtual host with SSL has been loaded by the Apache service.
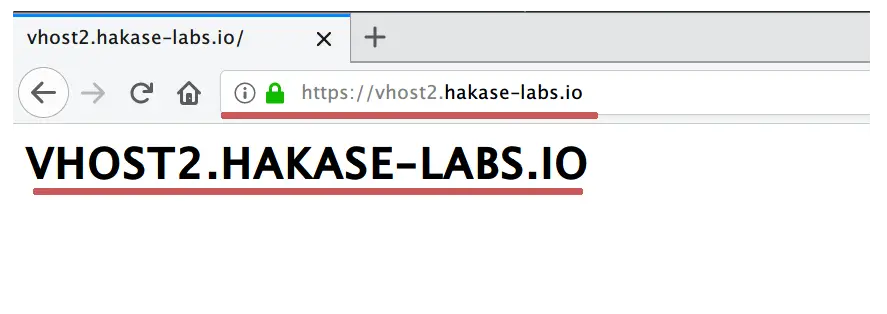
Now open your web browser and type the domain name 'vhost2.hakase-labs.io' on the address bar.
And you will be redirected to secure HTTPS connection and will be shown the index page as below.
Finally, the new configuration of Apache virtual host with SSL on it has been completed successfully.

