How to install Wolf CMS on Ubuntu 18.04 LTS
Wolf CMS is a free and open source content management system written in the PHP programming language. It is simple, fast, light-weight cms software and has a simple and elegant user interface. It provides lots of features such as archiving, markdown, statistics, file manager and much more.
In this tutorial, we will be going to learn how to install Wolf CMS on an Ubuntu 18.04 LTS server.
Requirements
- A server running Ubuntu 18.04.
- A non-root user with sudo privileges.
Getting Started
Before starting, you will need to update your system with the latest version. You can do this by running the following command:
sudo apt-get update -y
sudo apt-get upgrade -y
Install LAMP Server
Wolf CMS is written in PHP language and uses MariaDB to store their data. So, you will need to install Apache web server, MariaDB database server, PHP and other PHP libraries to your server. You can install all of them by running the following command:
sudo apt-get install apache2 mariadb-server php7.2 libapache2-mod-php7.2 php7.2-mysql wget unzip -y
After installing all the packages, open php.ini file and make some changes inside it.
sudo nano /etc/php/7.2/apache2/php.ini
Make the following changes:
memory_limit = 512M
upload_max_filesize = 200M
max_execution_time = 360
post_max_size = 200M
date.timezone = Asia/Kolkata
Save and close the file.
Next, start Apache and MariaDB service and enable them to start on boot time with the following command:
sudo systemctl start apache2
sudo systemctl enable apache2
sudo systemctl start mariadb
sudo systemctl enable mariadb
Configure MariaDB
By default, MariaDB is not secured. So, you will need to secure it. You can do this by running the mysql_secure_installation script:
sudo mysql_secure_installation
This script will change your current root password, remove anonymous users, disallow root login remotely as shown below:
    Enter current password for root (enter for none):
    Set root password? [Y/n]: N
    Remove anonymous users? [Y/n]: Y
    Disallow root login remotely? [Y/n]: Y
    Remove test database and access to it? [Y/n]:  Y
    Reload privilege tables now? [Y/n]:  Y
Once the MariaDB is secured, log in to MariaDB shell:
sudo mysql -u root
Enter your root password when prompt. Then, create a database and user for Wolf CMS:
MariaDB [(none)]> CREATE DATABASE wolfcmsdb;
MariaDB [(none)]> CREATE USER 'wolfcmsuser'@'localhost' IDENTIFIED BY 'mypassword';
Next, grant all privileges to the Wolf CMS with the following command:
MariaDB [(none)]> GRANT ALL ON wolfcmsdb.* TO 'wolfcmsuser'@'localhost' IDENTIFIED BY 'mypassword' WITH GRANT OPTION;
Next, flush the privileges and exit from the MariaDB shell:
MariaDB [(none)]> FLUSH PRIVILEGES;
MariaDB [(none)]> EXIT;
Install Wolf CMS
First, you will need to download the latest version of Wolf CMS from their official website. You can download it by simply running the following command:
cd /tmp
wget https://bitbucket.org/wolfcms/wolf-cms-downloads/downloads/wolfcms-0.8.3.1.zip
Once the download is completed, unzip the downloaded file to Apache web root directory with the following command:
sudo unzip wolfcms-0.8.3.1.zip -d /var/www/html/
Next, give proper permissions to the wolfcms directory with the following command:
sudo chown -R www-data:www-data /var/www/html/wolfcms/
sudo chmod -R 755 /var/www/html/wolfcms/
Configure Apache for Wolf CMS
Next, you will need to create an Apache virtual host file for Wolf CMS. You can create it with the following command:
sudo nano /etc/apache2/sites-available/wolfcms.conf
Add the following lines:
<VirtualHost *:80>
     ServerAdmin [email protected]
     DocumentRoot /var/www/html/wolfcms
     ServerName example.com
     DirectoryIndex index.html index.php
     <Directory /var/www/html/wolfcms/>
          Options FollowSymlinks
          AllowOverride All
          Require all granted
     </Directory>

     ErrorLog ${APACHE_LOG_DIR}/wolfcms_error.log
     CustomLog ${APACHE_LOG_DIR}/wolfcms_access.log combined

</VirtualHost>
Save and close the file, when you are finished. Then, enable Apache virtual host with the following command:
sudo a2ensite wolfcms
Next, enable the Apache rewrite module and restart Apache service with the following command:
sudo a2enmod rewrite
sudo systemctl restart apache2
You can verify the Apache web server with the following command:
sudo systemctl status apache2
You should see the following output:
? apache2.service - The Apache HTTP Server
   Loaded: loaded (/lib/systemd/system/apache2.service; enabled; vendor preset: enabled)
  Drop-In: /lib/systemd/system/apache2.service.d
           ??apache2-systemd.conf
   Active: active (running) since Wed 2019-01-09 06:38:39 UTC; 8h ago
  Process: 886 ExecStart=/usr/sbin/apachectl start (code=exited, status=0/SUCCESS)
    Tasks: 25 (limit: 1114)
   CGroup: /system.slice/apache2.service
           ??1195 /usr/sbin/apache2 -k start
           ??1197 Passenger watchdog
           ??1200 Passenger core
           ??1207 Passenger ust-router
           ??1249 /usr/sbin/apache2 -k start
           ??1250 /usr/sbin/apache2 -k start
           ??1251 /usr/sbin/apache2 -k start
           ??1252 /usr/sbin/apache2 -k start
           ??1253 /usr/sbin/apache2 -k start

Jan 09 06:38:27 ubuntu1804 systemd[1]: Starting The Apache HTTP Server...
Jan 09 06:38:37 ubuntu1804 apachectl[886]: AH00558: apache2: Could not reliably determine the server's fully qualified domain name, using 192.1
Jan 09 06:38:39 ubuntu1804 systemd[1]: Started The Apache HTTP Server.
Rename the .htaccess file to enable clean URL's:
sudo mv /var/www/html/wolfcms/_.htaccess /var/www/html/wolfcms/.htaccess
Open the .htaccess file in an editor
sudo nano /var/www/html/wolfcms/.htaccess
and change the 'RewriteBase /wolfcms/' line to:
RewriteBase /
Then save the file.
Access Wolf CMS Web Interface
Wolf CMS is now installed, it's time to access it through web browser.
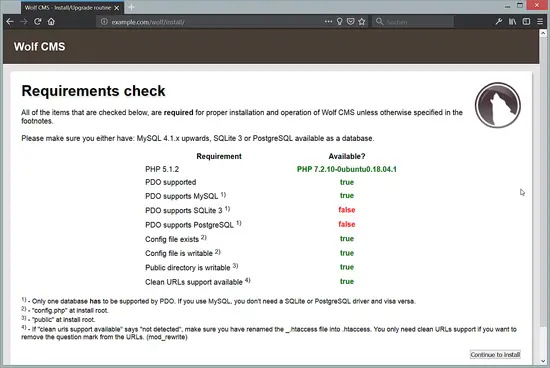
Open your web browser and type the URL http://example.com. You will be redirected to the following page:
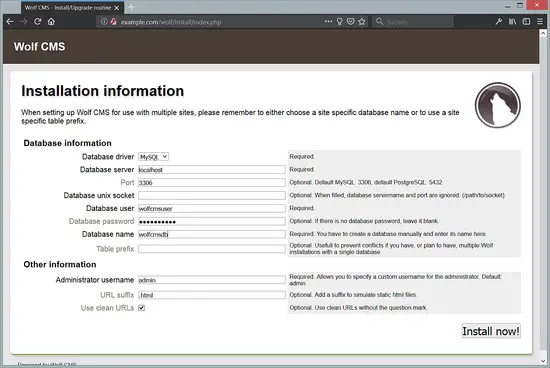
Now, click on the Continue to Install button. You should see the following page:
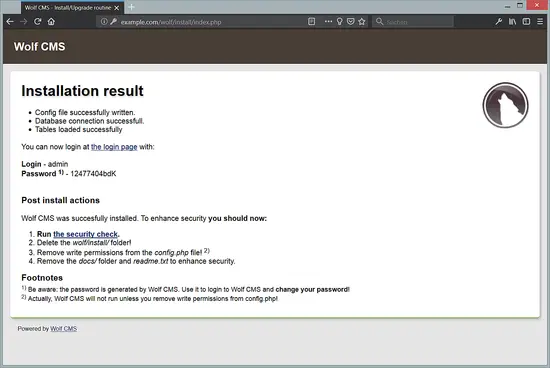
Provide your database details like, database name, database username and password. Then, click on the Install now button. Once the installation has been completed successfully. You should see the following page:
Next, you will need to remove the installation directory, doc directory and remove the write permission for config.php file. You can do this with the following command:
cd /var/www/html/wolfcms
sudo rm -rf wolf/install docs
sudo chmod -rwxr-xr-x config.php
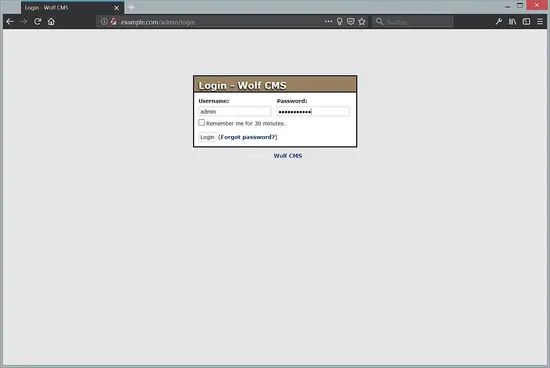
Now, click on the "the login page", you should see the following page:
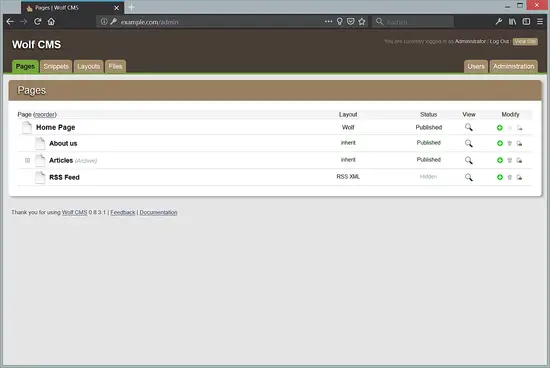
Now, provide your admin username and password. Then, click on the Login button. You should see the Wolf CMS dashboard in the following page:
Conclusion
Congratulations! you have successfully installed and configured Wolf CMS on Ubuntu 18.04 LTS server. I hope you can now easily create your own site using Wolf CMS. Feel free to ask me if you have any questions.

