This tutorial exists for these OS versions
- Debian 12 (Bookworm)
- Debian 11 (Bullseye)
- Debian 10 (Buster)
On this page
OpenProject is a web-based project management system written in Ruby on Rails and AngularJS. It provides a rich set of features including, project planning, timelines reports, task management, WYSIWYG text editor, intelligent workflows, conditional formatting and much more. It is simple, easy to use and allows business owners to collaborate and automate engaging experiences with users across multiple devices. It provides an easier way for teams to track their work and get results.
Features
- Project planning and scheduling.
- Team collaboration.
- Task management.
- Product roadmap and release planning.
- Agile and Scrum.
- Accessibility mode.
- Bug tracking.
- Time tracking, cost reporting and budgeting.
In this tutorial, we will show you how to install OpenProject on Debian 10.
Prerequisites
- A server running Debian 10.
- A root password is configured on your server.
Getting Started
Before starting, it is recommended to update your system's package repository to the latest version. You can do it using the following command:
apt-get update -y
apt-get upgrade -y
Once you are finished, you can proceed to the next step.
Install OpenProject
By default, OpenProject is not available in the Debian 10 default repository. So you will need to add the repository and GPG key for OpenProject.
First, install the required dependencies with the following command:
apt-get install gnupg2 wget apt-transport-https -y
Next, download and add the GPG key with the following command:
wget -qO- https://dl.packager.io/srv/opf/openproject/key | apt-key add -
Next, add the OpenProject repository with the following command:
wget -O /etc/apt/sources.list.d/openproject.list https://dl.packager.io/srv/opf/openproject/dev/installer/debian/10.repo
Once the repository is added, update the repository and install the OpenProject Community Edition with the following command:
apt-get update -y
apt-get install openproject -y
This will install the OpenProject installer in your system.
Next, configure the OpenProject with the following command:
openproject configure
You will be asked to select a database server as shown below:
Select "Install a PostgreSQL server" and hit Enter to continue. You will be asked to install the Apache2 web server as shown below:
Select Apache webserver and hit Enter to continue. You will be asked to provide a fully qualified domain name as shown below:
Provide your domain name and hit Enter to continue. You will be asked to set a project path as shown below:
Leave it empty to install the OpenProject on the root of your domain and hit Enter to continue. You will be asked to select SSL as shown below:
Select No and hit Enter to continue. You will be asked to select SVN as shown below:
Select Skip and hit Enter to continue. You will be asked to select Git as shown below:
Select Install Git Repository support and hit Enter to continue. You will be asked to provide the path of the Git repository as shown below:
Provide your Git repository path and hit Enter to continue. You will be asked to provide the path of the Git HTTP backend as shown below:
Provide your desired path and hit Enter to continue. You will be asked to select SMTP or sendmail as shown below:
Select Sendmail and hit Enter to continue. You should see the following screen:
Provide your admin Email and hit Enter to continue. You should see the following screen:
Select Install Memcached server and hit Enter to finish the installation.
Install and Download Let's Encrypt SSL
It is recommended to secure your OpenProject website with Let's encrypt free SSL. To do so, you will need to install the Certbot client in your system to install and manage Let's Encrypt SSL.
First, add the Certbot repository with the following command:
echo "deb http://ftp.debian.org/debian buster-backports main" >> /etc/apt/sources.list
Next, update the repository and install the Certbot Apache client with the following command:
apt-get update -y
apt-get install python3-certbot-apache -t buster-backports -y
Once installed, run the following command to download the Let's Encrypt SSL for your domain:
certbot certonly --webroot --webroot-path /opt/openproject/public -d openproject.linuxbuz.com
You will be prompt to accept the term of service and provide your valid email address as shown below:
Saving debug log to /var/log/letsencrypt/letsencrypt.log
Plugins selected: Authenticator webroot, Installer None
Enter email address (used for urgent renewal and security notices) (Enter 'c' to
cancel): [email protected]

- - - - - - - - - - - - - - - - - - - - - - - - - - - - - - - - - - - - - - - -
Please read the Terms of Service at
https://letsencrypt.org/documents/LE-SA-v1.2-November-15-2017.pdf. You must
agree in order to register with the ACME server at
https://acme-v02.api.letsencrypt.org/directory
- - - - - - - - - - - - - - - - - - - - - - - - - - - - - - - - - - - - - - - -
(A)gree/(C)ancel: A

- - - - - - - - - - - - - - - - - - - - - - - - - - - - - - - - - - - - - - - -
Would you be willing to share your email address with the Electronic Frontier
Foundation, a founding partner of the Let's Encrypt project and the non-profit
organization that develops Certbot? We'd like to send you email about our work
encrypting the web, EFF news, campaigns, and ways to support digital freedom.
- - - - - - - - - - - - - - - - - - - - - - - - - - - - - - - - - - - - - - - -
(Y)es/(N)o: Y
Obtaining a new certificate
Performing the following challenges:
http-01 challenge for openproject.linuxbuz.com
Using the webroot path /opt/openproject/public for all unmatched domains.
Waiting for verification...
Cleaning up challenges

IMPORTANT NOTES:
 - Congratulations! Your certificate and chain have been saved at:
   /etc/letsencrypt/live/openproject.linuxbuz.com/fullchain.pem
   Your key file has been saved at:
   /etc/letsencrypt/live/openproject.linuxbuz.com/privkey.pem
   Your cert will expire on 2020-07-03. To obtain a new or tweaked
   version of this certificate in the future, simply run certbot
   again. To non-interactively renew *all* of your certificates, run
   "certbot renew"
 - Your account credentials have been saved in your Certbot
   configuration directory at /etc/letsencrypt. You should make a
   secure backup of this folder now. This configuration directory will
   also contain certificates and private keys obtained by Certbot so
   making regular backups of this folder is ideal.
 - If you like Certbot, please consider supporting our work by:

   Donating to ISRG / Let's Encrypt:   https://letsencrypt.org/donate
   Donating to EFF:                    https://eff.org/donate-le

 - We were unable to subscribe you the EFF mailing list because your
   e-mail address appears to be invalid. You can try again later by
   visiting https://act.eff.org.
The above command will automatically save the keys and certificates in /etc/letsencrypt/live/openproject.linuxbuz.com/ directory. Please note down the path of your Let's Encrypt certificate from the above output.
Reconfigure OpenProject to Use Let's Encrypt SSL
At this point, your Let's Encrypt SSL certificate is ready to use. Next, you will need to reconfigure OpenProject to use this certificate.
You can reconfigure OpenProject with the following command:
openproject reconfigure
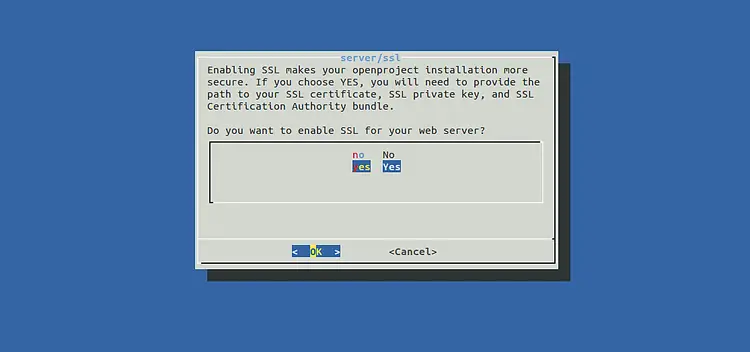
Select the same options for all the configurations that you have selected before during the first installation. When you will be asked for SSL support as shown below:
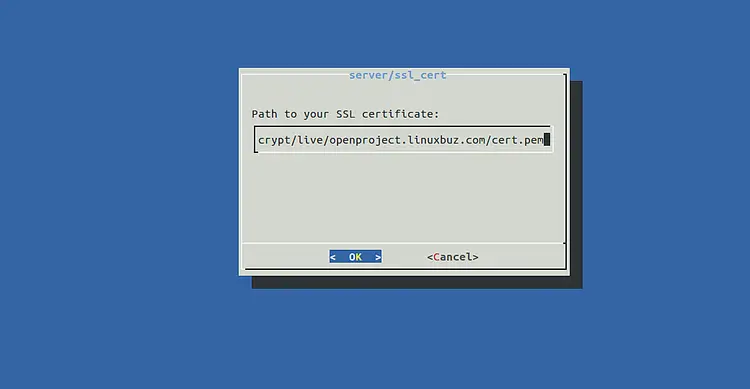
Select yes and hit Enter to continue. You will be asked to provide the path of your SSL certificate as shown below:
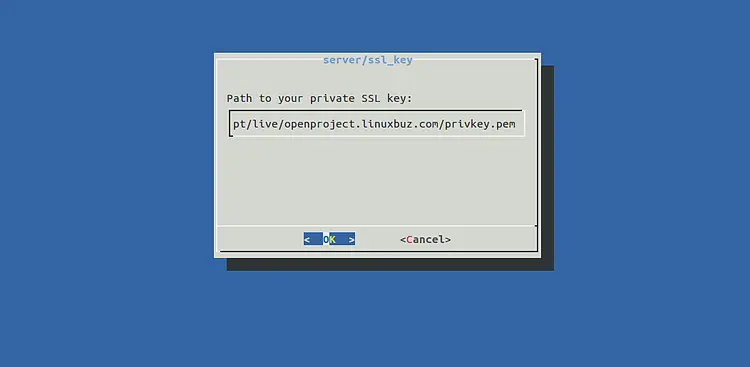
Provide the path of your cert.pem file and hit Enter to continue. You will be asked to provide the path of your SSL private key as shown below:
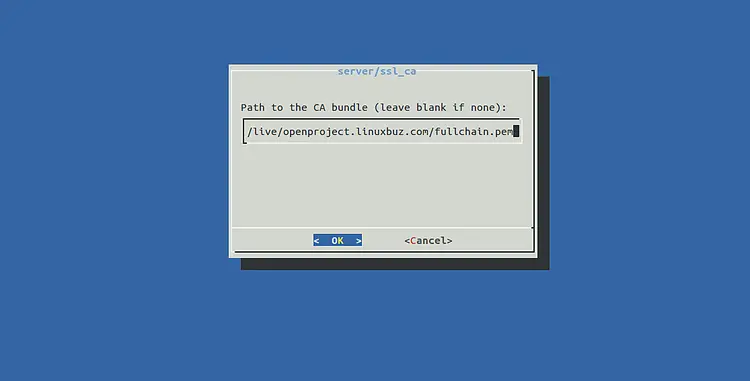
Provide the path of your privkey.pem file and hit Enter to continue. You will be asked to provide the path of your CA bundle as shown below:
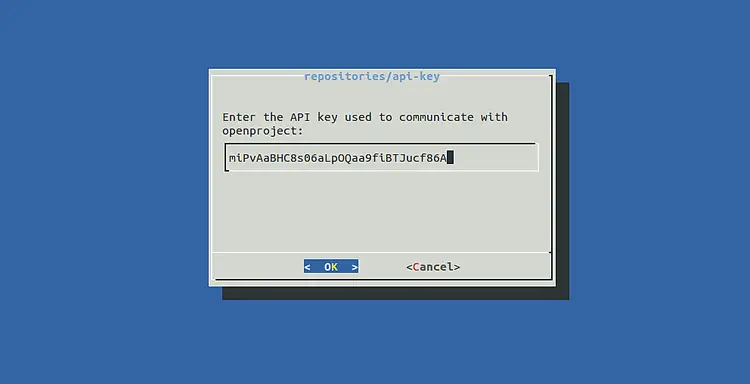
Provide the path of your fullchain.pem and hit Enter to continue. You will be asked to provide the API key as shown below:
Select the default key, hit Enter and complete the remaining steps to finish the installation.
Your OpenProject it now secured with Let's Encrypt SSL.
Access OpenProject Web Interface
Now, open your web browser and type the URL https://openproject.example.com/login. You will be redirected to the OpenProject login page:
Provide default username and password as admin/admin and click on the Sign in button. You should see the Change password wizard in the following screen:
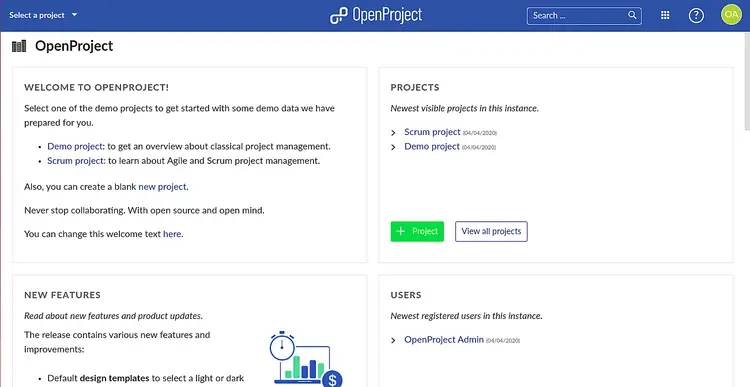
Provide a strong password and click on the Save button to reset the OpenProject default password. You should see the following page:
Select your desired language and click on the Save button. You should see the following screen:
Conclusion
Congratulations! you have successfully installed OpenProject Community Edition on Debian 10 server. You can now start exploring OpenProject and organize your own tasks and assign tasks to one of your teammates. Feel free to ask me if you have any questions.


