How to Install OpenCart with Nginx and Let's Encrypt on Debian 10
Opencart is a popular open-source shopping cart solution that helps you host your own fully functional e-commerce website. Opencart provides a simple and user-friendly interface to sell your products online, such as Amazon and Flipcart. It is specifically designed for small and medium-sized businesses and has all the standard e-commerce features needed for online shops. It offers a rich set of features including multi-currency, language, unlimited categories, products, product reviews, multi-store and many more.
In this tutorial, we will show you how to install OpenCart with Nginx on Debian 10 and secure it with Let's Encrypt SSL.
Prerequisites
- A server running Debian 10.
- A root password is configured on your server.
Getting Started
First, update your system to the latest version with the following command:
apt-get update -y
 apt-get upgrade -y
Once your server is updated, restart it to apply the changes.
Install LEMP Server
First, install the Nginx web server, MariaDB database server, PHP and other required PHP extensions by running the following command:
apt-get install nginx mariadb-server php-common php-cli php-fpm php-opcache php-gd php-mysql php-curl php-intl php-xsl php-mbstring php-zip php-bcmath php-soap unzip git -y
Once all the packages are installed, edit the php.ini file and make some changes:
nano /etc/php/7.3/fpm/php.ini
Change the following lines:
memory_limit = 256M
upload_max_filesize = 100M
opcache.save_comments=1
max_execution_time = 300
date.timezone = Asia/Kolkata
Save and close the file when you are finished.
Configure MariaDB Database
Next, you will need to set a MariaDB root password as it is not set in the Debian 10.
To do so, log in to MariaDB shell with the following command:
mysql
Once login, set a MariaDB root password with the following command:
MariaDB [(none)]> SET PASSWORD FOR 'root'@'localhost' = PASSWORD("yournewrootpassword");
Next, set the MariaDB authentication plugin to mysql_native_password with the following command:
MariaDB [(none)]> SET GLOBAL innodb_fast_shutdown = 0;
 MariaDB [(none)]> UPDATE mysql.user SET plugin = 'mysql_native_password' WHERE User = 'root';
Next, flush the privileges and exit from the MariaDB shell with the following command:
MariaDB [(none)]> FLUSH PRIVILEGES;
 MariaDB [(none)]> EXIT;
Next, log in to MariaDB with root user:
mysql -u root -p
Provide your root password and create a database and user for OpenCart with the following command:
MariaDB [(none)]> CREATE DATABASE opencartdb;
 MariaDB [(none)]> GRANT ALL ON opencartdb.* TO 'opencart'@'localhost' IDENTIFIED BY 'password';
Next, flush the privileges and exit from the MariaDB shell with the following command:
MariaDB [(none)]> FLUSH PRIVILEGES;
 MariaDB [(none)]> EXIT;
Once the MariaDB is configured, you can proceed to the next step.
Download OpenCart
You can download the latest version of OpenCart from the Git repository using the following command:
wget https://github.com/opencart/opencart/releases/download/3.0.3.2/opencart-3.0.3.2.zip
After downloading OpenCart, unzip the downloaded file with the following command:
unzip opencart-3.0.3.2.zip
Next, move the upload directory to the Nginx web root directory with the following command:
mv upload /var/www/html/opencart
Next, change the directory to opencart and rename the config-dist.php file:
cd /var/www/html/opencart/
 mv config-dist.php config.php
 mv admin/config-dist.php admin/config.php
Next, give proper permissions to the opencart directory with the following command:
chown -R www-data:www-data /var/www/html/opencart/
 chmod -R 775 /var/www/html/opencart/
Once you are finished, you can proceed to the next step.
Configure Nginx for OpenCart
Next, you will need to create an Nginx virtual host configuration file to serve OpenCart. You can create it with the following command:
nano /etc/nginx/sites-available/opencart.conf
Add the following content:
server {
    listen 80;
    server_name opencart.linuxbuz.com;
    root /var/www/html/opencart;
    index index.php;
    access_log /var/log/nginx/opencart_access.log;
    error_log /var/log/nginx/opencart_error.log;

    location = /favicon.ico {
        log_not_found off;
        access_log off;
    }

    location = /robots.txt {
        allow all;
        log_not_found off;
        access_log off;
    }

    location / {
        try_files $uri $uri/ /index.php?$args;
    }

    location ~ \.php$ {
        include snippets/fastcgi-php.conf;
        fastcgi_pass unix:/run/php/php7.3-fpm.sock;
    }

    location ~* \.(js|css|png|jpg|jpeg|gif|ico|svg)$ {
        expires max;
        log_not_found off;
    }

}
Save and close the file then check Nginx for any syntax error with the following command:
nginx -t
You should get the following output:
nginx: the configuration file /etc/nginx/nginx.conf syntax is ok
nginx: configuration file /etc/nginx/nginx.conf test is successful
Next, enable the Nginx virtual host file with the following command:
ln -s /etc/nginx/sites-available/opencart.conf /etc/nginx/sites-enabled/
Next, restart the Nginx and PHP-FPM service to apply the changes:
systemctl restart nginx
 systemctl restart php7.3-fpm
Once you are finished, you can proceed to the next step.
Secure OpenCart with Let's Encrypt SSL
Next, you will need to install a Certbot client to install and setup Let's Encrypt for your website.
By default, the Certbot is not available in the Debian 10 default repository. So you will need to add a Certbot repository in your system.
You can add it with the following command:
echo "deb http://ftp.debian.org/debian buster-backports main" >> /etc/apt/sources.list
Next, update the repository and install the Certbot client for Nginx with the following command:
apt-get update -y
 apt-get install python3-certbot-nginx -t buster-backports
Once installed, run the following command to download Let's Encrypt SSL and configure Nginx to use this SSL:
certbot --nginx -d opencart.linuxbuz.com
You will be prompt to accept the term of service and provide your valid email address as shown below:
Saving debug log to /var/log/letsencrypt/letsencrypt.log
Plugins selected: Authenticator apache, Installer apache
Enter email address (used for urgent renewal and security notices) (Enter 'c' to
cancel): [email protected]

- - - - - - - - - - - - - - - - - - - - - - - - - - - - - - - - - - - - - - - -
Please read the Terms of Service at
https://letsencrypt.org/documents/LE-SA-v1.2-November-15-2017.pdf. You must
agree in order to register with the ACME server at
https://acme-v02.api.letsencrypt.org/directory
- - - - - - - - - - - - - - - - - - - - - - - - - - - - - - - - - - - - - - - -
(A)gree/(C)ancel: A

- - - - - - - - - - - - - - - - - - - - - - - - - - - - - - - - - - - - - - - -
Would you be willing to share your email address with the Electronic Frontier
Foundation, a founding partner of the Let's Encrypt project and the non-profit
organization that develops Certbot? We'd like to send you email about our work
encrypting the web, EFF news, campaigns, and ways to support digital freedom.
- - - - - - - - - - - - - - - - - - - - - - - - - - - - - - - - - - - - - - - -
(Y)es/(N)o: Y
Obtaining a new certificate
Performing the following challenges:
http-01 challenge for opencart.linuxbuz.com
Waiting for verification...
Cleaning up challenges
Created an SSL vhost at /etc/nginx/sites-available/opencart-le-ssl.conf
Enabled Apache socache_shmcb module
Enabled Apache ssl module
Deploying Certificate to VirtualHost /etc/nginx/sites-available/opencart-le-ssl.conf
Enabling available site: /etc/nginx/sites-available/opencart-le-ssl.conf

Please choose whether or not to redirect HTTP traffic to HTTPS, removing HTTP access.
Next, you will need to choose whether or not to redirect HTTP traffic to HTTPS as shown below:
- - - - - - - - - - - - - - - - - - - - - - - - - - - - - - - - - - - - - - - -
1: No redirect - Make no further changes to the webserver configuration.
2: Redirect - Make all requests redirect to secure HTTPS access. Choose this for
new sites, or if you're confident your site works on HTTPS. You can undo this
change by editing your web server's configuration.
- - - - - - - - - - - - - - - - - - - - - - - - - - - - - - - - - - - - - - - -
Select the appropriate number [1-2] then [enter] (press 'c' to cancel): 2
Type 2 and hit Enter to continue. Once the installation has been completed, you should get the following output:
Redirecting vhost in /etc/nginx/sites-enabled/opencart.conf to ssl vhost in /etc/nginx/sites-available/opencart-le-ssl.conf

- - - - - - - - - - - - - - - - - - - - - - - - - - - - - - - - - - - - - - - -
Congratulations! You have successfully enabled https://opencart.linuxbuz.com

You should test your configuration at:
https://www.ssllabs.com/ssltest/analyze.html?d=opencart.linuxbuz.com
- - - - - - - - - - - - - - - - - - - - - - - - - - - - - - - - - - - - - - - -

IMPORTANT NOTES:
 - Congratulations! Your certificate and chain have been saved at:
   /etc/letsencrypt/live/opencart.linuxbuz.com/fullchain.pem
   Your key file has been saved at:
   /etc/letsencrypt/live/opencart.linuxbuz.com/privkey.pem
   Your cert will expire on 2020-04-30. To obtain a new or tweaked
   version of this certificate in the future, simply run certbot again
   with the "certonly" option. To non-interactively renew *all* of
   your certificates, run "certbot renew"
 - Your account credentials have been saved in your Certbot
   configuration directory at /etc/letsencrypt. You should make a
   secure backup of this folder now. This configuration directory will
   also contain certificates and private keys obtained by Certbot so
   making regular backups of this folder is ideal.
 - If you like Certbot, please consider supporting our work by:

   Donating to ISRG / Let's Encrypt:   https://letsencrypt.org/donate
   Donating to EFF:                    https://eff.org/donate-le
At this point, OpenCart is secured with Let's Encrypt SSL.
Access OpenCart Web Interface
Now, open your web browser and type the URL https://opencart.linuxbuz.com. You will be redirected to the OpenCart License Agreement page:
Click on the Continue button to accept the License Agreement. You should see the following page:
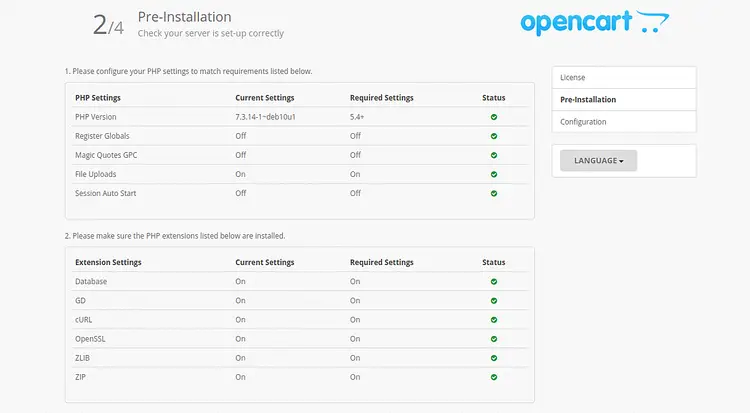
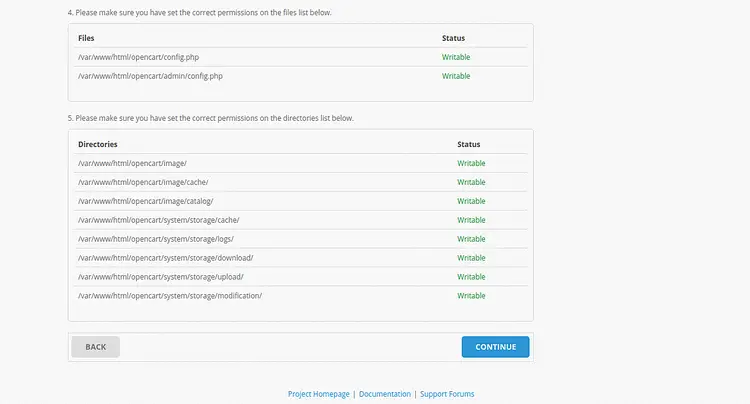
Make sure all the required PHP extensions are installed then click on the CONTINUE button. You should see the following page:
Provide your database credentials, admin username, password and click on the CONTINUE button. Once the installation has been completed, you should see the following page:
Now, open your terminal and remove the installation directory with the following command:
rm -rf /var/www/html/opencart/install/
Next, click on the GO TO YOUR ONLINE SHOP. You should see your OpenCart shop on the following page:
Next, click on the LOGIN TO YOUR ADMINISTRATION button. You should see the OpenCart login page:
Provide your admin username, password and click on the Login button. You should see your OpenCart administration panel in the following page:
Conclusion
Congratulations! you have successfully installed and secured OpenCart on Debian 10. You can now host your own online shopping cart with OpenCart. Feel free to ask me if you have any questions.


