How to Install KVM/QEMU on Manjaro/Archlinux
KVM is an acronym of Kernel-based Virtual Machine, it is a technology solution for virtualization based on the Linux kernel module. KVM is an open-source software solution running on the Linux x86 machine with the support of hardware virtualization extensions Intel VT or AMD-V. The KVM kernel module has been shipped to Linux kernel since version 2.6.20 and has been ported to other operating systems such as FreeBSD and Illumos as loadable kernel modules.
The KVM technology will turn the Linux machine into hypervisor virtualization, which is called the host machine. On the host machine, you will be able to create multiple isolated systems called virtual machines (VM). Each virtual machine has its system (it can be Linux, Windows, or BSD), also has private virtualized hardware such as memory, CPUs, network card, disk, graphic, etc.
What is QEMU?
QEMU or Quick Emulator is an open-source system emulator and virtualizer for hardware virtualization. Generally, it is used as a virtualizer with the KVM kernel module to run virtual machines. To achieve great performances for guest machines/virtual machines, it will take advantage of the hardware virtualization extensions such as Intel VT or AMD-V. The QEMU/KVM virtualization is mostly used as a hypervisor in a data center.
In this guide, you will learn how to set up KVM/QEMU virtualization on Manjaro/Archlinux machine. Also, you will learn how to create the first virtual machine with the GUI application "virt-manager" - a desktop user interface for managing virtual machines.
Prerequisites
- An Manjaro/Archlinux with x86 or 64-bit architecture.
- A CPU/processor with virtualization support (Intel VT or AMD-V).
- A non-root user with sudo root privileges.
Checking System Architecture and CPU Virtualization Support
First, check the machine architecture and the hardware support of virtualization acceleration Intel VT for Intel CPUs and AMD-v for AMD CPUs.
1. Execute the following command to check the system architecture of your system.
uname -m
You will get the following output.
Linux machine1 5.4.134-1 #1 SMP PREEMPT Tue Jul 06 08:10:03 UTC 2021 x86_64 GNU/Linux
As seen, we're currently using the Linux system with "x86_64" or "64-bit" architecture and the kernel version "5.4".
2. Next, check the hardware virtualization support by running the following command.
sudo lscpu | grep Virtualization
For the Intel processor, you will see similar output as below.
Virtualization: VT-x
And for AMD processors, below is a similar output.
Virtualization: AMD-V
3. Optionally, you can enable nested virtualization on your machine using the following command.
sudo modprobe -r kvm_intel
sudo modprobe kvm_intel nested=1
After that, execute the following command to verify the nested virtualization.
cat /sys/module/kvm_intel/parameters/nested
If you get the output like "Y" or "1", it means the feature nested virtualization is enabled. Otherwise, you will see the error message as "No such file or directory".
Installing QEMU and Virt-Manager Packages
1. To install qemu and virt-manager packages, run the command below.
sudo pacman -S qemu virt-manager libvirt virt-viewer dnsmasq vde2 bridge-utils openbsd-netcat ebtables libguestfs
For the manjaro system, there will be package conflict between "iptables" and "ebtables". Type "y" to remove the default iptables package and replace it with the "ebtables" and "nftables".
Below are essential packages you must know:
- qemu: An open-source machine emulator and virtualizer.
- virt-manager; A GUI application for managing virtual machines.
- libvirt: An API for controlling virtualization engines such as KVM, QEMU, etc.
- dnsmasq: Lightweight DNS forwarder and DHCP server.
- bridge-utils: Utilities for configuring Linux ethernet bridge.
- libguestfs: Set of tools for modifying virtual machine (VM) disk images.
2. Next, start and enable the libvirtd service using the following command.
sudo systemctl enable --now libvirtd
You will get similar output as below.
Created symlink /etc/systemd/system/multi-user.target.wants/libvirtd.service → /usr/lib/systemd/system/libvirtd.service.
Created symlink /etc/systemd/system/sockets.target.wants/virtlockd.socket → /usr/lib/systemd/system/virtlockd.socket.
Created symlink /etc/systemd/system/sockets.target.wants/virtlogd.socket → /usr/lib/systemd/system/virtlogd.socket.
Created symlink /etc/systemd/system/sockets.target.wants/libvirtd.socket → /usr/lib/systemd/system/libvirtd.socket.
Created symlink /etc/systemd/system/sockets.target.wants/libvirtd-ro.socket → /usr/lib/systemd/system/libvirtd-ro.socket.
3. After that, execute the following command to check the libvirtd service status.
sudo systemctl status libvirtd
And you should see similar output as below. As seen, the libvritd service is active and running.
? libvirtd.service - Virtualization daemon
     Loaded: loaded (/usr/lib/systemd/system/libvirtd.service; disabled; vendor preset: disabled)
     Active: active (running) since Fri 2021-07-23 10:33:25 UTC; 6s ago
TriggeredBy: ? libvirtd-ro.socket
             ? libvirtd.socket
             ? libvirtd-admin.socket
       Docs: man:libvirtd(8)
             https://libvirt.org
   Main PID: 16828 (libvirtd)
      Tasks: 19 (limit: 32768)
     Memory: 16.4M
        CPU: 226ms
     CGroup: /system.slice/libvirtd.service
             ??16828 /usr/bin/libvirtd --timeout 120
Allow Non-root User to use KVM/QEMU Virtualization
By default, only user "root" can create and manage virtual machines. To allow non-root users to create and manage virtual machines, you should follow the libvirtd configuration below.
1. Execute the following command to edit the libvirtd configuration.
sudo nano /etc/libvirt/libvirtd.conf
Uncomment the option "unix_sock_group" and enter the group name as "libvirt".
# Set the UNIX domain socket group ownership. This can be used to
# allow a 'trusted' set of users access to management capabilities
# without becoming root.
#
# This setting is not required or honoured if using systemd socket
# activation.
#
# This is restricted to 'root' by default.
unix_sock_group = "libvirt"
After that, uncomment the option "unix_sock_rw_perms" and leave the permission as default "0770".
# Set the UNIX socket permissions for the R/W socket. This is used
# for full management of VMs
#
# This setting is not required or honoured if using systemd socket
# activation.
#
# Default allows only root. If PolicyKit is enabled on the socket,
# the default will change to allow everyone (eg, 0777)
#
# If not using PolicyKit and setting group ownership for access
# control, then you may want to relax this too.
unix_sock_rw_perms = "0770"
Save the configuration by pressing the Ctrl+x button and type y, then enter.
2. Next, add your user to the group "libvirt" using the following command.
sudo usermod -a -G libvirt username
3. After that, restart the libvirtd service to apply a new configuration.
sudo systemctl restart libvirtd
Now all users within the group "libvirt" will be able to create and configure virtual machines.
Verify QEMU/KVM Installation with virt-manager
Now open the application "virt-manager" from your application menu.
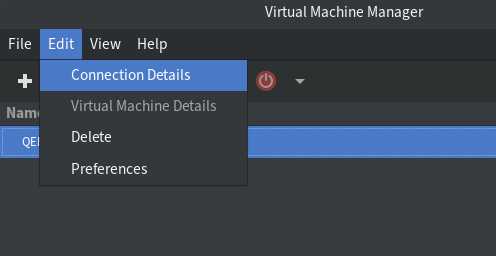
1. Click the menu "Edit -> Connection Details" on the virt-manager application.
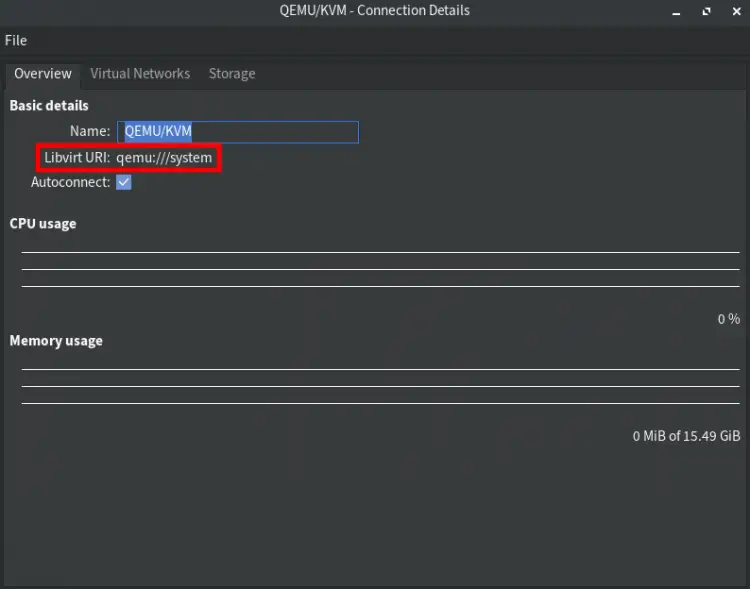
2. On the tab "Overview" you will see the virt-manager will automatically connect to "qemu:///system".
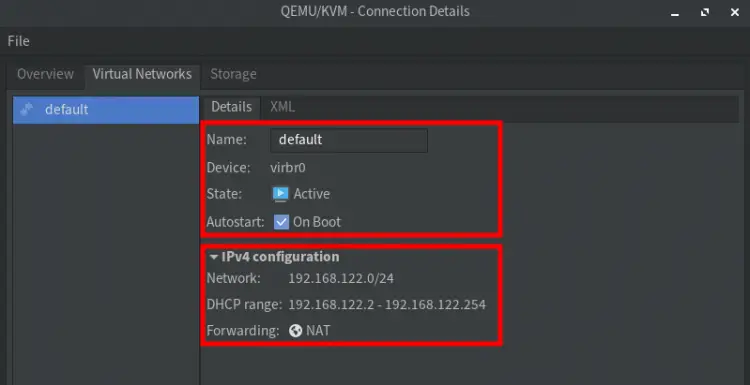
3. Move to the tabs "Virtual Networks" and you will see the "default" network configuration.
- Interface: virbr0
- Auto start at boot: yes
- IP address: 192.168.122.0/24
- Range DHCP IP address: 192.168.122.2 - 192.168.122.254
- Type network: NAT
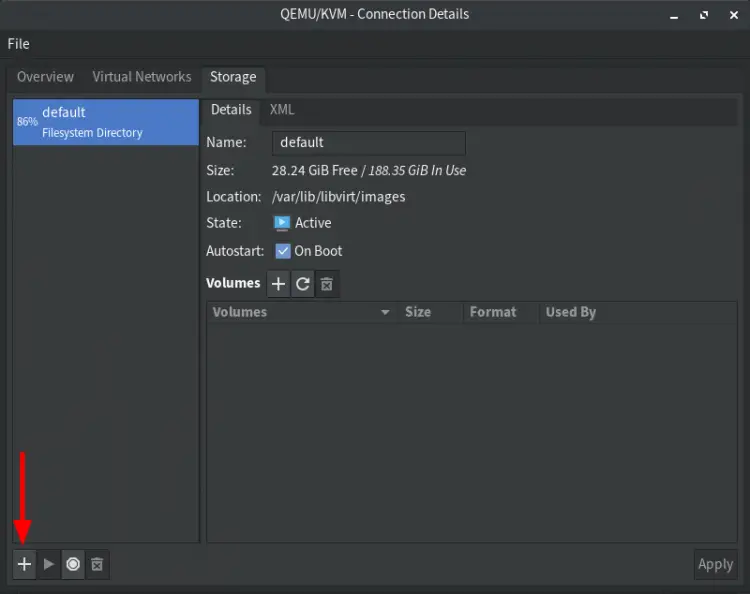
4. Now move to the tab "Storage", and you will see the "default" pool storage configuration.
- Type: Filesystem directory
- Size: Depends on your disk
- Location: /var/lib/libvirt/images
- Auto start at boot: yes
All virtual machine images will be available on this default storage, the directory "/var/lib/libvirt/images".
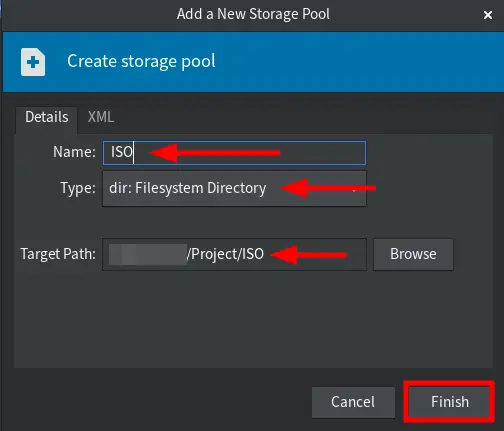
5. Next, click the button "+" to create new pool storage for ISO image files. All ISO files operating systems will be available at this pool.
Follow storage configration as below:
- Name: ISO
- Type: dir: Filesystem Directory
- Target Path: /path/directory/to/your/iso/
Click the "Finish" button to complete the process. After that, you are ready to create new virtual machines.
Create New Virtual Machine using virt-manager
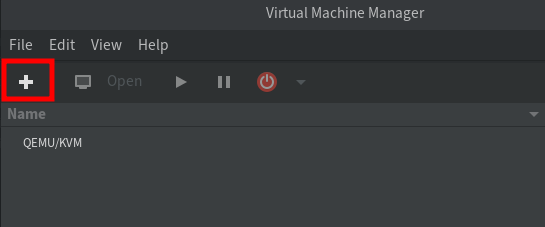
1. On the virt-manager application, click the button "+" to create a new virtual machine.
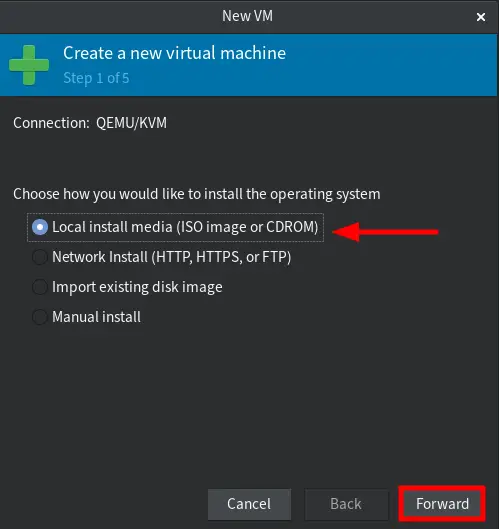
2. Select "Local install media" to use the ISO image for the installation and click the "Forward" button to continue.
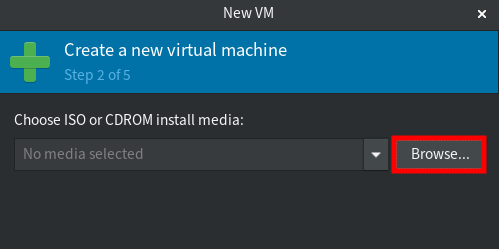
3. Click the "Browse" button to select the ISO file.
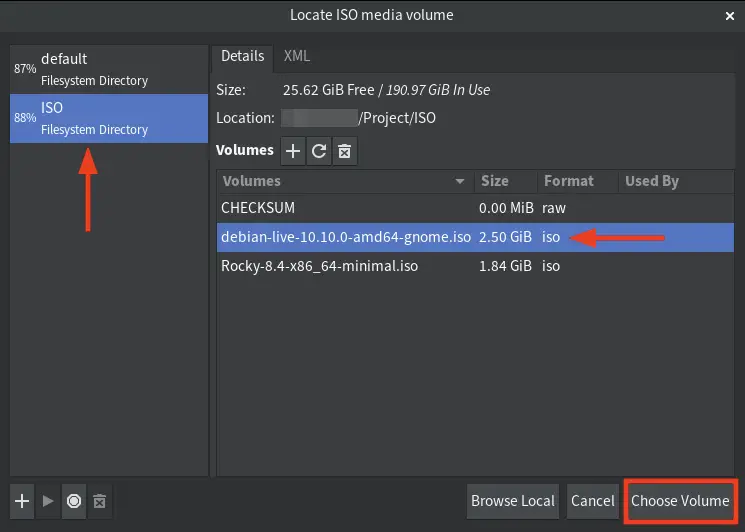
Now choose the pool storage "ISO" and select the iso file for the installation (for this example is the "Debian 10"), then click "Choose Volume".
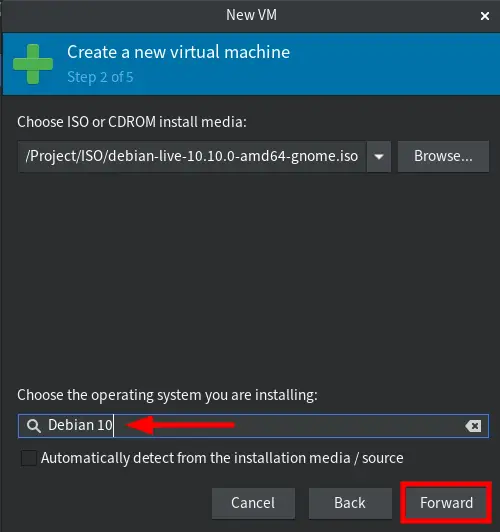
Uncheck the option "Automatically detect from the installation media/source", type the operating system you want to install (for this example is "Debian 10"), then click the "Forward" button again to continue.
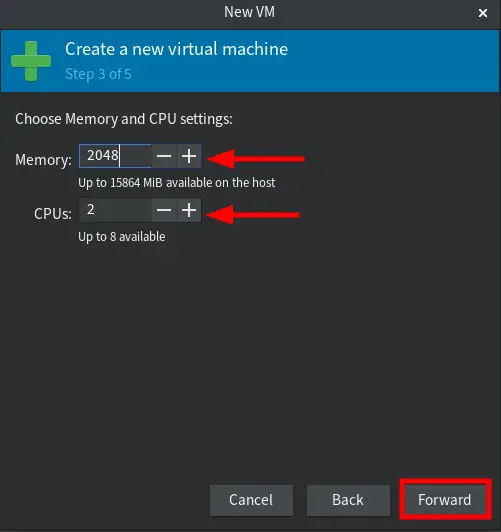
4. Choose how much memory and CPU for the virtual machine, then click "Forward".
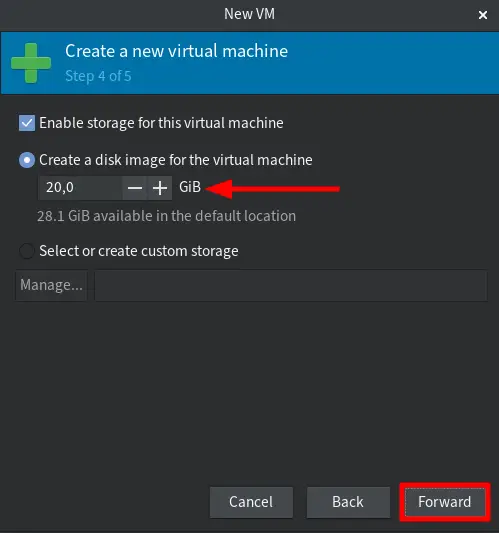
5. Choose how much disk for the virtual machine and click "Forward".
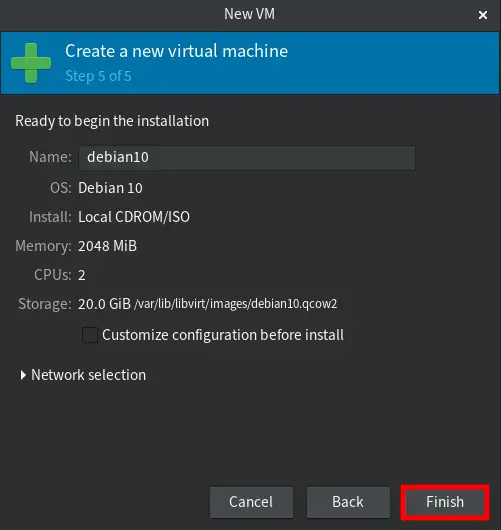
6. Double-check your configuration and click the "Finish" button to install.
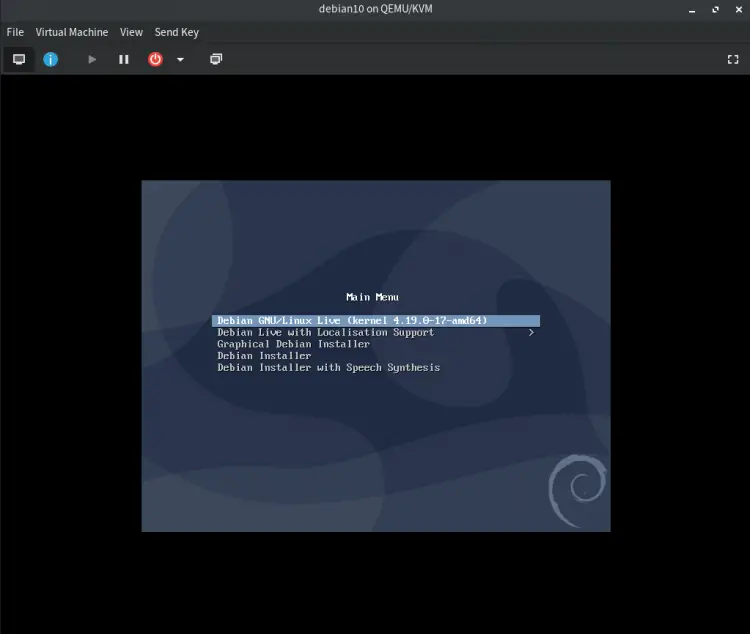
7. Now the virtual machine is up and running with QEMU/KVM virtualization, and you can continue the os installation.
Conclusion
Congratulations! you have learned how to set up QEMU/KVM virtualization on Manjaro/Archlinux machine. Also, how to use the virt-manager application for creating virtual machines. Now you can create virtual machines with your preferred operating system. You can use another Linux distro, Windows, or BSD family os.

