How to Install Jitsi Video Conference Platform on Debian 11
Jitsi is a free open-source solution for building a secure video conferencing platform. Jitsi is based on open-source software like coturn, prosody, jitsi video bridge, jitsi meet, etc. The main components of Jitsi are the Jitsi video bridge and Jitsi meet, which allow users to start conferences over the internet,
Jitsi is compatible with the WebRTC open standard for web communication. Jitsi is compatible with the WebRTC open standard for web communication and offers better quality, low latency and advanced video routing with bandwidth estimation and scalable video encoding.
On the client side, Jitsi offers applications for various systems, including Jitsi Desktop for computer users and Android and iOS clients.
Prerequisites
This article will go through the installation and configuration of the Jitsi Video Conference on the latest Debian 11 Bullseye. At the end of this guide, you will be able to create a meeting using the Jitsi Video conference.
Before you get started, ensure you've got the following requirements:
- Operating System: Debian 11 Bullseye
- Root privileges
Now let's begin.
Install Packages Dependencies
The first step is to install some packages dependencies such as gnupg2, nginx-full, sudo, apt-transport-https, curl, and java OpenJDK.
1. Update your Debian repository and install those packages on top using the following command.
sudo apt install apt-transport-https gnupg2 nginx-full sudo curl -y
2. Jitsi required Java OpenJDK version 1.8 or 1.11; the default Debian repository provides Java OpenJDK 1.11.
Now execute the following command to install Java OpenJDK packages.
sudo apt install default-jdk -y
After installation completes, verify the Java OpenJDK version using the following command.
java -version
You will see a similar output as below.
openjdk version "11.0.13" 2021-10-19
OpenJDK Runtime Environment (build 11.0.13+8-post-Debian-1deb11u1)
OpenJDK 64-Bit Server VM (build 11.0.13+8-post-Debian-1deb11u1, mixed mode, sharing)
After all packages have been installed, move on to setting up Jitsi and Prosody repositories.
Add Jitsi and Prosody Repository
Jitsi has essential components such as Jitsi Videbridge, Jicofo, Jigasi, Prosody (external software), etc.
Before installing Jitsi, you must add the Prosody and Jitsi repository to your system. To do so, run the following commands.
1. Add the Prosody repository and GPG key using the command below.
echo deb http://packages.prosody.im/debian $(lsb_release -sc) main | sudo tee -a /etc/apt/sources.list
wget https://prosody.im/files/prosody-debian-packages.key -O- | sudo apt-key add -
2. Add Jitsi repository and GPG key using the command below.
curl https://download.jitsi.org/jitsi-key.gpg.key | sudo sh -c 'gpg --dearmor > /usr/share/keyrings/jitsi-keyring.gpg'
echo 'deb [signed-by=/usr/share/keyrings/jitsi-keyring.gpg] https://download.jitsi.org stable/' | sudo tee /etc/apt/sources.list.d/jitsi-stable.list > /dev/null
3. Next, update and refresh your Debian repository using the command below.
sudo apt update
Setup UFW Firewall and Systemd Limits
For security reasons, running Jitsi with a UFW firewall is recommended. Also, to get better performance of Jitsi, you need to increase limits (max open files, max processes) on your Debian system.
1. Run the following command to install UFW firewall packages.
sudo apt install ufw -y
2. After UFW installation, execute the 'ufw' command below to open some ports for Jitsi.
sudo ufw allow 80/tcp
sudo ufw allow 443/tcp
sudo ufw allow 10000/udp
sudo ufw allow 22/tcp
sudo ufw allow 3478/udp
sudo ufw allow 5349/tcp
Now run the command below to start and enable the UFW service.
sudo ufw enable
Type 'y' to confirm and press 'Enter' to enable, and you've activated the UFW firewall on your Debian system.
Detail ports for Jitsi:
- Port 80/tcp: HTTP port will generate SSL Let'sencrypt.Port 443/tcp: Client requests will be secured through HTTPS protocol.
- Port 10000/udp: general video and audio communication port.
- Port 22/tcp: Default SSH port for managing Jitsi server.
- Port 3478/udp: Queering the STUN server.
- Port 5349/tcp: fallback port for audio and video communications over TCP (If UDP ports are blocked, this port will be used).
3. To set up limits of max open files, max processes, and max tasks, you need to edit the configuration '/etc/systemd/system.conf' using nano editor.
sudo nano /etc/systemd/system.conf
For Java applications, it's recommended to set up max limits to '65000'. Copy and paste the following configuration.
DefaultLimitNOFILE=65000
DefaultLimitNPROC=65000
DefaultTasksMax=65000
save the configuration and exit.
4. Next, reboot your server and log in again, then verify system limits configuration using the following command.
systemctl show --property DefaultLimitNPROC
systemctl show --property DefaultLimitNOFILE
systemctl show --property DefaultTasksMax
Ensure the value of 'DefaultLimitNPROC' (max processes), 'DefaultLimitNOFILE' (max open files), and 'DefaultTasksMax' (max thread limits) is '65000'.
Generate SSL Letsencrypt with Certbot
In this step, you will install the certbot tool and generate SSL letsencrypt to secure Jitsi installation.
1. Run the apt command below to install the certbot tool.
sudo apt install certbot -y
2. After certbot installation completes, stop the Nginx service and generate SSL letsencrypt using the certbot command below. Make sure to change the email address and domain name.
sudo systemctl stop nginx
sudo certbot certonly --standalone --agree-tos --no-eff-email --email [email protected] -d example.io
if all processes are complete, you will see your SSL certificates on the directory '/etc/letsencrypt/live/jitsi.example.io/'. The Public certificate is 'fullchain.pem', and the Private key is 'privkey.pem'.
Installing Jitsi Video Conference on the Debian 11
In this step, you will install and configure the Jitsi video conference on the Debian server.
1. Install Jitsi packages using the apt command below.
sudo apt install jitsi-meet
Type 'y' to confirm the installation and press 'Enter' to continue.
During the installation, you will be asked for some configurations below.
For the domain name, type your Jitsi domain installation and select 'Ok'.
For SSL certificate configuration, select 'I want to use my own certificate' and 'Ok'.
Now type the full path of your SSL private key 'privkey.pem' and select 'Ok'.
Now type the full path of the SSL public key 'fullchain.pem' and select 'Ok'.
Now you've completed the Jitsi Video Conference installation.
2. Next, verify all Jitsi services using the following commands.
Verify the coturn service and make sure it's active and running.
sudo systemctl status coturn
Verify the jicofo and jitsi-videobridge services and ensure both are active and running.
sudo systemctl status jicofo
sudo systemctl status jitsi-videobridge2
Verify the prosody service and make sure it's active and running.
sudo systemctl status prosody
And the last, start and verify the Nginx service using the following command.
sudo systemctl start nginx
sudo systemctl status nginx
If the services stopped, you can start using the systemctl command.
Now move to the next step to set up authentication on Jitsi Video Conference.
Enable Authentication on Jitsi Video Conference
In this step, you will enable the authentication on Jitsi Video Conference. With this method, only the moderator with the right authentication can start meeting with Jitsi.
1. First, you must enable the authentication on the Prosody service and define the guest domain.
Edit the Prosody configuration for the Jitsi domain installation. In this example, the domain example is 'jitsi.example.io'.
sudo nano /etc/prosody/conf.d/jitsi.example.io.cfg.lua
Change the default authentication 'anonymous' to 'internal_hashed' as below.
VirtualHost "jitsi.example.io"
    -- enabled = false -- Remove this line to enable this host
    authentication = "internal_hashed"
Add a new virtual host for guests with the name 'guest.jitsi.example.io' as below.
VirtualHost "guest.jitsi.example.io"
    authentication = "anonymous"
    c2s_require_encryption = false
Save the configuration and exit.
2. Next, you must add the guest/anonymous domain to the Jitsi Meet configuration.
Edit the Jitsi Meet configuration 'jitsi.example.io-config.js' using nano editor.
sudo nano /etc/jitsi/meet/jitsi.example.io-config.js
Add the anonymous domain 'guest.jitsi.example.io' to the 'hosts' section as below.
    hosts: {
        // XMPP domain.
        domain: 'jitsi.example.io',

        // When using authentication, domain for guest users.
        // anonymousdomain: 'guest.example.com',

        anonymousdomain: 'guest.jitsi.example.io',
Save the configuration and exit.
3. Create a new configuration, 'sip-communicator.properties', under the jicofo configuration directory.
sudo nano /etc/jitsi/jicofo/sip-communicator.properties
Copy and paste the following configuration. This will allow requests from an authenticated domain 'jitsi.example.io' to the jicofo.
org.jitsi.jicofo.auth.URL=XMPP:jitsi.example.io
save the configuration and exit.
4. Restart all Jitsi services using the following command to apply new configurations.
sudo systemctl restart prosody
sudo systemctl restart jicofo
sudo systemctl restart jitsi-videobridge2
sudo systemctl restart nginx
5. Lastly, you must create a new moderator user for your Jitsi Video Conference using the prosodyctl command below. Make sure to change the user, domain name, and password.
sudo prosodyctl register johndoe jitsi.example.io SecretPasswd
Now you've successfully enabled the authentication on Jitsi Video Conference. And you're ready to start a new first meeting with Jitsi.
Create First Meeting with Jitsi
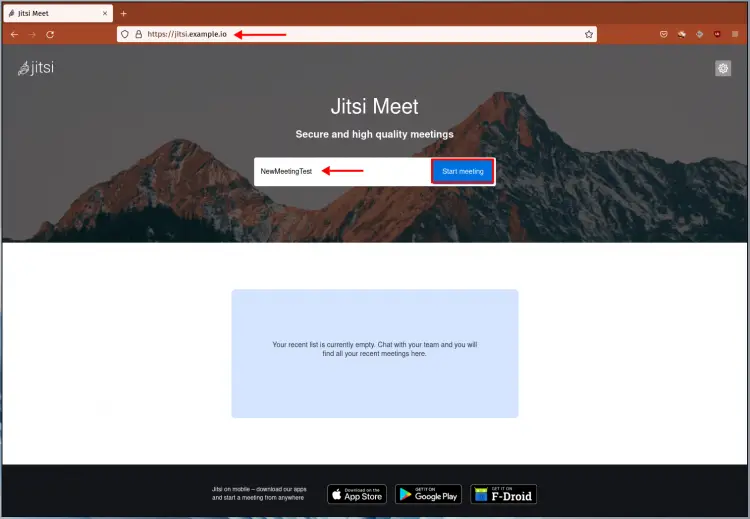
1. Open your web browser and type your Jitsi installation domain on the address bar.
https://jitsi.example.io/
2. To create the first meeting room, type your meeting room name and click the button 'Start meeting'.
3. You will get the 'Waiting for the host ...' pop-up window. Click the button 'I am the host' to start the meeting.
4. Now, type Jitsi moderator user and password, then click the 'Login' button.
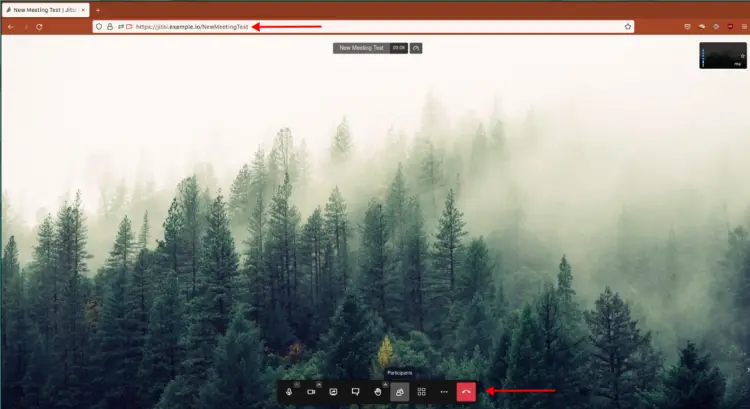
5. And you will see the screen of your Jitsi meeting room.
Now you've created the first meeting using Jitsi Video Conference.
Conclusion
Congratulation! You've learned the basic installation of the Jitsi Video Conference on the Debian 11 Bullseye. Also, you've learned how to set up a UFW firewall, set up system limits, and generate SSL Letsencrypt with the certbot tool.
At the end of the tutorial, you've learned how to enable the authentication on Jitsi and start the first meeting with Jitsi Video Conference.


