How to Install Gitea on Ubuntu 18.04
This tutorial exists for these OS versions
- Ubuntu 22.04 (Jammy Jellyfish)
- Ubuntu 20.04 (Focal Fossa)
- Ubuntu 18.04 (Bionic Beaver)
On this page
Gitea is a free and open-source version control system similar to GitHub. Gitea is a clone of Gogs, a lightweight code hosting solution written in Go and published under the MIT license. It is simple, fast, easy to use, scalable and a great alternative to other git services. Gitea comes with lots of features including, Multiple database support, Multiple OS support, Easy upgrade process, CSV support, Integrated Git-powered wiki, Built-in Container Registry, External git mirroring, issues, and time tracking, repository branching and much more.
In this tutorial, we will explain how to install Gitea git server on Ubuntu 18.04 server.
Requirements
- A server running Ubuntu 18.04.
- A static IP address 192.168.0.101 is set up to your server.
- A non-root user with sudo privileges.
Getting Started
Before starting, you will need to update your system with the latest version. You can do this by running the following command:
sudo apt-get update -y
sudo apt-get upgrade -y
Install Required Packages
First, you will need to install MariaDB server, git, unzip and wget to your server. You can install all of them with the following command:
sudo apt-get install mariadb-server wget unzip git -y
Once all the packages are installed, start MariaDB service and enable it to start on boot time with the following command:
sudo systemctl start mariadb
sudo systemctl enable mariadb
Configure MariaDB
By default, MariaDB is not secured. So, you will need to secure it. You can do this by running the mysql_secure_installation script:
sudo mysql_secure_installation
This script will change your current root password, remove anonymous users, disallow root login remotely as shown below:
    Enter current password for root (enter for none):
    Set root password? [Y/n]: N
    Remove anonymous users? [Y/n]: Y
    Disallow root login remotely? [Y/n]: Y
    Remove test database and access to it? [Y/n]:  Y
    Reload privilege tables now? [Y/n]:  Y
Once the MariaDB is secured, log in to MariaDB shell:
mysql -u root -p
Enter your root password when prompt. Then, create a database and user for Gitea:
MariaDB [(none)]> SET GLOBAL innodb_file_per_table = ON;
MariaDB [(none)]> CREATE DATABASE giteadb;
MariaDB [(none)]> CREATE USER 'giteauser'@'localhost' IDENTIFIED BY 'password';
Next, grant all privileges to the Gitea with the following command:
MariaDB [(none)]> GRANT ALL ON giteadb.* TO 'giteauser'@'localhost' IDENTIFIED BY 'password' WITH GRANT OPTION;
Next, update the database character set with the following command:
ALTER DATABASE giteadb CHARACTER SET = utf8mb4 COLLATE utf8mb4_unicode_ci;
Next, flush the privileges and exit from the MariaDB shell:
MariaDB [(none)]> FLUSH PRIVILEGES;
MariaDB [(none)]> EXIT;
Next, you will need to edit MariaDB default config file and make some changes:
sudo nano /etc/mysql/mariadb.conf.d/50-server.cnf
Add the following lines:
innodb_file_format = Barracuda
innodb_large_prefix = 1
innodb_default_row_format = dynamic
Save and close the file. Then, restart MariaDB service to apply the changes:
sudo systemctl restart mariadb
Crete Gitea Directory Structure
First, you will need to create a Gitea user. You can do this with the following command:
sudo adduser --system --shell /bin/bash --group --disabled-password --home /home/gitea gitea
Next, create a directory structure for Gitea with the following command:
sudo mkdir -p /etc/gitea /var/lib/gitea/{custom,data,indexers,public,log}
Next, give ownership to Gitea user with the following command:
sudo chown gitea:gitea /etc/gitea /var/lib/gitea/{custom,data,indexers,public,log}
sudo chmod 750 /var/lib/gitea/{data,indexers,log}
sudo chmod 770 /etc/gitea
Install Gitea
Next, you will need to download Gitea package from Git Hub repository. You can download it with the following command:
wget https://github.com/go-gitea/gitea/releases/download/v1.5.1/gitea-1.5.1-linux-amd64
Next, move the downloaded binary to /usr/local/bin directory with the following command:
sudo mv gitea-1.5.1-linux-amd64 /usr/local/bin/gitea
Next, give proper permission to the Gitea binary with the following command:
sudo chmod +x /usr/local/bin/gitea
Next, create a systemd service file for to manage Gitea service with the following command:
sudo nano /etc/systemd/system/gitea.service
Add the following lines:
[Unit]
Description=Gitea
After=syslog.target
After=network.target
After=mysql.service

[Service]
# Modify these two values and uncomment them if you have
# repos with lots of files and get an HTTP error 500 because of that
RestartSec=2s
Type=simple
User=gitea
Group=gitea
WorkingDirectory=/var/lib/gitea/
ExecStart=/usr/local/bin/gitea web -c /etc/gitea/app.ini
Restart=always
Environment=USER=gitea HOME=/home/gitea GITEA_WORK_DIR=/var/lib/gitea

[Install]
WantedBy=multi-user.target
Save and close the file, when you are finished. Then, reload systemd and start Gitea service with the following command:
sudo systemctl daemon-reload
sudo systemctl start gitea
You can now check the status of Gitea with the following command:
sudo systemctl status gitea
Output:
? gitea.service - Gitea
   Loaded: loaded (/etc/systemd/system/gitea.service; disabled; vendor preset: enabled)
   Active: active (running) since Sun 2019-01-06 08:04:52 UTC; 3s ago
 Main PID: 6030 (gitea)
    Tasks: 8 (limit: 1114)
   CGroup: /system.slice/gitea.service
           ??6030 /usr/local/bin/gitea web -c /etc/gitea/app.ini

Jan 06 08:04:52 ubuntu1804 gitea[6030]: 2019/01/06 08:04:52 [T] Log path: /var/lib/gitea/log
Jan 06 08:04:52 ubuntu1804 gitea[6030]: 2019/01/06 08:04:52 [I] Gitea v1.5.1 built with: bindata, sqlite
Jan 06 08:04:52 ubuntu1804 gitea[6030]: 2019/01/06 08:04:52 [I] Log Mode: Console(Info)
Jan 06 08:04:52 ubuntu1804 gitea[6030]: 2019/01/06 08:04:52 [I] XORM Log Mode: Console(Info)
Jan 06 08:04:52 ubuntu1804 gitea[6030]: 2019/01/06 08:04:52 [I] Cache Service Enabled
Jan 06 08:04:52 ubuntu1804 gitea[6030]: 2019/01/06 08:04:52 [I] Session Service Enabled
Jan 06 08:04:52 ubuntu1804 gitea[6030]: 2019/01/06 08:04:52 [I] SQLite3 Supported
Jan 06 08:04:52 ubuntu1804 gitea[6030]: 2019/01/06 08:04:52 [I] Run Mode: Development
Jan 06 08:04:53 ubuntu1804 gitea[6030]: 2019/01/06 08:04:53 Serving [::]:3000 with pid 6030
Jan 06 08:04:53 ubuntu1804 gitea[6030]: 2019/01/06 08:04:53 [I] Listen: http://0.0.0.0:3000
Access Gitea Web Interface
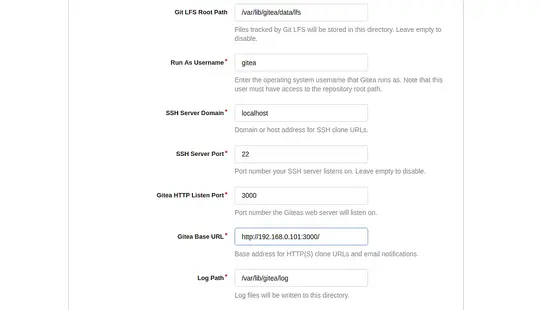
Gitea is now up and listening on port 3000. Now, open your web browser and type the URL http://192.168.0.101:3000/install. You will be redirected to the following page:
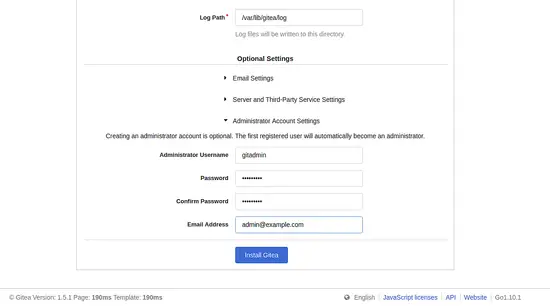
Here, provide all the required information like Gitea database name, username, password, base url, run as username, admin username, password and log path. Then, click on the Install Gitea button. Once the installation has been completed successfully, you will be redirected to the Gitea dashboard shown in the following page:
Congratulations! you have successfully installed Gitea git service on Ubuntu 18.04 server. You can now easily manage your git repository through a web browser.


