How to Install Fast API with MongoDB on Ubuntu 24.04
FastAPI is a web framework based on Python for creating API services. It's a modern, fast, high-performance framework supporting asynchronous operations.
In this tutorial, you'll learn how to install FastAPI with MongoDB on Ubuntu 24.04. You'll also learn how to create your first API with CRUD operations using FastAPI and MongoDB database.
Prerequisites
To begin with this guide, make sure you have the following:
- An Ubuntu 24.04 system
- A non-root user with administrator privileges
Installing MongoDB
Before creating a new FastAPI project, let's install the MongoDB server to our system.
First, run the command below to update your package index and install 'gnupg' and 'curl' to your system.
sudo apt update && sudo apt install gnupg curl -y
Execute the command below to add the GPG key for the MongoDB server.
curl -fsSL https://www.mongodb.org/static/pgp/server-8.0.asc | \
sudo gpg -o /usr/share/keyrings/mongodb-server-8.0.gpg \
--dearmor
Add the MongoDB repository using the command below.
echo "deb [ arch=amd64,arm64 signed-by=/usr/share/keyrings/mongodb-server-8.0.gpg ] https://repo.mongodb.org/apt/ubuntu noble/mongodb-org/8.0 multiverse" | sudo tee /etc/apt/sources.list.d/mongodb-org-8.0.list
After the repository is added, run the following command to refresh your package index and install the MongoDB server. Enter 'Y' to confirm the installation.
sudo apt update && sudo apt install mongodb-org

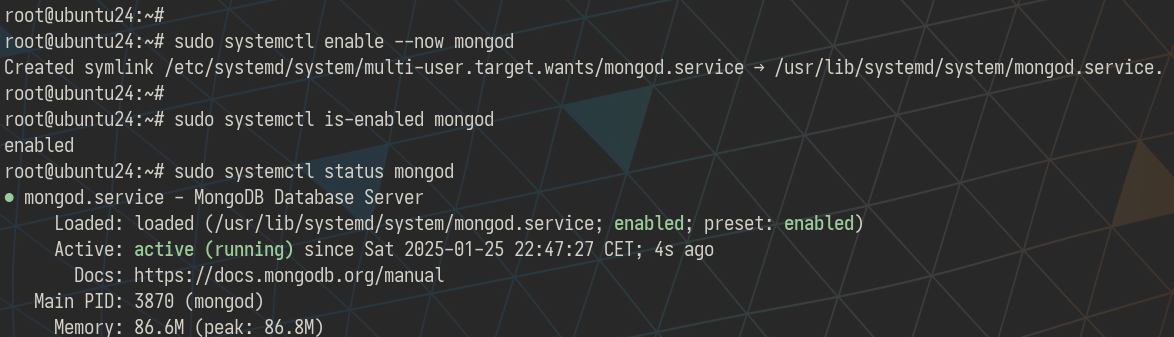
When the installation is finished, start and enable the MongoDB service 'mongod' service, and then check your MongoDB service status to ensure it is running.
sudo systemctl enable --now mongod
sudo systemctl status mongod
You can see below that the MongoDB server is running.
In addition to that, you can log in to the MongoDB server with the 'mongosh' command below. To exit, press Ctrl+d.
mongosh
Setting up Python and Virtual Environment
With MongoDB installed, you'll install Python packages and set up the project directory and virtual environment.
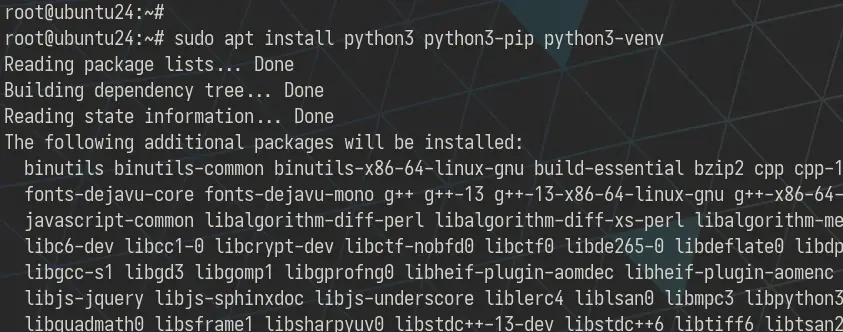
Install Python, Pip, and Venv modules with the following command. Enter 'Y' to confirm the installation.
sudo apt install python3 python3-pip python3-venv
Once installation is finished, log in to your user.
su - username
Now create a new '~/app' directory and move into it. This directory will be used to store your FastAPI project.
mkdir -p ~/app; cd ~/app
Execute the command below to create a new 'venv' virtual environment and activate it. With this, your shell prompt will become like '(venv) user@hostname'.
python3 -m venv .venv
source .venv/bin/activate

From here, your working environment must be on the 'venv' virtual environment. You can log out from 'venv' using the command below.
deactivate
Creating FastAPI Project
Now that you've created and activated your Python virtual environment, let's install FastAPI and create the project structure.
With the 'pip3' command, execute it to install the 'fastapi' and 'uvicorn' packages.
pip3 install fastapi uvicorn
- The 'fastapi' is the main FastAPI web framework for building APIs in Python
- The 'uvicorn' is the implementation of the ASGI (Asynchronous Server Gateway Interface) web server in Python.
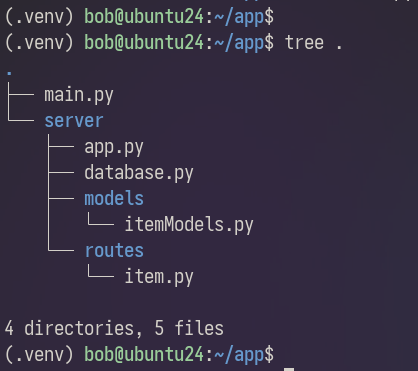
After the installation is finished, create new files and directories with the following command.
mkdir -p server/{models,routes}
touch main.py server/{app.py,database.py} server/models/itemModels.py server/routes/item.py
Below is our FastAPI project structure.
server/app.py
Now that your project is ready, let's modify the 'server/app.py' file, which is the main application of your FastAPI project.
Open the 'app.py' file with your text editor and copy the following script.
from fastapi import FastAPI

app = FastAPI()

@app.get("/")
async def root():
 return {"message": "Hello FastAPI!"}
- Import the FastAPI module to your project and bind it to the 'app' variable
- Create a new 'root' function that returns the 'Hello FastAPI!'
- The 'root' function responded to the GET method on the root URL
- 'async' marks your function as an asynchronous function and might use 'await' within its body when called
main.py
In this section, we'll modify the 'main.py' file that will be used to run your FastAPI project via 'uvicorn' (ASGI web server in Python).
Now open and modify the 'main.py' script and insert the following code.
import uvicorn

if __name__ == "__main__":
 uvicorn.run("server.app:app", host="0.0.0.0", port=8080, reload=True)
- Import the 'uvicorn' module
- When the 'main.py' script is executed, it will load the 'app' or FastAPI module within the 'server/app.py'
- FastAPI will be running on '0.0.0.0' with port '8080'
- Enable the auto-reloading when code is changing via 'reload=True'
Run Your FastAPI project
Now that your project is ready, let's run your first FastAPI project.
Execute the 'main.py' script as follows and your FastAPI will be running on your system.
python3 main.py
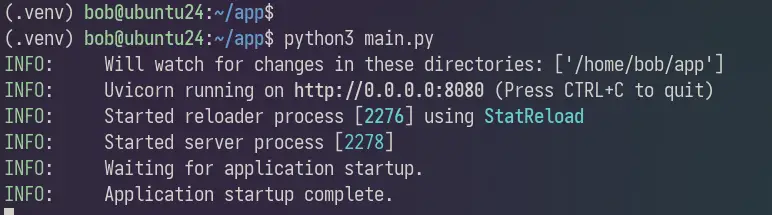
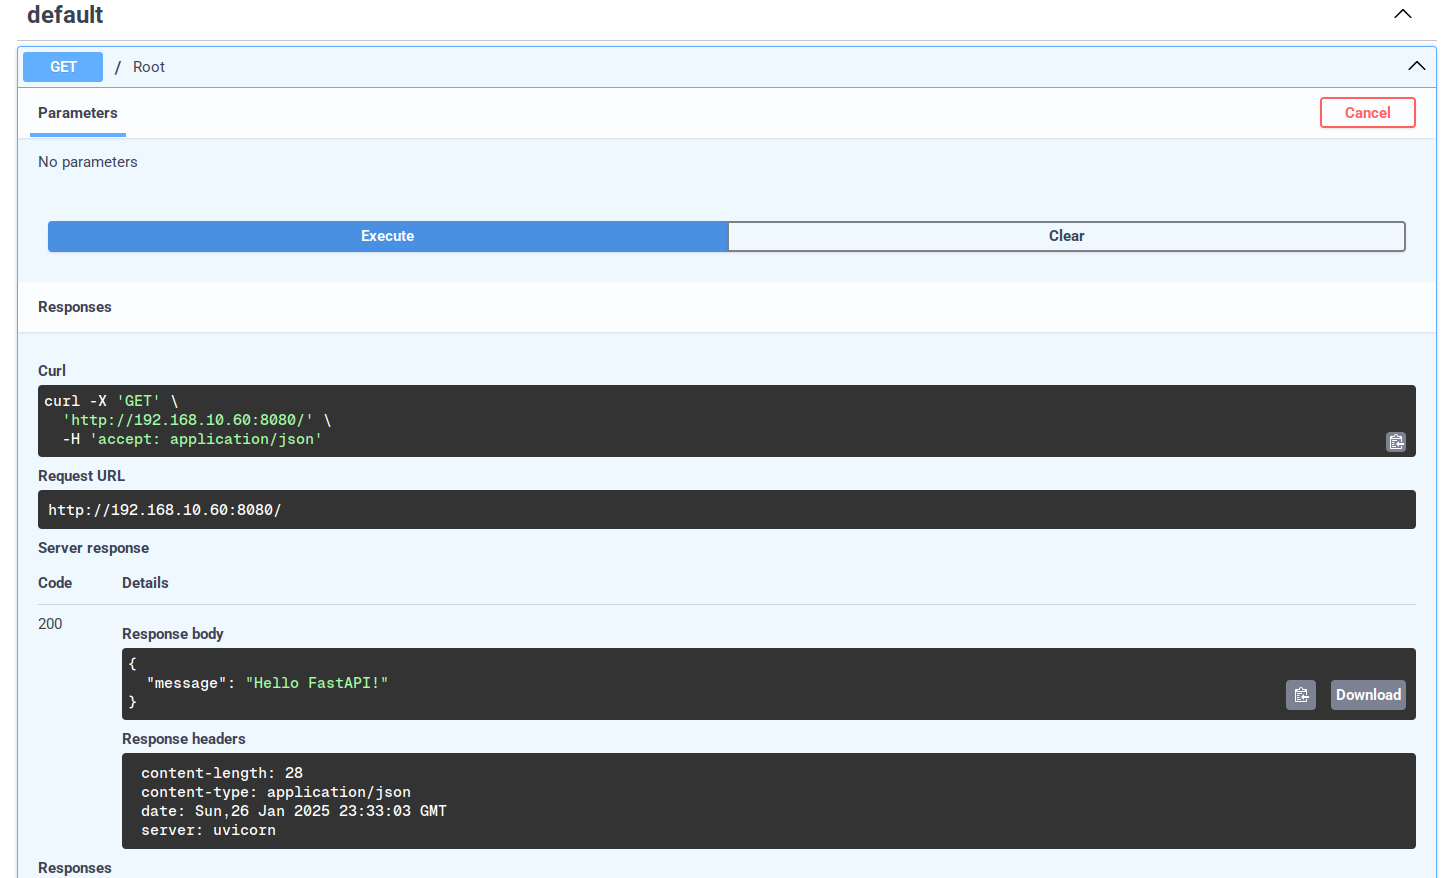
Now open your web browser and visit http://SERVERIP:8080/. If your installation is successful, you'll see the 'Hello FastAPI!' message. You can also access it via 'curl' from the terminal.
Lastly, you can access the API documentation on http://SERVERIP:8080/docs> which is provided by Swagger UI.
Connecting FastAPI to MongoDB
In this guide, you'll create a basic API with FastAPI and MongoDB. Your API should be able to CRUD with the MongoDB database server. As for this step, you'll connect your project to the MongoDB server.
First, run the 'pip3' command below to install the 'motor' MongoDB driver to your project. 'motor' provides non-blocking and coroutine-based API access to the MongoDB server.
pip3 install motor
server/database.py
After the 'motor' module is installed, let's modify the 'server/database.py' script.
Open the 'server/database.py' file with your text editor and input the following script. This will be used to connect to the MongoDB server via the 'motor' module.
from motor.motor_asyncio import AsyncIOMotorClient

MONGODB_HOST = "mongodb://localhost:27017"

connection = AsyncIOMotorClient(MONGODB_HOST)

database = connection.items
item_collection = database.get_collection("item_collection")
- Import the 'AsyncIOMotorClient' from the 'motor.motor_asyncio'
- Create a new constant 'MONGODB_HOST' and point to the MongoDB server 'mongodb://localhost:27017'
- Connect to the MongoDB server via 'connection' variable
- Connect to the database 'items' via the 'database' variable
- Access collections on the database with the 'item_collection' variable
Creating Database Model with pydantic
In this section, you'll design your data via 'pydantic', which provides modeling for our MongoDB database.
Install the 'pydantic' module with the 'pip3' command below. The 'pydantic' module is a data validation library that allows you to create database schema via model.
pip3 install pydantic
Now open the 'server/models/itemModels.py' file with your text editor and copy the following script.
from pydantic import BaseModel, Field
from typing import Optional

class Item(BaseModel):
 name: str
 category: str
 stocks: int
 price: int = Field(gt=0)

 class Config:
 json_schema_extra = {
 "example": {
 "name": "Company Smart Watch",
 "category": "smartwatch",
 "stocks": 10,
 "price": 1000,
 }
 }

class ItemUpdate(BaseModel):
 name: Optional[str] = None
 category: Optional[str] = None
 stocks: Optional[int] = None
 price: Optional[int] = None

 class Config:
 json_schema_extra = {
 "example": {
 "name": "New Smart watch",
 "category": "new-smartwatch",
 "stocks": 5,
 "price": 500,
 }
 }
- Import 'BaseModel' and 'Field' modules from 'pydantic'
- Import the 'Optional' module from 'typing'
- Create the following 'Item' database schema for the FastAPI:
- 'name' and 'category' with type string
- 'stocks' and 'price' with category integer
- 'price' must be greater than 0
- Extend the data model via the 'Config' class by providing an example of data that the user can include in the request
- Create the following 'ItemUpdate' schema with every field as optional.
Adding CRUD Operations
At this point, you've created a connection to the MongoDB server and created database schema via 'pydantic'. Let's move on to create the CRUD operations with FastAPI and MongoDB.
Open the 'server/database.py' script again and create a new function 'item_helper' with type 'dict'. Call this function to get detailed data on an item.
def item_helper(item) -> dict:
 return {
 "id": str(item["_id"]),
 "name": item["name"],
 "category": item["category"],
 "stocks": item["stocks"],
 "price": item["price"],
 }
Add the following line to import the 'ObjectId' module from 'bson.objectid'. The 'ObjectId' is part of the data type in BSON, which MongoDB uses for data storage and representation of JSON data.
from bson.objectid import ObjectId
Create an Item
First, you'll create an asynchronous function that will be able to add new data to the MongoDB database.
Create a new function 'add_item' like the following:
# Add a new item
async def add_item(item_details: dict) -> dict :
 item = await item_collection.insert_one(item_details)
 new_item = await item_collection.find_one({"_id": item.inserted_id})
 return item_helper(new_item)
- The 'add_item' function accepts dictionary data of your item details
- Via the 'item_collection' to access documents in the database and execute the 'insert_one' query to add a new item
- The new item will be printed out upon successful operation
Retrieve All Items
Secondly, you'll create a new function 'get_items' that will be able to retrieve all available items in your database.
Create a new function 'get_items' for retrieving all items from MongoDB.
# retrieve all items
async def get_items():
 items = []
 async for item in item_collection.find():
 items.append(item_helper(item))
 return items
- You'll create an empty list of 'items'
- Using the 'find()' query to search all data and loop through it
- Each item will be added to the 'items' list via the 'append' method
- After the loop is complete, your items will be shown
Retrieve Specific Item based on id
Next, you'll create a new function that will be able to retrieve data for specific selector 'id'. This will show you details data on specific items.
Create a new function 'get_item' function to retrieve data of specific items. The 'get_item' function will accept a string of 'id' as a selector and return a dictionary.
# retrieve specific item
async def get_item(id: str) -> dict:
 item = await item_collection.find_one({"_id": ObjectId(id)})
 if item:
 return item_helper(item)
 return "Item Not Found."
- The 'find_one()' query will be used to retrieve data based on the 'id'
- If an item is found, the details will be shown using the 'item_helper' dictionary format
- If the item is not available, the response is 'Item Not Found'
Update an item
Now you'll create a new function for updating an item. You can also partially update your item via API.
Define the new function 'change_item' like the following codes:
# update item
async def change_item(id: str, data: dict):
 if len(data) < 1:
 return "Please input your data"
 find_item = await item_collection.find_one({"_id": ObjectId(id)})
 if find_item:
 item_update = await item_collection.update_one({"_id": ObjectId(id)}, {"$set": data})
 if item_update:
 return True
 return False
- The 'change_item' function takes two arguments, the 'id' of the target item and 'data' as the new data
- If data is empty or '< 1', operation terminated
- This function will find an item based on the 'id' selector
- If the 'id' is found, the 'item_update' will be executed
- If the 'item_update' success, return 'True', or return 'False' if not
Delete an item
Lastly, you'll create the 'delete_item' function for deleting items via a specific selector.
To delete an item, we'll create the 'delete_item' function and use the 'id' selector like the following:
# delete an item
async def delete_item(id: str):
 item = await item_collection.find_one({"_id": ObjectId(id)})
 if item:
 await item_collection.delete_one({"_id": ObjectId(id)})
 return(f'Item {id} deleted.')
 return "Item Not Found."
- The 'find_one()' query will search for an item based on the provided 'id'
- If item found, it will be deleted via 'delete_one()' query and return the 'Item id deleted'
- If the item is not available, the 'Item Not Found' will be shown
Adding Routes for CRUD Operations
At this point, we've created asynchronous functions for CRUD operation with FastAPI. Now let's create the route or endpoint for each operation.
Edit the 'server/routes/item.py' file using your preferred editor.
server/routes/item.py
First, add the 'APIRouter' and 'Body' modules from the 'fastapi'. Then, add the 'jsonable_encode' from the 'fastapi.encoders'.
from fastapi import APIRouter, Body
from fastapi.encoders import jsonable_encoder
Import each function from the 'database.py' file.
from server.database import (
 add_item,
 get_items,
 get_item,
 change_item,
 delete_item,
)
Import the 'Item' and 'ItemUpdate' models from the 'itemModels.py' file.
from server.models.itemModels import (
 Item,
 ItemUpdate,
)
Call the 'APIRouter' class via the 'router' variable.
router = APIRouter()
Route for Adding New Item
Now let's add a route for adding new items. In this example, you can add a new item via POST to the '/item' URL.
Add the following lines to set up routes for adding new items. Every POST to the root URL of the item will be treated as insert new data.
# add new item operation
@router.post("/")
async def add_item_data(item: Item = Body(...)):
 item = jsonable_encoder(item)
 new_item = await add_item(item)
 return new_item
- The 'add_item_data' function accepts the 'Item' schema, which will be part of the 'Body' on your request
- Your item will be converted to dictionary format via 'jsonable_encoder'
- Insert your dictionary data via the 'add_item' function (see database.py) on top of the 'new_item' variable
- Return your inserted data 'new_item' as a response
Route to Get All Items
Add the following script to set up a route for retrieving data. Every GET request to the root item URL will retrieve all of your data.
# get all available items
@router.get("/")
async def get_item_data():
 items = await get_items()
 if items:
 return items
 return "No available item."
- Create the 'get_item_data' function that will execute the 'get_item' function from 'database.py' file
- If items are available, you'll get the list of all your items
- If no item, you'll get the 'No available item' response
Route to Get Specific Item
To get details of a specific item, we'll be using the 'id' as a selector. Every GET request to the '/id' will return a detailed item of the requested 'id'.
# Show details of the item via the id
@router.get("/{id}")
async def get_item_details(id):
 item_details = await get_item(id)
 if item_details:
 return item_details
 return "Item not found."
- The 'get_item_details' function will be created and pass the 'id' from the URL
- The 'get_item' function (see database.py) will be called and also pass the 'id' as an argument
- If the item is found, the details of the item will be shown
- If no item with that specific 'id', you'll get 'Item not found'
Route for Updating an Item
Copy the following code to set the route for the updated item:
# Update Item
@router.put("/{id}")
async def update_item(id: str, data: ItemUpdate = Body(...)):
 data = {k: v for k, v in data.dict().items() if v is not None}
 updated_item = await change_item(id, data)
 if updated_item:
 return{f'Success: item {id} updated.'}
 return "Error"
- The 'update_item' function will take two arguments, 'id' as the selector and the 'data', which is based on the 'ItemUpdate' model
- Data will be checked in the 'data' variable
- The 'updated_item' will execute the 'change_item' function from the 'database.py' file
- If the update success, you'll see the output 'Success'
Route for Deleting an Item
Insert the following lines to create the 'remove_item' function for deleting items. Every DELETE operation to a specific '/id', will remove the item matched with the 'id'.
# delete item via id
@router.delete("/{id}")
async def remove_item(id):
 item_to_delete = await delete_item(id)
 if item_to_delete:
 return item_to_delete
 return{f'Item {id} Not Available.'}
- The 'remove_item' function will execute 'delete_item' and pass the 'id' selector
- The delete operation will be stored and executed via 'item_to_delete' variable
- When an item is not available, you'll get the return 'Item id Not Available'
server/app.py
Now that you've finished the 'server/routes/item.py' file, let's include it in the 'server/app.py'.
Open the 'app.py' file using your text editor.
Import the 'router' from the 'server/routes/item.py' file as an 'ItemRouter'.
from server.routes.item import router as ItemRouter
Insert the 'ItemRouter' with the default prefix '/item'. The CRUD operations will be handled via the '/item' URL.
app.include_router(ItemRouter, tags=["Item"], prefix="/item")
Now your CRUD endpoint will be available at the following:
- Add new item: POST to '/item'
- Retrieve all items: GET to '/item'
- Retrieve specific item: GET to '/item/id'. The 'id' is generated by MongoDB
- Update item: PUT to '/item/id'
- Delete item: DELETE to '/item/id'
Test CRUD Operations
First, make sure that your FastAPI project is running, or you can execute the 'main.py' script like the following:
python3 main.py
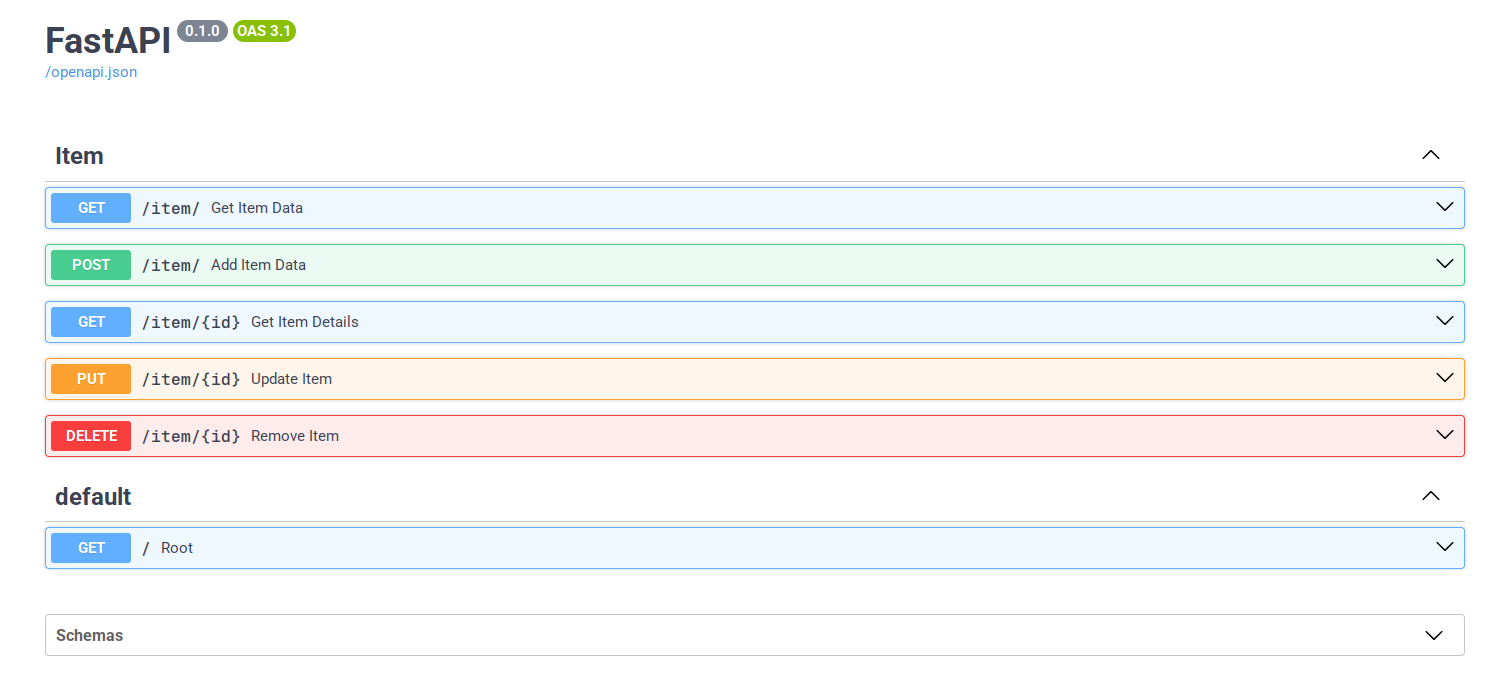
Navigate through the http://SERVERIP:8080/docs and you'll see each route that you've created.
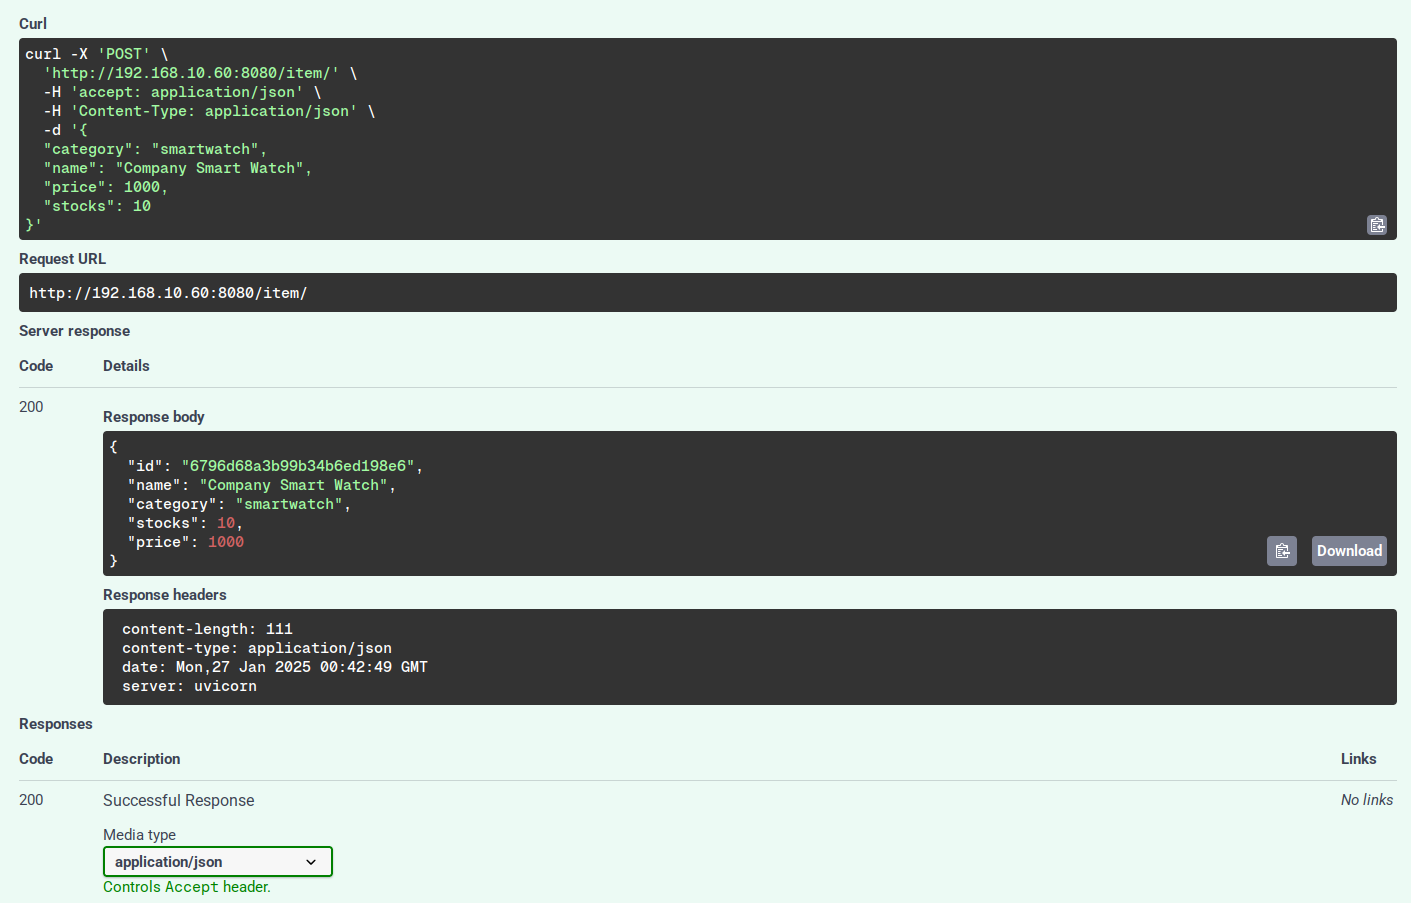
Below is an example of adding a new item.
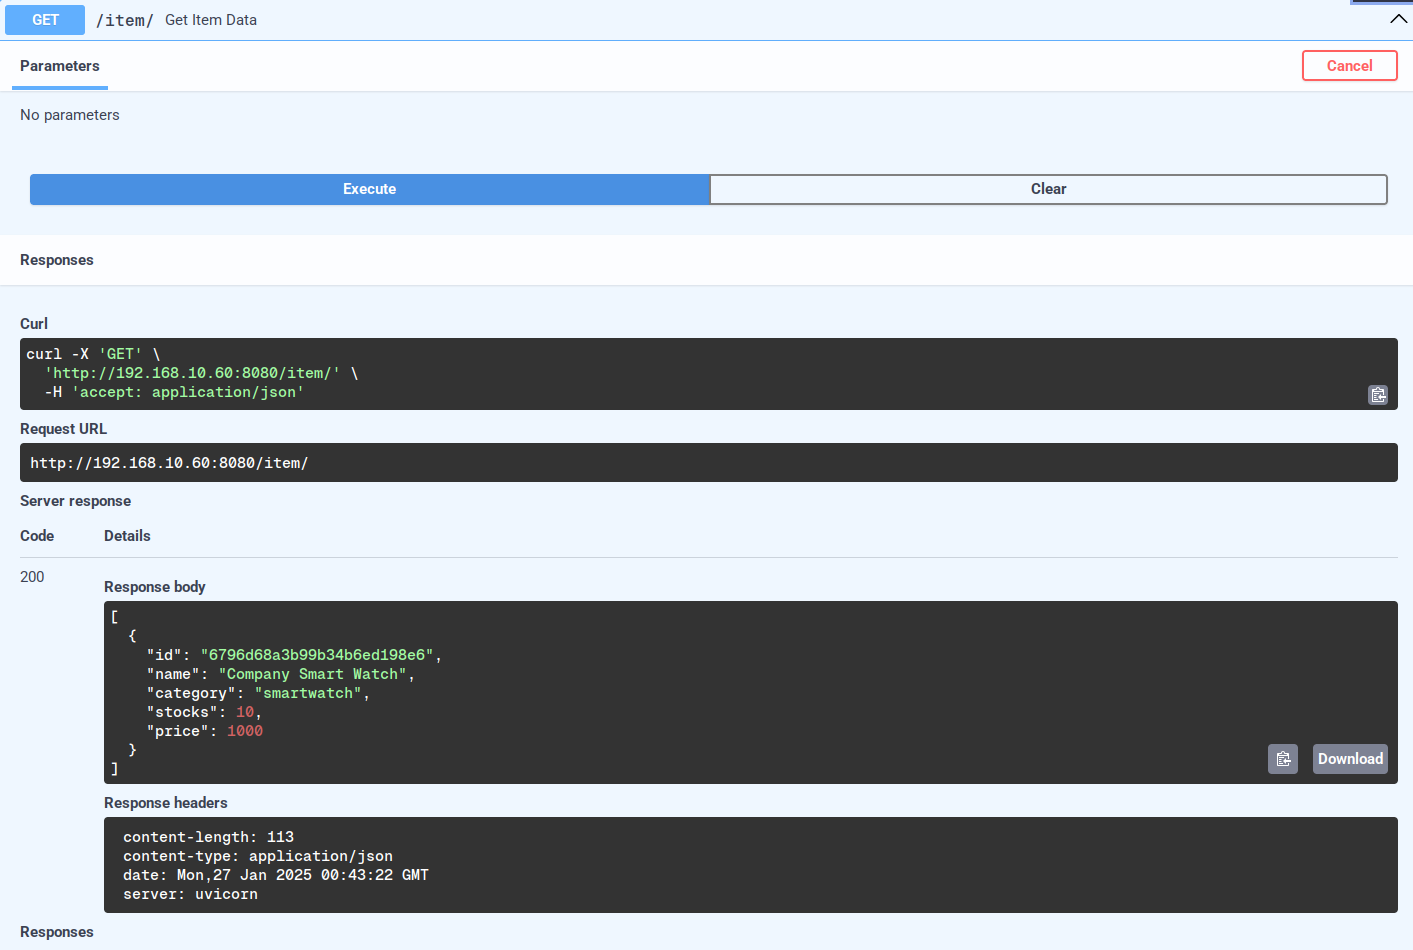
Retrieve all available items via API.
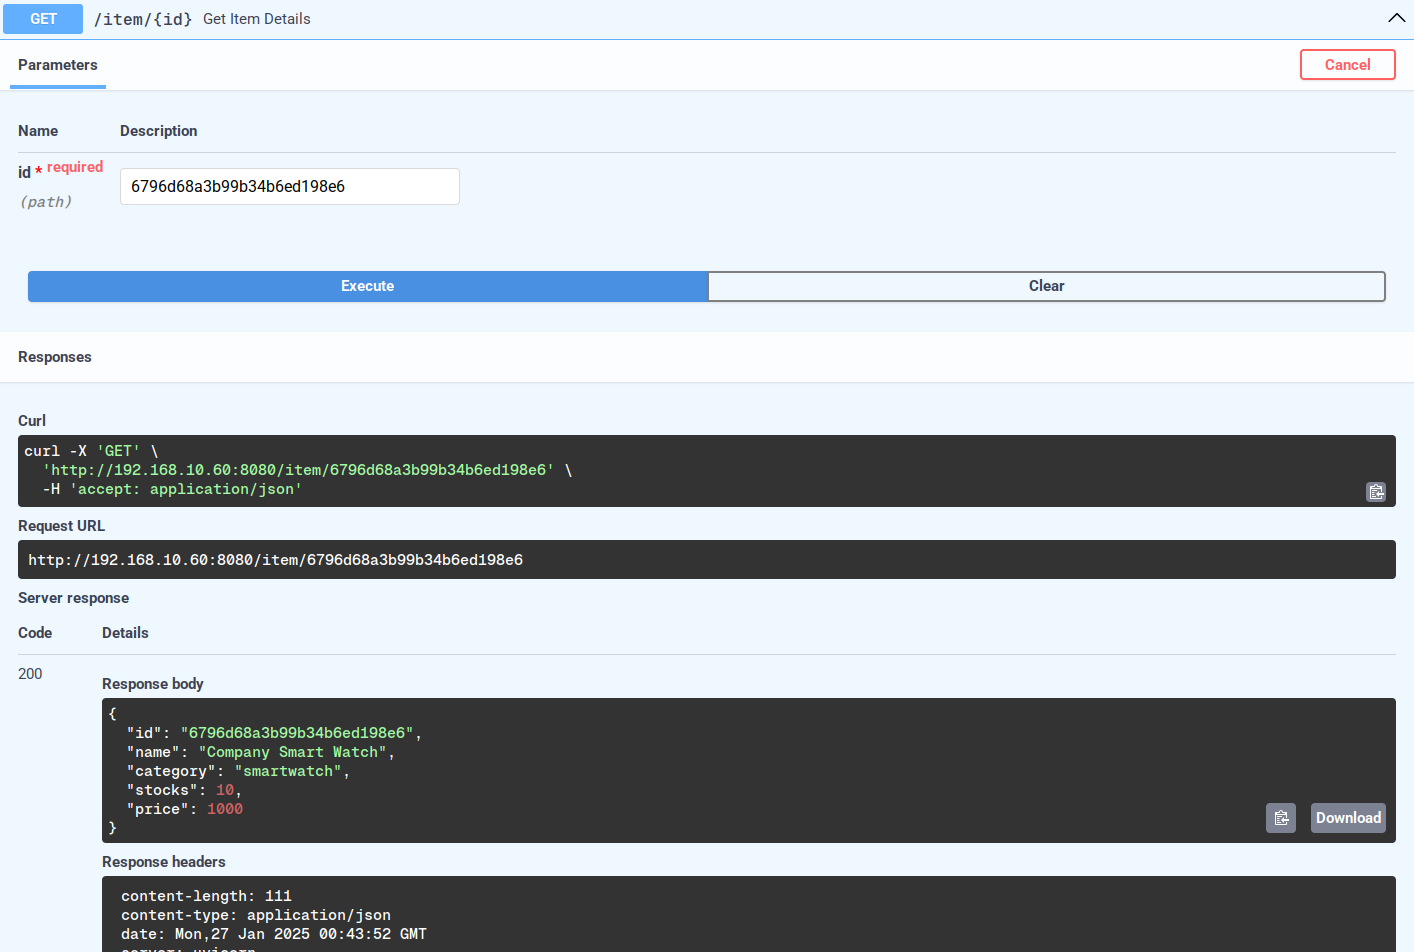
Retrieve specific items via the 'id' selector.
Update partial data from specific items.
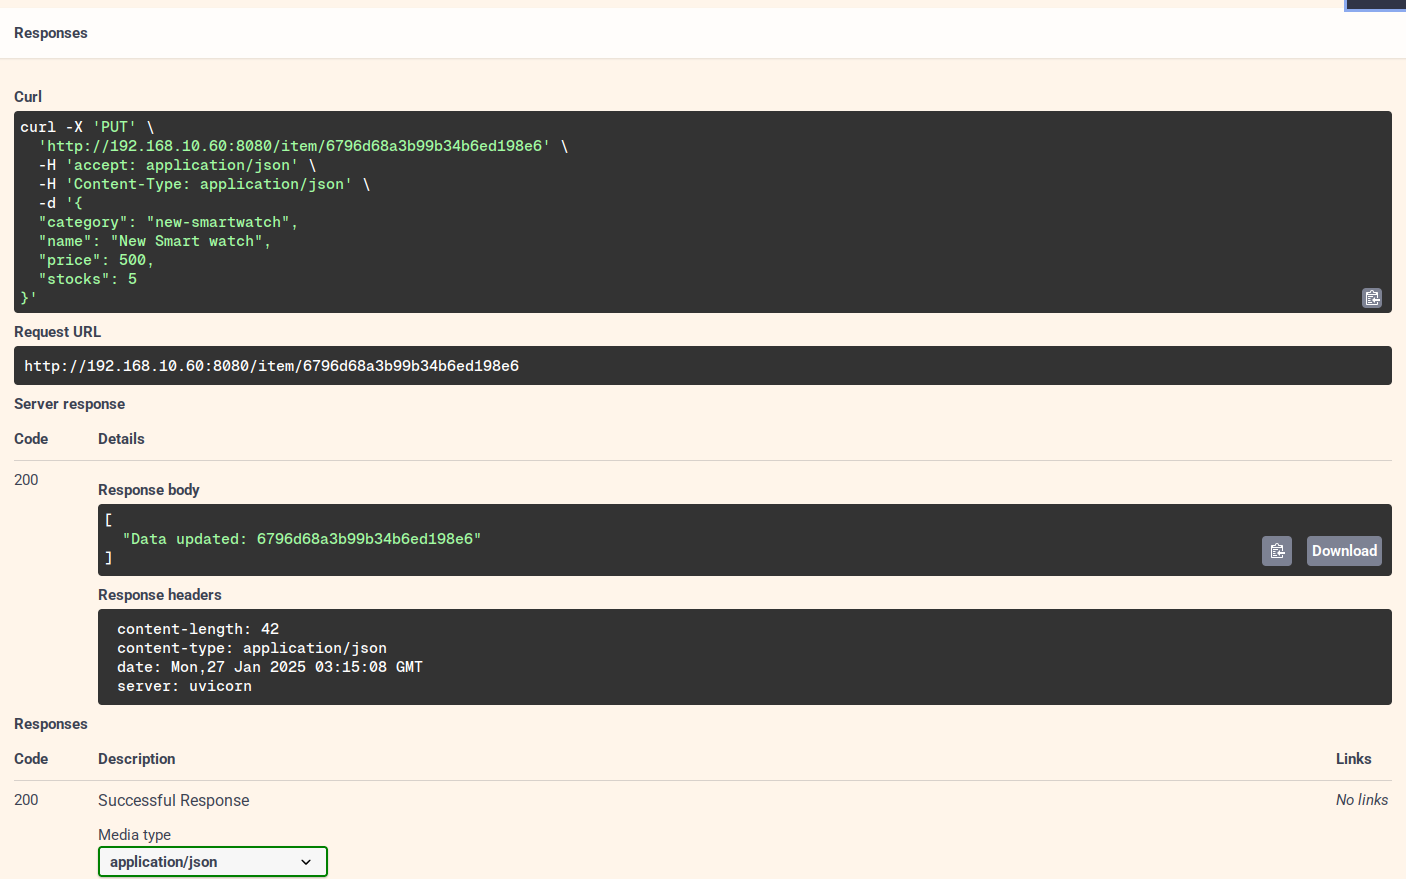
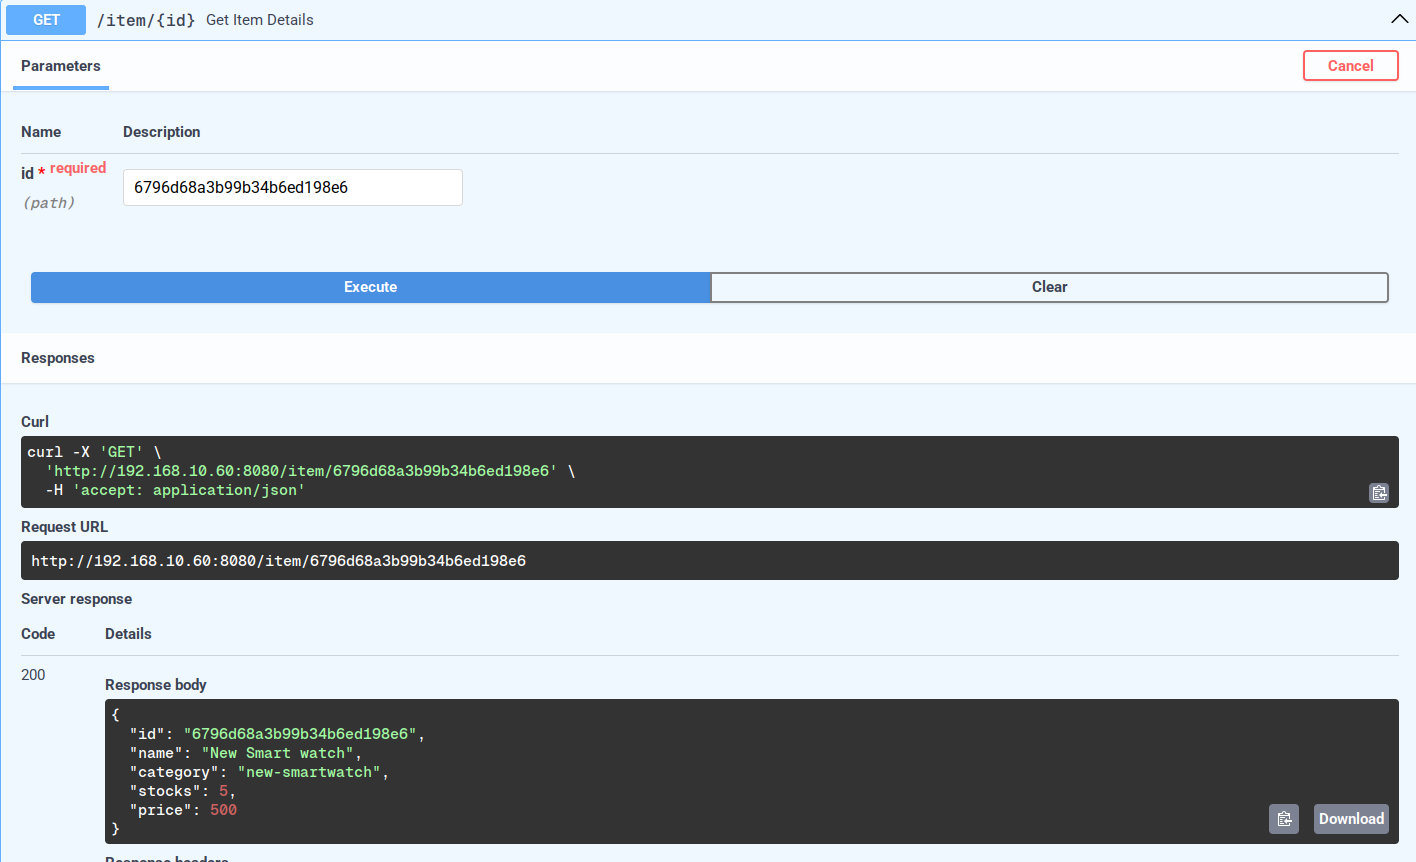
Below is the updated data.
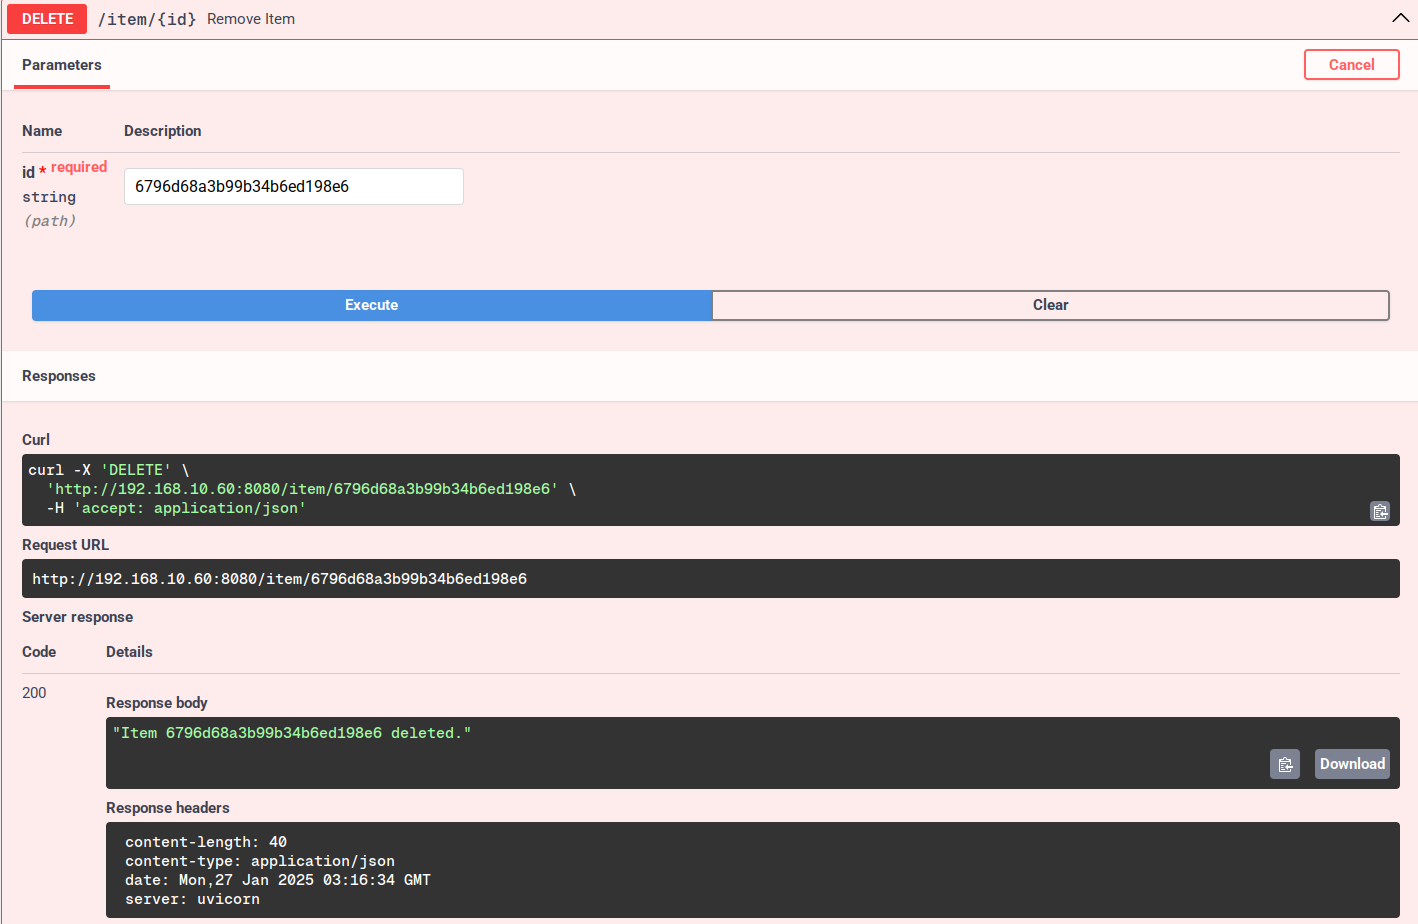
Below is the delete operation via the 'id' selector.
Conclusion
Congratulations! You've completed the installation of FastAPI with MongoDB on Ubuntu 24.04. You've also learned how to connect FastAPI to MongoDB using the 'motor' module, create data models via 'pydantic', create CRUD operations with FastAPI, and learn how to create endpoints for your API.

