How To Install Discourse Forum on Ubuntu 18.04 LTS
This tutorial exists for these OS versions
- Ubuntu 20.04 (Focal Fossa)
- Ubuntu 18.04 (Bionic Beaver)
On this page
Discourse is a free and open source discussion forum application that can be used as a mailing list and chat room. It is a very powerful and flexible platform that allows users to login with Single Sign-On. It can be integrated with WordPress, Google Analytics, Zendesk, Patreon, Slack and many more. It supports email notifications, email replies and various authentication methods such as social networks, and single sign-on. It is simple, easy to use, flat and comes with a built-in mobile layout.
In this tutorial, we will learn how to install and configure Discourse forum on Ubuntu 18.04 server.
Requirements
- A server running Ubuntu 18.04.
- A static IP address 192.168.0.101 is setup on your server.
- A root password is setup to your server.
Getting Started
First, you will need to update your server with the latest version. You can do it with the following command:
apt-get update -y
apt-get upgrade -y
Once your server is updated, restart your system to apply all the changes
Next, you will need to setup FQDN on your server. You can do it with the following command:
hostnamectl set-hostname test.example.com
Next, open /etc/hosts file and add the following line:
nano /etc/hosts
Add the following line:
192.168.0.101 test.example.com test
Save and close the file, when you are finished. Then, run the following command to apply all the changes:
hostname -f
Next, you will need to install some required packages to your system. You can install them with the following command:
apt-get install nginx curl git wget unzip nano -y
Once you have done, you can proceed to the next step.
Install and Configure PostgreSQL
First, you will need to install PostgreSQL to your system. You can install it by running the following command:
apt-get install postgresql -y
After installing PostgreSQL installed, log into PostgreSQL console with the following command:
sudo -u postgres psql
Next, create a database and user for Discourse with the following command:
postgres=#CREATE DATABASE discoursedb;
postgres=#CREATE USER discourseuser;
postgres=#ALTER USER discourseuser WITH ENCRYPTED PASSWORD 'password';
postgres=#ALTER DATABASE discoursedb OWNER TO discourseuser;
Next, connect to discoursedb and create hstore and pg_trgm extension with the following command:
postgres=#\c discoursedb;
postgres=#CREATE EXTENSION hstore;
postgres=#CREATE EXTENSION pg_trgm;
Finally, exit from the PostgreSQL with the following command:
postgres=#\q
Install Ruby
Next, you will need to install latest version of Ruby to your system. You can install Ruby using RVM.
First, install GNU privacy guard with the following command:
apt-get install gnupg2 -y
Next, import the public of Ruby version manager with the following command:
gpg2 --recv-keys 409B6B1796C275462A1703113804BB82D39DC0E3 7D2BAF1CF37B13E2069D6956105BD0E739499BDB
You should see the following output:
gpg: keybox '/root/.gnupg/pubring.kbx' created
gpg: key 105BD0E739499BDB: 6 signatures not checked due to missing keys
gpg: /root/.gnupg/trustdb.gpg: trustdb created
gpg: key 105BD0E739499BDB: public key "Piotr Kuczynski <[email protected]>" imported
gpg: key 3804BB82D39DC0E3: 103 signatures not checked due to missing keys
gpg: key 3804BB82D39DC0E3: public key "Michal Papis (RVM signing) <[email protected]>" imported
gpg: no ultimately trusted keys found
gpg: Total number processed: 2
gpg:               imported: 2
Next, install RVM with default Ruby and Rails with the following command:
curl -sSL https://get.rvm.io | bash -s stable --rails
After installing Ruby and Rails, you will need to source RVM scripts. You can do it with the following command:
source /usr/local/rvm/scripts/rvm
You can now see the Ruby versions with the following command:
rvm list
You should see the following output:
=* ruby-2.6.3 [ x86_64 ]

# => - current
# =* - current && default
#  * - default
Install and Configure Discourse
First, you will need to download the latest version of Discourse from the Git repository. You can download it with the following command:
cd /var/www/
git clone https://github.com/discourse/discourse.git
Output:
Cloning into 'discourse'...
remote: Enumerating objects: 57, done.
remote: Counting objects: 100% (57/57), done.
remote: Compressing objects: 100% (37/37), done.
remote: Total 403387 (delta 26), reused 34 (delta 20), pack-reused 403330
Receiving objects: 100% (403387/403387), 267.39 MiB | 235.00 KiB/s, done.
Resolving deltas: 100% (252384/252384), done.
Checking out files: 100% (27055/27055), done.
Next, check out the latest stable release of Discourse with the following command:
cd discourse
git checkout v2.2.4
Next, install Ruby dependency manager with the following command:
/usr/local/rvm/src/ruby-2.6.3/bin/gem install bundler -v '1.17.3'
You should see the following output:
Fetching bundler-1.17.3.gem
Successfully installed bundler-1.17.3
Parsing documentation for bundler-1.17.3
Installing ri documentation for bundler-1.17.3
Done installing documentation for bundler after 15 seconds
1 gem installed
Next, you will need to install some extra packages to compile source code. You can install all of them with the following command:
apt-get install gcc ruby-dev libxslt-dev libxml2-dev zlib1g-dev libpq-dev imagemagick redis-server optipng pngquant jhead jpegoptim gifsicle -y
Next, install all the dependencies required by Discourse with the following command:
RAILS_ENV=production bundle install --path vendor/bundle/
Next, rename Discourse default configuration file with the following command:
mv config/discourse_defaults.conf config/discourse.conf
Next, open discourse.conf file and define your database settings:
nano config/discourse.conf
Change the following lines:
db_host = localhost
db_port = 5432
db_name = discoursedb
db_username = discourseuser
db_password = password
hostname = "test.example.com"
Save and close the file. Then, edit the production environment config file with the following command:
nano /var/www/discourse/config/environments/production.rb
Add the following line as the third line
require 'uglifier'
Then, find the following line:
config.assets.js_compressor = :uglifier
And replace it with the following:
config.assets.js_compressor = Uglifier.new(harmony: true)
Save and close the file, when you are finished. Then, prepare Discourse for production with the following command:
RAILS_ENV=production bundle exec rake db:migrate
RAILS_ENV=production bundle exec rake assets:precompile
Next, open puma.rb file with the following command:
nano /var/www/discourse/config/puma.rb
Find the following line:
APP_ROOT = '/home/discourse/discourse'
Replace it with the following line:
APP_ROOT = '/var/www/discourse'
Save and close the file, when you are finished. Then, create the sockets and process ID directory with the following command:
mkdir /var/www/discourse/tmp/sockets/
mkdir /var/www/discourse/tmp/pids/
Finally, start the Discourse by running the following command:
RAILS_ENV=production bundle exec puma -C /var/www/discourse/config/puma.rb
You should see the following output:
[29834] Puma starting in cluster mode...
[29834] * Version 3.11.4 (ruby 2.6.3-p62), codename: Love Song
[29834] * Min threads: 8, max threads: 32
[29834] * Environment: development
[29834] * Process workers: 4
[29834] * Preloading application

[29834] * Listening on unix:///var/www/discourse/tmp/sockets/puma.sock
[29834] ! WARNING: Detected 3 Thread(s) started in app boot:
[29834] ! #<Thread:0x000055b1a3e871a0@/var/www/discourse/vendor/bundle/ruby/2.6.0/gems/message_bus-2.2.0.pre.1/lib/message_bus.rb:667 sleep> - /var/www/html/discourse/vendor/bundle/ruby/2.6.0/gems/hiredis-0.6.1/lib/hiredis/ext/connection.rb:19:in `read'
[29834] ! #<Thread:0x000055b1a3e86840@/var/www/discourse/vendor/bundle/ruby/2.6.0/gems/message_bus-2.2.0.pre.1/lib/message_bus/timer_thread.rb:38 sleep> - /var/www/html/discourse/vendor/bundle/ruby/2.6.0/gems/message_bus-2.2.0.pre.1/lib/message_bus/timer_thread.rb:123:in `sleep'
[29834] ! #<Thread:0x000055b1a234dfb0@/var/www/discourse/lib/discourse.rb:584 sleep> - /var/www/discourse/lib/discourse.rb:587:in `sleep'
[29834] * Daemonizing...
Next, create an admin account to access Discourse web interface with the following command:
cd /var/www/discourse
RAILS_ENV=production bundle exec rake admin:create
Provide your email and password as shown below:
Email:  [email protected]
Password:
Repeat password:

Ensuring account is active!

Account created successfully with username example
Do you want to grant Admin privileges to this account? (Y/n)  Y

Your account now has Admin privileges!
Next, restart the Discourse service with the following command:
RAILS_ENV=production bundle exec pumactl -P /var/www/discourse/tmp/pids/puma.pid restart
Configure Nginx for Discourse
Next, you will need to configure Nginx as a reverse proxy to access Discourse web interface on port 80.
First, copy the sample Nginx virtual host configuration file with the following command:
cp /var/www/discourse/config/nginx.sample.conf /etc/nginx/conf.d/discourse.conf
Next, open the discourse.conf file with the following command:
nano /etc/nginx/conf.d/discourse.conf
Make the following changes:
#upstream discourse {
#    server unix:/var/www/discourse/tmp/sockets/thin.0.sock;
#    server unix:/var/www/discourse/tmp/sockets/thin.1.sock;
#    server unix:/var/www/discourse/tmp/sockets/thin.2.sock;
#    server unix:/var/www/discourse/tmp/sockets/thin.3.sock;
#}

upstream discourse {
       server unix:/var/www/discourse/tmp/sockets/puma.sock;
 }
server_name test.example.com;
Save and close the file, when you are finished. Then, create the cache directory with the following command:
mkdir -p /var/nginx/cache/
Next, check the Nginx for any syntax error with the following command:
nginx -t
Output:
nginx: the configuration file /etc/nginx/nginx.conf syntax is ok
nginx: configuration file /etc/nginx/nginx.conf test is successful
Next, restart Nginx to apply all the changes:
systemctl restart nginx
You can also check the status of Nginx with the following command:
systemctl status nginx
Output:
? nginx.service - A high performance web server and a reverse proxy server
   Loaded: loaded (/lib/systemd/system/nginx.service; enabled; vendor preset: enabled)
   Active: active (running) since Sun 2019-05-26 04:19:12 UTC; 29min ago
     Docs: man:nginx(8)
  Process: 1052 ExecStart=/usr/sbin/nginx -g daemon on; master_process on; (code=exited, status=0/SUCCESS)
  Process: 848 ExecStartPre=/usr/sbin/nginx -t -q -g daemon on; master_process on; (code=exited, status=0/SUCCESS)
 Main PID: 1065 (nginx)
    Tasks: 3 (limit: 1114)
   CGroup: /system.slice/nginx.service
           ??1065 nginx: master process /usr/sbin/nginx -g daemon on; master_process on;
           ??1066 nginx: worker process
           ??1067 nginx: cache manager process

May 26 04:19:04 ubuntu1804 systemd[1]: Starting A high performance web server and a reverse proxy server...
May 26 04:19:12 ubuntu1804 systemd[1]: nginx.service: Failed to parse PID from file /run/nginx.pid: Invalid argument
May 26 04:19:12 ubuntu1804 systemd[1]: Started A high performance web server and a reverse proxy server.
You also need to copy the following JS file if you get any error to access Discourse web inetrface:
cp /var/www/discourse/public/assets/_vendor-3eae3eec8fba033cb1b5af6c103a5b8781caa69cf97fe7773ba89ba68980b263.js /var/www/discourse/public/assets/vendor-3eae3eec8fba033cb1b5af6c103a5b8781caa69cf97fe7773ba89ba68980b263.js
Access Discourse Web Interface
Discourse is now installed and configured, it's time to access Discourse web interface.
Open your web browser and type the URL http://test.example.com. You will be redirected to the following page:
Now, click on the Log In button. You should see the following page:
Now, provide your username and password. Then, click on the Log In button. You should see the following page:
You can now start the Setup wizard using the URL http://test.example.com/wizard on your web browser. You should see the Welcome screen in the following page:
Now, select your language and click on the Next button. You should see the following page:
Here, type your topic and click on the Next button. You should see the following page:
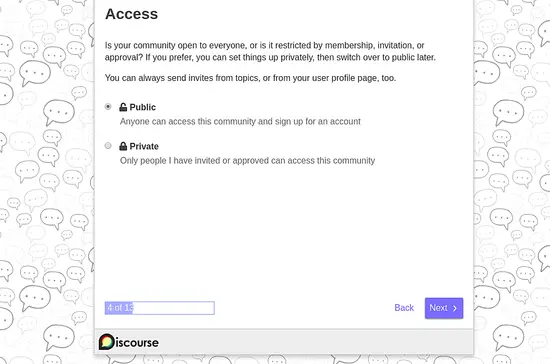
Here, select Public and click on the Next button. You should see the following page:
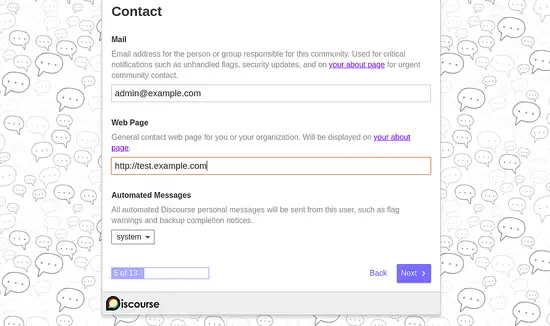
Here, provide your email and contact page. Then, click on the Next button. You should see the following page:
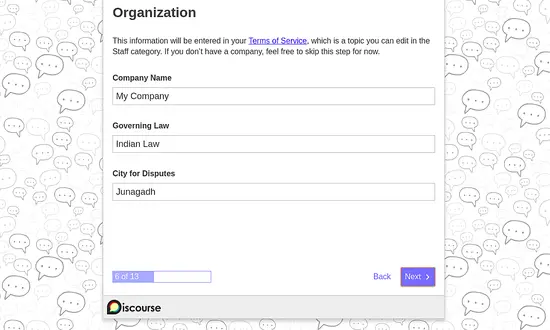
Here, provide your company name and address. Then, click on the Next button. You should see the following page:
Now, select your theme and click on the Next button. You should see the following page:
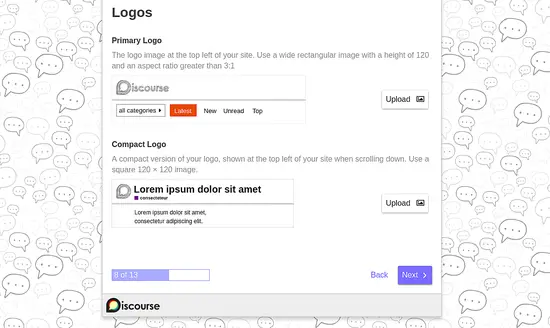
Now, upload your logo and click on the Next button. You should see the following page:
Now, select Icons and click on the Next button. You should see the following page:
Now, select your home page and click on the Next button. You should see the following page:
Now, select Emoji as you wish and click on the Next button. You should see the following page:
Now, invite your staff to join this forum and click on the Next button. Once the installation has been completed, You should see the following page:
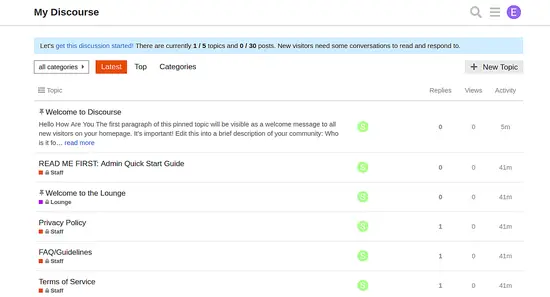
Now, click on the Done button. You will be redirected to the Discourse dashboard shown in the following page:
Congratulations! you have successfully installed and configured Discourse forum on Ubuntu 18.04 server.


