How to Install CryptPad Collaborative Office Suite on Ubuntu 22.04
On this page
- Prerequisites
- Step 1 - Configure Firewall
- Step 2 - Install Git
- Step 3 - Install Nodejs
- Step 4 - Install Bower
- Step 5 - Install Cryptpad
- Step 6 - Configure Cryptpad
- Step 7 - Install Nginx
- Step 8 - Install SSL
- Step 9 - Configure Nginx
- Step 10 - Create a Cryptpad Systemd Service
- Step 11 - Access and Configure Cryptpad
- Step 12 - Update Cryptpad
- Conclusion
Cryptpad is an open-source collaborative office suite that is an alternative to Office 365. It allows you to access office applications via the web browser. The difference between Cryptpad and Office 365 is that Cryptpad is end-to-end encrypted, which means you can create and share documents with others without the risk of leaking personal information. Applications offered with Cryptpad include Rich Text, Spreadsheets, Code/Markdown, Kanban, Slides, Whiteboards, and Forms.
In this tutorial, you will learn how to install the Cryptpad suite on a Ubuntu 22.04 server.
Prerequisites
-
A server running Ubuntu 22.04 with a minimum of 2GB of RAM and 2 CPU cores.
-
A non-root user with sudo privileges.
-
Two fully qualified domain names (FQDN) like
example.comanddocs.example.com. -
Make sure everything is updated.
$ sudo apt update
$ sudo apt upgrade
-
Few packages that your system needs.
$ sudo apt install wget curl nano software-properties-common dirmngr apt-transport-https gnupg2 ca-certificates lsb-release ubuntu-keyring unzip -y
Some of these packages may already be installed on your system.
Step 1 - Configure Firewall
The first step is to configure the firewall. Ubuntu comes with ufw (Uncomplicated Firewall) by default.
Check if the firewall is running.
$ sudo ufw status
You should get the following output.
Status: inactive
Allow SSH port so the firewall doesn't break the current connection on enabling it.
$ sudo ufw allow OpenSSH
Allow HTTP and HTTPS ports as well.
$ sudo ufw allow http
$ sudo ufw allow https
Enable the Firewall
$ sudo ufw enable
Command may disrupt existing ssh connections. Proceed with operation (y|n)? y
Firewall is active and enabled on system startup
Check the status of the firewall again.
$ sudo ufw status
You should see a similar output.
Status: active

To                         Action      From
--                         ------      ----
OpenSSH                    ALLOW       Anywhere
80/tcp                     ALLOW       Anywhere
443                        ALLOW       Anywhere
OpenSSH (v6)               ALLOW       Anywhere (v6)
80/tcp (v6)                ALLOW       Anywhere (v6)
443 (v6)                   ALLOW       Anywhere (v6)
Step 2 - Install Git
Git comes usually pre-installed with Ubuntu 22.04 but in case it is not installed, run the following command to install it.
$ sudo apt install git -y
Check Git's version.
$ git --version
git version 2.34.1
Run the following commands to configure Git to add your name and email address to it.
git config --global user.name "Your Name"
git config --global user.email "[email protected]"
Step 3 - Install Nodejs
We will use Node Version Manager (NVM) to install Nodejs. Install the NVM script using the following command.
$ curl -o- https://raw.githubusercontent.com/nvm-sh/nvm/v0.39.3/install.sh | bash
You can get the latest version of NVM from its GitHub repository.
To use it, you need to source your .bashrc file.
$ source ~/.bashrc
Check the list of available Node versions.
$ nvm list-remote
You will get a similar output.
.....
        v18.9.0
        v18.9.1
       v18.10.0
       v18.11.0
       v18.12.0   (LTS: Hydrogen)
       v18.12.1   (LTS: Hydrogen)
       v18.13.0   (LTS: Hydrogen)
       v18.14.0   (LTS: Hydrogen)
->     v18.14.1   (Latest LTS: Hydrogen)
        v19.0.0
        v19.0.1
        v19.1.0
        v19.2.0
        v19.3.0
        v19.4.0
        v19.5.0
        v19.6.0
        v19.6.1
Install the latest LTS version (v18.x or) of Node at the time of writing this tutorial.
$ nvm install lts/hydrogen
Verify the installation.
$ node -v
v18.14.1
Step 4 - Install Bower
Bower is a package manager for frontend components used by Cryptpad. Install it using the following command.
$ npm install -g bower
Step 5 - Install Cryptpad
Clone the Cryptpad GitHub repository.
$ git clone https://github.com/xwiki-labs/cryptpad.git cryptpad
Switch to the directory.
$ cd cryptpad
Switch the repository to the latest version.
$ git checkout $(git tag -l | grep -v 'v1.*$' | sort -V | tail -n 1)
Install Cryptpad using the following commands.
$ npm install
$ bower install
Build Cryptpad static pages and enable social media link previews using the following command.
$ npm run build
Step 6 - Configure Cryptpad
Create the configuration file using the provided example file.
$ cp /home/$USER/cryptpad/config/config.example.js /home/$USER/cryptpad/config/config.js
Open the config file for editing.
$ nano ~/cryptpad/config/config.js
Find the line httpUnsafeOrigin: 'http://localhost:3000', and change its value to your main domain.
httpUnsafeOrigin: 'https://example.com',
Find the line // httpSafeOrigin: "https://some-other-domain.xyz", and uncomment it by removing the slash marks in front of it and change its value to your subdomain.
httpSafeOrigin: "https://docs.example.com",
Add the following line right below the httpSafeOrigin variable.
httpSafeOrigin: "https://docs.example.com",
    adminEmail: "[email protected]",
Save the file by pressing Ctrl + X and entering Y when prompted once finished.
To further configure, create a copy of the ~/cryptpad/customize.dist/application_config.js in the ~/cryptpad/customize directory.
$ cp ~/cryptpad/customize.dist/application_config.js ~/cryptpad/customize
Open the ~/cryptpad/customize/application_config.js file for editing.
$ nano ~/cryptpad/customize/application_config.js
Make sure to add all the configurations before the return AppConfig; line.
To disable the unregistered use of Cryptpad, add the following line.
AppConfig.registeredOnlyTypes = AppConfig.availablePadTypes;
Add links to the Privacy Policy, Terms of Service, and Imprint pages.
// Privacy Policy
AppConfig.privacy = 'https://example.com/privacy-policy/';
// Terms of Service
AppConfig.terms = 'https://example.com/terms-of-service/';
// Imprint / Legal Notice
AppConfig.imprint = 'https://example.com/imprint/';
Add a password salt to secure Cryptpad.
AppConfig.loginSalt = 'ggkljerthhkletho0the90hoserhtgse90rh4ohzisdofh90-43kbdf9009io';
To increase the minimum length of the password, add the following line.
AppConfig.minimumPasswordLength = 10;
Save the file by pressing Ctrl + X and entering Y when prompted once finished. Before starting Cryptpad, we need to first install Nginx, create an SSL certificate, and configure the Nginx server to prepare the Cryptpad domains for access.
Step 7 - Install Nginx
Ubuntu 22.04 ships with an older version of Nginx. To install the latest version, you need to download the official Nginx repository.
Import Nginx's signing key.
$ curl https://nginx.org/keys/nginx_signing.key | gpg --dearmor \
	| sudo tee /usr/share/keyrings/nginx-archive-keyring.gpg >/dev/null
Add the repository for Nginx's stable version.
$ echo "deb [signed-by=/usr/share/keyrings/nginx-archive-keyring.gpg arch=amd64] \
http://nginx.org/packages/ubuntu `lsb_release -cs` nginx" \
    | sudo tee /etc/apt/sources.list.d/nginx.list
Update the system repositories.
$ sudo apt update
Install Nginx.
$ sudo apt install nginx
Verify the installation.
$ nginx -v
nginx version: nginx/1.22.1
Start the Nginx server.
$ sudo systemctl start nginx
Step 8 - Install SSL
We need to install Certbot to generate the SSL certificate. You can either install Certbot using Ubuntu's repository or grab the latest version using the Snapd tool. We will be using the Snapd version.
Ubuntu 22.04 comes with Snapd installed by default. Run the following commands to ensure that your version of Snapd is up to date. Ensure that your version of Snapd is up to date.
$ sudo snap install core
$ sudo snap refresh core
Install Certbot.
$ sudo snap install --classic certbot
Use the following command to ensure that the Certbot command runs by creating a symbolic link to the /usr/bin directory.
$ sudo ln -s /snap/bin/certbot /usr/bin/certbot
Run the following command to generate an SSL Certificate.
$ sudo certbot certonly --nginx --agree-tos --no-eff-email --staple-ocsp --preferred-challenges http -m [email protected] -d example.com -d docs.example.com
The above command will download a certificate to the /etc/letsencrypt/live/example.com directory on your server for the domains example.com, and docs.example.com.
Generate a Diffie-Hellman group certificate.
$ sudo openssl dhparam -dsaparam -out /etc/ssl/certs/dhparam.pem 4096
To check whether the SSL renewal is working fine, do a dry run of the process.
$ sudo certbot renew --dry-run
If you see no errors, you are all set. Your certificate will renew automatically.
Step 9 - Configure Nginx
Open the file /etc/nginx/nginx.conf for editing.
$ sudo nano /etc/nginx/nginx.conf
Add the following line before the line include /etc/nginx/conf.d/*.conf;.
server_names_hash_bucket_size 64;
Save the file by pressing Ctrl + X and entering Y when prompted.
Create and open the file /etc/nginx/conf.d/cryptpad.conf for editing.
$ sudo nano /etc/nginx/conf.d/cryptpad.conf
Paste the following code in it.
server {
    # Redirect any http requests to https
    listen 80;
    listen [::]:80;
    server_name example.com docs.example.com;
    return 301 https://$host$request_uri;
}

server {
    listen 443 ssl http2;
    listen [::]:443 ssl http2;

    # CryptPad serves static assets over these two domains.
    # `main_domain` is what users will enter in their address bar.
    # Privileged computation such as key management is handled in this scope
    # UI content is loaded via the `sandbox_domain`.
    # "Content Security Policy" headers prevent content loaded via the sandbox
    # from accessing privileged information.
    # These variables must be different to take advantage of CryptPad's sandboxing techniques.
    # In the event of an XSS vulnerability in CryptPad's front-end code
    # this will limit the amount of information accessible to attackers.
    set $main_domain "example.com";
    set $sandbox_domain "docs.example.com";

    # By default CryptPad allows remote domains to embed CryptPad documents in iframes.
    # This behaviour can be blocked by changing $allowed_origins from "*" to the
    # sandbox domain, which must be permitted to load content from the main domain
    # in order for CryptPad to work as expected.
    #
    # An example is given below which can be uncommented if you want to block
    # remote sites from including content from your server
    set $allowed_origins "*";
    # set $allowed_origins "https://${sandbox_domain}";

    # CryptPad's dynamic content (websocket traffic and encrypted blobs)
    # can be served over separate domains. Using dedicated domains (or subdomains)
    # for these purposes allows you to move them to a separate machine at a later date
    # if you find that a single machine cannot handle all of your users.
    # If you don't use dedicated domains, this can be the same as $main_domain
    # If you do, they can be added as exceptions to any rules which block connections to remote domains.
    # You can find these variables referenced below in the relevant places
    set $api_domain "example.com";
    set $files_domain "example.com";

    # nginx doesn't let you set server_name via variables, so you need to hardcode your domains here
    server_name example.com docs.example.com;

    # You'll need to Set the path to your certificates and keys here
    # IMPORTANT: this config is intended to serve assets for at least two domains
    # (your main domain and your sandbox domain). As such, you'll need to generate a single SSL certificate
    # that includes both domains in order for things to work as expected.
    ssl_certificate /etc/letsencrypt/live/example.com/fullchain.pem;
    ssl_certificate_key /etc/letsencrypt/live/example.com/privkey.pem;
    ssl_trusted_certificate /etc/letsencrypt/live/example.com/chain.pem;

    # diffie-hellman parameters are used to negotiate keys for your session
    # generate strong parameters using the following command
    ssl_dhparam /etc/ssl/certs/dhparam.pem;

    # Speeds things up a little bit when resuming a session
    ssl_session_timeout 1d;
    ssl_session_cache shared:MozSSL:10m;
    ssl_session_tickets off;

    ssl_protocols TLSv1.2 TLSv1.3;
    ssl_ciphers ECDHE-ECDSA-AES128-GCM-SHA256:ECDHE-RSA-AES128-GCM-SHA256:ECDHE-ECDSA-AES256-GCM-SHA384:ECDHE-RSA-AES256-GCM-SHA384:ECDHE-ECDSA-CHACHA20-POLY1305:ECDHE-RSA-CHACHA20-POLY1305:DHE-RSA-AES128-GCM-SHA256:DHE-RSA-AES256-GCM-SHA384;
    ssl_prefer_server_ciphers off;

    # HSTS (ngx_http_headers_module is required) (63072000 seconds)
    add_header Strict-Transport-Security "max-age=63072000; includeSubDomains" always;

    # OCSP stapling
    ssl_stapling on;
    ssl_stapling_verify on;
    resolver 8.8.8.8 8.8.4.4 valid=300s;
    resolver_timeout 5s;

    # verify chain of trust of OCSP response using Root CA and Intermediate certs
    ssl_trusted_certificate /etc/ssl/certs/ca-certificates.crt;

    # replace with the IP address of your resolver
    resolver 8.8.8.8 8.8.4.4 1.1.1.1 1.0.0.1 9.9.9.9 149.112.112.112 208.67.222.222 208.67.220.220;

    add_header X-XSS-Protection "1; mode=block";
    add_header X-Content-Type-Options nosniff;
    add_header Access-Control-Allow-Origin "${allowed_origins}";
    # add_header X-Frame-Options "SAMEORIGIN";

    # Opt out of Google's FLoC Network
    add_header Permissions-Policy interest-cohort=();

    # Enable SharedArrayBuffer in Firefox (for .xlsx export)
    add_header Cross-Origin-Resource-Policy cross-origin;
    add_header Cross-Origin-Embedder-Policy require-corp;

    # Insert the path to your CryptPad repository root here
    root /home/username/cryptpad;
    index index.html;
    error_page 404 /customize.dist/404.html;

    # any static assets loaded with "ver=" in their URL will be cached for a year
    if ($args ~ ver=) {
        set $cacheControl max-age=31536000;
    }
    # This rule overrides the above caching directive and makes things somewhat less efficient.
    # We had inverted them as an optimization, but Safari 16 introduced a bug that interpreted
    # some important headers incorrectly when loading these files from cache.
    # This is why we can't have nice things :(
    if ($uri ~ ^(\/|.*\/|.*\.html)$) {
        set $cacheControl no-cache;
    }

    # Will not set any header if it is emptystring
    add_header Cache-Control $cacheControl;

    # CSS can be dynamically set inline, loaded from the same domain, or from $main_domain
    set $styleSrc   "'unsafe-inline' 'self' https://${main_domain}";

    # connect-src restricts URLs which can be loaded using script interfaces
    # if you have configured your instance to use a dedicated $files_domain or $api_domain
    # you will need to add them below as: https://${files_domain} and https://${api_domain}
    set $connectSrc "'self' https://${main_domain} blob: wss://${api_domain} https://${sandbox_domain}";

    # fonts can be loaded from data-URLs or the main domain
    set $fontSrc    "'self' data: https://${main_domain}";

    # images can be loaded from anywhere, though we'd like to deprecate this as it allows the use of images for tracking
    set $imgSrc     "'self' data: blob: https://${main_domain}";

    # frame-src specifies valid sources for nested browsing contexts.
    # this prevents loading any iframes from anywhere other than the sandbox domain
    set $frameSrc   "'self' https://${sandbox_domain} blob:";

    # specifies valid sources for loading media using video or audio
    set $mediaSrc   "blob:";

    # defines valid sources for webworkers and nested browser contexts
    # deprecated in favour of worker-src and frame-src
    set $childSrc   "https://${main_domain}";

    # specifies valid sources for Worker, SharedWorker, or ServiceWorker scripts.
    # supercedes child-src but is unfortunately not yet universally supported.
    set $workerSrc  "'self'";

    # script-src specifies valid sources for javascript, including inline handlers
    set $scriptSrc  "'self' resource: https://${main_domain}";

    # frame-ancestors specifies which origins can embed your CryptPad instance
    # this must include 'self' and your main domain (over HTTPS) in order for CryptPad to work
    # if you have enabled remote embedding via the admin panel then this must be more permissive.
    # note: cryptpad.fr permits web pages served via https: and vector: (element desktop app)
    set $frameAncestors "'self' https://${main_domain}";
    # set $frameAncestors "'self' https: vector:";

    set $unsafe 0;
    # the following assets are loaded via the sandbox domain
    # they unfortunately still require exceptions to the sandboxing to work correctly.
    if ($uri ~ ^\/(sheet|doc|presentation)\/inner.html.*$) { set $unsafe 1; }
    if ($uri ~ ^\/common\/onlyoffice\/.*\/.*\.html.*$) { set $unsafe 1; }

    # everything except the sandbox domain is a privileged scope, as they might be used to handle keys
    if ($host != $sandbox_domain) { set $unsafe 0; }
    # this iframe is an exception. Office file formats are converted outside of the sandboxed scope
    # because of bugs in Chromium-based browsers that incorrectly ignore headers that are supposed to enable
    # the use of some modern APIs that we require when javascript is run in a cross-origin context.
    # We've applied other sandboxing techniques to mitigate the risk of running WebAssembly in this privileged scope
    if ($uri ~ ^\/unsafeiframe\/inner\.html.*$) { set $unsafe 1; }

    # privileged contexts allow a few more rights than unprivileged contexts, though limits are still applied
    if ($unsafe) {
        set $scriptSrc "'self' 'unsafe-eval' 'unsafe-inline' resource: https://${main_domain}";
    }

    # Finally, set all the rules you composed above.
    add_header Content-Security-Policy "default-src 'none'; child-src $childSrc; worker-src $workerSrc; media-src $mediaSrc; style-src $styleSrc; script-src $scriptSrc; connect-src $connectSrc; font-src $fontSrc; img-src $imgSrc; frame-src $frameSrc; frame-ancestors $frameAncestors";

    # The nodejs process can handle all traffic whether accessed over websocket or as static assets
    # We prefer to serve static content from nginx directly and to leave the API server to handle
    # the dynamic content that only it can manage. This is primarily an optimization
    location ^~ /cryptpad_websocket {
        proxy_pass http://localhost:3000;
        proxy_set_header X-Real-IP $remote_addr;
        proxy_set_header Host $host;
        proxy_set_header X-Forwarded-For $proxy_add_x_forwarded_for;

        # WebSocket support (nginx 1.4)
        proxy_http_version 1.1;
        proxy_set_header Upgrade $http_upgrade;
        proxy_set_header Connection upgrade;
    }

    location ^~ /customize.dist/ {
        # This is needed in order to prevent infinite recursion between /customize/ and the root
    }
    # try to load customizeable content via /customize/ and fall back to the default content
    # located at /customize.dist/
    # This is what allows you to override behaviour.
    location ^~ /customize/ {
        rewrite ^/customize/(.*)$ $1 break;
        try_files /customize/$uri /customize.dist/$uri;
    }

    # /api/config is loaded once per page load and is used to retrieve
    # the caching variable which is applied to every other resource
    # which is loaded during that session.
    location ~ ^/api/.*$ {
        proxy_pass http://localhost:3000;
        proxy_set_header X-Real-IP $remote_addr;
        proxy_set_header Host $host;
        proxy_set_header X-Forwarded-For $proxy_add_x_forwarded_for;

        # These settings prevent both NGINX and the API server
        # from setting the same headers and creating duplicates
        proxy_hide_header Cross-Origin-Resource-Policy;
        add_header Cross-Origin-Resource-Policy cross-origin;
        proxy_hide_header Cross-Origin-Embedder-Policy;
        add_header Cross-Origin-Embedder-Policy require-corp;
    }

    # encrypted blobs are immutable and are thus cached for a year
    location ^~ /blob/ {
        if ($request_method = 'OPTIONS') {
            add_header 'Access-Control-Allow-Origin' "${allowed_origins}";
            add_header 'Access-Control-Allow-Methods' 'GET, POST, OPTIONS';
            add_header 'Access-Control-Allow-Headers' 'DNT,X-CustomHeader,Keep-Alive,User-Agent,X-Requested-With,If-Modified-Since,Cache-Control,Content-Type,Content-Range,Range';
            add_header 'Access-Control-Max-Age' 1728000;
            add_header 'Content-Type' 'application/octet-stream; charset=utf-8';
            add_header 'Content-Length' 0;
            return 204;
        }
        add_header X-Content-Type-Options nosniff;
        add_header Cache-Control max-age=31536000;
        add_header 'Access-Control-Allow-Origin' "${allowed_origins}";
        add_header 'Access-Control-Allow-Methods' 'GET, POST, OPTIONS';
        add_header 'Access-Control-Allow-Headers' 'DNT,X-CustomHeader,Keep-Alive,User-Agent,X-Requested-With,If-Modified-Since,Cache-Control,Content-Type,Content-Range,Range,Content-Length';
        add_header 'Access-Control-Expose-Headers' 'DNT,X-CustomHeader,Keep-Alive,User-Agent,X-Requested-With,If-Modified-Since,Cache-Control,Content-Type,Content-Range,Range,Content-Length';
        try_files $uri =404;
    }

    # the "block-store" serves encrypted payloads containing users' drive keys
    # these payloads are unlocked via login credentials. They are mutable
    # and are thus never cached. They're small enough that it doesn't matter, in any case.
    location ^~ /block/ {
        add_header X-Content-Type-Options nosniff;
        add_header Cache-Control max-age=0;
        try_files $uri =404;
    }

    # This block provides an alternative means of loading content
    # otherwise only served via websocket. This is solely for debugging purposes,
    # and is thus not allowed by default.
    #location ^~ /datastore/ {
        #add_header Cache-Control max-age=0;
        #try_files $uri =404;
    #}

    # The nodejs server has some built-in forwarding rules to prevent
    # URLs like /pad from resulting in a 404. This simply adds a trailing slash
    # to a variety of applications.
    location ~ ^/(register|login|settings|user|pad|drive|poll|slide|code|whiteboard|file|media|profile|contacts|todo|filepicker|debug|kanban|sheet|support|admin|notifications|teams|calendar|presentation|doc|form|report|convert|checkup)$ {
        rewrite ^(.*)$ $1/ redirect;
    }

    # Finally, serve anything the above exceptions don't govern.
    try_files /customize/www/$uri /customize/www/$uri/index.html /www/$uri /www/$uri/index.html /customize/$uri;
}
Save the file by pressing Ctrl + X and entering Y when prompted once finished.
Verify the Nginx configuration file syntax.
$ sudo nginx -t
nginx: the configuration file /etc/nginx/nginx.conf syntax is ok
nginx: configuration file /etc/nginx/nginx.conf test is successful
Restart the Nginx service.
$ sudo systemctl restart nginx
Step 10 - Create a Cryptpad Systemd Service
Open the ~/cryptpad/docs/cryptpad.service file for editing.
$ nano ~/cryptpad/docs/cryptpad.service
Modify the code in it to resemble the following. Ensure the correct path for the Node binary and replace username with your currently logged-in Linux user name.
[Unit]
Description=CryptPad API server

[Service]
ExecStart=/home/username/.nvm/versions/node/v18.14.1/bin/node /home/username/cryptpad/server.js
# modify to match the location of your cryptpad repository
WorkingDirectory=/home/username/cryptpad

Restart=always
# Restart service after 10 seconds if node service crashes
RestartSec=2

# Output to syslog
StandardOutput=syslog
StandardError=syslog
SyslogIdentifier=cryptpad
User=username
Group=username
# modify to match your working directory
Environment='PWD="/home/username/cryptpad"'

# systemd sets the open file limit to 4000 unless you override it
# cryptpad stores its data with the filesystem, so you should increase this to match the value of `ulimit -n`
# or risk EMFILE errors.
LimitNOFILE=1000000

[Install]
WantedBy=multi-user.target
Save the file by pressing Ctrl + X and entering Y when prompted once finished.
Copy the file to the Systemd folder.
sudo cp ~/cryptpad/docs/cryptpad.service /etc/systemd/system/cryptpad.service
Reload the service daemon.
$ sudo systemctl daemon-reload
Enable and start the Cryptpad service.
$ sudo systemctl enable cryptpad --now
Check the status of the service.
$ suddo systemctl status cryptpad
You will get the following output.
? cryptpad.service - CryptPad API server
     Loaded: loaded (/etc/systemd/system/cryptpad.service; enabled; vendor preset: enabled)
     Active: active (running) since Tue 2023-02-21 08:43:50 UTC; 1h 52min ago
   Main PID: 8145 (node)
      Tasks: 33 (limit: 2237)
     Memory: 53.4M
        CPU: 2.323s
     CGroup: /system.slice/cryptpad.service
             ??8145 /home/navjot/.nvm/versions/node/v18.14.1/bin/node /home/navjot/cryptpad/server.js
             ??8158 /home/navjot/.nvm/versions/node/v18.14.1/bin/node lib/workers/db-worker
             ??8159 /home/navjot/.nvm/versions/node/v18.14.1/bin/node lib/workers/db-worker

Feb 21 08:43:50 nspeaks systemd[1]: Started CryptPad API server.
Feb 21 08:43:50 nspeaks cryptpad[8145]: Serving content for https://example.com/ via http://127.0.0.1:3000.
Step 11 - Access and Configure Cryptpad
Open the URL https://example.com in your browser and you will get the following screen.

Click on the Sign up button to create an account. Enter your credentials and click the Sign up button to create your account.

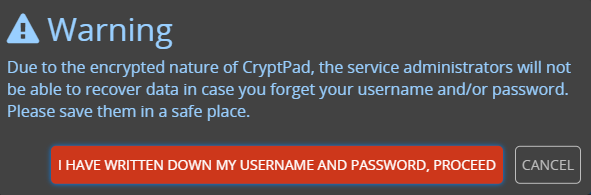
You will get the following confirmation popup. Click the red button to finish creating the account.
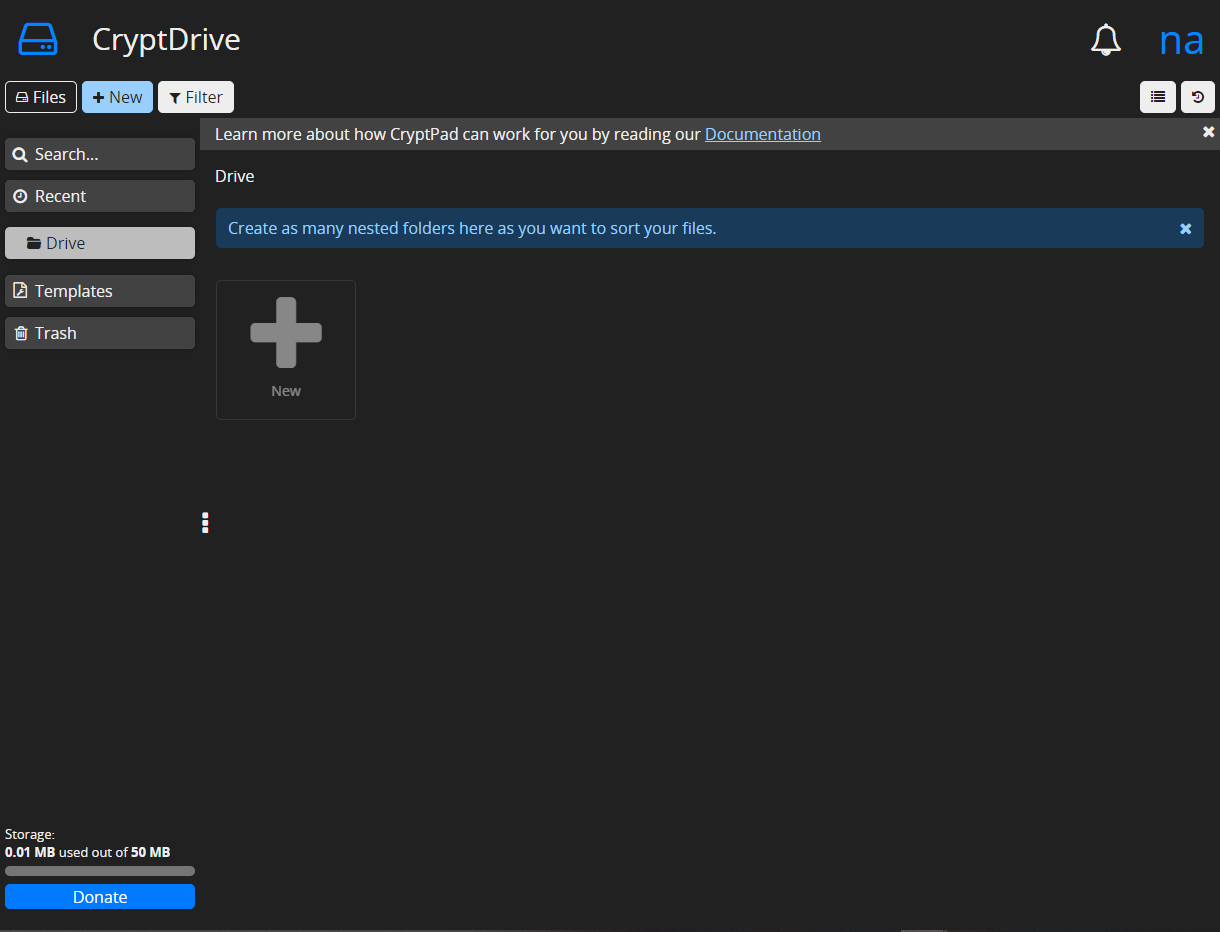
You will be logged in and taken to the CryptDrive dashboard.
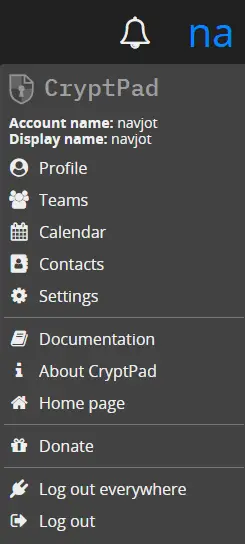
Click on the User menu in the upper right corner and click the Settings option.
You will get the following settings page.
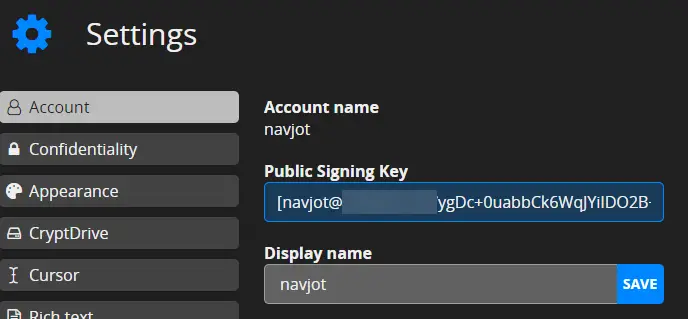
Copy the value of the Public Signing Key and go back to the terminal and open the configuration file.
$ nano ~/cryptpad/config/config.js
Find the adminKeys variable and paste the key in between the square brackets as shown below.
adminKeys: ["[[email protected]/ygDc+0uabbCk6WqJYiIDO2B+gP6mYZ9FlQ94zL3UAoU=]"],
Save the file by pressing Ctrl + X and entering Y when prompted once finished.
Restart the Cryptpad service.
$ sudo systemctl restart cryptpad
Your Cryptpad office suite is ready for use.
Step 12 - Update Cryptpad
Updating Cryptpad is quite easier and involves fetching the latest updates from the GitHub repository and then running Node update commands.
The first step is to stop the Cryptpad service.
$ sudo systemctl stop cryptpad
Run the following commands in order to update Cryptpad.
$ cd ~/cryptpad
$ git pull
$ git checkout $(git tag -l | grep -v 'v1.*$' | sort -V | tail -n 1)
$ npm update
$ bower update
Start the Cryptpad service.
$ sudo systemctl start cryptpad
Conclusion
This concludes our tutorial on installing Cryptpad Collaborative Office Suite on a Ubuntu 22.04 server. If you have any questions, post them in the comments below.

