How to Install Consul Server on AlmaLinux 9
Consul is a modern platform for service discovery that allows you to register services via DNS and HTTP interface. It also offers a Service mesh feature that enables secure connections via TLS and provides authorization between services. On top of that, the Consul also provides an API Gateway for managing access to services and a KV (Key/Value) store for storing service configuration.
In this guide, we'll walk you through the installation of Consul Cluster with multiple servers on AlmaLinux 9 step-by-step.
Prerequisites
To complete this guide, ensure you have the following:
- Two or more AlmaLinux servers within the same network.
- A non-root user with administrator privileges.
Setting Up System
In this first step, you will prepare your AlmaLinux servers for Consul installation, which includes:
- Configuring Firewalld to open ports.
- Configure SELinux to Permissive mode.
Configuring Firewalld
Before installing packages, you must open ports on your Consul servers. As for the RHEL-based operating system, you will be using Firewalld to open ports.
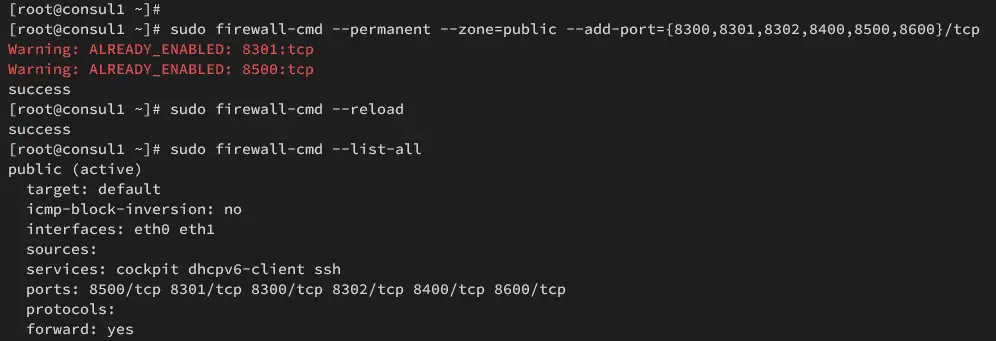
Execute the command below to open ports 8300, 8301, 8302, 8400, 8500, and 8600 on your AlmaLinux servers. If successful, you should get the output such as success.
sudo firewall-cmd --permanent --zone=public --add-port={8300,8301,8302,8400,8500,8600}/tcp
Now, reload the firewalld using the below command to take effects.
sudo firewall-cmd --reload
Lastly, verify your firewalld rules using the following command. Ensure ports 8300, 8301, 8302, 8400, 8500, 8600 are available on your firewalld.
sudo firewall-cmd --zone=public --list-all
Changing SELinux to Permissive
After configuring firewalld, you will change the default SELinux mode to permissive. This will generate error logs on SELinux without blocking the action.
Execute the following command to change SELinux mode to permissive.
sudo setenforce 0
sudo sed -i 's/^SELINUX=.*/SELINUX=permissive/g' /etc/selinux/config
Then, restart your servers to take effect.
sudo reboot
Now that you've configured all your AlmaLinux servers, you can start the Consul installation.

Installing Consul via DNF
Consul is a service networking platform that supports multiple operating systems. Also, Consul provides a package repository for Linux distributions, including RHEL-based distributions. In this step, you will install Consul from the Consul repository via DNF.
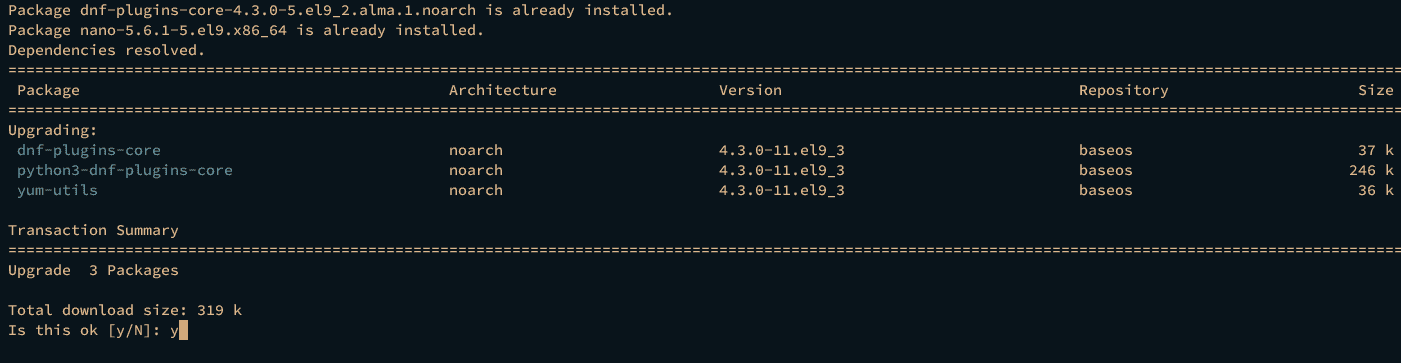
To start, install some basic packages by executing the following command. Input y to proceed with the installation.
sudo dnf install dnf-plugins-core nano
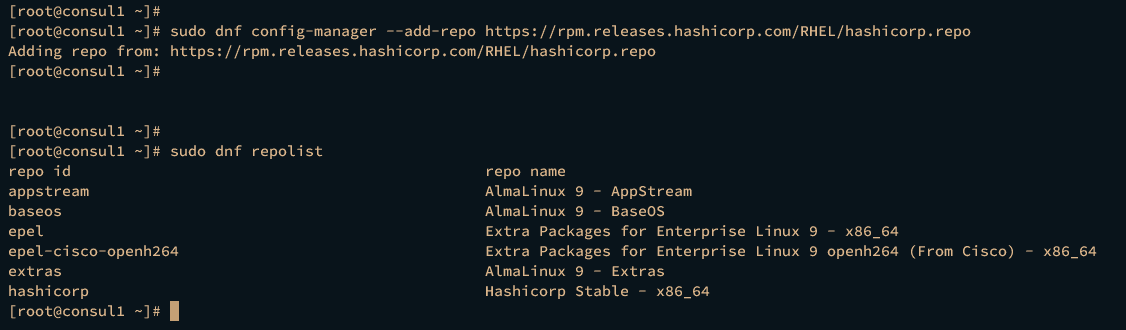
Now run the DNF command below to add the Consul repository to your Alma Linux servers. Then, verify the list of available repositories on each server.
sudo dnf config-manager --add-repo https://rpm.releases.hashicorp.com/RHEL/hashicorp.repo
sudo dnf repolist
The following output proves that you've added the HashiCorp repository to your systems.
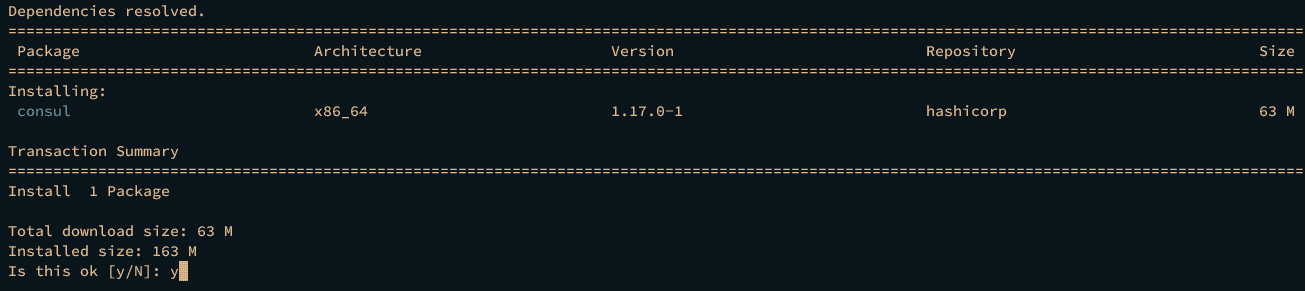
Next, install Consul by executing the following command. Type y to proceed with the Consul installation.
sudo dnf install consul
After you've finished the installation, run the following command to locate the consul binary file and check its version.
which consul
consul version
The output below, confirms that the Consul binary file is available at /bin/consul, and the current Consul version is 1.17.

Configuring Consul
At this point, you've installed Consul on all your AlmaLinux servers. Let's start configuring the Consul cluster with multiple servers without further ado. To illustrate, we'll be using three AlmaLinux servers.
|  Hostname  |    IP Address   |
| ---------  |  -------------- |
|  consul1   |  192.168.10.41  |
|  consul2   |  192.168.10.42  |
|  consul3   |  192.168.10.43  |
First, stop the consul service on every server by executing the command below.
sudo systemctl stop consul
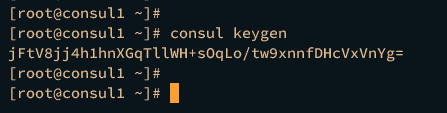
Move to the consul1 server and run the command below to generate a new key for the Consul cluster. Be sure to keep the generated key.
consul keygen
In all your Consul servers, open the default Consul configuration /etc/consul.d/consul.hcl using the following nano editor command.
sudo nano /etc/consul.d/consul.hcl
Change the default configuration with the following and be aware of some parameters below:
- server: True means the node will act as a Consul server.
- advertise_addr: Change this with the respective IP address of the Consul server.
- bootstrap_expect: How many servers is your cluster would be?
- encrypt: Every server must have the same key.
- retry_join: Input Consul cluster IP addresses to this parameter.
# Full configuration options can be found at https://www.consul.io/docs/agent/config

# datacenter
datacenter = "kitty-dc1"

# data_dir
# This flag provides a data directory for the agent to store state.
data_dir = "/opt/consul"

# client_addr
# The address to which the Consul will bind client interfaces, including the HTTP and DNS
# servers.
client_addr = "0.0.0.0"

# ui
# Enables the built-in web UI server and the required HTTP routes.
ui_config{
  enabled = true
}

# default domain
domain = "consul"

# enable dns_config
dns_config{
  enable_truncate = true
  only_passing = true
}

# server
# This flag is used to control if an agent is in server or client mode. When provided,
# an agent will act as a Consul server. Each Consul cluster must have at least one
# server and ideally no more than 5 per datacenter. All servers participate in the Raft
# consensus algorithm to ensure that transactions occur in a consistent, linearizable
# manner. Transactions modify cluster state, which is maintained on all server nodes to
# ensure availability in the case of node failure. Server nodes also participate in a
# WAN gossip pool with server nodes in other datacenters. Servers act as gateways to
# other datacenters and forward traffic as appropriate.
server = true

# Advertise addr - if you want to point clients to a different address than bind or LB.
advertise_addr = "192.168.10.41"

# bootstrap_expect
# This flag provides the number of expected servers in the datacenter.
bootstrap_expect=3

# encrypt
# Specifies the secret key to use for encryption of Consul network traffic.
encrypt = "jFtV8jj4h1hnXGqTllWH+sOqLo/tw9xnnfDHcVxVnYg="

# retry_join
retry_join = ["192.168.10.41", "192.168.10.42", "192.168.10.43"]
Save and exit the file when finished.
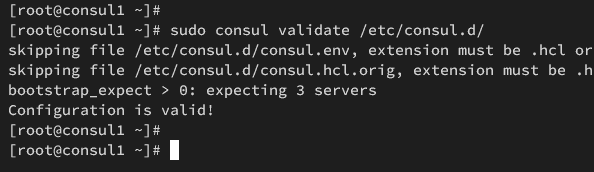
Next, run the following command to verify Consul configurations. If you have proper syntax, you should get the output such as 'Configuration is valid'.
sudo consul validate /etc/consul.d/
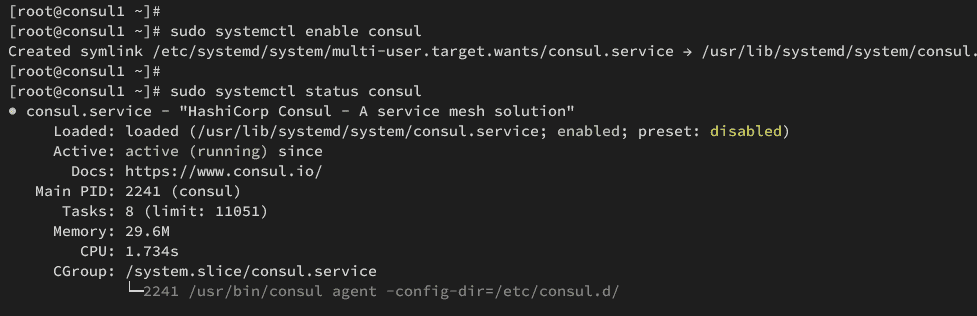
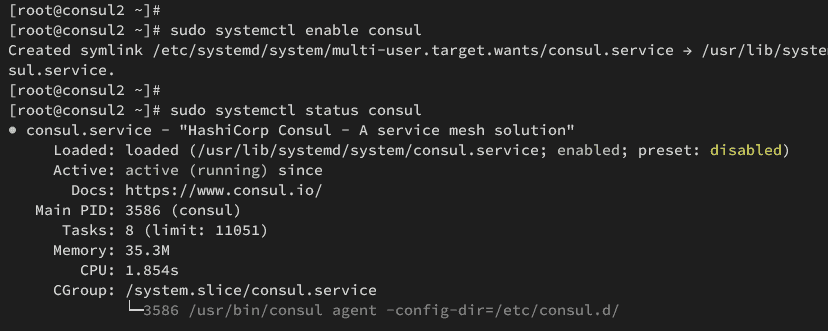
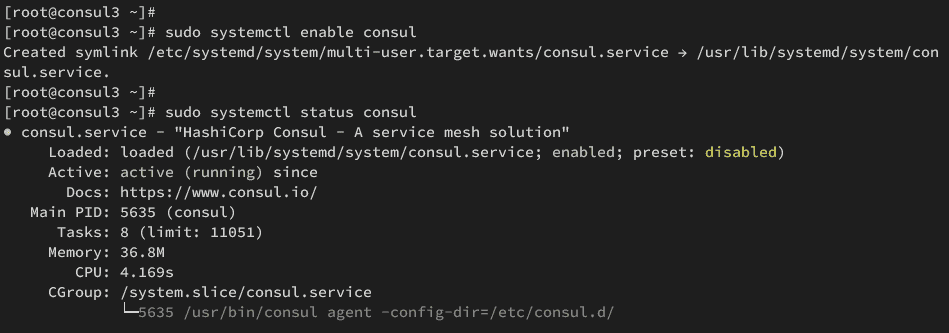
Now run the command below to start and enable the consul service.
sudo systemctl start consul
sudo systemctl enable consul
Then verify the consul using the following command to ensure the service runs.
sudo systemctl status consul
In the following output, you should see Consul is running on consul1 server.
In the following output, you should see Consul is running on consul2 server.
In the following output, you should see Consul is running on consul3 server.
Interacting with Consul Cluster
Now that you have the Consul cluster configured on AlmaLinux servers, you can verify and interact with the Consul cluster via the consul command line.
Checking Consul Cluster
Run the command below to check the available Consul server within the cluster.
consul members
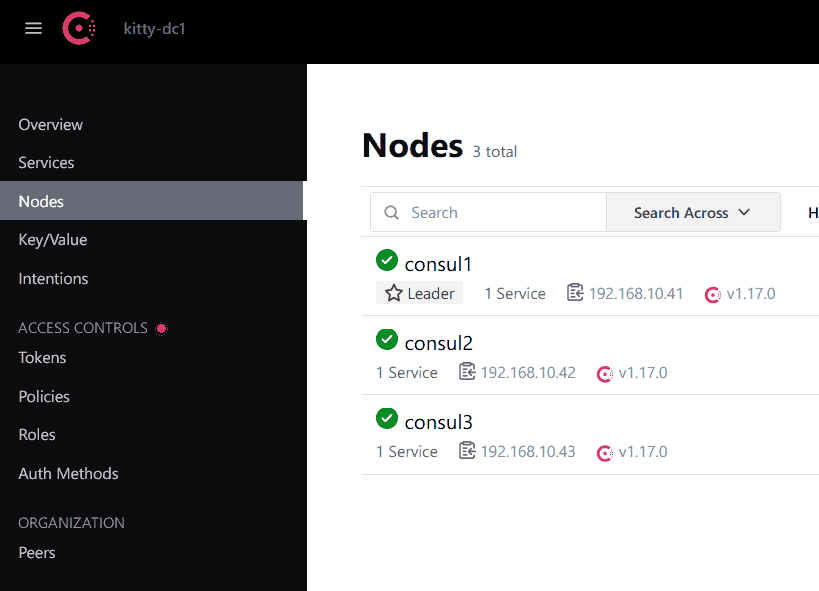
In this example, the Consul cluster is composed of three servers, consul1, consul2, and consul3.

You can also verify the list of peers on the Cluster using the below command.
consul operator raft list-peers
Below you can see detailed information on each Consul server, including the ID, state, voter, and RaftProtocol version.

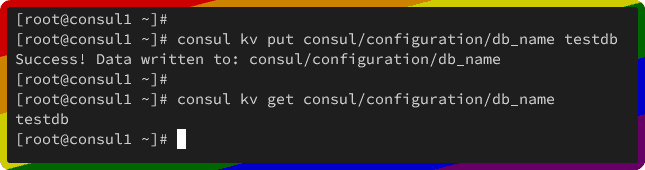
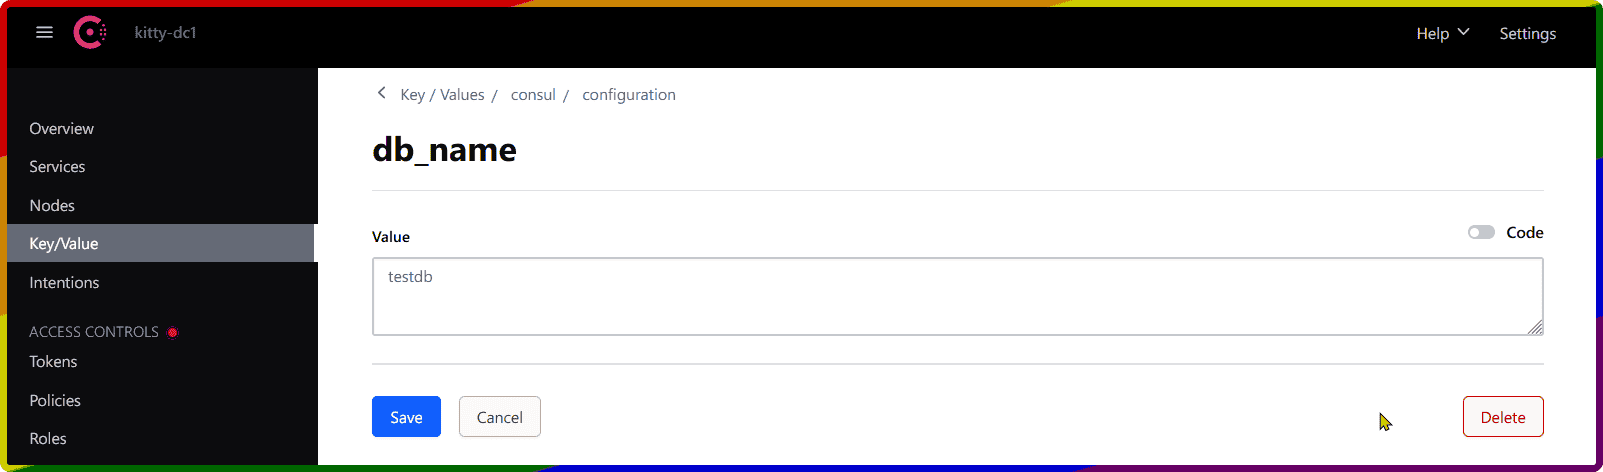
Adding KV (Key-Value) Store to Consul
Next, run the following consul command to create a new key-value database. In this example, you will create a new key db_name with the value testdb.
consul kv put consul/configuration/db_name testdb
Now run the command below to retrieve the value for db_name.
consul kv get consul/configuration/db_name
You should get the value testdb like the following:
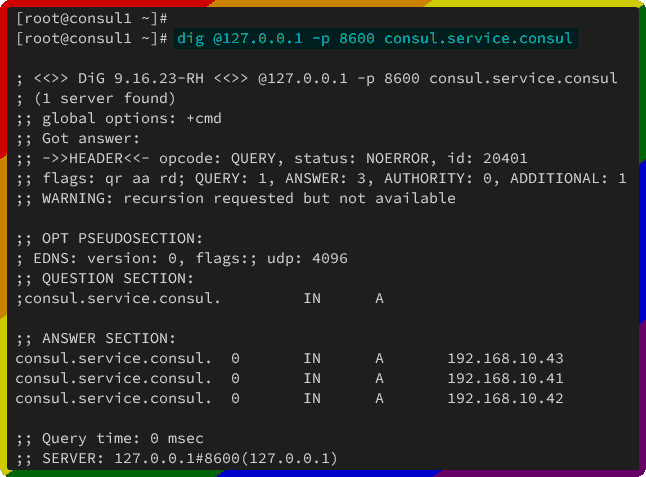
Interacting with DNS on Consul
Within this guide, you've enabled the Consul DNS. To check the Consul DNS configuration, utilize the dig command below.
dig @127.0.0.1 -p 8600 consul.service.consul
In this example, you've configured Consul servers within the cluster with the same domain name as consul. The following confirms that the domain consul.service.consul with A records 192.168.10.41, 192.168.10.42, 192.168.10.43.
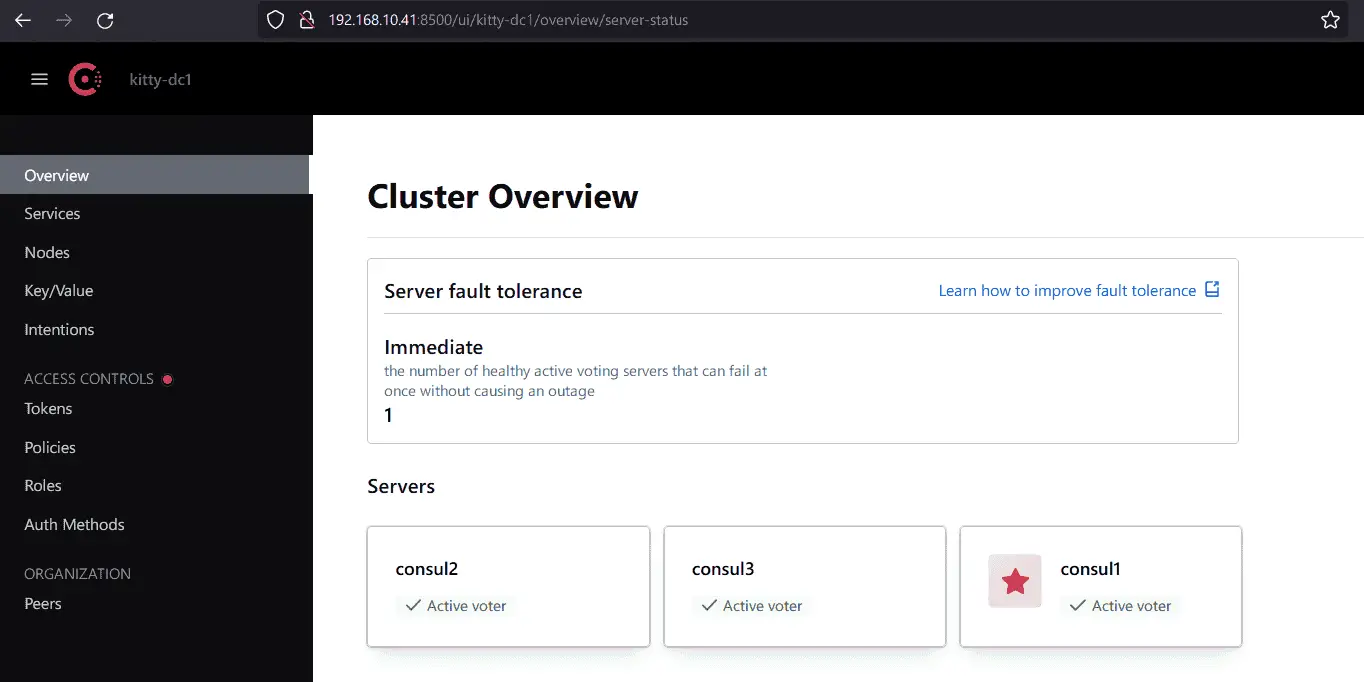
Accessing Consul Web UI (User Interface)
Lastly, open your web browser and visit the Consul server IP address with port 8500 e.g: http://192.168.10.41:8500/ui/ to get the Consul web administration dashboard.
Below you should see the available servers in the Consul cluster.
Now, click on the Nodes menu to get detailed information about each server.
Then click on the Key/Value menu to get the list of available KV on your Consul servers.
Conclusion
To wrap up, you've completed the step-by-step installation of the Consul cluster with three AlmaLinux servers. You've enabled the Consul Web UI and Consul DNS within the cluster. Last, you've also learned some basic commands for interacting with Consul clusters, key-value stores, and DNS.
From here, you can now activate the ACLs (Access Control Lists) and implement TLS for connections between Consul servers and clients.

