How to Install Ansible on Rocky Linux 8
Ansible is open-source software that automates software provisioning, configuration management, and application deployment. The tool is designed to automate cloud provisioning, OS deployments, etc., for multiple Linux or UNIX-like systems. Using the Ansible automation tool, one can automate services in a data center as well as products developed with differing technologies.
Ansible's main goals include making IT automation simple enough to manage complex enterprise environments without excessive custom scripting or manual drudge work. By not requiring any extra dependencies other than Python itself, it allows users to further automate their system via SSH connections which are enabled by default on most mainstream distributions of Linux today.
Ansible works by connecting to the nodes over SSH, and gathering facts about the remote system. It then executes tasks in a playbook for deploy services or other configuration management goals. Playbooks can automate any number of systems provisioning processes such as the creation of cloud server instances, virtual machines, containers, etc. Ansible is useful in automating repetitive tasks such as application deployments across servers which are diverse in nature and often require customizations based on the local infrastructure and user input. Clusters running Kubernetes can also be managed easily with Ansible's container orchestration support: taking actions like pulling images from private registries and updating pod configurations simultaneously across clusters.
How many times have you tried to install a new Linux package and failed? Have you ever wanted to try installing the Ansible package onto your Linux system but don't know how? If you answered yes, this blog post is for you. This tutorial will show you how to download, compile, and install Ansible on a Rocky Linux 8 system.
Prerequisite
- A server running Rocky Linux 8 operating system
- Root privileges
Step 1. Updating the System
First, we must update our system to ensure that all the latest packages are installed. Open a terminal and type in the following commands.
sudo dnf update -y
Step 2. Configuring the EPEL repository
The Extra Packages for Enterprise Linux (EPEL) repository is a Fedora Special Interest Group that creates, maintains, and manages a high-quality set of additional packages that complement the Red Hat released packages. Some of the repository's focus areas are games and educational applications, programming languages and tools, virtualization and system administration.
Ansible is dependent on python, and we cannot install it without the EPEL repository. So, to install ansible via dnf, we must first configure the EPEL repository.
sudo dnf install epel-release -y
After configuring the EPEL repository, it's necessary to update the DNF package manager so that it can install Ansible from the new repository.
sudo dnf makecache
To check if the repository has been properly configured, run the following command.
You will get the following output.
Step 3. Installing Ansible
Now that the EPEL repository has been configured, we can use it to install Ansible with the DNF package manager.
sudo dnf -y install ansible
The DNF command should start downloading all the required packages and install the latest version of Ansible onto your system. During the installation, you may be asked to accept the GPG key. Press Y and Enter to continue.
Once Ansible has been installed, you can verify which version of Ansible is installed by running the following command:
ansible --version
Ansible should display its version number and release date. This verifies that Ansible has been installed properly.
Step 4. Verifying Ansible Installation
To ensure that the installation was successful. In this step, we will manage or administer a remote server with Ansible.
Configuring Target Server for Ansible
Ansible uses SSH to connect to a target server and configure it. SSH is a popular network protocol used for connecting securely to a remote Linux machine for executing commands on the remote machine via SSH.
Ansible uses the 22 port, so the 22 port must be opened on the firewall to allow SSH connections.
In this example, we are going to use one Ubuntu 20.04 server with its IP address: 137.184.66.179.
You can use the IP addresses of the servers that you want to manage with Ansible. Just replace the IP address above with your target server. You can also use the DNS name or DNS alias of the machine.
Run the following commands to install the SSH server and open port 22 on the target server.
sudo apt install openssh-server
sudo systemctl start ssh
sudo systemctl enable ssh
sudo ufw allow 22
Generating an SSH key
In this step, we need to generate an SSH key on our local machine and then push the SSH key to the remote machine.
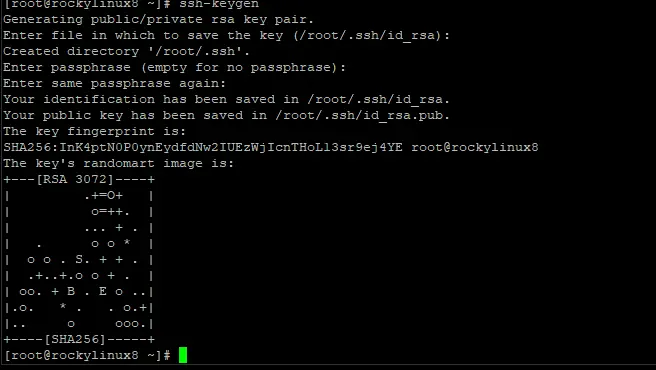
SSH keys are simply pairs of keys that allow SSH connections to be established with SSH. Run the following command to generate an SSH key on your local machine. Press the Enter key multiple times to accept the default values. You will get the following output.
ssh-keygen
After the SSH key has been generated, we need to push our newly generated SSH key to the target machine. Run the following command on your host machine to push the key.
ssh-copy-id [email protected]
Remember to replace root with the sudo users on your target machine. Replace 137.184.66.179 with the IP address of your target machine.
Now, on the remote machine, run the below command to run the SSH command with the sudo prefix without having to re-enter the password.
echo "$(whoami) ALL=(ALL) NOPASSWD:ALL" | sudo tee /etc/sudoers.d/$(whoami)
Creating Inventory File
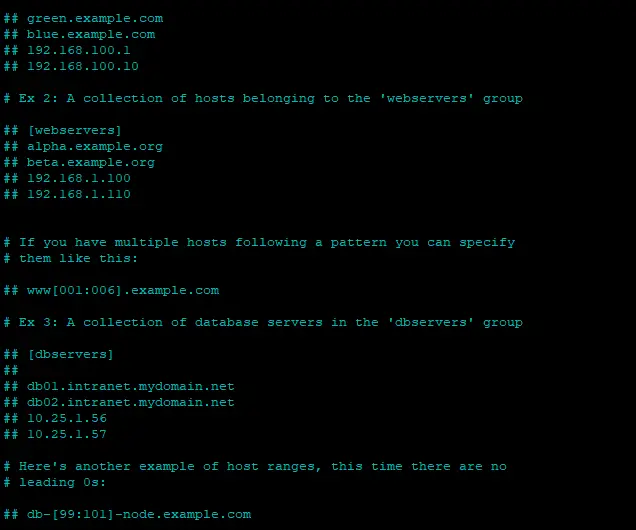
Ansible keeps its host inventory in a file inside the /etc/ansible directory, and its name is hosts. The hosts file can be used to create the host inventory for managing your remote servers.
You can also create a group of hosts based on their function, location or any other criteria. For example, you can create a group of hosts named Web server and place all the servers that run Apache or Nginx inside this group. This provides a way to control and manage the hosts in a more flexible fashion.
First, open the host file with your favorite text editor.
sudo nano /etc/ansible/hosts
The inventory file should have contents as follows.
To add an additional host to this inventory, simply append the new line with the hostname or IP address of the host. In this example, we add one more server with IP address 137.184.66.179 to the hosts file under the webservers group.
Pressing ctrl+o to save the file and ctrl+x to exit the file.
Pinging Remote servers
Once the inventory file is created, we need to inform Ansible that there is a new remote server. We can do this by using the ansible command with the argument -m ping.
ansible -m ping all
If there is no error, the remote server has been added to the inventory file successfully, and your Ansible installation is successful.
Conclusion
In this tutorial, you have learned how to install Ansible on a Rocky Linux 8.4 system and connect it to a remote server via SSH. After that, you learned how to create an inventory file ansible group of hosts. Finally, you were able to ping remote servers using the ansible command.
Now that we have covered some of the basics of Ansible. We hope that you will find this tutorial useful. You may be interested in How to Install and Configure Ansible on Ubuntu 22.04 LTS.


