How to Install and Configure NFS Server on Debian 11
This tutorial exists for these OS versions
- Debian 12 (Bookworm)
- Debian 11 (Bullseye)
- Debian 9 (Stretch)
- Debian 7 (Wheezy)
- Debian 5 (Lenny)
On this page
NFS or Network File System is a network protocol that allows you to mount a remote filesystem through the network. The NFS protocol is used the server-client architecture, the NFS server that provides all directories or partitions that are ready to access and mount, and clients that used the rpcbind protocol to access all directories and filesystem through the internal network connection.
The current status of the Network File System protocol is described below.
1. The NFSv2 and NFSv3 is still supported by the major operating system, but for security reason, you must restrict the access of NFS server to the trusted local network. The NFSv2 and NFSv3 are recommended for the small and medium types of deployment.
2. The NFSv4 protocol provides basic security features such as authentication and encryption, but it relies on Kerberos for those parts. So you need to add additional configuration for using NFSv4 with basic security features.
For this tutorial, you will learn how to install and configure an NFS Server on the latest Debian 11 Bullseye. You will be installing the NFS server and securing the access by limiting the hosts using the ufw firewall. And then you will learn how to setting up the client to mount directories and partitions provided by the NFS server, and set up auto-mount NFS server at system boot through the '/etc/fstab' configuration.
Prerequisites
1. We will be using two different machines on the same network as below.
- debian64 - 192.168.1.25 - as NFS Server
- client-debian - 192.168.1.30 - as a client
2. A root user or a user with root privileges. This user will be used for installing new packages and editing system configurations.
Installing and Configuring NFS Server
At first, you will be installing the nfs server package and set up the shared directory for clients.
1. Execute the following command to install nfs-server packages.
apt install nfs-kernel-server rpcbind
Type 'y' and press 'Enter' to continue the installation.
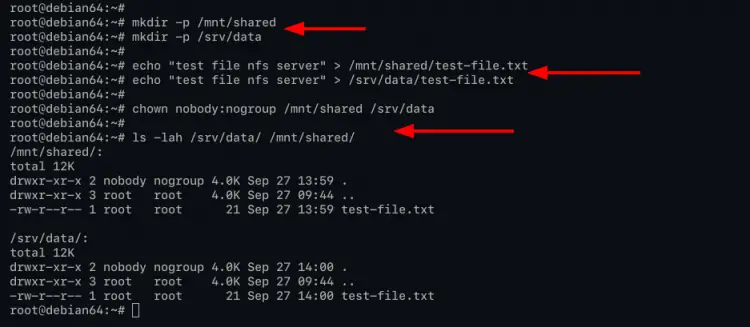
2. Now create a new directory that you want to share with clients. For this example, you will be sharing two directories '/mnt/shared' and '/srv/data' to clients. And do not share the default '/' root directory or '/etc' directory.
Create a new shared directory using the mkdir command below.
mkdir -p /mnt/shared
mkdir -p /srv/data
Create a new file on each directory by running the echo command below.
echo "test file nfs server" > /mnt/shared/test-file.txt
echo "test file nfs server" > /srv/data/test-file.txt
Now change the ownership of both shared directories to 'nobody:nogroup' by executing the command below.
chown nobody:nogroup /mnt/shared /srv/data
And you're ready to configure the NFS Server.
3. To configure the shared directory for nfs, edit the configuration '/etc/exports' using nano editor.
nano /etc/exports
Below are some example configurations for some scenarios
Share directory for the single-host client with read-write access.
/mnt/shared 192.168.1.30(rw,sync,no_subtree_check)
Share directory for multiple clients, including a group of the host network.
/srv/data 172.16.1.0/24(rw,sync,no_root_squash,no_subtree_check) 10.11.12.0/24(rw,no_subtree_check)
Share directory for a single client with read-only access.
/srv/data 192.168.1.30(ro)
Below is the final example configuration.
/mnt/shared    192.168.1.30(rw,sync,no_subtree_check)
/srv/data      172.16.1.0/24(rw,sync,no_root_squash,no_subtree_check) 10.11.12.0/24(rw,no_subtree_check)
/srv/data      192.168.1.30(ro,no_root_squash)
Save the configuration by pressing the 'Ctrl+x' button, type 'y', then press 'Enter' to exit.
Options you must know:
- rw : allow read and write access for both NFS server and client to the volume/directory.
- ro : allow read-only access for clients.
- sync : reply to requests only after the changes have been committed to stable storage. This option enabled by default.
- async : allows the NFS server to violate the NFS protocol and reply to requests before any changes made by that request have been committed to stable storage.
- subtree_check : allow and enable subtree checking. This option enabled by default.
- no_subtree_check : disables subtree checking, which has mild security implications, but can improve reliability in some circumstances.
- root_squash : Map requests from uid/gid 0 to the anonymous uid/gid. Note that this does not apply to any other uids or gids that might be equally sensitive, such as user bin or group staff.
- no_root_sqash : disable root squashing. This option is mainly useful for disk-less clients.
4. Next, restart the nfs-server service to apply a new configuration using the command below.
systemctl restart nfs-server
Now check and verify the nfs-server service using the following command.
systemctl is-enabled nfs-server
systemctl status nfs-server
And you will get a similar output as below.
As can be seen, the nfs-server service is 'enabled' and will automatically run at system startup. And the current status of nfs-service is 'active (exited)', which means the service is running, but the systemd cannot find the daemon to monitor.
Securing NFS Server with UFW Firewall
For this stage, you will be installing the ufw firewall and restricting access to the NFS server for specific hosts and networks only.
1. Execute the apt command below to install the ufw package.
apt install ufw
Type 'y' and press 'Enter' to confirm and continue the installation.
2. If all installation is completed, add SSH service to the ufw firewall rules using the command below.
ufw allow ssh
3. Next, execute the ufw commands below to add hosts or networks to your ufw firewall.
Allow host with IP address '192.168.1.30' to access the NFS server.
ufw allow from 192.168.1.30 to any port nfs
Allow block of a network to access the NFS server.
ufw allow from 172.16.1.0/24 to any port nfs
ufw allow from 10.11.12.0/24 to any port nfs
4. After that, enable the ufw firewall using the following command.
ufw enable
Type 'y' and press 'Enter' to start and enable the ufw firewall.
Now check the ufw firewall status using the command below.
ufw status
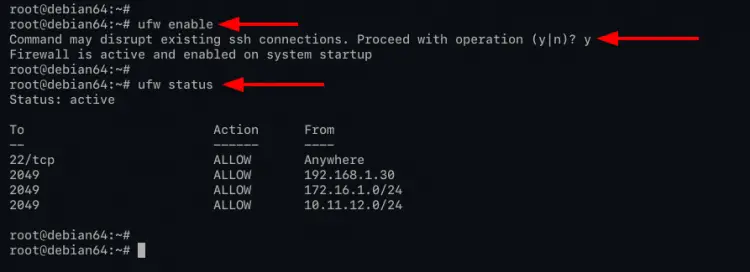
And you will see a similar output as below.
As can be seen, the ufw firewall state is 'active', and the NFS service on default port '2049' is available on the rules list.
Setting up NFS Client
For this step, you will be configuring clients for accessing the shared directory and partition on the NFS server.
1. First, install the 'nfs-common' package using the apt command below.
apt install nfs-common
Type 'y' and press 'Enter' to confirm and continue the installation.
2. After the installation is complete, create a new directory for the mount directory.
mkdir -p /nfs/shared; mkdir -p /nfs/data
3. To mount the nfs directory or partition from the NFS server, execute the mount command below.
mount 192.168.1.25:/mnt/shared /nfs/shared
mount 192.168.1.25:/srv/data /nfs/data
The basic mount command for accessing NFS is by specifying the IP address of NFS server '192.168.1.25' with the path mount directory '/mnt/shared' and '/srv/data' and the target path on client-side '/nfs/shared' and '/nfs/data' directory.
4. Next, execute the following command to verify the NFS mount is successful.
df -h
Also, you can check files that you just created on top by executing the following commands.
cat /nfs/shared/test-file.txt
cat /nfs/data/test-file.txt
Below is the output you will get.
As can be seen, you've successfully mounted the NFS server to the '/nfs/shared' and '/nfs/data' directory, and you will be able to read files that you just created on top.
Verify Read and Write Access to the NFS Server
For this stage, you will be verifying the read and write access to the NFS server directory.
1. change the working directory to '/nfs/shared', check available files on that directory, and show the content of that file using the command as below.
cd /nfs/shared
ls

cat test-file.txt
Next, create a new file using the echo command below.
echo "This file from nfs-client" > client.txt
cat client.txt
If you're able to create the file 'client.txt', the write access to the NFS directory '/nfs/share' is successful, as described in the configuration below.
/mnt/shared 192.168.1.30(rw,sync,no_subtree_check)
2. Next, at the configuration you've created on top, the cline tis only have the access to read to the NFS directory '/nfs/data', as you can see in the configuration below.
/srv/data 192.168.1.30(ro,no_root_squash)
Change the working directory to '/nfs/data', check files on it, check available files on that directory, and show the content of that file using the command as below.
cd /nfs/data
ls

cat test-file.txt
Next, if you want to create a new file, you will get an error 'Read-only file system'. Because you only have the permission to 'read-only' as described on top configuration.
echo "This is a file from client to data" > client-data.txt
Below is the similar output you will get.
The read and write permission is matched with the current NFS server configuration.
Mount NFS on boot
For this stage, you will learn how to mount the NFS directory/partition at system boot/startup through the '/etc/fstab' configuration.
1. Edit the '/etc/fstab' configuration using nano editor.
nano /etc/fstab
Change details IP addresses, shared directory, and path mount directory with your own, then paste the configuration.
192.168.1.25:/mnt/shared        /nfs/shared   nfs auto,nofail,noatime,nolock,intr,tcp,actimeo=1800 0 0
192.168.1.25:/srv/data          /nfs/data     nfs auto,nofail,noatime,nolock,intr,tcp,actimeo=1800 0 0
Save the configuration by pressing the 'Ctrl+x' and type 'y', then press 'Enter' to exit.
2. Next, verify the '/etc/fstab' configuration is correct by using the following commands.
Umount all mount directory using the command below.
umount -R /nfs/shared
umount -R /nfs/data
Execute the following command to mount all available file-system on the '/etc/fstab' configuration file.
mount -a
Make sure you don't have any errors.
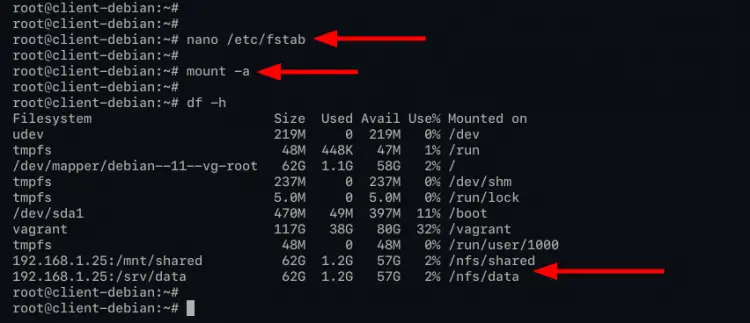
Now run the following command to show all mounted file systems.
df -h
If your configuration is correct, you will see the NFS server is mounted to the target directory as described at the '/etc/fstab' configuration.
3. You can reboot the client machine and login again, then verify again using the command as below.
df -h
And you will see the NFS server is automatically munted at system boot on the client machine through the '/etc/fstab' file.
Conclusion
Congratulations! You've successfully installed the NFS Server on the latest Debian 11 Bullseye. Also, you've successfully secured the NFS Server deployment using the ufw firewall, setting up NFS client machines, and setting up auto-mount using the '/etc/fstab' configuration. For the next step, you may also be interested in the NFSv4 protocol, which provides security mechanisms such as encryption and authentication through the Kerberos server.


