How to Deploy Secure CockroachDB Cluster on Ubuntu 20.04 Server
This tutorial exists for these OS versions
- Ubuntu 24.04 (Noble Numbat)
- Ubuntu 22.04 (Jammy Jellyfish)
- Ubuntu 20.04 (Focal Fossa)
- Ubuntu 18.04 (Bionic Beaver)
On this page
- Step 1 - Setup NTP Server with Chrony
- Step 2 - Download CockroachDB Binary
- Step 3 - Create SSL Certificates for the CockroachDB Cluster
- Step 4 - Start Secure Cluster CockRoachDB
- Step 5 - Create Admin User for CockroachDB
- Step 6 - Access CockroachDB Dashboard
- Step 7 - Testing Database Replication
- Reference
CockroachDB is an open-source and cloud-native SQL database developed by the CockroachLabs. It's a distributed SQL database built on the transactional and key-value stores.
CockroachDB is a scalable SQL database that has been compared to the Google Spanner database. It's based on the PostgreSQL protocol wire and production-ready.
This tutorial will show you how to set up the Secure CockroachDB Cluster on Ubuntu 20.04. You will learn how to set up the secure cluster, access the CockroachDB admin dashboard, create a new user on CockroachDB, create and show database on CockroachDB.
Prerequisites
For this guide, we will set up the Secure CockroachDB Cluster with 3 Ubuntu Servers 20.04.
node01 172.16.0.3
node02 172.16.0.4
node03 172.16.0.5
What will we do?
- Setup NTP with Chrony
- Download CockroachDB Binary for Linux
- Generate SSL Certificates for CockroachDB Cluster
- Start Secure CockroachDB Cluster
- Create Admin User for CockroachDB
- Access CockroachDB Dashboard
- Testing Database Replication on CockroachDB Cluster
Step 1 - Setup NTP Server with Chrony
First, we will synchronize time on all our three servers with the NTP Server using chrony. So make sure to run all command on this step on all servers.
Now update all available repositories on your system and install the chrony package using the apt command below.
sudo apt update
sudo apt install chrony -y
Once all installation is completed, go to the '/etc/chrony' directory and edit the configuration 'chrony.conf' using vim editor.
cd /etc/chrony/
vim chrony.conf
Change the default pool with your nearest NTP server as below.
pool 0.sg.pool.ntp.org iburst maxsources 4
pool 1.sg.pool.ntp.org iburst maxsources 1
pool 2.sg.pool.ntp.org iburst maxsources 1
pool 3.sg.pool.ntp.org iburst maxsources 2
Save and close.
Next, restart the chrony service and add it to the system boot.
systemctl restart chrony
systemctl enable chrony
The chrony service is up and running, check using the following command.
systemctl status chrony
Below is the result you will get.
As a result, the installation and configuration of Chrony have been completed. In effect, the time on all servers has been synchronized with the same NTP Servers.
Step 2 - Download CockroachDB Binary
In this step, we will download and install CockroachDB to all our three servers.
Now create a new directory named 'binary' and go into it.
mkdir -p binary; cd binary
After that, download the latest version of the CockroachDB binary file and extract it.
wget -q https://binaries.cockroachdb.com/cockroach-latest.linux-amd64.tgz
tar -xf cockroach-latest.linux-amd64.tgz
Now move the binary file 'cockroach' to the '/usr/local/bin' directory.
cp cockroach-*/cockroach /usr/local/bin/
As a result, you're able to run the 'cockroach' command on your system.
Check the 'cockroach' binary file and the version of CockroachDB using the following command.
which cockroach
cockroach version
Below is the result you will get.
As a result, you've downloaded and installed the CockroachDB v20.1.5 on Linux servers, and now you're able to create the CockroachDB Cluster.
Step 3 - Create SSL Certificates for the CockroachDB Cluster
Before creating the new CockroachDB Cluster, we will create and generate SSL certificates for securing our cluster. To generate the SSL Certificates, we can use the OpenSSL or suing the 'cockroach' command-line.
- Create CockroachDB Certificate Directory
First, we need to create a new directory for storing all SSL certificates for our CockroachDB Cluster.
As a root user, create a new directory '~/.cockroach-certs' and add the system environment variable 'COCKROACH_CERTS_DIR' using the command below.
mkdir -p ${HOME}/.cockroach-certs/
export COCKROACH_CERTS_DIR='${HOME}/.cockroach-certs/'
Next, to make the 'COCKROACH_CERTS_DIR' environment variable permanent, edit the ~/.bashrc configuration using vim editor.
vim ~/.bashrc
Paste the following configuration to the end of the line.
export COCKROACH_CERTS_DIR='${HOME}/.cockroach-certs/'
Save and close.
Next, reload the ~/.bashrc configuration and check the 'COCKROACH_CERTS_DIR' environment variable.
source ~/.bashrc
echo $COCKROACH_CERTS_DIR
And you will get the 'COCKROACH_CERTS_DIR' variable with value 'directory ${HOME}/.cockroach-certs/'.
- Create a CA Certificate and Key
After creating the SSL path directory, we will generate the CA certificate and key using the 'cockroach' command-line on the 'node01' server.
Generate the CA certificate and key to the '$COCKROACH_CERT_DIR' using the 'cockroach' command below.
cockroach cert create-ca \
 --certs-dir=$COCKROACH_CERTS_DIR \
 --ca-key=$COCKROACH_CERTS_DIR/ca.key
After that, copy the generated 'ca.crt' and 'ca.key' to other servers 'node02' and 'node03' using the scp command as below.
scp ~/.cockroach-certs/ca.crt ~/.cockroach-certs/ca.key [email protected]:~/.cockroach-certs/
scp ~/.cockroach-certs/ca.crt ~/.cockroach-certs/ca.key [email protected]:~/.cockroach-certs/
As a result, the CA certificate and key are created and uploaded to all servers.
- Create Client Certificate on node01
After creating the CA certificate and key, we will generate the client certificate used to secure communication between the built-in SQL shell and the cluster.
Generate the client certificate using the following cockroach command.
cockroach cert create-client \
 root \
 --certs-dir=$COCKROACH_CERTS_DIR \
 --ca-key=$COCKROACH_CERTS_DIR/ca.key
Now you will get new certificates 'client.root.crt' and 'client.root.key' on the '$COCKROACH_CERTS_DIR' directory.
- Create Server Certificates on All Servers
Server certificates will be used to secure communication between servers on the CockroachDB cluster. To join the secure cluster, you need to generate server certificates for each server.
On the first 'node01', generate the server certificate using the following command, and make sure to change the IP address with your own.
cockroach cert create-node \
 localhost \
 $(hostname) \
 172.16.0.3 \
 --certs-dir=$COCKROACH_CERTS_DIR \
 --ca-key=$COCKROACH_CERTS_DIR/ca.key
Next, generate the server certificate for the 'node02' using the following command.
cockroach cert create-node \
 localhost \
 $(hostname) \
 172.16.0.4 \
 --certs-dir=$COCKROACH_CERTS_DIR \
 --ca-key=$COCKROACH_CERTS_DIR/ca.key
After that, generate the server certificate for the 'node03' server.
cockroach cert create-node \
 localhost \
 $(hostname) \
 172.16.0.5 \
 --certs-dir=$COCKROACH_CERTS_DIR \
 --ca-key=$COCKROACH_CERTS_DIR/ca.key
Now, if you check the '~/.cockroach-certs' directory, you will get new certificates the 'node.crt' and 'node.key' on all servers.
ls -lah ${HOME}/.cockroach-certs/
Below are all available certificates on the master server 'node01'.
You will see three different certificates, CA certificates, Client certificates, and Server certificates.
And for other nodes 'node02' and 'node03', you will see two certificates, CA certificates and Server certificates.
As a result, we're ready to start and create the CockroachDB Secure Cluster.
Step 4 - Start Secure Cluster CockRoachDB
To start the secure CockroachDB cluster, you need to start the CockroachDB process on each server.
Before starting the CockroachDB process, make sure to change the details IP address for each server with your own and make sure the '$COCKROACH_CERTS_DIR' environment variable is loaded.
First, start the CockroachDB process on the 'node01' using the following command.
cockroach start \
 --background --certs-dir=$COCKROACH_CERTS_DIR \
 --store=/var/lib/cockroachdb \
 --advertise-host=172.16.0.3 --listen-addr=172.16.0.3 \
 --join=172.16.0.3:26257,172.16.0.4:26257,172.16.0.5:26257
Now move to the 'node02' server and start the CockroachDB process.
cockroach start \
 --background --certs-dir=$COCKROACH_CERTS_DIR \
 --store=/var/lib/cockroachdb \
 --advertise-host=172.16.0.4 --listen-addr=172.16.0.4 \
 --join=172.16.0.3:26257,172.16.0.4:26257,172.16.0.5:26257
After that, start the CockroachDB process on the 'node03' server.
cockroach start \
 --background --certs-dir=$COCKROACH_CERTS_DIR \
 --store=/var/lib/cockroachdb \
 --advertise-host=172.16.0.5 --listen-addr=172.16.0.5 \
 --join=172.16.0.3:26257,172.16.0.4:26257,172.16.0.5:26257
Now the CockroachDB process has been started on all servers. It's running on the port '26257,' and the DockroachDB data are stored at the '/var/lib/cockroachdb' directory.
You can check the CockroachDB port using the following command.
ss -plntu
As can be seen, the CockroachDB process is running on the TCP port '26257' for database connection and the port '8080' as default CockroachDB admin dashboard.
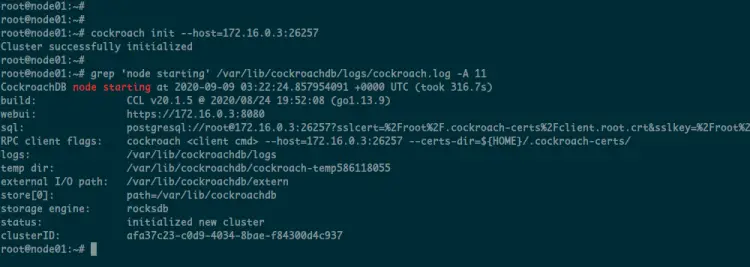
Next, back to the master server 'node01' and initialize the CockroachDB secure cluster using the command below.
cockroach init --host=172.16.0.3:26257
And you will get the following message.
Cluster successfully initialized
Additionally, you can check the CockroachDB log file to see the details cluster initialization.
grep 'node starting' /var/lib/cockroachdb/logs/cockroach.log -A 11
Below is the result you will get.
As a result, the CockroachDB Secure Cluster initialization has been completed successfully.
Step 5 - Create Admin User for CockroachDB
After you've successfully initialized the CockroachDB Cluster, you need to create a new user who will log in to the CockroachDB admin dashboard.
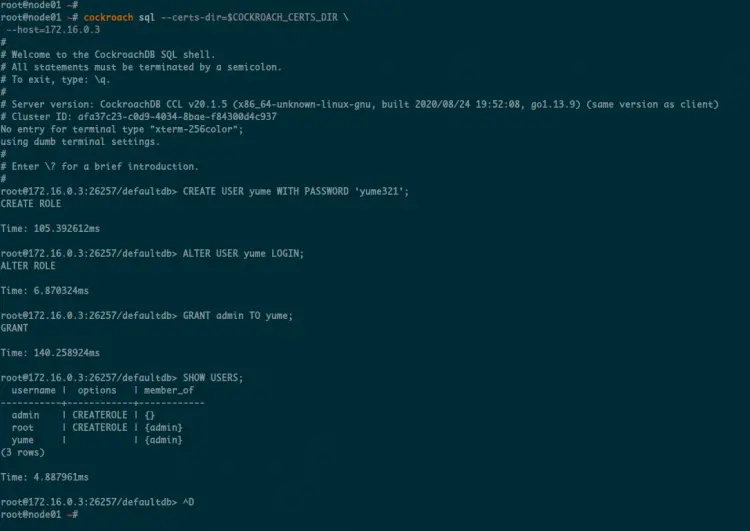
From the master server 'node01', log in to the CockroachDB SQL shell using the following command.
cockroach sql --certs-dir=$COCKROACH_CERTS_DIR \
 --host=172.16.0.3
Now create a new user named 'yume' with password 'yume321' using the following query.
CREATE USER yume WITH PASSWORD 'yume321';
After that, allow the user 'yume' to login and add it to the role 'admin'.
ALTER USER yume LOGIN;
GRANT admin TO yume;
Now check all available users on the CocoroachDB using the following query.
SHOW USERS;
Below is the result you will get.
As can be seen, the new user yume is available on the list. It's a member of a role 'admin'.
As a result, you've created a new user for CockroachDB Database.
Step 6 - Access CockroachDB Dashboard
By default, the CockroachDB provides a web-based admin dashboard running on default TCP port '8080'.
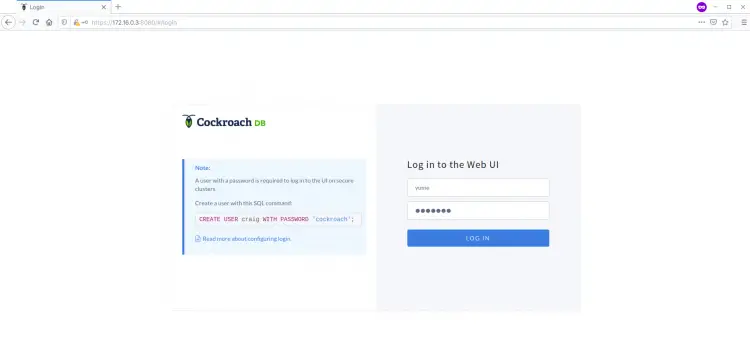
Open your web browser and type your server IP address with port '8080' on the address bar.
Now you will get the CockroachDB Login page as below.
Type the user 'yume' and password 'yume321' on the field and click the 'LOG IN' button.
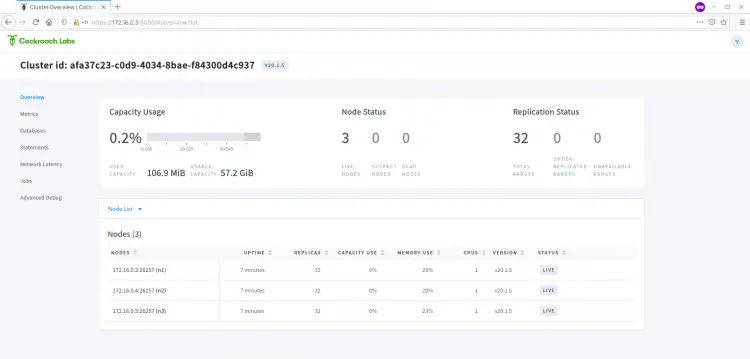
And you will get the CockroachDB Dashboard as below.
As can be seen, you have the CockroachDB Cluster with three live nodes.
As a result, you've successfully logged in to the CockroachDB Admin Dashboard with a new user.
Step 7 - Testing Database Replication
For this step, we will test the database replication between each node on the cluster.
We will create a new database on the 'node01' server using the user 'yume' and then check the database from other nodes 'node02' and 'node03'.
- Connect to node01 and Create Databases
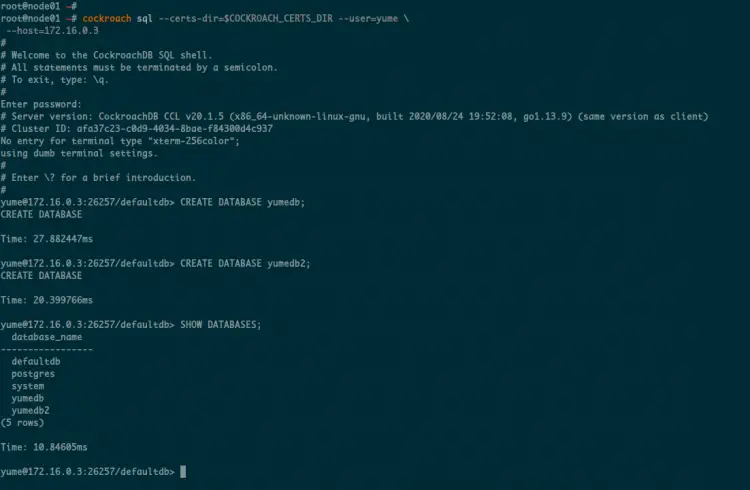
On the 'node01' server, log in to the CockroachDB SQL Shell as a user 'yume' using the following command.
cockroach sql --certs-dir=$COCKROACH_CERTS_DIR --user=yume \
 --host=172.16.0.3
Once you've logged in to the CockroachDB SQL shell, create new databases using the following queries.
CREATE DATABASE yumedb;
CREATE DATABASE yumedb2;
Now check all available databases on the CockroachDB.
SHOW DATABASES;
And you will get the 'yumedb' and 'yumedb2' on the list of databases.
- Check Database Replication on node02 and node03
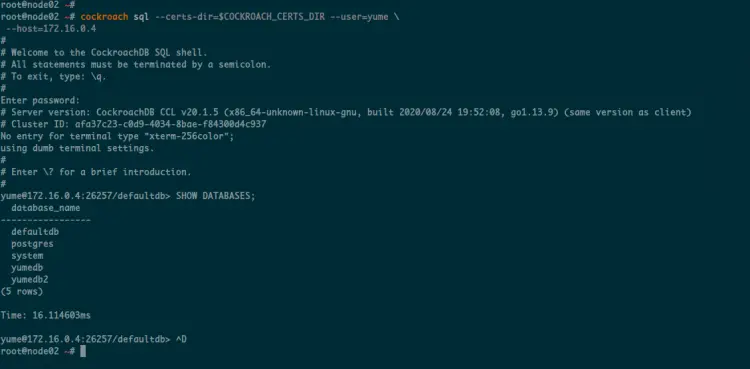
Next, move to the 'node02' server and log in to the CockroachDB SQL shell as a user 'yume' using the following command.
cockroach sql --certs-dir=$COCKROACH_CERTS_DIR --user=yume \
 --host=172.16.0.4
Once you've logged in, check all available databases using the following query.
SHOW DATABASES;
And you will get the 'yumedb' and 'yumedb2' databases on the list.
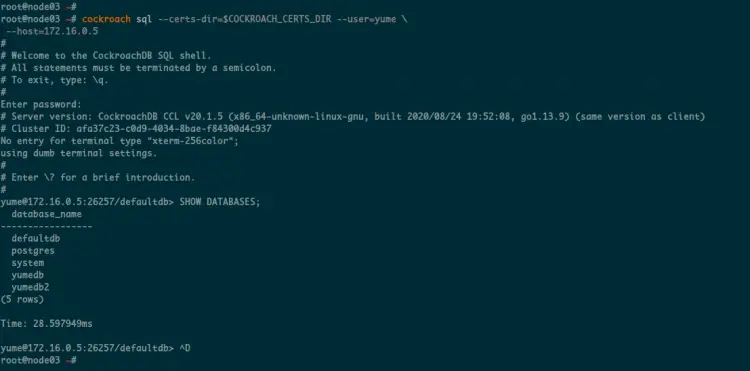
Do the same on the 'node03' server, and you will get the same result.
Below is the result of the 'node03' server.
As a result, the database replication across nodes on the CockroachDB Cluster is working.
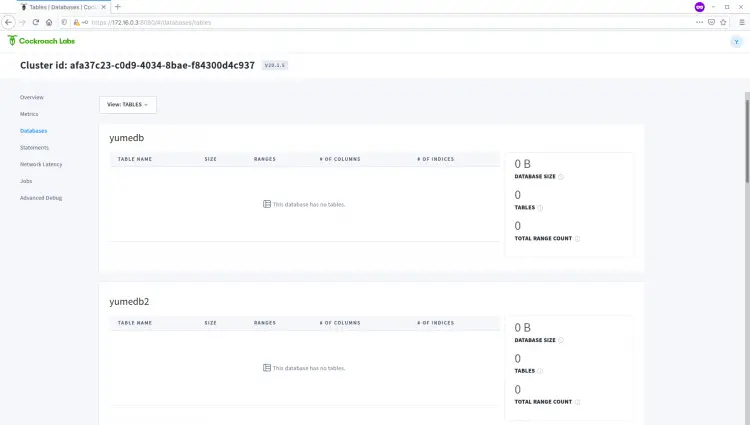
Additionally, below you can see all databases from the CockroachDB Admin Dashboard.
And finally, the installation and configuration of secure CockroachDB Cluster on Ubuntu 20.04 have been completed successfully.


