How To Compile Coloured rTorrent From SVN In Ubuntu 10.10 Maverick Meerkat / Debian 6 Squeeze With ruTorrent - Page 2
On this page
- 28. Copy and extend rtorrent configuration
- 29. Run rtorrent
- 30. Create SSL Certificate
- 31. Go to the webfolder
- 32. Download ruTorrent
- 33. Unpack ruTorrent
- 34. Go into ruTorrent folder
- 35. Create .htaccess file
- 36. Chmod .htaccess file
- 36. Edit .htaccess file
- 34. Go into ruTorrent config folder
- 35. Edit config.php
- 36. Chown ruTorrent to Apache
- 37. Enable Apache Modules
- 38. Extend apache2.conf
- 39. Go into the Apache sites enabled folder
- 40. Edit 000-default
- 41. Edit 000-default
- 42. Add yourself to authdigest
- 43. Restart Apache
- 44. Try it
- Enjoy
28. Copy and extend rtorrent configuration
If you have no .rtorrent.rc file yet in your homefolder, copy the default one first:
cp ~/subversion/rtorrent/trunk/rtorrent/doc/rtorrent.rc ~/.rtorrent.rc
In order to make ruTorrent and the colours work, you have to add a few options to the .rtorrent.rc file. Add them at the end of the file:
http_capath=/etc/ssl/certs
scgi_port = 127.0.0.1:5000
encoding_list = UTF-8
# Color / Canvas patch
done_fg_color = 2
#done_bg_color = 2
active_fg_color = 1
#active_bg_color = 4
In addition I would also add the following items:
schedule = filter_active,10,10,"view_filter = active,\"or={d.get_up_rate=,d.get_down_rate=}\""
view_sort_new = seeding,less=d.get_message=
schedule = filter_seeding,30,30,"view_filter = seeding,d.get_message=; view_sort = seeding"
The first schedule command alters view 9 in such a way that only active torrents are being shown. The view_sort and the second schedule command alter view 8 in such a way, that "unusual" tracker replies are being displayed there. This makes it easier to find misbehaving torrents in rtorrent.
It is important to create the download and session directories. Set them in the .rtorrent.rc config and create the directories.
More info on rTorrent can be found on the Common Tasks page. Especially the section about watch dirs and move on completion are interesting.
29. Run rtorrent
Now that rtorrent is ready, run it in a screen session:
screen rtorrent
30. Create SSL Certificate
sudo openssl req $@ -new -x509 -days 365 -nodes -out /etc/apache2/apache.pem -keyout /etc/apache2/apache.pem
31. Go to the webfolder
cd /var/www
Current location: /var/www
32. Download ruTorrent
wget http://rutorrent.googlecode.com/files/rutorrent-3.2.tar.gz
33. Unpack ruTorrent
tar xvzf rutorrent-3.2.tar.gz
34. Go into ruTorrent folder
cd rutorrent
Current location: /var/www/rutorrent
35. Create .htaccess file
touch .htaccess
36. Chmod .htaccess file
chmod 0755 .htaccess
36. Edit .htaccess file
Add the following content to the .htaccess file:
RewriteEngine On
RewriteCond %{HTTPS} off
RewriteRule (.*) https://%{HTTP_HOST}%{REQUEST_URI}
34. Go into ruTorrent config folder
cd conf
Current location: /var/www/rutorrent/conf
35. Edit config.php
Replace
$XMLRPCMountPoint = "/RPC2";
with
$XMLRPCMountPoint = "/rutorrent/RPC2";
36. Chown ruTorrent to Apache
sudo chown -R www-data:www-data /var/www/rutorrent
37. Enable Apache Modules
sudo a2enmod ssl auth_digest scgi rewrite
38. Extend apache2.conf
echo "SCGIMount /rutorrent/RPC2 127.0.0.1:5000" | sudo tee -a /etc/apache2/apache2.conf
echo "servername localhost" | sudo tee -a /etc/apache2/apache2.conf
39. Go into the Apache sites enabled folder
cd /etc/apache2/sites-enabled
Current location: /etc/apache2/sites-enabled
40. Edit 000-default
Insert after
        <Directory /var/www/>
                Options Indexes FollowSymLinks MultiViews
                AllowOverride None
                Order allow,deny
                allow from all
        </Directory>
this:
        <Directory /var/www/rutorrent/>
                AllowOverride All
                Order allow,deny
                allow from all
        </Directory>
This makes sure that the .htaccess in the rutorrent folder is being called and hence a redirect of to https will take place.
41. Edit 000-default
Still editing the 000-default file, add at the end this:
<VirtualHost *:443>
        ServerAdmin webmaster@localhost
        SSLEngine on
        SSLCertificateFile /etc/apache2/apache.pem
        DocumentRoot /var/www/
        <Directory />
                Options FollowSymLinks
                AllowOverride None
        </Directory>
        <Directory /var/www/>
                Options Indexes FollowSymLinks MultiViews
                AllowOverride None
                Order allow,deny
                allow from all
        </Directory>
        ScriptAlias /cgi-bin/ /usr/lib/cgi-bin/
        <Directory "/usr/lib/cgi-bin">
                AllowOverride None
                Options +ExecCGI -MultiViews +SymLinksIfOwnerMatch
                Order allow,deny
                Allow from all
        </Directory>
        ErrorLog /var/log/apache2/error.log
        # Possible values include: debug, info, notice, warn, error, crit,
        # alert, emerg.
        LogLevel warn
        CustomLog /var/log/apache2/access.log combined
    Alias /doc/ "/usr/share/doc/"
    <Directory "/usr/share/doc/">
        Options Indexes MultiViews FollowSymLinks
        AllowOverride None
        Order deny,allow
        Deny from all
        Allow from 127.0.0.0/255.0.0.0 ::1/128
    </Directory>
    <Location /rutorrent>
        AuthType Digest
        AuthName "rtorrent"
        AuthDigestDomain /var/www/rutorrent/ http://SERVER_IP/rutorrent
        AuthDigestProvider file
        AuthUserFile /etc/apache2/passwords
        Require valid-user
        SetEnv R_ENV "/var/www/rutorrent"
     </Location>
</VirtualHost>
Replace SERVER_IP with the ip of your server
42. Add yourself to authdigest
sudo htdigest -c /etc/apache2/passwords rtorrent USER
Replace USER with your desired username and after that you will be prompted to enter the password and verify it.
43. Restart Apache
sudo service apache2 restart
Debian users have to issue:
/etc/init.d/apache2 restart
44. Try it
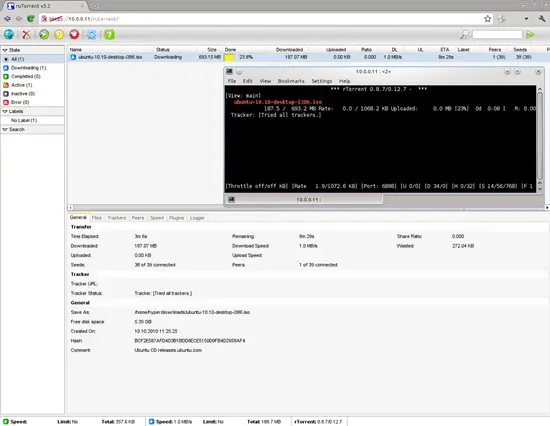
rTorrent should already be running, if not then start it. Then enter the server and rutorrent folder in your browser:
http://SERVER_IP/rutorrent
You will be auto-redirected to the HTTPS site and you'll get a warning about the ssl certificate. Since you created it yourself you can ignore this warning and proceed (or add it to your browser for the next time). After that you are asked to enter username and password (see step 42). If you enter them correctly, you'll get to ruTorrent web interface.


