Guide to Set up Chrony as NTP Server and Client on AlmaLinux 9
NTP, or Network Time Protocol, is a networking protocol for time and clock synchronization on the computer network.
Chrony implements the NTP or Network Time Protocol and is an alternative to other applications such as up. Chrony can be run on Unix-like operating systems, released under the GNU GPL v2. Chrony is used as the default NTP server software for some Linux distributions and is also available for multiple Linux distributions.
In the following guide, I will show you how to install Chrony on an AlmaLinux 9 server. We will install Chrony as an NTP server and NTP client. Furthermore, you will also learn how to use the chronyc command line for managing and monitoring Chrony.
Prerequisites
To get started, ensure you have the following:
- An AlmaLinux 9 server - This demo uses a server with the hostname alma9 and IP address 192.168.10.15.
- The Linux client machine also uses an AlmaLinux machine with hostname node1 and IP address 192.168.10.20.
- A non-root user with root administrator privileges.
Setting Up System Timezone
To set up a timezone on Linux, you can use the utility timedatectl. The following section will show you how to set up and verify the system timezone before installing the Chrony NTP server.
First, check the list of available time zones using the following command and decide which timezone you want to use.
sudo timedatectl list-timezones
Now run the command below to change the default timezone on your server. The following command will configure the default timezone to Europe/Amsterdam.
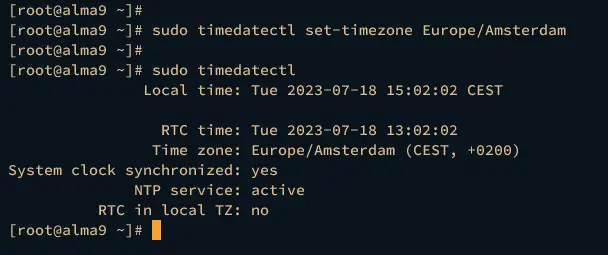
sudo timedatectl set-timezone Europe/Amsterdam
Next, verify the current timezone using the following command.
sudo timedatectl
Within the Time zone section, you can see your current time zone.
Or, you can also check the default system timezone by checking the file /etc/localtime. Be sure that the file is a symlink of the proper timezone.
ls -lah /etc/localtime
Installing Chrony
The Chrony is an implementation of the NTP protocol that can be used as an NTP server and NTP client. The following section will show you how to install Chrony and manage the Chrony service via the systemctl utility.
To start, run the dnf command below to find the chrony package on the AlmaLinux repository. You should see the default baseos repository provides chrony and is ready to install.
sudo dnf search chrony
Install chrony via the following dnf command. When prompted, input y to confirm and press ENTER.
sudo dnf install chrony
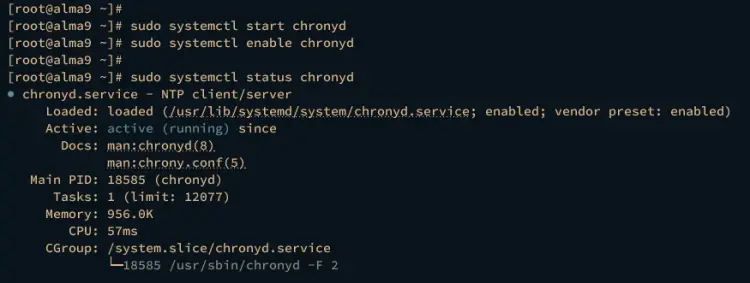
Once Chrony is installed, execute the following command to start and enable chronyd service. The chronyd is a systemd service for Chrony, with these commands, chronyd will be running and start automatically upon the system boot.
sudo systemctl start chronyd
sudo systemctl enable chronyd
Verify the chronyd service using the following command to ensure that the service is running.
sudo systemctl status chronyd
The following output confirms that chronyd is running, as the output message active (running) is displayed.
Configuring Firewalld
After Chrony is installed, you must open the NTP port on the NTP server. Now, you will add the NTP service to the firewalld via the firewall-cmd command line.
If you're running a public NTP server, execute the firewall-cmd command below to allow anyone to access your NTP server installation.
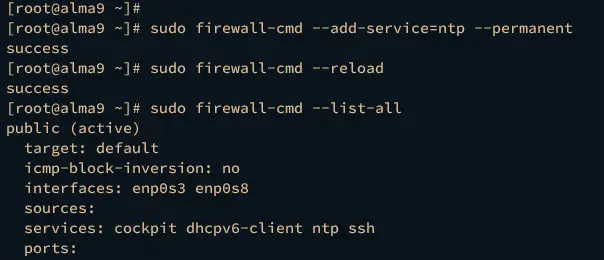
sudo firewall-cmd --add-service=ntp --permanent
sudo firewall-cmd --reload
But, if you're running an NTP server for your local networks, execute the firewall-cmd command below to specify the network subnet via the firewalld rich-rule.
sudo firewall-cmd --permanent --add-rich-rule="rule family='ipv4' source address='192.168.5.0/24' service='ntp' accept"
sudo firewall-cmd --reload
If all is complete, verify the list of firewalld rules using the following command.
sudo firewall-cmd --list-all
You should get the service ntp added to the firewalld services list.
Setting Up Chrony as NTP Server
An NTP server is the destination where your clients can synchronize system time. To set up Chrony as an NTP server, you need to change two main configurations:
- Add NTP pool as the source: visit https://www.ntppool.org/en/ to get available NTP servers that can be used as the source.
- Allow internal network: add your internal network subnets that will be allowed to access and use your NTP server. This way you can create a private/local NTP server for your environment.
Open the chrony default configuration /etc/chrony.conf using the following nano editor command.
sudo nano /etc/chrony.conf
Visit https://www.ntppool.org/en/ and choose public NTP servers available that will be used as the sources. Mostly, it depends on the location of your server locations, choose nearby NTP servers as the source.
Then add to the server parameter like this:
# list servers
server 0.nl.pool.ntp.org iburst
server 1.nl.pool.ntp.org iburst
server 2.nl.pool.ntp.org iburst
server 3.nl.pool.ntp.org iburst
Add the allow parameter and specify your network subnet. Any network subnet within the allow parameter will be allowed to access your NTP server installation.
# allowed clients
allow 192.168.10.0/24
Furthermore, you may also need to adjust the following options:
# Allow the system clock to be stepped in the first three updates
# if its offset is larger than 1 second.
makestep 1.0 3

# Enable hardware timestamping on all interfaces that support it.
#hwtimestamp *

# Specify the file containing keys for NTP authentication.
keyfile /etc/chrony.keys

# Get TAI-UTC offset and leap seconds from the system tz database.
leapsectz right/UTC
When finished, save and close the editor.
Now run the systemctl command below to restart the chronyd service and apply the changes.
sudo systemctl restart chronyd
Once chronyd restarted, execute the chronyc command below to verify the current NTP server sources. The chronyc is a command-line utility provided by Chrony for managing both the NTP server and the client.
chronyc sources
If everything goes well, you should see the nearest NTP server sources list.
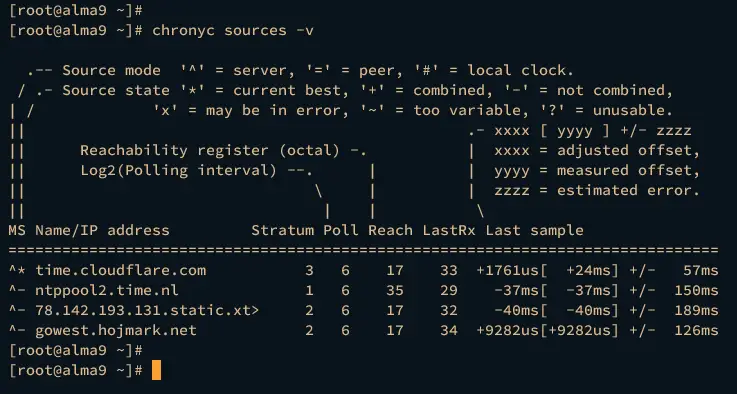
Moreover, you can also get detailed versions of the report by adding the -v option, which means verbose output.
chronyc sources -v
Setting Up Chrony as NTP Client
At the top, you have learned how to create an NTP server with Chrony. You will learn how to set up Chrony as an NTP client. The Chrony package is installed on the client machine with hostname node1 and IP address 192.168.10.20 in the following example.
To set up Chrony as an NTP client, you must add your NTP server to the server parameter within the Chrony configuration file /etc/chrony.conf.
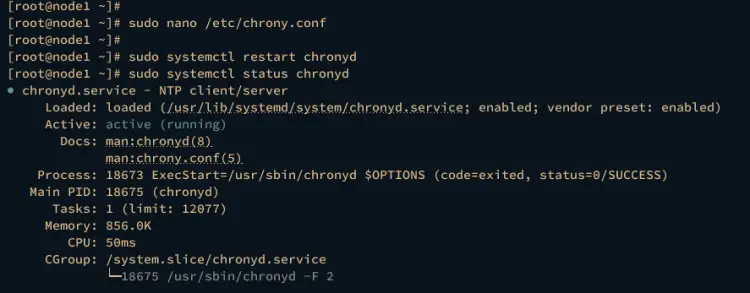
First, execute the following command to ensure that the chronyd service is running on your client machine.
sudo systemctl status chronyd
If running, the following output should be displayed:
Now open the chrony configuration file /etc/chrony.conf using the nano editor.
sudo nano /etc/chrony.conf
Add your NTP server to the server parameter. You can use whether IP address or fqdn of your NTP server.
An additional parameter iburst allows the Chronyd service to make the first update of the clock shortly after the start, and the parameter prefer will prioritize the NTP Server source among other servers without prefer option.
server 192.168.10.15 iburst prefer
Now run the below systemctl command to restart the chronyd service and apply the changes. Then, verify the chronyd to ensure that the service is running.
sudo systemctl restart chronyd
sudo systemctl status chronyd
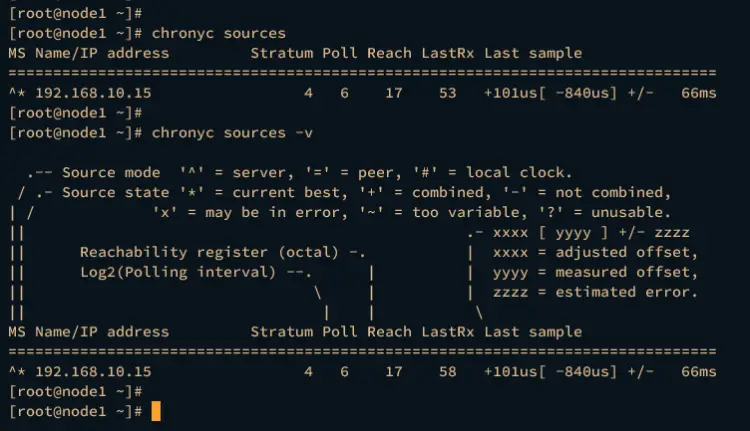
Lastly, enter the following command to verify the NTP server sources on your client machine.
chronyc sources
chronyc sources -v
If successful, you should see your NTP server is used as the NTP server source on the client machine.
Basic Usage of Chronyc Command
Chronyc is a command-line interface for managing Chrony, whether as an NTP server or NTP client. In the last section here, you will learn some basic chronyc commands for managing your NTP installation.
The tracking parameter will show you the performance of the system clock.
chronyc tracking
On the Reference ID section, you should see the NTP server source that is currently synchronized.
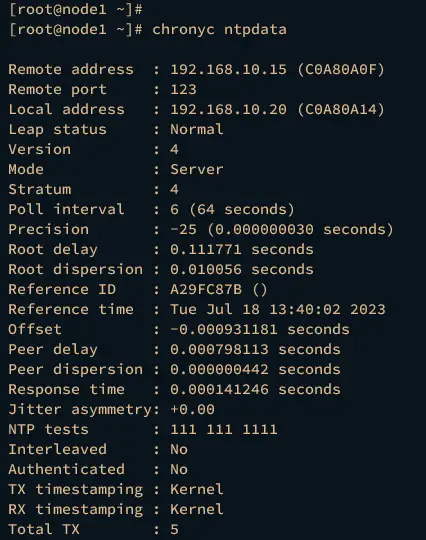
With the ntpdata parameter, you can measure and check the NTP source.
chronyc ntpdata
On the Remote address, you can see the IP address of the NTP server source. On the Remote port section, you should get the default NTP server port that is currently used. Lastly, within the Local address section, you should see the client machine IP address as the corresponding reference ID.
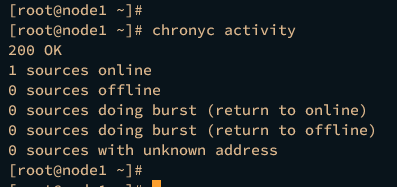
Next, use the activity parameter to show the number of NTP servers on the peer.
chronyc activity
You can see the output online if the NTP server is reachable and only, and the offline status if the server peer is offline.
Lastly, you can also allow/deny network subnet on Chrony via the chronyc command line.
Use the allow parameter to allow subnets for accessing and using the Chrony NTP server.
chronyc allow IP/subnet
To deny subnets from accessing your Chrony NTP server, use the deny parameter like this:
chronyc deny IP/subnet
Conclusion
Good job! You've now successfully installed Chrony on AlmaLinux 9 server. You have also learned how to set up an NTP server with Chrony, and how to set up an NTP client using Chrony. Furthermore, you have also configured the system timezone via timedatectl and learned some basic chronyc command-line for managing Chrony installation.

