Dual-Booting Windows XP/Vista And Ubuntu 7.04 - Page 3
Part 2: Installing Ubuntu with Windows XP/Vista installed
If you are reading this part of the guide, then you likely have a computer in which XP/Vista takes up if not all, almost all of your hard drive space. This will help you edit your partitions in order to make space for Ubuntu.
Disclaimer - Editing your partitions on an already installed OS is not always the safest method. You should back-up all data that is important to you in case an accident occurs. Also I take no responsibility for any data loss as a result of using my guide.
Editing XP Partitions
Unfortunately Windows XP does not come with any utility to edit your partitions. This also makes editing XP a bit more difficult.
You have two options on how to do this:
- Buy a partition editor (best choice would be Partition Magic).
- Do the following steps I am about to show: using a System Rescue CD and GParted.
Editing XP partitions using System Rescue CD
What you will need:
- System Rescue CD
Creating the Disk
We will now create the System Rescue CD.
1. Download "System Rescue CD 0.3.7" from Sourceforge.net - System Rescue CD Download
2. Now we are going to burn the ISO file to a blank disk. A good program to use is "Infra Recorder" - Infra Recorder Download
3. Now burn the image to the CD (Actions > Burn Image).
4. Locate the ISO file you downloaded before and click Open. Next click OK to begin burning.
Editing XP Partitions
Now it's time to edit the XP partitions. It is VERY important that you properly shut down XP. If you do not you will not be able to edit the partitions properly. So after your disk is done burning make sure you fully shut down your computer by going to the Start Menu and selecting Shut down instead of just pushing a button on your computer case to do it.
Next make sure your computer is set to boot from a CD.
To check this go into your BIOS. From there go to "Boot" and go to "Boot Priorities". Make sure CD-ROM is set to boot first and you're all set.
1. Insert your "System Rescue CD" and start up your computer.
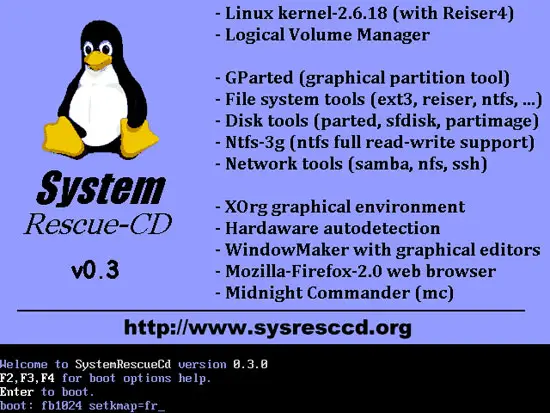
2. When you see the following screen press Enter to let the CD boot.
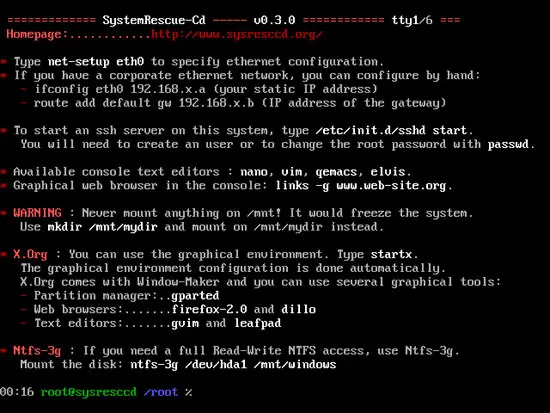
3. After it has completely loaded you will be presented with a black screen that includes a bunch of options. We want to run all this in a graphical view so type
startx
and press Enter.
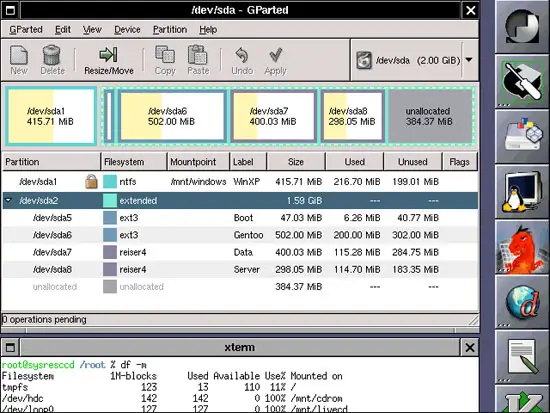
4. When it is finished loading look to the right sidebar and double-click on the mini hard drive picture.
5. This will open up GParted. Wait a bit for it to scan your disks. Now right-click on the NTFS drive and click on Resize/Move.
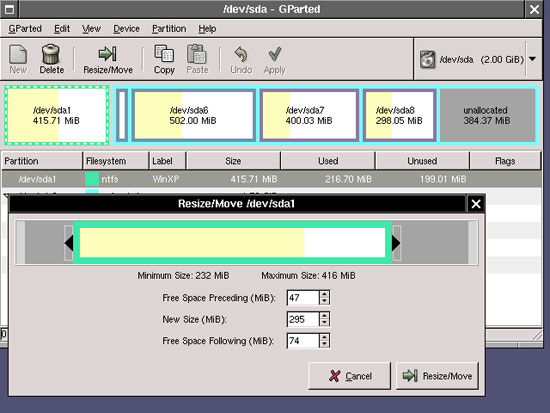
6. From here you can either use the movable bar to edit your partitions or type them in. Personally I find it much easier to use the bar, but it is up to you. After you have resized it click on Resize/Move.
7. Now click Apply to permanently resize your partition.
That's it! Now just follow my guide on how to install Ubuntu with a dual-boot on the previous page to complete your installation.
Editing Vista Partitions
Lucky for us Windows Vista does come with a partition editing utility and it is extremely easy to use.
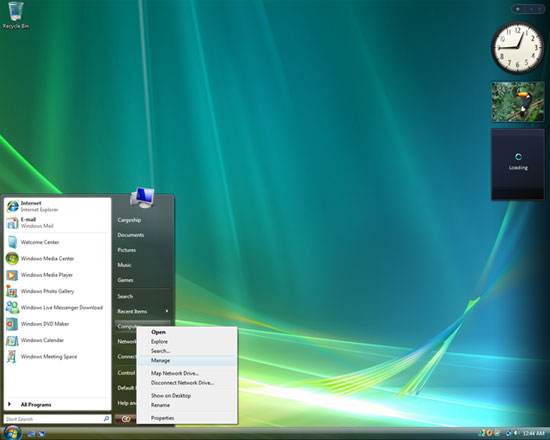
1. To start right-click on My Computer and select the Manage option to open up Computer Management.
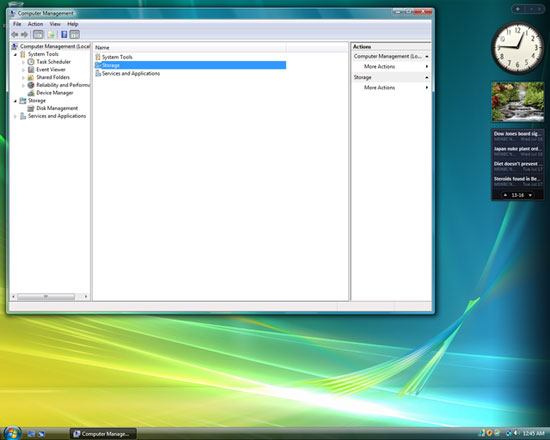
2. Next double-click on Storage.
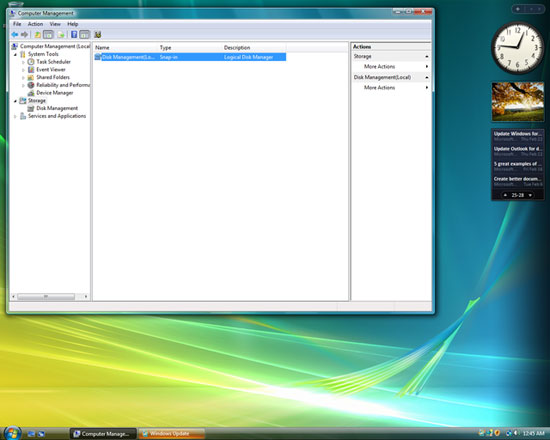
3. Double-click on Disk Management to view your partitions.
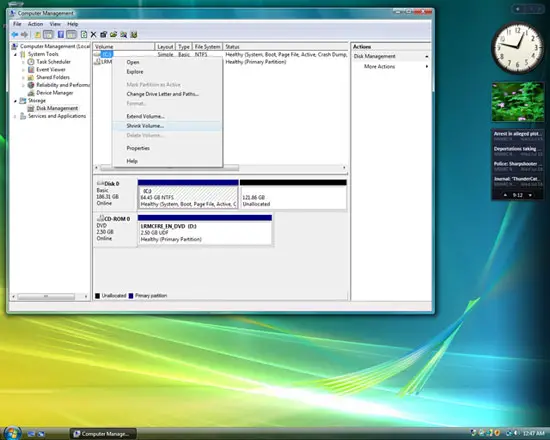
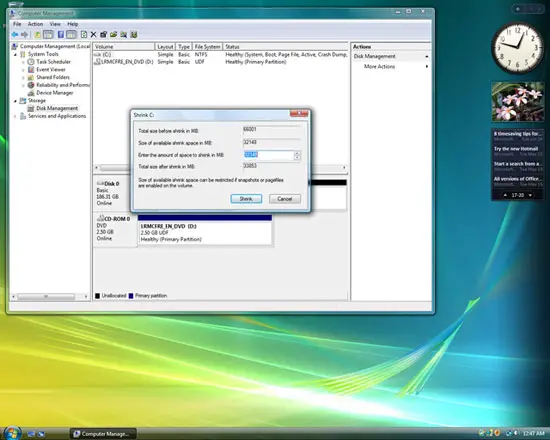
4. We are now in the partitions section, so right-click on the partition that Vista is installed on (most likely the C: drive and the NTFS file system). Now click on Shrink Volume.
If the shrink option happens to be greyed out which may be the case for some people, then click here.
5. From here just shrink it till you are pleased and have enough to install Ubuntu 7.04 (at least 2GB) and a SWAP file (at least 512MB) and then click Shrink.
That's all! Now just refer back to the previous pages in order to get Ubuntu set up.
The End
Thanks to everyone who has taken the time to read this. I hope this guide has served as a great resource for you all.
If you have comments or concerns just leave me a comment as I would love to hear your feedback on this tutorial.
Enjoy =) - Cargoship

