Desktop Search In Ubuntu Intrepid (And Debian) In KDE 4.2
Author: Stephan Jau
Revision: v1.2
Last Change: Februar 19 2009
Introduction
Ubuntu Intrepid 8.10 features an inbuilt desktop search. Unfortunately I never managed to get it to work right and I tried a lot of things. So I finally went on irc.freenode.org into the #strigi channel and asked for help. Lucky me Phreedom in there gave me a helping hand. Why Nepomuk doesn't work by default is still a mystery. I think this is related to Redland instead of Soprano. Unfortunately, as Phreedom told me, the Ubuntu and Debian maintainers don't supply Soprano with the current builds. Also his recommendation is to use KDE 4.2 (Kubuntu 8.10 comes with KDE 4.1).
Step 1: Upgrading to KDE 4.2
You can use my tool Ubuntu RepoGen Tool to get the according KDE 4.2 repos. There are two entries, one is the stable one (recommended) and the other one is nightly-build from the svn (I use nightly Amarok but not KDE repo). I know this is shameless self-advertisment *smile*
After you modified your sources list and added the KDE 4.2 upgrade it:
sudo apt-get update && sudo apt-get ugprade
Step 2: Getting the necessary packages
For compiling soprano we need a few additional things. Very likely you'll have some of it already.
sudo apt-get install libqt4-dev openjdk-6-jre openjdk-6-jdk build-essential cmake subversion qmake strigi-utils
Instead of the OpenJDK Java you could use a different one. Just be sure use the according path in step 4.2. I prefer OpenJDK because it also has a 64bit browser plugin (keyword: icedtea).
Step 3: Getting the sources
Now we need to fetch the sources. Unfortunately we can't just only fetch soprano but we need to fetch a bit more. Run the following command from any location (desktop or so) and it will then create a kdesupport folder there and will fetch the sources inside.
svn co svn://anonsvn.kde.org/home/kde/tags/kdesupport-for-4.2/kdesupport
Step 4: Compiling and installing
(1) Now that we have the sources, go into the folder and create a build folder:
cd kdesupport/soprano
mkdir build
cd build
(2) The environment variable JAVA_HOME is not set (at least on a default installation) and you need to do that now. If you don't use OpenJDK then change the path accordingly.
export JAVA_HOME=/usr/lib/jvm/java-6-openjdk
(3) Run now cmake to check the prerequisites:
cmake ..
You should get an output like this:
-- Soprano Components that will be built:
   * Sesame2 storage backend (java-based)
   * D-Bus server/client support
-- Soprano Components that will NOT be built:
   * Redland storage backend
   * Raptor RDF parser
   * Raptor RDF serializer
   * The CLucene-based full-text search index library
(4) If you get that output you can compile and install soprano.
make
sudo make install
Step 5: Configure Nepomuk
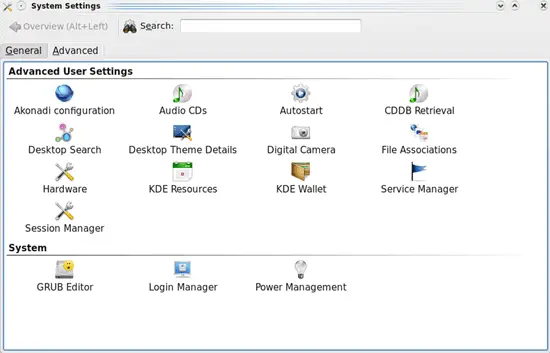
(1) As final step we have to configure Nepomuk a bit. First you need to stop it by going into the KDE system settings and go to the Advanced tab:
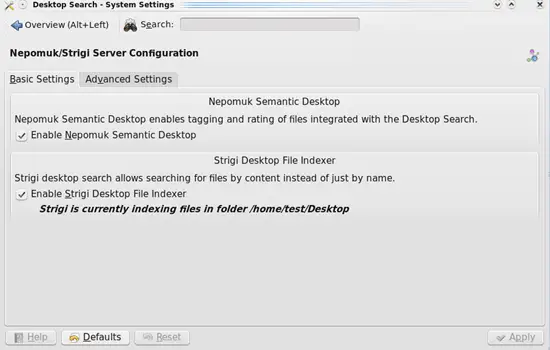
(2) Select there "Destkop Search" and you are in the Nepomuk configuration.
(3) Deactivate Nepomuk there. Strigi will get greyed out.
(4) Then open a terminal and delete the current Nepomuk data files.
rm -Rf ~/.kde/share/apps/nepomuk
(5) Then we need to edit the Nepomuk config file.
nano ~/.kde/share/config/nepomukserverrc
And set the new config to this:
[Basic Settings]
Configured repositories=main
Start Nepomuk=true
[Service-nepomukmigration1]
autostart=false
[Service-nepomukstrigiservice]
autostart=true
[main Settings]
Storage Dir[$e]=$HOME/.kde/share/apps/nepomuk/repository/main/
Used Soprano Backend=sesame2
rebuilt index for type indexing=true
This will start Nepomuk and Strigi at boot-up and the database will be in the nepomuk folder.
(6) Once you have done that, you can go into the Nepomuk Advanced Settings and select the folders you want to have indexed and set excludes for what you don't want to have indexed. Then start Nepomuk and Strigi again and it will start to index.
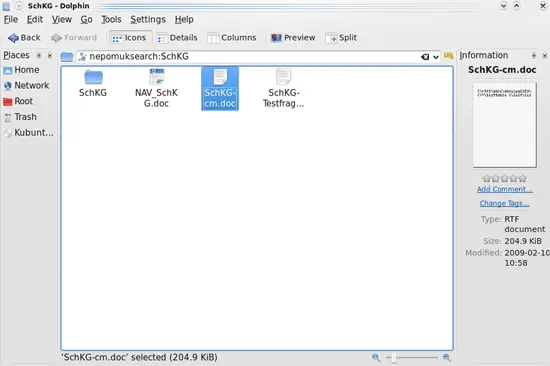
(7) For searching now, open Dolphin and in the topbar enter the following.
nepomukcsearch:KEYWORD
Below you have an example.
You can see results will be returned. As I set this up on a test-vm there aren't many hits. What you also can see is that in the right pane of Dolphin you can add description and tags to a file. Nepomuk will also index this metadata.
Step 6: Wait and search
That's it. First indexing will take a while and you can see the results immediately. In the Desktop Search in the system settings it will show you what folder currently is being indexed. Same goes if you move your mouse over the Nepomuk icon in the system tray.


