How To Set Up An SSL Vhost Under Apache2 On Ubuntu 9.10/Debian Lenny
Version 1.0
Author: Falko Timme
 Follow me on Twitter
This article explains how you can set up an SSL vhost under Apache2 on Ubuntu 9.10 and Debian Lenny so that you can access the vhost over HTTPS (port 443). SSL is short for Secure Sockets Layer and is a cryptographic protocol that provides security for communications over networks by encrypting segments of network connections at the transport layer end-to-end. We use the mod_ssl Apache module here to provide strong cryptography for Apache2 via SSL by the help of the Open Source SSL toolkit OpenSSL.
This document comes without warranty of any kind! I do not issue any guarantee that this will work for you!
1 Preliminary Note
I'm assuming that you have a working LAMP setup on your Ubuntu 9.10 or Debian Lenny box, as shown in these tutorials:
- Installing Apache2 With PHP5 And MySQL Support On Debian Lenny (LAMP)
- Installing Apache2 With PHP5 And MySQL Support On Ubuntu 9.10 (LAMP)
I will set up SSL for my vhost www.hostmauritius.com in this tutorial - hostmauritius.com is a domain that I own - replace it with your own domain. I will show how to use a self-signed certificate (this will result in a browser warning when you access https://www.hostmauritius.com) and how to get a certificate from a trusted certificate authority (CA) such as Verisign, Thawte, Comodo, etc. - with a certificate from a trusted CA, your visitors won't see any browser warnings, as is the case with a self-signed certificate. I will use a certificate from CAcert.org - these certificates are free, but are not recognized by all browsers, but it should give you the idea how to install a certificate from a trusted CA.
It is important to know that you can have just one SSL vhost per IP address - if you want to host multiple SSL vhost, you need multiple IP addresses!
I'm running all the steps in this tutorial with root privileges, so make sure you're logged in as root. On Ubuntu, run
sudo su
to become the root user.
2 Enabling mod_ssl
To enable apache's SSL module, run...
a2enmod ssl
... and restart Apache:
/etc/init.d/apache2 restart
Apache should now be listening on port 443 (HTTPS):
netstat -tap | grep https
root@server1:~# netstat -tap | grep https
tcp6 0 0 [::]:https [::]:* LISTEN 1238/apache2
root@server1:~#
3 Setting Up The Vhost
I will now create the vhost www.hostmauritius.com with the document root /var/www/www.hostmauritius.com. First I create that directory:
mkdir /var/www/www.hostmauritius.com
Apache comes with a default SSL vhost configuration in the file /etc/apache2/sites-available/default-ssl. We use that file as a template for the www.hostmauritius.com vhost...
cp /etc/apache2/sites-available/default-ssl /etc/apache2/sites-available/www.hostmauritius.com-ssl
... and open /etc/apache2/sites-available/www.hostmauritius.com-ssl:
vi /etc/apache2/sites-available/www.hostmauritius.com-ssl
Make sure you use the correct IP address in the <VirtualHost xxx.xxx.xxx.xxx:443> line (192.168.0.100 in this example); Also fill in the correct ServerAdmin email address and add the ServerName line. Adjust the paths in the DocumentRoot line and in the <Directory > directives, if necessary:
<IfModule mod_ssl.c>
<VirtualHost 192.168.0.100:443>
        ServerAdmin [email protected]
        ServerName www.hostmauritius.com:443
        DocumentRoot /var/www/www.hostmauritius.com
        <Directory />
                Options FollowSymLinks
                AllowOverride None
        </Directory>
        <Directory /var/www/www.hostmauritius.com/>
                Options Indexes FollowSymLinks MultiViews
                AllowOverride None
                Order allow,deny
                allow from all
        </Directory>
        ScriptAlias /cgi-bin/ /usr/lib/cgi-bin/
        <Directory "/usr/lib/cgi-bin">
                AllowOverride None
                Options +ExecCGI -MultiViews +SymLinksIfOwnerMatch
                Order allow,deny
                Allow from all
        </Directory>
        ErrorLog /var/log/apache2/error.log
        # Possible values include: debug, info, notice, warn, error, crit,
        # alert, emerg.
        LogLevel warn
        CustomLog /var/log/apache2/ssl_access.log combined
        Alias /doc/ "/usr/share/doc/"
        <Directory "/usr/share/doc/">
                Options Indexes MultiViews FollowSymLinks
                AllowOverride None
                Order deny,allow
                Deny from all
                Allow from 127.0.0.0/255.0.0.0 ::1/128
        </Directory>
        #   SSL Engine Switch:
        #   Enable/Disable SSL for this virtual host.
        SSLEngine on
        #   A self-signed (snakeoil) certificate can be created by installing
        #   the ssl-cert package. See
        #   /usr/share/doc/apache2.2-common/README.Debian.gz for more info.
        #   If both key and certificate are stored in the same file, only the
        #   SSLCertificateFile directive is needed.
        SSLCertificateFile    /etc/ssl/certs/ssl-cert-snakeoil.pem
        SSLCertificateKeyFile /etc/ssl/private/ssl-cert-snakeoil.key
        #   Server Certificate Chain:
        #   Point SSLCertificateChainFile at a file containing the
        #   concatenation of PEM encoded CA certificates which form the
        #   certificate chain for the server certificate. Alternatively
        #   the referenced file can be the same as SSLCertificateFile
        #   when the CA certificates are directly appended to the server
        #   certificate for convinience.
        #SSLCertificateChainFile /etc/apache2/ssl.crt/server-ca.crt
        #   Certificate Authority (CA):
        #   Set the CA certificate verification path where to find CA
        #   certificates for client authentication or alternatively one
        #   huge file containing all of them (file must be PEM encoded)
        #   Note: Inside SSLCACertificatePath you need hash symlinks
        #         to point to the certificate files. Use the provided
        #         Makefile to update the hash symlinks after changes.
        #SSLCACertificatePath /etc/ssl/certs/
        #SSLCACertificateFile /etc/apache2/ssl.crt/ca-bundle.crt
        #   Certificate Revocation Lists (CRL):
        #   Set the CA revocation path where to find CA CRLs for client
        #   authentication or alternatively one huge file containing all
        #   of them (file must be PEM encoded)
        #   Note: Inside SSLCARevocationPath you need hash symlinks
        #         to point to the certificate files. Use the provided
        #         Makefile to update the hash symlinks after changes.
        #SSLCARevocationPath /etc/apache2/ssl.crl/
        #SSLCARevocationFile /etc/apache2/ssl.crl/ca-bundle.crl
        #   Client Authentication (Type):
        #   Client certificate verification type and depth.  Types are
        #   none, optional, require and optional_no_ca.  Depth is a
        #   number which specifies how deeply to verify the certificate
        #   issuer chain before deciding the certificate is not valid.
        #SSLVerifyClient require
        #SSLVerifyDepth  10
        #   Access Control:
        #   With SSLRequire you can do per-directory access control based
        #   on arbitrary complex boolean expressions containing server
        #   variable checks and other lookup directives.  The syntax is a
        #   mixture between C and Perl.  See the mod_ssl documentation
        #   for more details.
        #<Location />
        #SSLRequire (    %{SSL_CIPHER} !~ m/^(EXP|NULL)/ \
        #            and %{SSL_CLIENT_S_DN_O} eq "Snake Oil, Ltd." \
        #            and %{SSL_CLIENT_S_DN_OU} in {"Staff", "CA", "Dev"} \
        #            and %{TIME_WDAY} >= 1 and %{TIME_WDAY} <= 5 \
        #            and %{TIME_HOUR} >= 8 and %{TIME_HOUR} <= 20       ) \
        #           or %{REMOTE_ADDR} =~ m/^192\.76\.162\.[0-9]+$/
        #</Location>
        #   SSL Engine Options:
        #   Set various options for the SSL engine.
        #   o FakeBasicAuth:
        #     Translate the client X.509 into a Basic Authorisation.  This means that
        #     the standard Auth/DBMAuth methods can be used for access control.  The
        #     user name is the `one line' version of the client's X.509 certificate.
        #     Note that no password is obtained from the user. Every entry in the user
        #     file needs this password: `xxj31ZMTZzkVA'.
        #   o ExportCertData:
        #     This exports two additional environment variables: SSL_CLIENT_CERT and
        #     SSL_SERVER_CERT. These contain the PEM-encoded certificates of the
        #     server (always existing) and the client (only existing when client
        #     authentication is used). This can be used to import the certificates
        #     into CGI scripts.
        #   o StdEnvVars:
        #     This exports the standard SSL/TLS related `SSL_*' environment variables.
        #     Per default this exportation is switched off for performance reasons,
        #     because the extraction step is an expensive operation and is usually
        #     useless for serving static content. So one usually enables the
        #     exportation for CGI and SSI requests only.
        #   o StrictRequire:
        #     This denies access when "SSLRequireSSL" or "SSLRequire" applied even
        #     under a "Satisfy any" situation, i.e. when it applies access is denied
        #     and no other module can change it.
        #   o OptRenegotiate:
        #     This enables optimized SSL connection renegotiation handling when SSL
        #     directives are used in per-directory context.
        #SSLOptions +FakeBasicAuth +ExportCertData +StrictRequire
        <FilesMatch "\.(cgi|shtml|phtml|php)$">
                SSLOptions +StdEnvVars
        </FilesMatch>
        <Directory /usr/lib/cgi-bin>
                SSLOptions +StdEnvVars
        </Directory>
        #   SSL Protocol Adjustments:
        #   The safe and default but still SSL/TLS standard compliant shutdown
        #   approach is that mod_ssl sends the close notify alert but doesn't wait for
        #   the close notify alert from client. When you need a different shutdown
        #   approach you can use one of the following variables:
        #   o ssl-unclean-shutdown:
        #     This forces an unclean shutdown when the connection is closed, i.e. no
        #     SSL close notify alert is send or allowed to received.  This violates
        #     the SSL/TLS standard but is needed for some brain-dead browsers. Use
        #     this when you receive I/O errors because of the standard approach where
        #     mod_ssl sends the close notify alert.
        #   o ssl-accurate-shutdown:
        #     This forces an accurate shutdown when the connection is closed, i.e. a
        #     SSL close notify alert is send and mod_ssl waits for the close notify
        #     alert of the client. This is 100% SSL/TLS standard compliant, but in
        #     practice often causes hanging connections with brain-dead browsers. Use
        #     this only for browsers where you know that their SSL implementation
        #     works correctly.
        #   Notice: Most problems of broken clients are also related to the HTTP
        #   keep-alive facility, so you usually additionally want to disable
        #   keep-alive for those clients, too. Use variable "nokeepalive" for this.
        #   Similarly, one has to force some clients to use HTTP/1.0 to workaround
        #   their broken HTTP/1.1 implementation. Use variables "downgrade-1.0" and
        #   "force-response-1.0" for this.
        BrowserMatch ".*MSIE.*" \
                nokeepalive ssl-unclean-shutdown \
                downgrade-1.0 force-response-1.0
</VirtualHost>
</IfModule>
|
As you see, this vhost uses the default self-signed snakeoil certificate that comes with Ubuntu/Debian:
SSLCertificateFile /etc/ssl/certs/ssl-cert-snakeoil.pem
SSLCertificateKeyFile /etc/ssl/private/ssl-cert-snakeoil.key
Now disable the default SSL vhost (if it is enabled), enable the www.hostmauritius.com vhost and reload apache:
a2dissite default-ssl
a2ensite www.hostmauritius.com-ssl
/etc/init.d/apache2 reload
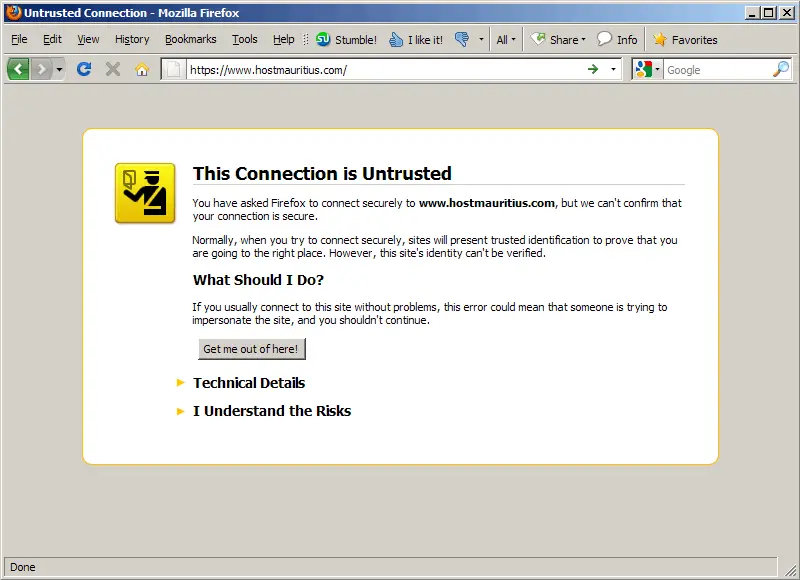
Now open a browser and go to your new SSL vhost (https://www.hostmauritius.com in this case). Because we are using Debian's/Ubuntu's default self-signed certificates, we should get a warning that the connection is untrusted (to use that web site anyway, click on I Understand the Risks and follow the instructions in your browser):
4 Creating A Self-Signed Certificate
Until now, we've used Debian's/Ubuntu's default self-signed certificate. I will now show you how to create your own self-signed certificate. With this certificate, you will still get browser warnings, but this certificate is required to get a trusted certificate from a trusted CA later on.
Make sure that the package ssl-cert is installed:
aptitude install ssl-cert
You can now create a self-signed certificate for www.hostmauritius.com as follows:
make-ssl-cert /usr/share/ssl-cert/ssleay.cnf /etc/ssl/private/www.hostmauritius.com.crt
You will be asked for the hostname:
Host name: <-- www.hostmauritius.com
This will create the self-signed certificate and the private key in one file, /etc/ssl/private/www.hostmauritius.com.crt:
cat /etc/ssl/private/www.hostmauritius.com.crt
-----BEGIN RSA PRIVATE KEY----- MIICXgIBAAKBgQDWuQUCXjDucCdKnowwclux0Tb392+I/KSLkqp4bY577U4EcS0V J28eWIYOTiA38UDteLMXZSFyzWtq1QREzU0sPeQXWjJ/r6sDGSNlOFxnBJlg/ll2 2JHTeMZQZ4QoLejaS8SBU2v8mQFIZrvT+/RUsAyFNVvfVA+dm5bQS9dH5QIDAQAB AoGBAMBwsfydTl1kRtKpphsFYwjK6Ojz6hJr20z79axZBAotdG6mwDDlVsFrtTm8 60M4BWjPdDLTgFbTpCHrKBhBp5cJqgSXntd2i2JjOFpIQSlinGJ6HncFEC3AAxeE PVTH77k2sVckwQ5tnOVX6gGuYt5E5wd3J43mLyyHCpFXz4dBAkEA/O4q2CpCXlT0 Mklt/8rlzzIhxyoOuPI3WH+lr5tO3LSNpLbzW74l/lTvFhCbQCKsb3eyZVhzE+f+ 9ZJM+ao5kwJBANlUJPyc2bYpY2124c83rYtK6Xth9c+sxxUdWbkkyEdaF1ixlR+r 8Qoze+ISHBr9DCZWbQGZirwoX/+qufvFA6cCQHECcT44U4MWbi1xxaY+n8Od4J2+ Wumjv7rY/cyile/i9E6eN8nMAenLRTAUp2lWlLkRQDIr/O7t/2r1vVLoDeUCQQCO 5R+opS0U9CO27srMZ+yIwMnB4Ygxc4Y24OSEsqWpHJhrLeBCQdir/2v+GjA2oplh f8QOoDkzPEzamxPMch7TAkEAyLke88CR1awZQQnTGKho6g5npdGgntjBVO+ZEl18 PfCIyGk5bsLrAsprgS+Xp5SSQfAG2fUatpXqsYGBO8q2dA== -----END RSA PRIVATE KEY----- -----BEGIN CERTIFICATE----- MIIBqzCCARQCCQDDCFjQ7Ii1gjANBgkqhkiG9w0BAQUFADAaMRgwFgYDVQQDEw93 d3cuZXhhbXBsZS5jb20wHhcNMTAwMTEyMTY1NDI2WhcNMjAwMTEwMTY1NDI2WjAa MRgwFgYDVQQDEw93d3cuZXhhbXBsZS5jb20wgZ8wDQYJKoZIhvcNAQEBBQADgY0A MIGJAoGBANa5BQJeMO5wJ0qejDByW7HRNvf3b4j8pIuSqnhtjnvtTgRxLRUnbx5Y hg5OIDfxQO14sxdlIXLNa2rVBETNTSw95BdaMn+vqwMZI2U4XGcEmWD+WXbYkdN4 xlBnhCgt6NpLxIFTa/yZAUhmu9P79FSwDIU1W99UD52bltBL10flAgMBAAEwDQYJ KoZIhvcNAQEFBQADgYEAJ/tYRc3CImo2c4FyG+UJTUIgu+p8IcMH9egGaMc335a5 IwA2BBsiS3YAux8mteE2N03Nae6wTVbgEl8J68z1XyzklGtC/EG7ygtnOlfFTJWn U5HMaGOGBvOnFViF4e/DuBs7VPePKzqF2mmKIeAvoMA5GTH/iA4yJIFlgHhCMU8= -----END CERTIFICATE----- |
I will now split up that file in two, the private key /etc/ssl/private/www.hostmauritius.com.key and the self-signed certificate /etc/ssl/certs/www.hostmauritius.com.pem:
vi /etc/ssl/private/www.hostmauritius.com.key
This file must contain the part beginning with -----BEGIN RSA PRIVATE KEY----- and ending with -----END RSA PRIVATE KEY-----:
-----BEGIN RSA PRIVATE KEY----- MIICXgIBAAKBgQDWuQUCXjDucCdKnowwclux0Tb392+I/KSLkqp4bY577U4EcS0V J28eWIYOTiA38UDteLMXZSFyzWtq1QREzU0sPeQXWjJ/r6sDGSNlOFxnBJlg/ll2 2JHTeMZQZ4QoLejaS8SBU2v8mQFIZrvT+/RUsAyFNVvfVA+dm5bQS9dH5QIDAQAB AoGBAMBwsfydTl1kRtKpphsFYwjK6Ojz6hJr20z79axZBAotdG6mwDDlVsFrtTm8 60M4BWjPdDLTgFbTpCHrKBhBp5cJqgSXntd2i2JjOFpIQSlinGJ6HncFEC3AAxeE PVTH77k2sVckwQ5tnOVX6gGuYt5E5wd3J43mLyyHCpFXz4dBAkEA/O4q2CpCXlT0 Mklt/8rlzzIhxyoOuPI3WH+lr5tO3LSNpLbzW74l/lTvFhCbQCKsb3eyZVhzE+f+ 9ZJM+ao5kwJBANlUJPyc2bYpY2124c83rYtK6Xth9c+sxxUdWbkkyEdaF1ixlR+r 8Qoze+ISHBr9DCZWbQGZirwoX/+qufvFA6cCQHECcT44U4MWbi1xxaY+n8Od4J2+ Wumjv7rY/cyile/i9E6eN8nMAenLRTAUp2lWlLkRQDIr/O7t/2r1vVLoDeUCQQCO 5R+opS0U9CO27srMZ+yIwMnB4Ygxc4Y24OSEsqWpHJhrLeBCQdir/2v+GjA2oplh f8QOoDkzPEzamxPMch7TAkEAyLke88CR1awZQQnTGKho6g5npdGgntjBVO+ZEl18 PfCIyGk5bsLrAsprgS+Xp5SSQfAG2fUatpXqsYGBO8q2dA== -----END RSA PRIVATE KEY----- |
The key must be readable and writable by root only:
chmod 600 /etc/ssl/private/www.hostmauritius.com.key
vi /etc/ssl/certs/www.hostmauritius.com.pem
This file must contain the part beginning with -----BEGIN CERTIFICATE----- and ending with -----END CERTIFICATE-----:
-----BEGIN CERTIFICATE----- MIIBqzCCARQCCQDDCFjQ7Ii1gjANBgkqhkiG9w0BAQUFADAaMRgwFgYDVQQDEw93 d3cuZXhhbXBsZS5jb20wHhcNMTAwMTEyMTY1NDI2WhcNMjAwMTEwMTY1NDI2WjAa MRgwFgYDVQQDEw93d3cuZXhhbXBsZS5jb20wgZ8wDQYJKoZIhvcNAQEBBQADgY0A MIGJAoGBANa5BQJeMO5wJ0qejDByW7HRNvf3b4j8pIuSqnhtjnvtTgRxLRUnbx5Y hg5OIDfxQO14sxdlIXLNa2rVBETNTSw95BdaMn+vqwMZI2U4XGcEmWD+WXbYkdN4 xlBnhCgt6NpLxIFTa/yZAUhmu9P79FSwDIU1W99UD52bltBL10flAgMBAAEwDQYJ KoZIhvcNAQEFBQADgYEAJ/tYRc3CImo2c4FyG+UJTUIgu+p8IcMH9egGaMc335a5 IwA2BBsiS3YAux8mteE2N03Nae6wTVbgEl8J68z1XyzklGtC/EG7ygtnOlfFTJWn U5HMaGOGBvOnFViF4e/DuBs7VPePKzqF2mmKIeAvoMA5GTH/iA4yJIFlgHhCMU8= -----END CERTIFICATE----- |
Now we can delete the /etc/ssl/private/www.hostmauritius.com.crt file:
rm -f /etc/ssl/private/www.hostmauritius.com.crt
Next we adjust our SSL vhost to use the new private key and the self-signed certificate:
vi /etc/apache2/sites-available/www.hostmauritius.com-ssl
[...]
        #   A self-signed (snakeoil) certificate can be created by installing
        #   the ssl-cert package. See
        #   /usr/share/doc/apache2.2-common/README.Debian.gz for more info.
        #   If both key and certificate are stored in the same file, only the
        #   SSLCertificateFile directive is needed.
        SSLCertificateFile    /etc/ssl/certs/www.hostmauritius.com.pem
        SSLCertificateKeyFile /etc/ssl/private/www.hostmauritius.com.key
[...]
|
Reload Apache:
/etc/init.d/apache2 reload
The SSL vhost will now use your new private key and self-signed certificate for encryption (but because it is a self-signed certificate, you will still get the browser warning when you access https://www.hostmauritius.com).

