Web Based Project Management With Collabtive On Ubuntu 7.10 Server
Project management is becoming an increasingly important part of the Sys Admin's life. While Microsoft Project seems to be the standard project management tool used in most environments that I have worked in, it can sometimes be nice to have such tools web based so that multiple users can share information. This is where tools such as Collabtive come in. Collabtive is a web based project management tool that supports everything that you need to plan out and complete your projects.
These tools include milestones, time tracking, tasks and task lists, all presented in a multi language environment. Currently German, English and French are all supported. The web interface itself is intuitive, functional and attractive all at the same time. You can see for yourself though at their online demo - Collabtive online demo.
If after having tried the demo, you decide that this is the right tool for you, then this guide should help you to implement Collabtive on your own Ubuntu 7.10 server. This guide is based on the base LAMP install that comes packaged with Ubuntu 7.10 server, but should work equally as well on any Ubuntu LAMP server. The installation is fairly straight forward, so let's begin.
The base Ubuntu installation
As I mentioned earlier, this guide is based on the base LAMP installation included with Ubuntu. The only things that I did during the installation was to assign a static IP address and choose the LAMP and OpenSSH Server options when prompted. Once you have the base system installed along with the LAMP and OpenSSH server, you are ready to move on. I will assume from this point that you are either working at the command line on your server or using an SSH client such as PuTTY.
Update your server
The first step we need to take is to make sure that your server is up to date. Issue the following command to edit your sources.list file:
sudo nano /etc/apt/sources.list
Now that your sources.list file is open, you will need to edit out the cdrom from your updates list. Find the following line in your sources.list file:
deb cdrom:[Ubuntu-Server 7.10 _Gutsy Gibbon_ - Release i386 (20071016)]/ gutsy main restricted
Now comment it out as shown below:
# deb cdrom:[Ubuntu-Server 7.10 _Gutsy Gibbon_ - Release i386 (20071016)]/ gutsy main restricted
Once you have made the necessary change, you can save the file by pressing "CTRL-O" on your keyboard and can exit the editor by pressing "CTRL-X".
With that done, you can now proceed to update your system. We will also be installing unzip for use later in the guide. Issue these commands:
sudo apt-get update
sudo apt-get upgrade
sudo apt-get install unzip
Obtain Collabtive and prepare for the installation
In this step, you will be creating the directory in which Collabtive will be installed, obtaining the Collabtive code itself and setting up permissions. Issue the following commands:
cd /var/www/
sudo mkdir collabtive
cd collabtive/
sudo wget http://superb-west.dl.sourceforge.net/sourceforge/collabtive/collabtive0-4-5.zip
sudo unzip collabtive0-4-5.zip
sudo rm collabtive0-4-5.zip
sudo chmod -R 757 templates_c/
sudo chmod -R 757 files/
sudo chmod 757 config.php
Create the Collabtive database and database user
This step will help you to create a database for Collabtive in MySQL, as well as the user under which access will be granted. To enter the MySQL environment, issue the root login request with this command:
mysql -uroot -p
You will now be prompted for your root MySQL password. After entering it, issue the following commands to create your database and the database user. Please note that you can change the username and password to meet your needs.
create database collabtive;
grant all on collabtive.* to collabuser;
grant all on collabtive.* to collabuser@localhost;
set password for collabuser=password('collabPW');
set password for collabuser@localhost=password('collabPW');
exit
The web setup phase
It is now time to begin the web setup phase of the installation process (almost done). Point your web browser to the URL shown below (adjusting of course, for the local IP address of your server):
http://Server IP address/collabtive/install.php
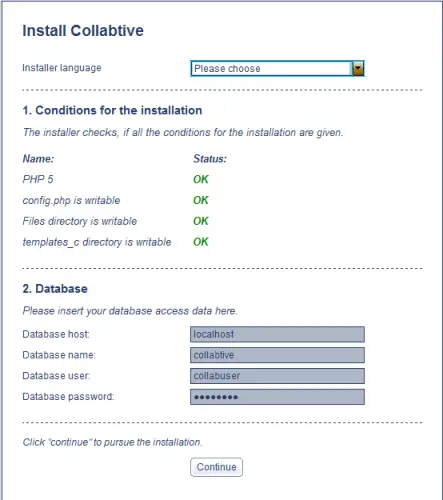
You should now be greeted with the first page of the web setup. On this page, you can change your language to German, English or French. You can also check to ensure that conditions for the installation are ready to proceed (see the screen shot below) and enter your database information. If you followed the guide above, then the information that you will need is as follows:
Database host: localhost
Database name: collabtive
Database user: collabuser
Database password: collabPW
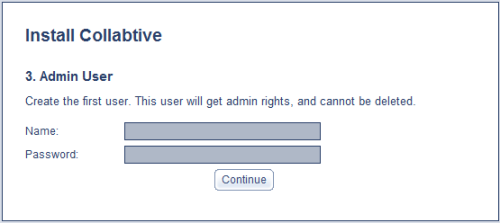
If everything appears alright here, then you can click on "continue" to move forward to step number 2. In this step, you will be creating your admin user. It is fairly straight forward, simply enter the username and password that you wish to use and click on continue. See the image below for reference.
You should now be greeted with a screen letting you know that the installation was successful, as shown in this image.
If you see anything other than message, then you may want to retrace your steps and make sure that you did not miss something. If you do see the above image though, you can now safely remove the install.php file for security purposes by using the following command:
sudo rm /var/www/collabtive/install.php
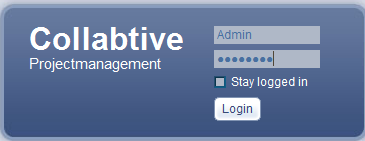
Now, you may click on the "Login" link shown above to be taken to the admin login. If all has gone well, then you should now be prompted with a login request (see the image below). This will the admin user that you created in step #2 of the web installation.
Enter your credentials and click on the "Login" button. You should now be presented with the web interface for Collabtive and ready to begin your first project. While I couldn't find any documentation on the usage of Collabtive, it is fairly straight forward, if you are familiar with project management. If you should run into problems though, they do have a forum that has a lot of good information in it. The forums are located at - Collabtive Forums.


