Securing X2Go On Ubuntu Precise With WiKID Two-Factor Authentication
In this document we are going to demonstrate how to implement two-factor authentication from WiKID for remote desktop on an Ubuntu 12.04 server using X2Go. The WiKID Strong Authentication System is a commercial/open source two-factor authentication solution. X2Go is an NX-based remote desktop tool. First, we will configure a domain on the WiKID server, then add the targeted server as a network client to the WiKID server, and finally configure the Ubuntu Precise box for x2go using pam-radius. Note that if you already have a server configured as an SSH gateway box with pam-radius, you can simply add X2Go to and it will work.
The WiKID Strong Authentication server is available for Ubuntu. Please see the installation instructions for the .deb package and the complete installation manual. We assume your server is up and running and you are ready to implement two-factor authentication in your environment.
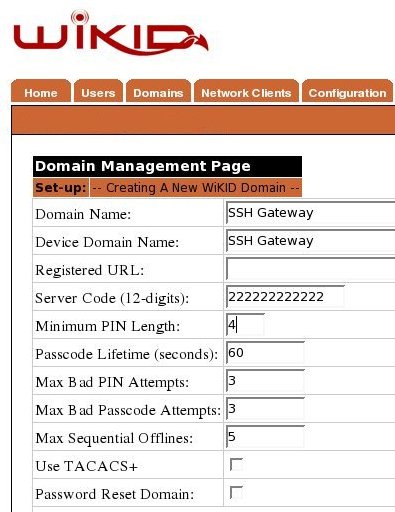
Adding A Domain To The WiKID Server
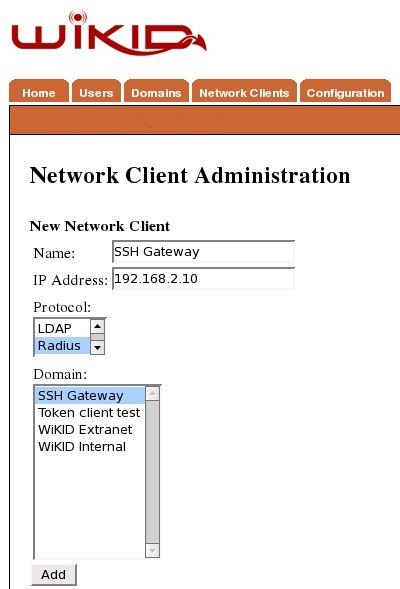
Create A Network Client
After saving the domain information, click on the Network Client tab and Create New Network Client. Enter a name for this client and the IP Address of the X2Go server on the internal network. Select Radius as the protocol and the domain you created above as the domain.
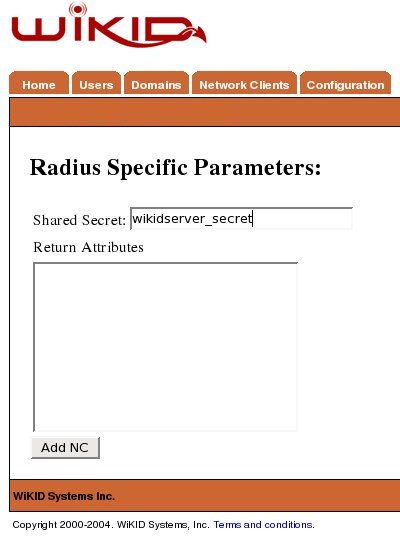
Click Add to get the next page and enter the shared secret for Radius. You will enter this same shared secret in your PAM RADIUS configuration.
Configure X2Go On Your Ubuntu Box
Installing X2Go is quite simple.
sudo apt-get install python-software-properties
sudo add-apt-repository ppa:x2go/stable
sudo apt-get update
sudo apt-get install x2goserver x2goserver-xsession x2gobroker x2gobroker-daemon x2gobroker-authservice
Finally, we need a desktop. If you didn't install one originally, you can run:
sudo apt-get install ubuntu-desktop gnome
Or whatever desktops you wish to provide.
At this point, I recommend you test the X2Go config to make sure you can login with your static password. Install the x2go client:
apt-get install x2goclient
Or for other client OS's see the X2Go client page. Start the client and create a new session that uses the IP address of your X2Go server and the desktop you installed. Start the session and login with your linux username and password.
Configure PAM on the X2Go Server
Now we will configure PAM RADIUS on the X2Go server. Each flavor of linux handles PAM slightly differently. This tutorial covers how to install pam-radius for two-factor authentication on Ubuntu. For instructions on how to install pam-radius on Redhat flavors, see this page.
First, install the package:
$ sudo apt-get install libpam-radius-auth
That was pretty painless. Now let's configure it. First, let's tell pam_radius which radius server to talk to:
$ sudo vim /etc/pam_radius_auth.conf
Note that the file says to copy it to /etc/raddb/server, but DO NOT do that.
Edit the line "other-server; other-secret 3"; replacing 'other-server' with IP address or hostname of your WiKID Strong Authentication server (or radius server if you have one set up in between WiKID and your servers) and change 'other-secret' the shared secret for this network client.
Now that the package is setup and pointing to your WiKID server, let's configure a service to use it.
Edit your /etc/pam.d/sshd file
$ sudo vim /etc/pam.d/sshd
And add the line:
auth sufficient pam_radius_auth.so
Just above:
# Standard Un*x authentication.
@include common-auth
Now, you are ready to test. I recommend you run 'tail -f /var/log/auth.log' while you test. Start your WiKID software token and select the domain you created. Enter your PIN and get your one-time passcode. Login with your linux usernme and the OTP. Note that the username must be the same on the linux box and the WiKID server.
Note that we have not made any changes to the account setup, so the user is expected to have a local account on the machine or you can configure account to use pam_ldap and point it to your AD/LDAP server.
Remote Desktop is now protected by two-factor authentication. No user can get access to the server without first getting a one-time passcode from the WiKID server. The two-factors of authentication are possession of the WiKID token (and it's registered cryptographic key embedded in the token) and knowledge of the PIN. Because the PIN is validated on the WiKID server, it is very easy to disable a user. Note that if you have a directory infrastructure, we recommend you point PAM RADIUS to your radius server. Your radius server should perform authorization against your directory based on the username and if successful, proxy the credentials to your WiKID authentication server. This configuration keeps authorization where it belongs, in your directory and makes user disablement easy.

