How to Install Seafile on Ubuntu 16.04 (Xenial Xerus)
This tutorial exists for these OS versions
- Ubuntu 22.04 (Jammy Jellyfish)
- Ubuntu 20.04 (Focal Fossa)
- Ubuntu 18.04 (Bionic Beaver)
- Ubuntu 16.04 (Xenial Xerus)
- Ubuntu 15.04 (Vivid Vervet)
On this page
- Prerequisites
- Installing Seafile
- Step 1 - Install the necessary Dependencies
- Step 2 - Create a new "seafile" user
- Step 3 - Download and extract the Seafile archive
- Step 4 - Create the Database
- Step 5 - Install Seafile
- Step 6 - Configure Seafile and Seahub Service files
- Step 7 - Install and Configure Nginx as Reverse Proxy
- Step 8 - Testing with the Web Browser
- Conclusion
- Links
Seafile is a private cloud such as Dropbox, mega.co.nz and others. Seafile is based on python and it is open source, so that you can create your own private cloud and it will be much more secure.
Seafile supports encryption libraries that make your data will be more secure. To encrypt files in a library, you need to set a password when you create the library. The password won't be stored on Seafile cloud. So even the administrator of the servers cannot view your encrypted data without the password.
This tutorial shows the installation of Seafile on Ubuntu 16.04.
Prerequisites
- A Server with 2GB RAM
- Ubuntu 16.04 64-bit
Installing Seafile
Step 1 - Install the necessary Dependencies
To perform the installation, the seafile need some dependencies:
- openjdk-8jre
- LibreOffice
- Popler-utils
- mysql-server
- Python-pip and others.
apt-get install openjdk-8-jre poppler-utils libreoffice libreoffice-script-provider-python libpython2.7 python-pip mysql-server python-setuptools python-imaging python-mysqldb python-memcache ttf-wqy-microhei ttf-wqy-zenhei xfonts-wqy python-pip
Install boto with pip:
pip install boto
If you have error about locale setting, run all command below:
export LANGUAGE=en_US.UTF-8
export LANG=en_US.UTF-8
export LC_ALL=en_US.UTF-8
locale-gen en_US.UTF-8
dpkg-reconfigure locales
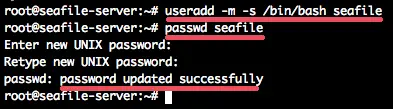
Step 2 - Create a new "seafile" user
In this step, we will create a new user for the seafile installation. We will run the seafile server as this user.
Create new 'seafile' user for the installation.
useradd -m -s /bin/bash seafile
passwd seafile
Step 3 - Download and extract the Seafile archive
Seafile can be downloaded from the official site, please download according to your needs. Here I use Ubuntu 15.04 64-bit.
Download the Seafile archive with wget:
su - seafile
wget wget https://bintray.com/artifact/download/seafile-org/seafile/seafile-server_5.1.4_x86-64.tar.gz
Extract the seafile-server_5.1.4_x86-64.tar.gz and rename the directory to 'seafile-server'.
tar -xzf seafile-server_5.1.4_x86-64.tar.gz
mv seafile-server-5.1.4/ seafile-server/
So the directory for the seafile installation is on the seafile user home directory.
Step 4 - Create the Database
Seafile requires 3 databases:
- ccnet server
- seafile server
- seahub
Now back to the root user with "exit", then login to your mysql server.
Create 3 databases with one user and grant the user to all databases.
#Login to mysql
mysql -u root -p

#Create database
create database ccnet_db character set = 'utf8';
create database seafile_db character set = 'utf8';
create database seahub_db character set = 'utf8';

#Create user
create user seacloud@localhost identified by 'yourpassword';

#Grant user to the databases
grant all privileges on ccnet_db.* to seacloud@localhost identified by 'yourpassword';
grant all privileges on seafile_db.* to seacloud@localhost identified by 'yourpassword';
grant all privileges on seahub_db.* to seacloud@localhost identified by 'yourpassword';
flush privileges;
Step 5 - Install Seafile
Login to the 'seafile' user and go to the installation directory 'seafile-server/', there run the setup-seafile-mysql.sh file.
su - seafile
cd seafile-server/
./setup-seafile-mysql.sh
Just press Enter and you will be asked about:
- Server Name - we will use seafile-server.
- Domain/IP - cloud.mydomain.co.
- Seafile data directory - default data directory
- Seafile server port configuration.
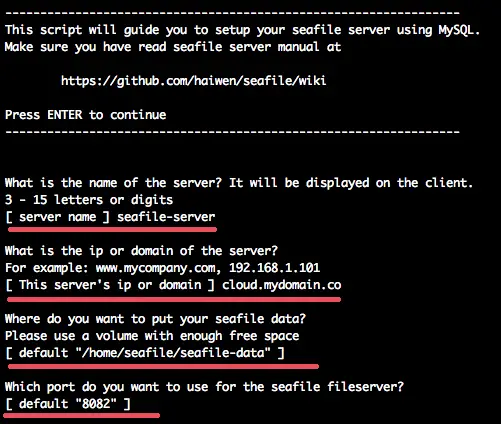
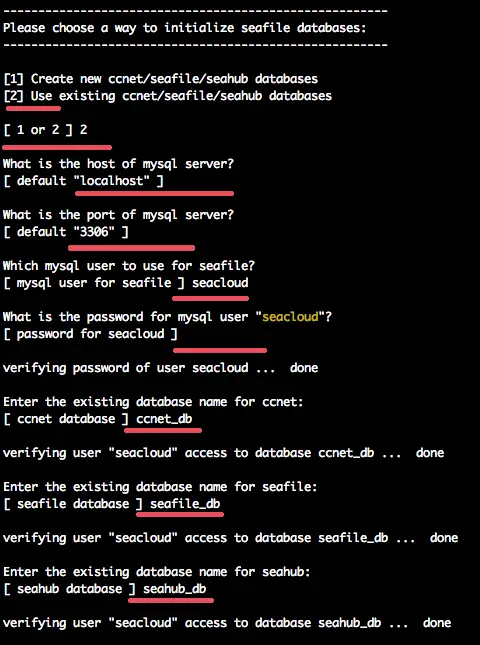
Then you will be asked for the database setup. You can choose number 2 because all database have been created in step 4.
Seafile is installed. Start seafile and the seahub server:
./seafile.sh start
./seahub.sh start
You will be asked about the admin email and password for seafile admin email and password.
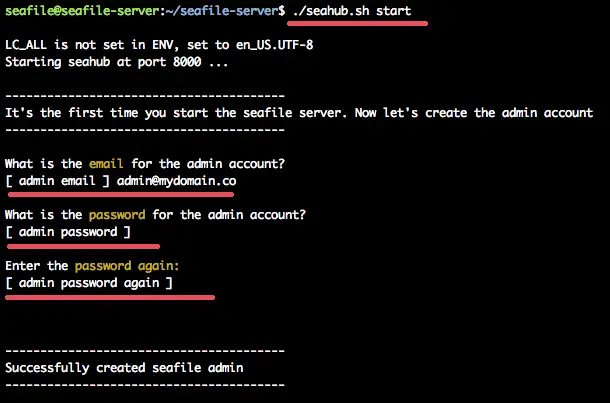
If the admin user has been created. Stop seafile now, next we will create a service file for the seafile server:
./seafile.sh stop
./seahub.sh stop
Step 6 - Configure Seafile and Seahub Service files
Next, we will configure seafile and seahub services. We will create new service files for the seafile and seahub server.
As root user, go to the '/lib/systemd/system/' directory and create a new seafile service file 'seafile-server.service' with vim editor:
cd /lib/systemd/system/
vim seafile.service
Paste seafile service configuration below:
[Unit]
Description=Seafile Server
After=network.target mariadb.service

[Service]
Type=oneshot
ExecStart=/home/seafile/seafile-server/seafile.sh start
ExecStop=/home/seafile/seafile-server/seafile.sh stop
RemainAfterExit=yes
User=seafile
Group=seafile

[Install]
WantedBy=multi-user.target
Save and exit.
Now create new seahub service file seahub.service:
vim seahub.service
Paste configuration below:
[Unit]
Description=Seafile Hub
After=network.target seafile.target

[Service]
Type=oneshot
ExecStart=/home/seafile/seafile-server/seahub.sh start-fastcgi
ExecStop=/home/seafile/seafile-server/seahub.sh stop
RemainAfterExit=yes
User=seafile
Group=seafile

[Install]
WantedBy=multi-user.target
Save and exit.
Reload the systemd service and start seafile and seahub:
systemctl daemon-reload
systemctl start seafile
systemctl start seahub
Make sure there is no error and check the seafile and seahub server is running by checking the service ports.
netstat -plntu
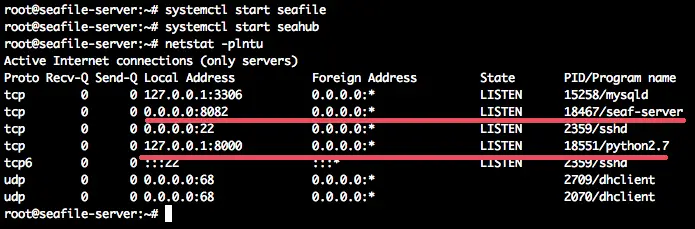
You will see the seafile port 8082 and the seahub port 8000.
Step 7 - Install and Configure Nginx as Reverse Proxy
In this step, we will install nginx from the Ubuntu repository and then configure it as a reverse proxy server for seafile-server on port 8000 and 8002.
Install nginx with this apt-get command:
apt-get install nginx -y
When the installation is finished, go to the nginx virtual host directory and create a new virtual host file cloud.mydomain.conf with vim:
cd /etc/nginx/sites-available/
vim cloud.mydomain.conf
Paste virtual host configuration below:
server {
    listen 80;
    server_name cloud.mydomain.co;

    proxy_set_header X-Forwarded-For $remote_addr;
    # Reverse proxy for seafile
    location / {
        fastcgi_pass    127.0.0.1:8000;
        fastcgi_param   SCRIPT_FILENAME     $document_root$fastcgi_script_name;
        fastcgi_param   PATH_INFO           $fastcgi_script_name;

        fastcgi_param    SERVER_PROTOCOL        $server_protocol;
        fastcgi_param   QUERY_STRING        $query_string;
        fastcgi_param   REQUEST_METHOD      $request_method;
        fastcgi_param   CONTENT_TYPE        $content_type;
        fastcgi_param   CONTENT_LENGTH      $content_length;
        fastcgi_param    SERVER_ADDR         $server_addr;
        fastcgi_param    SERVER_PORT         $server_port;
        fastcgi_param    SERVER_NAME         $server_name;
        fastcgi_param   REMOTE_ADDR         $remote_addr;

        access_log      /var/log/nginx/seahub.access.log;
        error_log       /var/log/nginx/seahub.error.log;
        fastcgi_read_timeout 36000;
    }
    # Reverse Proxy for seahub
    location /seafhttp {
        rewrite ^/seafhttp(.*)$ $1 break;
        proxy_pass http://127.0.0.1:8082;
        client_max_body_size 0;
        proxy_connect_timeout  36000s;
        proxy_read_timeout  36000s;
        proxy_send_timeout  36000s;
        send_timeout  36000s;
    }
    #CHANGE THIS PATH WITH YOUR OWN DIRECTORY
    location /media {
        root /home/seafile/seafile-server/seahub;
    }
}
Save and exit.
I will use 'cloud.mydomain.co' as the domain name.
Next, enable the new virtual host by creating a link to the 'sites-enabled' directory and restart nginx.
Enable new virtual host:
ln -s /etc/nginx/sites-available/cloud.mydomain.co
Test and restart the nginx web server.
nginx -t
systemctl restart nginx
Step 8 - Testing with the Web Browser
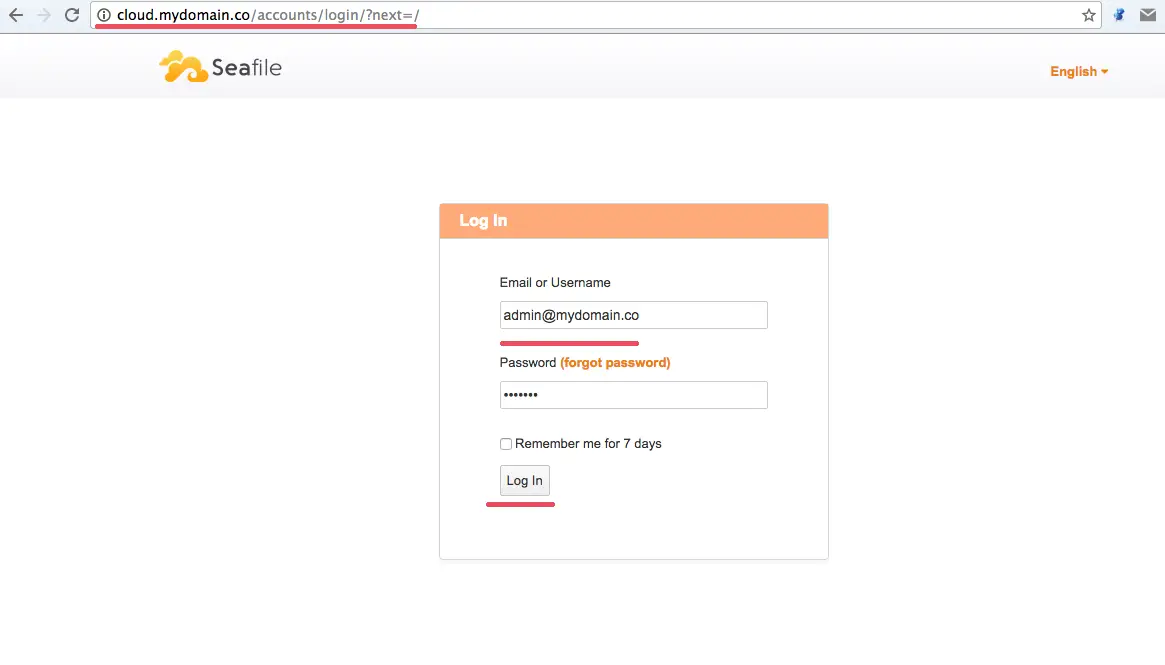
Open your browser cloud.mydomain.co and try to login with your admin account.
Seafile admin dashboard:

Conclusion
With the wide variety of cloud applications today, Seafile is a private cloud solution that is good for use on this day. With the encryption feature at the library/folder, you can make the data more secure. And also ease to configure it, make it easy to implement in your server.

